Installing Deck and Border Boards
In this video, learn how to install decking boards by using spacer blocks to allow for proper water drainage.
Sponsored by Trex®
In this episode, Mike Guertin has finished framing, taping, and wrapping the stairs around the deck, so it’s time for him to install the boards. He starts by explaining how to install Trex® Transcend Lineage decking with spacer blocks to ensure proper water drainage. Mike also shares how a handy fastener tool helps him make quick work of screwing everything into place.

Here’s the Transcript:
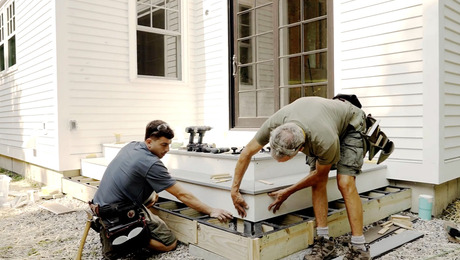
So we got the frame done. We have all the tape on, and the stair boxes are wrapped around. Now we’re ready to start putting the deck boards on top with the border board around the perimeter. We’re going to start installing the boards against the house.
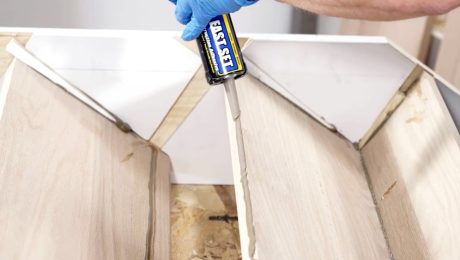
We’re going to use a groove board because the outside edge of the groove will be up against the house, so we won’t notice that, and that sets us up perfectly to use the Trex® Hideaway Hidden Fasteners. We’ll use those on all our field boards. Along the inside edge, we’re going to use the deck plugs and screws.

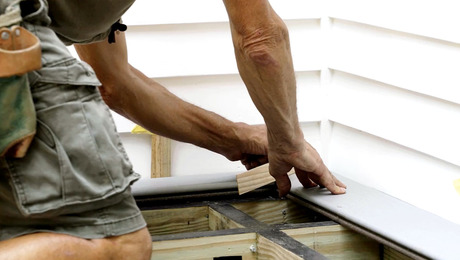
We already set up our starter boards, one against the house over here and one against the house there. We already checked to make sure the house is nice and straight, so we can use spacer blocks to space the deck boards off the wall by about ¼ to 3/16-in. That way, water flowing down the wall, and any leaves or debris that fall on the deck, will be able to drop right through and down to the ground without causing a water or debris capture point.
We’ve already mitered the inside corner here, and we’re spacing the miters at ⅛ in. I’ve got a spacer which is a little less than ⅛ in., so when we bring those boards together, we’ll have a ⅛-in. space, which is what’s required by Trex® for all of their joints when we’re above 40°F. If we were below 40°F, we would increase that to about ¼ in.
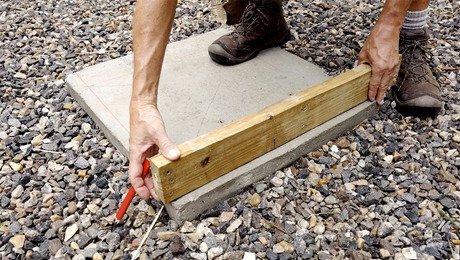
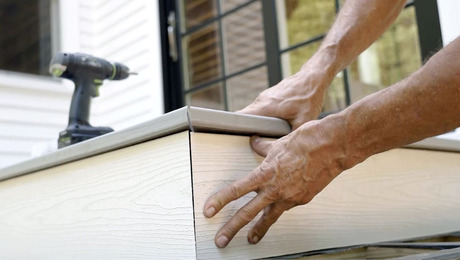
Installing the Fascia Board
We’ll be using the Trex® Fascia Board as our riser board. I want to space those off the deck frame to allow water to flow through. If we put the fascia board in direct contact with the framing, water that gets in there is going to tend to soak into the wood. The drier we can keep the wood, the better it’s going to last.
So by spacing it, it’s like creating a rainscreen for the water to flow through. I’ve already ripped a bunch of spacer boards at about 5/16-in. When we add that to the thickness of the riser board, that’s going to project out our treads just the right distance, so that two deck treads will end up with about a ¾-in. overhang, which is what we’re targeting.
I want to target that same distance up here overhanging the front of the deck, so both the stair tread overhangs and the overhang on the top of the deck are all the same. I can take this, put it in position, instead of just doing a measurement, run this over, and make a mark with a pencil.
Then I transfer that mark and add in for my overhang. Right now, what I had penciled in earlier isn’t correct, so I can erase that and draw my new miter mark, cut it on the chopsaw, bring it back, and then we know we’re in the right spot.
These screws are the ones intended for the Trex® Hideaway Plug System. I’ve already marked out 1½ in., which puts me in the center of that rim board that goes around the perimeter.
You’ll notice as I drive it in that this little rubber cap piece will squish down and then disengage from the teeth of the spline of the screw head. So you keep driving until you hear that little thud, and that’s where the spline disengages from the screw. Then we’ll come back later and put the plugs in when we wrap up the whole deck.
I have not mitered the outside corner here, so I’m just going to drive two screws about three-quarters of the way in so I can back them out. In the meantime, it’ll hold this end board in place so that we can start installing the field boards. Once they’re done, I can take those screws out, cut my miter, and set it in. That way, the front border board miter will look perfect.
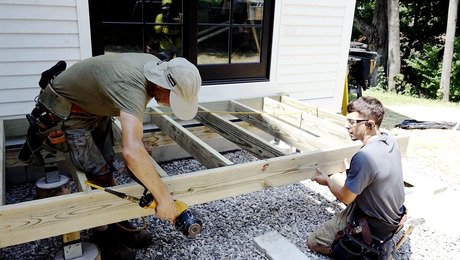
Ensure Proper Measurements
I want to make sure that the length of all of my deck boards, which go in the field of the decking between the border boards, are cut to the right length. I don’t want to cut them in place. I could do that, but because we’ve got the joist tape on top, if I run my sawblade long on a tracksaw and it cuts down into that tape, I’ve defeated the purpose of having the tape.
So instead, what we’re doing is we already have that inside corner established between the inside border board and the end board. Now I’ve set up a temporary piece here at the outside edge, and I put my spacer in for my ⅛-in. space. Addison is going to take the tape measure, put the spacer that he has there up against the inside border board, and I’m going to measure to the outside border board.

These spaces are already going to establish our ⅛-in. space, so all I have to do is read right off the tape measure. We need 102¾, so we’re going to cut 102¾ for all of our deck boards. That way, when we drop them in, they’ll be spaced just as they’re supposed to be.
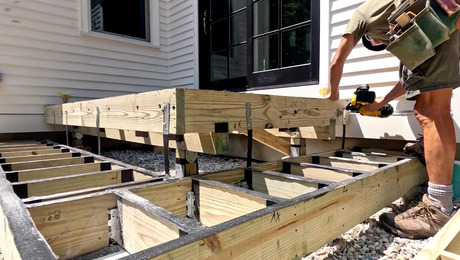
These Boards Were Made for Walking
Trex® has a Universal Installation Tool, which works with their Hideaway fastener. It’s got a molded tip to match the profile of the clip, so you just lock it in. Then you’ve got a hole so you don’t have to precisely position the screw bit in the head of the screw itself. That little inverted cone positions the driver bit right where it belongs.
When you drive the screw in, it won’t let you overdrive the fastener too far. When I disengage it, now it’s raised up just enough so that when I bring the next board in, it’ll engage. Let’s install all of these, and we’ll just walk our way right down the whole row. Then we’ll push the next board in and do the next row, and the next row, and the next row.
Because we’re just using the hidden fasteners that are trapping the board in the groove, there are no physical fasteners going through the board to hold it down to the deck frame. So what can happen over time with expansion and contraction is that the board can actually walk one way or the other.
The intentional gaps we’re leaving on the left and right will end up crowding to one side or the other. So I’m going to take one of these screws out of the hidden fastener. Then I’m going to trap the board down by driving a diagonal screw roughly in the middle of the board down into a joist. I’m just going to angle it so that it’s not going to interfere with the next board coming in. And now that will stop that board from walking.
Sometimes with the way the boards are stored, they can take on a little bit of a curve. This one’s got a little bit of a curve, and we want to take that out. We could use a board straightening tool, but I don’t have any with me, so instead I’m going to use an old trick.
I kick the board in, take a screw, and this is going to serve two purposes: the purpose I showed earlier of locking the board in, and it’s also going to help draw the board into the previous one. So we close that gap up a little.
Final Checks
This is a square edge board. It doesn’t have the groove in it like all of the others we used here, and we’re using it so that it has a nice finished look on the outside edge for our border. This is the end border board, and then we’ll have one analogous there on the front. What I’m going to do right now is space my gap here—space my gap along the edge here to the boards, just as Addison did on that side.
That way we can get a distance from that end to this end for the outside border board. Then I’m going to determine the overhang here so that when I make my miter, I’ve got it in the right spot to match the front border board. So it’s going to be a few steps that I’m going to work through over the next few minutes.
I could take a measurement, cut it, and go with it, which would work fine. But sometimes I get fussy, and I just want to make sure that I’ve got the right balance on the left and the right side. I’m also micro-adjusting and checking my distance away from the wood framing underneath because that’s going to gauge the spacer that I use behind the riser board.
So I’m just doing a double, triple, quadruple check, because what I don’t want to have happen is to be stuck if I made a miscalculation and cut it incorrectly. So this is looking right about where it’s supposed to be. I’m going to make a mark. I should use a shim just so it looks clear. I’m going to make this mark right here, which is that space that I want between the two boards.
Now I’ve got that set to cut, and I’ll do the same on the other side. This is the one that we just tack-screwed, so I’ll be able to remove this board to make that final cut. I can put this down. The way this board is loose, Addison can unscrew that one and bring it over to me and then I’ll make the cuts.

Notice no slot. Notice here’s a hidden fastener intended for a groove board. We’ve got a problem. Well, not a problem—we knew this, so we have a tool to fix it. I’m marking where the slots are going to go, and I’m going to use a router with the Trex® Grooving Tool to make grooves just where the fasteners are located.
You could do the entire board, but that’s excess work that you don’t need to do. So we’re just going to do little slots where we need them. I’m going to be using a regular router. It could be any size—a little laminate router. It could be a big plunge router. But the important thing I’ve got here is the Trex® Grooving Tool. It has the same profile to create the same groove that the slotted boards have.
It’s got a top bearing to space it just the right depth. So all I have to do is drop it in position in front of the slots that I made earlier to locate the hidden fasteners. I’m going to bump it in, draw it down, release it, bring it down to the next spot, and go all the way down the board in one pass.
I’m going to mark the location for all the screws in line with the center of the joists at 2½-in., which is right in the center of the rim board. So our last deck board is nice and straight. But you might be able to notice that our border board, the one without the grooves, got a little bow to it. So we’re going to move that in. I’m going to do it with a combination of a mallet strike and a leverage board.
RELATED STORIES