FHB Logo Facebook LinkedIn Email Pinterest Twitter X Instagram Tiktok YouTube Plus Icon Close Icon Navigation Search Icon Navigation Search Icon Arrow Down Icon Video Guide Icon Article Guide Icon Modal Close Icon Guide Search Icon Skip to content
Subscribe
Log In
  • How-To
  • Design
  • Tools & Materials
  • Restoration
  • Videos
  • Blogs
  • Forum
  • Magazine
  • Members
  • FHB House
  • Podcast
Log In
Shop Space

Talking Shop

A custom finish carpenter shares how he designed and outfit his two-car garage shop with all the tools, jigs, and accessories he needs to comfortably do great work.

By Casey Knips Issue 327 - November 2024

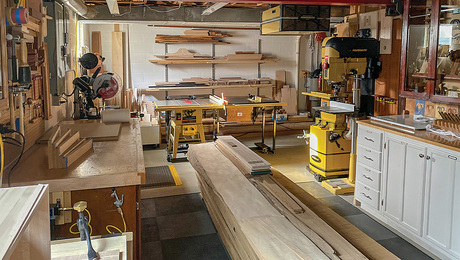
Finish carpenter Casey Knips built himself a workshop in his home’s 24-ft. by 25-ft. garage. He began the shop organization process by creating a digital model of his ideal shop. This then allowed him to move his tools and materials into place immediately rather than figuring out their placement through trial and error.

This shop has all the essential tools and machines for Knips’s carpentry work, adequate storage space for lumber and clamps, and a dust collection system that includes an articulating boom arm. Knips believes that having powerful stationary tools; a big, comfortable work surface; a full supply of clamps; and the ability to easily keep his workplace clean is better than even the best job-site setup.

A Good Shop Can Make a Big Difference

Some of a carpenter’s genius is figuring out how to use off-the-shelf materials, tools from the truck, and clever jigs to get great results on custom projects done entirely on the job site. And on some of my projects, I work that way. But I also value having a dedicated shop—and whenever I can, I use it.

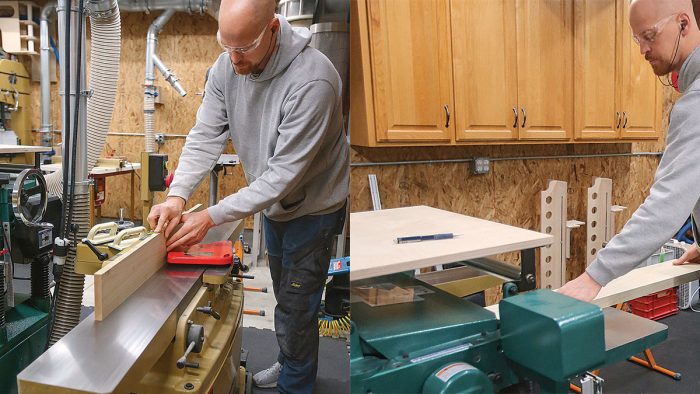
I find having powerful stationary tools; a big, comfortable work surface; all the clamps I need; and the ability to effortlessly keep my workplace clean has more potential that even the best job-site setup. For example, with a jointer and planer, I can mill lumber of any species my client wants to any dimensions the project calls for; with my router table or shaper I can safely make custom trim profiles in a wide range of sizes. Working in my shop, I have more control, and therefore, I tend to get better results.

Woodshed the Plan

Creating a digital model of my desired shop was time well spent. Not only was I able to take a trial-and-error approach to tool placement, but I worked through workflow, clearances, and storage areas before I loaded the garage with tools and materials and made it more difficult to rearrange.

Photo of Casey Knips' digitally-organized workshop.
Drawing by Christopher Mills

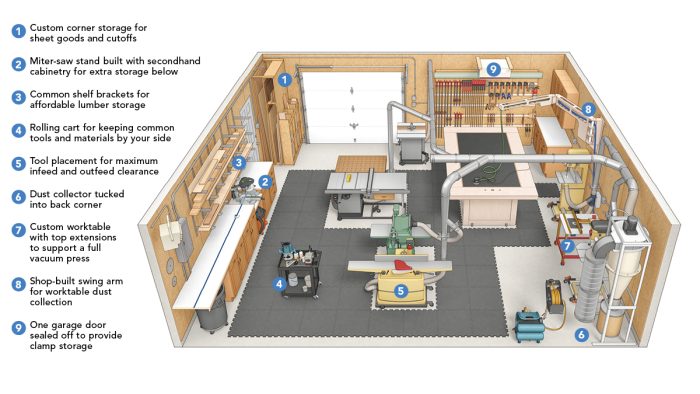
For example, by the time I moved my tablesaw to its place in the shop, I knew exactly how much space I would have on both the infeed and outfeed sides. My model was helpful when it came time to have dust collection and lighting designs done too.

Four side-by-side photos of Casey Knips organizing his workshop with essentials, machines, storage, and dust collection.

Size, and Tools, Matter

This doesn’t mean that a finish carpenter like me needs a particularly big or expensive shop. My shop is on the property where I live. It’s a slightly oversized two-car garage at 24 ft. by 25 ft. I do custom finish carpentry, which includes adding trim details like coffered ceilings and wainscot paneling, building and installing big doors, and some cabinetry work. I generally work alone, and this size shop fits all the tools I need.

There’s room for infeed and outfeed on both sides of tools through which I might be running long materials, and just enough room for material storage, though I don’t have the luxury of stockpiling materials that I may use in the future. If I’m not pretty certain I can use a particular board or partial sheet good on a coming project, it has to go so there is space for the necessary material for my next project.

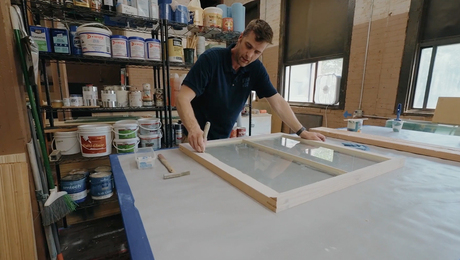
As you see, I do have a lot of expensive tools and machines, and I admit to being a tool junkie, but I buy them as jobs arise where they’ll make the work better, faster, or safer to do. Most of the tools you’ll find in my garage are expected in a woodshop, and I’ll focus on the most common and what I consider shop must-haves in this article, but I do have some luxuries too. For example, I have both a router table and a shaper.
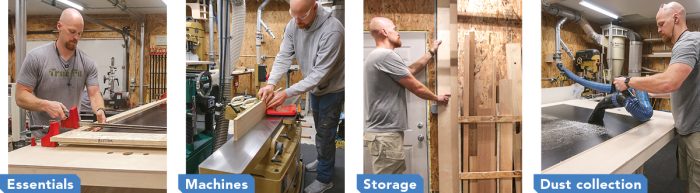
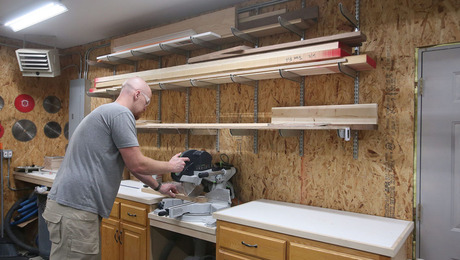
Workshop Essentials

Every carpenter will have different requirements for organizing a shop based on their work and their preferences. I can’t imagine too many carpenters who don’t need an easy-to-use and dedicated miter-saw station and worktable, though. It’s also important to consider power, heating and cooling needs, and safety in your shop.

Photo of good lighting without windows in Casey Knips' shop.
Good Lighting Without Windows: It would be nice to have some natural light in here, but I just can’t give up any wall space for windows. These LED fixtures are from American Green Lights. The company used my shop drawing to help me choose products and place them properly for good lighting throughout the shop.

Photo of a custom-height assembly table in Casey Knips' shop.
Custom-Height Assembly Table: With storage beneath and adjustable feet to keep it level, my worktable top is a torsion box with a laminated surface. If built right, this style of tabletop will stay very flat over time. And laminate is easy to clean up, a big plus considering this is where I do all my glue-ups. I am 6 ft. 8 in. tall, so I built the table to a custom 40-in. height that is comfortable for me. For a recent project, I built extension arms for all sides of the table, expanding the 4-ft. by 8-ft. surface to fit the full length and width of my vacuum press.
Photo of the miter-saw station in Casey Knips' station.
Must-Have Miter-Saw Station: I built my own miter-saw station by leaving a space between two of the secondhand base cabinets and dropping the countertop between them. This puts the Festool miter saw’s table at the same height as the adjacent countertops, which support the boards I am cutting. I made laminate counters for the miter-saw station because they are affordable and durable. The longer counter to the left of the saw has an inset stop system from Rockler to help speed repetitive cuts. Under the saw is an open space for the shop vac that collects dust from the miter saw.

Photo of Casey Knips installing a small shop heater.
Electrical Service and a Small Shop Heater: When I bought this property, where I also live, the garage did not have power. I brought electrical service to the shop and installed this 200-amp panel. The shop has its own electrical meter on the outside of this wall, and the bill is paid by my business. The shop is air-sealed and insulated and one of the garage doors is closed off, so even in a cold Minnesota winter I can keep it warm enough to work in (around 60°F) with an off-the-shelf, 5000w electrical heater. Fortunately, I don’t need cooling.

Photo of a fire extinguisher in Casey Knips' shop
Safety First: As every issue of this magazine says, home building is inherently dangerous. Every shop needs a fire extinguisher that’s charged and ready and a first aid kit nearby.

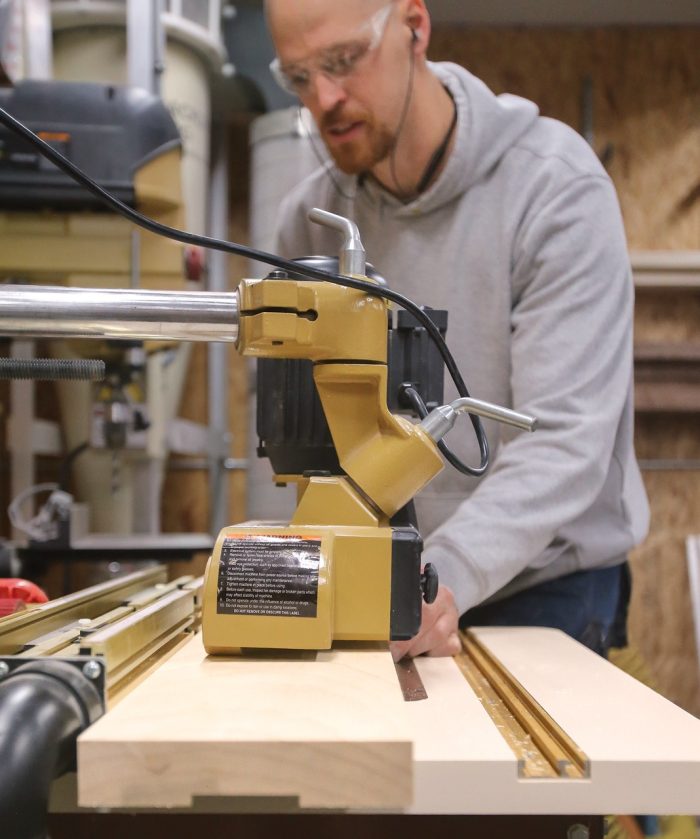
A shaper does similar work to the router table but can handle a bit larger material and larger profiles, and I can have custom cutters made to match profiles that my clients already have. My 3-hp Delta shaper is probably 30 years old, and though I may upgrade to a bigger machine at some point, it still works great. It is also set up with a power feeder from Co-Matic.

Even though I don’t use my Powermatic drill press as much as I thought I would, when it comes time to make large-diameter and repetitive holes, sometimes at an angle, I’m glad to have it. It recently paid for itself on a complex stair-rail project.

Similarly, my Powermatic bandsaw is powerful and has great cut capacity, and its table is set at a very comfortable height for me. I do a fair number of projects with shop-sawn veneers, so this tool is a must-have. The bandsaw is tucked farther away than most of my other tools, but all I have to do is move a couple things out of the way and I can push boards up to 9 ft. long through the bandsaw.

I also have a drum sander and a dedicated sharpening machine. I don’t use them too often—I should definitely sharpen more— but when the time comes to roll either of them out, they do better work faster than I could do with alternative tools.

Not-So-Stationary Machines

One of the main reasons for a finish carpenter to have a shop is to access tools that are less common on job sites but that improve the quality and safety of the work. For example, a powerful planer makes it easy to mill boards to custom finished dimension; a router table is more precise and safer than a handheld router. These “stationary” machines are big and heavy, which is why they’re not common on job sites—but I’ve put them on mobile bases so I can move them around.

Photo of Casey Knips using a router on his custom router table.
Router Table: There are lots of projects where a router table comes in handy, like the pocket-door project I shared in FHB #325. I needed to route a dovetail-shaped groove in hundreds of feet of poplar to catch clips for the door jambs. I particularly appreciate having this nice Incra table with a 3-hp router for pattern routing with flush-trim bits. For smooth, consistent cutting, I have it set up with a Powermatic power feeder.
Photo of Casey Knips using jointer and planer in his shop.
Jointer and Planer: Often, rough-sawn lumber is more affordable, is available in more wood species, and is the only option when the finished stock dimensions needed for the project are not standard. For this reason, a planer and jointer are shop essentials.

Photo of Casey Knips using a tablesaw in his shop.
Tablesaw: I found this 3-hp Delta cabinet saw on Facebook Marketplace. An accurate and powerful saw with a sturdy outfeed table is a shop must-have. However, with a preference for a track saw to break down sheet goods, I find that I rarely need the extralong fence rail that it came with. I may change this in the future to save some space.

OSB Walls, Because It’s a Shop

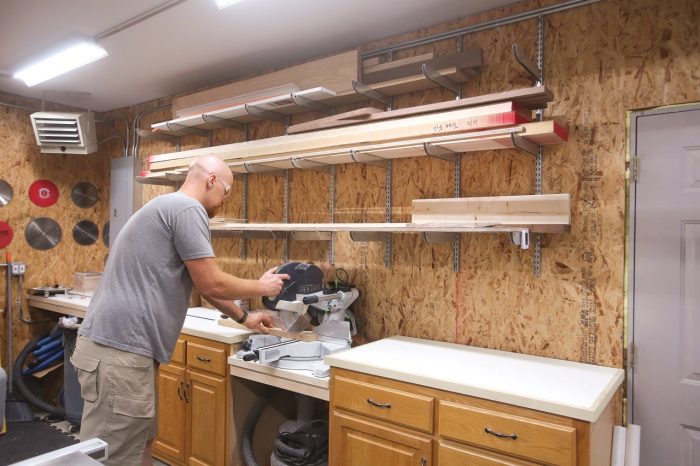
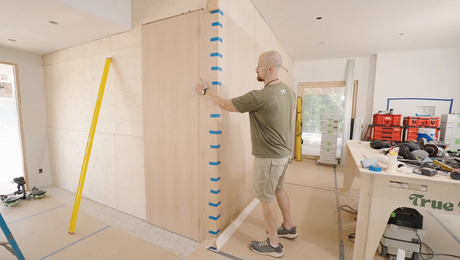
When it came time to convert this garage into a shop, I had a lot of decisions to make, from how to insulate the walls and ceiling and how to finish the walls, to where to put the tablesaw and where to store my many clamps. One good decision I made in regards to shop organization was to finish the walls with OSB.

It was fast (just screw it to the studs; no taping), it’s durable, and I can fasten a shelf bracket, a hook, or an accessory to it anywhere I want. I have very simple and very convenient sawblade storage in the back corner of the shop that is no more than a screw partially driven into the OSB.

The ceiling I did finish with drywall. At 8 ft. 6 in., the ceiling is a little low sometimes. I did have to bump up the area above the dust collector, which is quite tall. With light fixtures and dust-collection piping, it can be a bit tight when moving sheet goods and other long materials around in the shop. Still, raising the ceiling was a cost and complexity I decided against, and I don’t regret it yet.

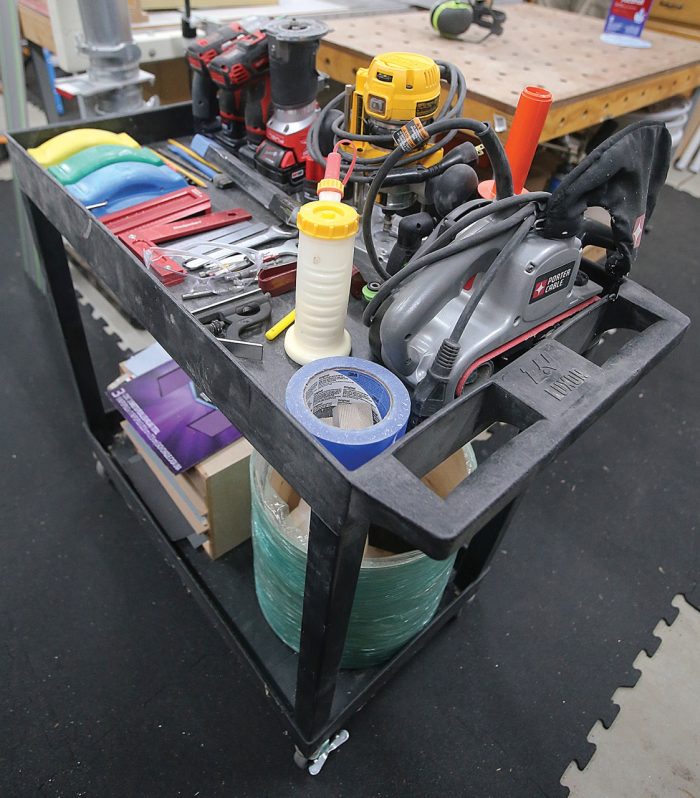
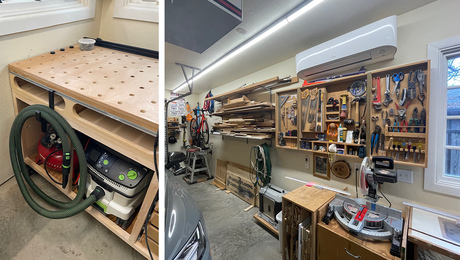
While the biggest storage challenge in a small shop is finding places for lumber, tools, and accessories, and I’ll get into how I solved some specific challenges—like where to put my clamps—in more detail, every shop needs some kind of catch-all space for random items.

I took care of some of this with a kitchen’s worth of secondhand cabinets. I used the base cabinets in a few locations, including for my miter-saw station, and the wall cabinets in a couple other locations for more general storage. This was an affordable approach, and one nice thing about the upper cabinets is that they keep the floor space below open. That said, as I get more specific with storage solutions, some of the uppers may get replaced with dedicated storage.
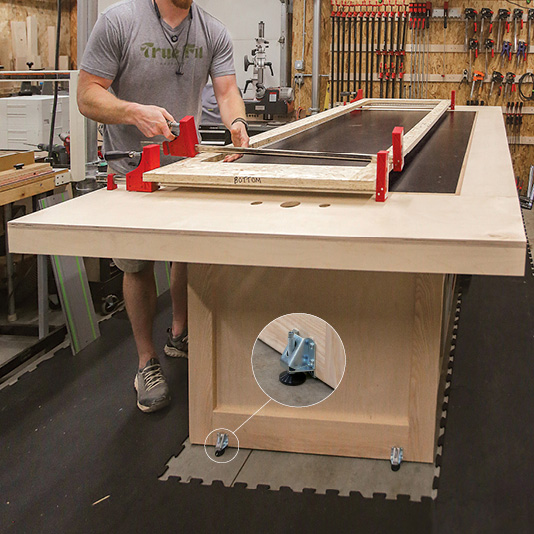
Storage Solutions

The right workshop storage makes the difference between an organized and convenient shop and a messy one. My storage setup is ever-evolving, but worth all of the time and money I have put into it.

Photo of a clamp storage wall in Casey Knips' shop.
Wall of Clamps: When I realized that I didn’t need two garage doors to load tools and materials in and out of my shop, I closed one off to create more wall space and dedicated it to clamp storage. A lot of the work I do in the shop requires clamping, so I need lots of clamps in many sizes. The storage system is simple: I attached cleats to the OSB for the clamps to grab.
Photo of lumber storage in Casey Knips' shop.
Lumber Storage, Where You Can: Designing out-of-the-way places to store long boards, cutoffs, and sheet goods is one of the challenges in a small workshop. I have three material storage areas that work for me. The first is above the miter-saw station, where I have installed common shelving brackets that are available at any big box store. They can carry plenty of weight, they are adjustable, and they are much more affordable than actual lumber racks. Another place I used these shelf brackets is on the back wall; to save floor space, I went with narrow 10-in. brackets as opposed to the 12-in. brackets over the miter-saw station. I left the area below the back wall’s lumber storage open so that I can lean sheet goods against the wall when I have a job that requires a lot of 4×8 material, but the main sheet-good storage is by the entry door, where I have a built-in storage rack to store sheet goods and lumber cutoffs vertically.

Photo of a storage cart for miscellaneous small items in Casey Knips' shop.
Consider a Cart: For things I need regularly, I have a simple cart. I might change what is on the cart depending on the job, but it’s common that I have a drill and driver, bits, sanding accessories, glue, and a few basic hand tools onboard.

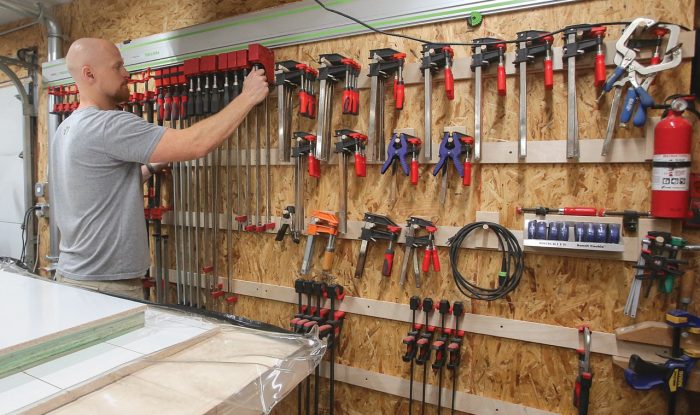
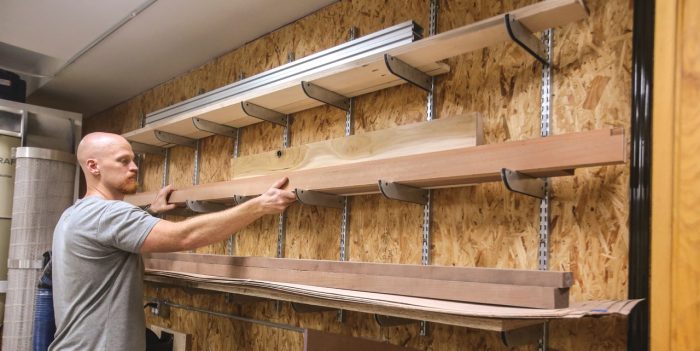
Design Tool to the Rescue

I could have loaded my worktable and all my tools into the shop, taken a guess at where everything should go, and then rearranged as I learned about how I used the space. But these tools are heavy, and my worktable is nearly immobile—plus, I may never have come to some of the helpful decisions I made in the planning phase if I had taken that more haphazard approach. Instead, I used an online tool to plan the shop layout, and it was helpful in some surprising ways.

After drawing out the shop footprint, I started to place the tools I had, and the tools I planned to buy in the near future, into the digital model. I tried out various layouts that gave me the most infeed and outfeed where I needed it and made sure there was enough room to move materials around between workstations.

For example, I positioned the tablesaw with 10 ft. 6 in. on the infeed side and 10 ft. on the outfeed side. Most of the time, that’s more than enough space, but I positioned the saw so that if I need just a little more room, I can open the garage door and move the saw just a bit toward it.

Dust-Collection Details

Dust collection keeps the shop clean and me healthy. Remember, sawdust is a carcinogen. I use a combination of a central dust collector, a shop vac, and an air filter, as well as a few accessories to keep the air clear and the shop clean.

Photo of a custom articulating arm in Casey Knips' shop.
The Big Jig: To reach all around my assembly table with dust collection for tools like my track saw and orbital sander, I built an articulating boom arm. It’s my own design, though I took a lot of ideas from similar jigs I found online. I built it with plywood and removed a lot of material to reduce the weight. A steel rod is hidden inside short lengths of PVC pipe to create the main swivel point. The secondary swivel point has a knuckle so that the whole assembly can fold flat against the wall when not being used. It has sagged a bit over time, but moves smoothly and reaches all corners of the assembly table, so I am very happy with it.
Photo of cleaning tools in Casey Knips' shop for dust-collection.
Keep It Clean: To help keep the shop clean during a project and to deep clean in between projects, I have both a vacuum and an air hose ready to go at all times. The vacuum, connected to a flex duct that can be attached to the dust collector, is from Rockler. I also have an air hose on a retractable reel that I found on Amazon. It’s always plugged into a small compressor to blow sawdust off surfaces and materials as I am working.
Three photos side-by-side of a 5-hp cyclone-style system designed and built by Casey Knips' friend for his shop.
Custom Collection: The heart of my dust-collection system is a 5-hp cyclone-style system designed and built by a friend. It has an air filter and a barrel that I line with plastic bags to catch the sawdust. If you are interested in designing and building a dust-collection system, check out billpentz.com. Bill’s site is a great resource. For a dust-collection system, the piping design and sizing is shop-specific, based on the tools it is serving and the layout of the shop. I worked with a company called Nordfab to get the right piping system for my shop. They were able to design and ship me a piping system based on my digital model. The piping transitions from 8 in. close to the cyclone to a 6-in. trunk line. In some cases, a 4-in. pipe drops to the tools. There are a few places near the tools where I had to transition from rigid pipes to flexible pipes. Though sometimes unavoidable, flexible pipes do restrict airflow, so I try to keep them to a minimum. Every tool has a blast gate, and I have a few magnetic connectors for accessories. The system was expensive, but it works better than any of the systems I’ve had in other shops.

Photo of Casey Knips' installing a Jet air-filtration system in his shop.
Extra Air Filtration: This Jet air-filtration system helps capture what the dust collector doesn’t catch. I run it whenever I am making a lot of dust and change the filters regularly.

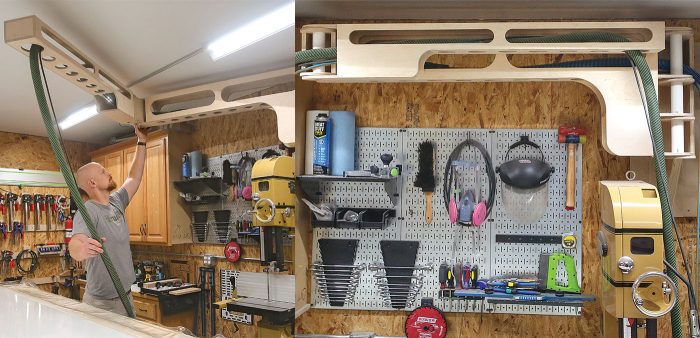
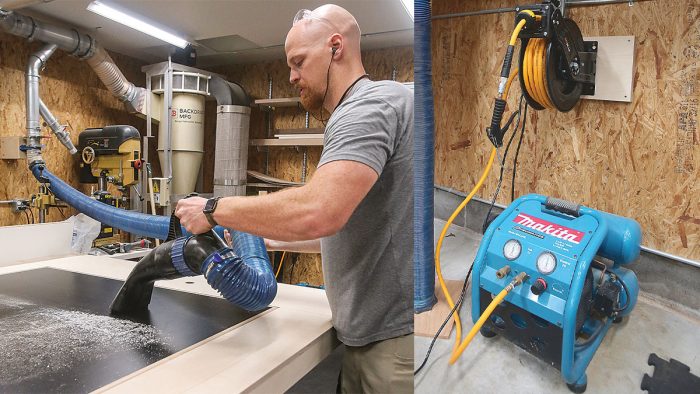
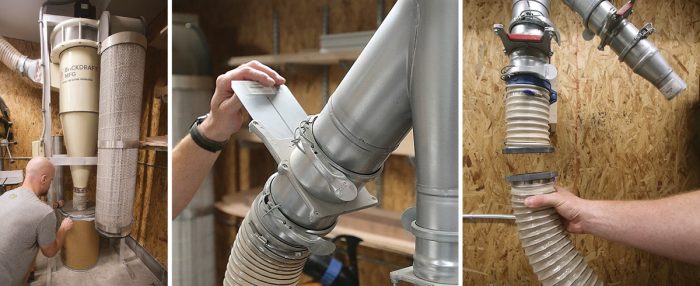
I also realized during this exercise that I didn’t need two operational garage doors. One would be plenty for bringing tools and materials in and out of the shop. Closing the second door off not only makes the shop more comfortable (garage doors are basically thermal holes in a building), but it gives me another big wall space for tool storage.

Finally, the model helped me determine where I needed things like electrical outlets and dust collection. In fact, the companies from which I purchased the dust-collection piping and the lighting used my digital model to design layouts and choose products for the shop. Both systems are working really well.

Like I mentioned earlier, I’ve innovated a lot of on-site solutions to building challenges. But if I have to build custom doors, run miles of molding through a router, or assemble an office’s worth of built-in boxes, I’ll take a shop any day. And this two-car garage is just enough. It’s tight in here, but it works.

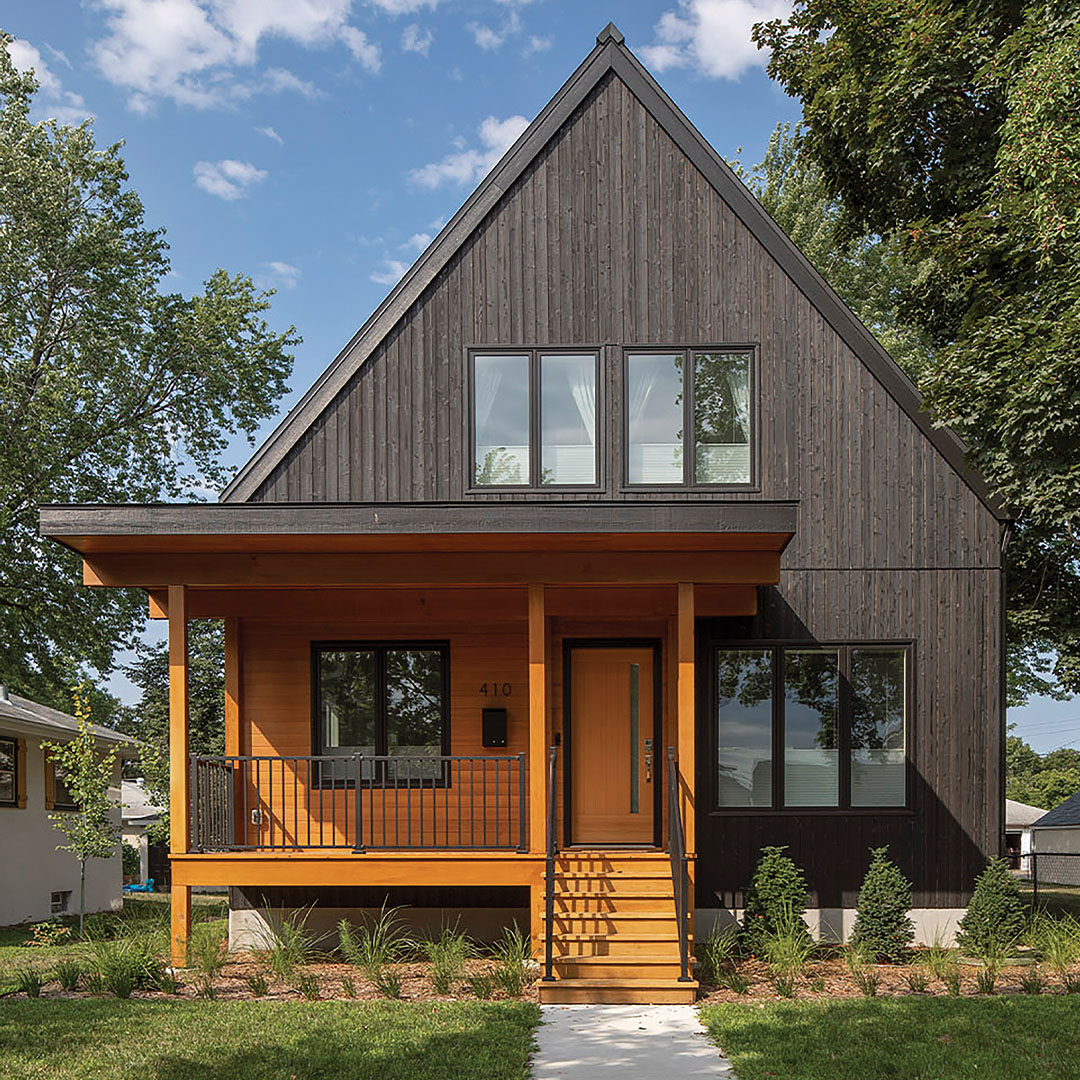
— Casey Knips; operator of True Fit Carpentry, a custom trim and cabinetry company in the Twin Cities. Photos by Brian Pontolilo.

From Fine Homebuilding #327

RELATED STORIES

  • Show Us Your Shop
  • Podcast Episode 651: Pretty Good Houses, Replacing Innie Windows, and Talking Shops
  • A Small-Shop Survival Guide

Sign up for eletters today and get the latest how-to from Fine Homebuilding, plus special offers.

Signing you up...

This site is protected by reCAPTCHA and the Google Privacy Policy and Terms of Service apply.
See all newsletters
See all newsletters
×

Get home building tips, offers, and expert advice in your inbox

Signing you up...

This site is protected by reCAPTCHA and the Google Privacy Policy and Terms of Service apply.
See all newsletters
See all newsletters

New Feature

Fine Homebuilding Forums

Ask questions, offer advice, and share your work

View Comments

  1. Litchworks | Mar 21, 2025 06:56pm | #1

    Thanks for the great shop tips in here. Just curious, what software was used for modeling the layout? The detail in that rendering would be really helpful for planning my own space.

Log in or create an account to post a comment.

Sign up Log in

Become a member and get full access to FineHomebuilding.com

More Shop Space

View All
  • Shop Space: Five Readers Share Their Workspaces
  • Making a Garage Workshop More Efficient
  • Talking Shop
  • Show Us Your Shop
View All

Up Next

Video Shorts

Featured Story

Podcast Episode 680: Knob-and-Tube Wiring, Vapor Movement, and Gutter Covers

Listeners write in about shower panels and cordless tools and ask questions about old wiring, air leaks, and gutter covers.

Featured Video

How to Install Cable Rail Around Wood-Post Corners

Use these tips to keep cables tight and straight for a professional-looking deck-railing job.

Related Stories

  • Window Glazing with Traditional Putty
  • Making and Installing Wood Wall Paneling
  • Shop Space: Five Readers Share Their Workspaces
  • Torched and Porched

Discussion Forum

Recent Posts and Replies

  • |
  • |
  • |
  • |
  • |
  • |
View More Create Post

Highlights

Fine Homebuilding All Access
Fine Homebuilding Podcast
Tool Tech
Plus, get an extra 20% off with code GIFT20

"I have learned so much thanks to the searchable articles on the FHB website. I can confidently say that I expect to be a life-long subscriber." - M.K.

Get home building tips, offers, and expert advice in your inbox

Signing you up...

This site is protected by reCAPTCHA and the Google Privacy Policy and Terms of Service apply.
See all newsletters
See all newsletters

Video

View All Videos
  • Window Glazing with Traditional Putty
  • Making and Installing Wood Wall Paneling
  • Building a Flush Interior Door With Carpenter Casey Knips
  • How to Repair Shrinking Crown Molding
View All

Tool Storage

View All Tool Storage Articles
  • Storage-Bin Solution
  • Repurpose Tool Boxes
  • Smart Truck Storage
View All Tool Storage Articles

Fine Homebuilding Magazine

  • Issue 330 - April/May
    • Deck Details for Durability
    • FAQs on HPWHs
    • 10 Tips for a Long-Lasting Paint Job
  • Issue 329 - Feb/Mar 2025
    • Smart Foundation for a Small Addition
    • A Kominka Comes West
    • Making Small Kitchens Work
  • Issue 328 - Dec/Jan 2024
    • How a Pro Replaces Columns
    • Passive House 3.0
    • Tool Test: Compact Line Lasers
  • Issue 327 - November 2024
    • Repairing Damaged Walls and Ceilings
    • Plumbing Protection
    • Talking Shop
  • Issue 326 - October 2024
    • Paint Behind Strike Plates
    • Conceal Cut Ends
    • Ladder Slip Solution

Fine Home Building

Newsletter Sign-up

  • Fine Homebuilding

    Home building tips, offers, and expert advice in your inbox.

  • Green Building Advisor

    Building science and energy efficiency advice, plus special offers, in your inbox.

  • Old House Journal

    Repair, renovation, and restoration tips, plus special offers, in your inbox.

Signing you up...

This site is protected by reCAPTCHA and the Google Privacy Policy and Terms of Service apply.
See all newsletters

Follow

  • Fine Homebuilding

    Dig into cutting-edge approaches and decades of proven solutions with total access to our experts and tradespeople.

    Start Free Trial Now
    • Facebook
    • Instagram
    • X
    • LinkedIn
  • GBA Prime

    Get instant access to the latest developments in green building, research, and reports from the field.

    Start Free Trial Now
    • Facebook
    • YouTube
  • Old House Journal

    Learn how to restore, repair, update, and decorate your home.

    Subscribe Now
    • Facebook
    • Instagram
    • X

Membership & Magazine

  • Online Archive
  • Start Free Trial
  • Magazine Subscription
  • Magazine Renewal
  • Gift a Subscription
  • Customer Support
  • Privacy Preferences
  • About
  • Contact
  • Advertise
  • Careers
  • Terms of Use
  • Site Map
  • Do not sell or share my information
  • Privacy Policy
  • Accessibility
  • California Privacy Rights

© 2025 Active Interest Media. All rights reserved.

Fine Homebuilding receives a commission for items purchased through links on this site, including Amazon Associates and other affiliate advertising programs.

X
X
This is a dialog window which overlays the main content of the page. The modal window is a 'site map' of the most critical areas of the site. Pressing the Escape (ESC) button will close the modal and bring you back to where you were on the page.

Main Menu

  • How-To
  • Design
  • Tools & Materials
  • Video
  • Blogs
  • Forum
  • Project Guides
  • Reader Projects
  • Magazine
  • Members
  • FHB House

Podcasts

  • FHB Podcast
  • ProTalk

Webinars

  • Upcoming and On-Demand

Podcasts

  • FHB Podcast
  • ProTalk

Webinars

  • Upcoming and On-Demand

Popular Topics

  • Kitchens
  • Business
  • Bedrooms
  • Roofs
  • Architecture and Design
  • Green Building
  • Decks
  • Framing
  • Safety
  • Remodeling
  • Bathrooms
  • Windows
  • Tilework
  • Ceilings
  • HVAC

Magazine

  • Current Issue
  • Past Issues
  • Magazine Index
  • Subscribe
  • Online Archive
  • Author Guidelines

All Access

  • Member Home
  • Start Free Trial
  • Gift Membership

Online Learning

  • Courses
  • Project Guides
  • Reader Projects
  • Podcast

More

  • FHB Ambassadors
  • FHB House
  • Customer Support

Account

  • Log In
  • Join

Newsletter

Get home building tips, offers, and expert advice in your inbox

Signing you up...

This site is protected by reCAPTCHA and the Google Privacy Policy and Terms of Service apply.
See all newsletters
See all newsletters

Follow

  • X
  • YouTube
  • instagram
  • facebook
  • pinterest
  • Tiktok

Join All Access

Become a member and get instant access to thousands of videos, how-tos, tool reviews, and design features.

Start Your Free Trial

Subscribe

FHB Magazine

Start your subscription today and save up to 70%

Subscribe

We hope you’ve enjoyed your free articles. To keep reading, become a member today.

Get complete site access to expert advice, how-to videos, Code Check, and more, plus the print magazine.

Start your FREE trial

Already a member? Log in