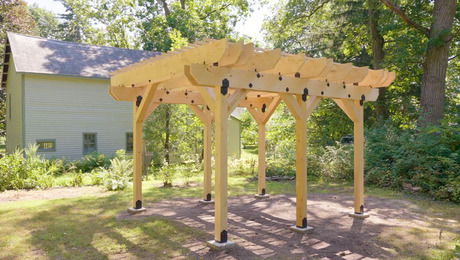
How to Lay Out Post Bases for a Pergola
Learn how to build a strong foundation to make your pergola last longer.
Sponsored by Simpson Strong‑Tie
Jeremy Kassel shares the best way to create a strong pergola foundation for a long-lasting structure. He starts by burying footings below the frost line, then he tops them off with a 12-in. square. Next, he precisely places and secures the pergola’s adjustable post bases that are designed for durability. Finally, he uses a rotary laser to establish the elevation of the footings.

Here’s the Transcript:
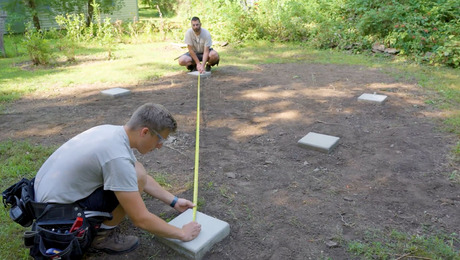
When we were laying out our pergola footings, we of course wanted to make sure that we dug all the way down below the frost line. At grade, we topped off our footing with a 12-in. square. And that just sort of plays off the square 6×6 posts, and I just like the aesthetic of it rather than a round footing.
They should be pretty much all 12 in. Make a mark at the center of each footing on the edge of the footing. It’s probably going to be right at 6, and you can do both sides.
We want to make sure that our hardware is centered on these peer pads here. But visually, we also want to make sure that it just looks nice on the footing as well. Let’s go and snap across north to south first, and then we’ll go the long way after.

This is just to set a reference line to kind of see where we’re at with the centers of these footings. Then we will check those to kind of see where they cross, and that’s where we’re going to put our post-base connector.
And then we’ll come back through and touch these up with the mechanical pencil just to give us a backup so that we can see it a little bit better. We’re going to go around and check them to make sure that that post-base connector is not off-center and there’s a nice even reveal around.
Yeah, these are all so close. We are within 1/16 on that one. We are within 1/8 on that one. I think over 10 feet, 12 feet. That is very respectable, I’m very happy with that. So now what I want to do is I want to check corner to corner.
So the center of where those marks cross to the center of this one. We are 188-5/8. OK, so same maneuver over there. All right, we are 189-15/16. So over nearly 16 feet. We are out of square about 1/4 in., and I think we can make that up pretty easily when we mount our hardware.
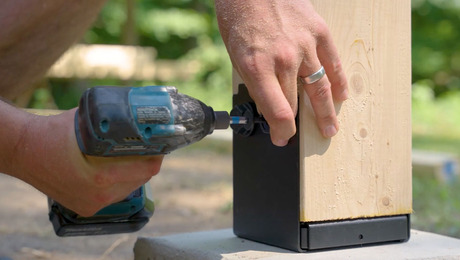
Securing Post Bases
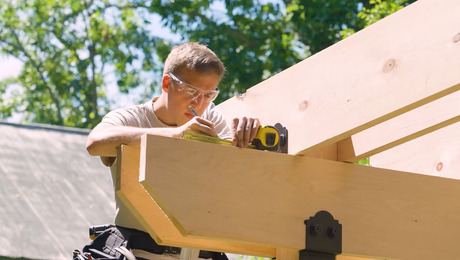
Can you start unboxing a few connectors, please? Thank you. And just be mindful of the fact that they do have a powder-coat finish on them. So try not to scratch them, scuff them.
That timber-to-concrete connector is called an adjustable post base. I’m going to bring them over here to our footings. I am going to want to orient it on the footings so that the open section of it runs this way.
You can see that there’s this sort of bean-shaped pocket in there. And that will allow us a little bit of flexibility in case we need to manipulate this to truly where we want it on the footing. We’ve got a 1/2-in. by 10-in. rotary hammer bit. And that’s going to be plenty long for this long fastener that we’re going to be installing.
We are vacuuming up our concrete dust. Concrete has silica in it, and we want to control that silica dust, but also we want to vacuum the dust out of the holes so that our fasteners get a really nice bite into the walls of the concrete and they’re not hindered by that dust.
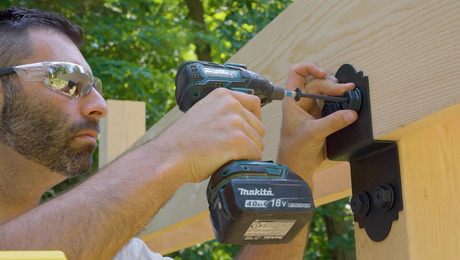
We are going to use these heavy duty Titan HD Screw Anchors from Simpson Strong-Tie to bolt our post-base connector down onto the concrete. It has an integrated washer that’ll go underneath our bolt. I’m going to get it so that it’s nearly tight, but it still gives us a little bit of flexibility to wiggle these around once we have them in place. And then we’re going to finish it off by hand with a ratchet wrench.
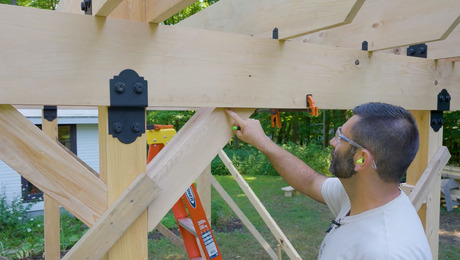
Make sure that front to back we’re within tolerance here. I’m going to make a little reference line. Now we can go ahead and tighten this. Let’s go to the next corner. We’re good there to tighten this one. Make sure it’s up high near the holes, then pull it nice and tight. I want to make sure that we are centered left to right. I would like to slide this over 1/4 in. after double checking it.
Now that we have that first set of hardware bolted down where we want it, we want to check corner to corner and make sure that we’re square in line with these. All right, I am 181-1/8. Now let’s go to that next corner. We are at 181. We are within 1/8 over about 15 feet and I’m really happy with that.
So the next thing we want to do is bolt down the corners, because we know they’re set where we want them. Then we’ll run the string line again and get this set where we want it. I can see there’s a little bit of a gap here. So I do want to knock this hardware right back up against the line—and we’re just kissing it, which is right where I want it. Perfect, now let’s look over to the other side. I do want to slide it over just a bit here. And I think that’s all we need.
There’s a few things that I really like about this adjustable post base. Not only is this a structural component, but it is also a decorative one; you’ve got this nice detailing here. But what I really like is this integrated standoff. It does have a weep hole on either side, and we want to make sure that these weep holes are oriented on the side of our bracket.
This will cover our fastener and give us a standoff so that our timber post is not sitting directly on concrete. It’ll nest on this standoff. The concrete will hold moisture, and we don’t want the end grain of our post wicking in any moisture off of that concrete. That’s great for long-term durability.
Footing Elevation
The next step is going to be to set up a rotary laser and establish the elevation of our footings. If you don’t own a rotary laser with a receiver, you can rent one from a rental center. Some box stores have them as well. And if you don’t want to use a rotary laser, you could also use a transit level.
Some people call this a story pole. And this is what we’re going to mount the receiver for the rotary laser right onto. I’m just going to loosely get this thing set up, and then we’re going to tone it in when we walk out to the footings. But I am going to turn it on to receive.
So, starting with the highest one, I want to get this toned in, and I want to make sure that I’m plumb here. I have an indicator on the back of the receiver that tells me when I’m toned-in level, and we are there. So now I want to leave this receiver set.
I’m going to pull this up to where it tones into level and measure the distance between the bottom of the story pole and the top of the connector. So we’re going to write +7/16 right on this.
This is 7/16 lower than our first control point, and we’re going to repeat the process at the remaining four footings; +3-5/16, +3-5/8. We now have numbers recorded for how much timber we need to add so that the top of our pergola is level.
RELATED STORIES


View Comments
It would be nice if you showed how you put the concrete footings in... thats like the most difficult part of the job isnt it???