FHB Logo Facebook LinkedIn Email Pinterest Twitter X Instagram Tiktok YouTube Plus Icon Close Icon Navigation Search Icon Navigation Search Icon Arrow Down Icon Video Guide Icon Article Guide Icon Modal Close Icon Guide Search Icon Skip to content
Subscribe
Log In
  • How-To
  • Design
  • Tools & Materials
  • Restoration
  • Videos
  • Blogs
  • Forum
  • Magazine
  • Members
  • FHB House
  • Podcast
Log In
How-To

Installing Risers and Treads on Wraparound Deck Stairs

Follow Mike Guertin's recommendations for a deck that will stay free of mold and debris.

By Mike Guertin

Sponsored by Trex®

In the final episode of Mike Guertin’s freestanding deck-building video series, he installs the deck-stair risers between the top of the rough framing and the underside of the finished decking. He makes sure to leave ¾ in. for proper drainage and to avoid hardware interference. Mike secures everything in place using seamless screws and color-matched plugs from Trex®, and ensures the bottom riser remains adjustable for future patio paving.

Here’s the Transcript:

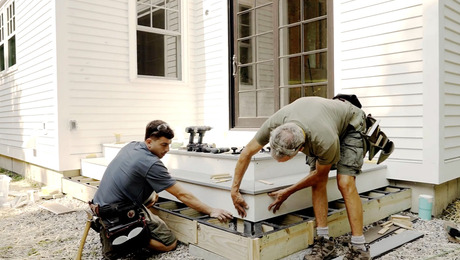
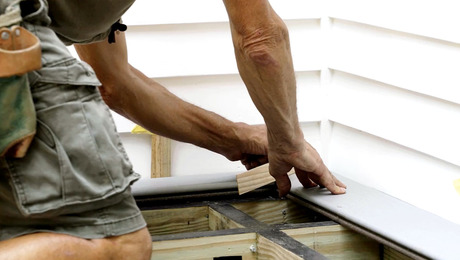
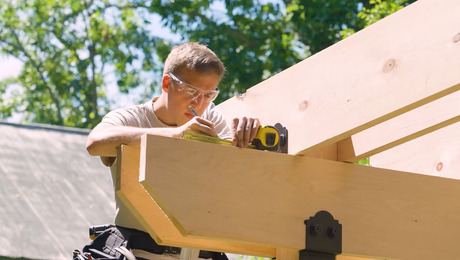
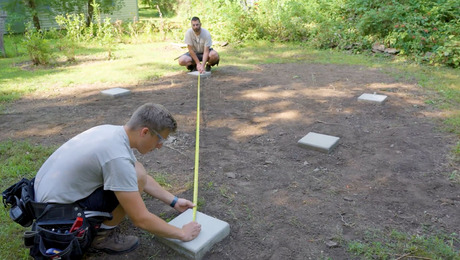
So we work from the top of the deck down to the ground. First, we got the decking on. Now we’re going to put the deck-stair riser boards / fascia boards on that will fit between the top of our rough framing to the underside of the finished decking. I’m going to space that fascia off the framing, and I gauged it at ¼ in. So I just want to check and make sure that my spacers are going to result in ¾ in. when I put this fascia board on.

I’m just going to test this spot here, and we have a little bit of variability. We could be anywhere from ½ in. to ¾, but the closer to ¾ we are the better. And we are dead on ¾. I’m going to put one basically next to each of the joists that are opposite here. This space is not only going to allow the water to drain behind the fascia board that may weep underneath here, but it’s also going to space the fascia board off of our screw heads and our metal straps.

Making Space

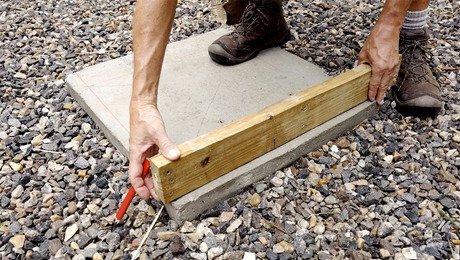
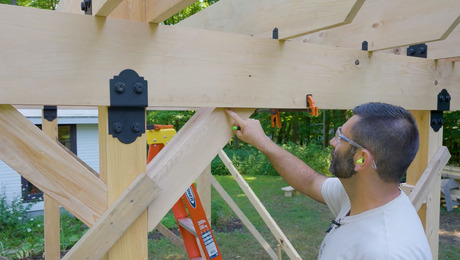
In addition to giving us that airspace and clearing all of the hardware that’s underneath, we can also use these spacers to micro-adjust how far the fascia board is standing off of the framing. So we’ve cut different thickness spacers; you saw the ¼-in. ones, and then we have some ⅝-in. ones, which are just some scrap pieces of the fascia board that we’re using. It’s nonstructural, so this is perfectly fine to use.

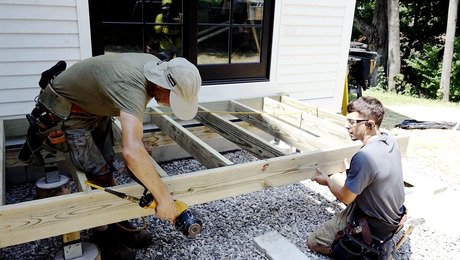
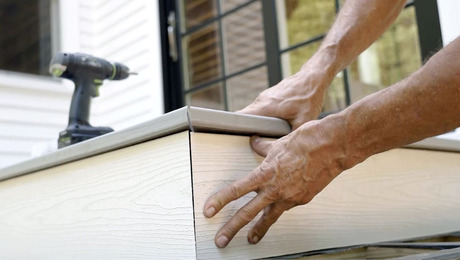
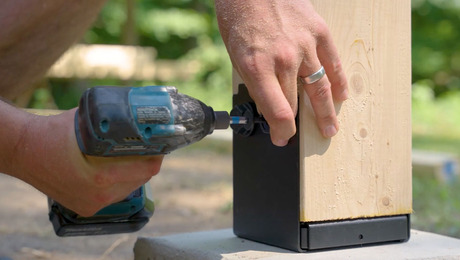
Now we’re ready to fasten. We’ll start at the corner; that way we’ll lock this in, and then we’ll work our way down. So we’re going to use the Trex® Hideaway Fascia Screws. You can see they have a broad shoulder on them and a large head. We’re going to start a countersink with this tool that comes with the kit, and then we’ll drive these into the holes with a fascia depth-setting tool.

We’ll finish the whole thing off with plugs that are color-matched to the fascia board, and we’ll plug these after we get everything installed. We position these spacers at 16 in. on center or less. I did that because the Trex® installation instructions call for their fascia fasteners to be no more than 18 in. apart. So we’ll be within tolerance.

Final Touches

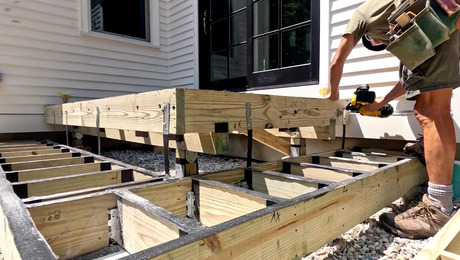
So we finished up the top of the deck and our first riser board. We’ve gone ahead and precut our riser boards and our deck boards that are being used as treads. The inner tread board is a groove board that will be clipped in with a hidden fastener that goes up against the riser board, the outer board, because we want the front edge to be a square-edge board so it looks nice and clean.

In order to use the hidden fasteners, the Hideaways, we had to groove the board. We did that with a router. So now we’ve got all our slots prepped. Before we can put them in, we first have to put in the plugs in the lower row. Otherwise it’ll be too close to the top of the tread board in order to get the hammer to tap it in.

So we’re going to match the grain as best we can and tap those plugs in. Then once we’ve done that, we’ll set our hidden fasteners to receive that first grooved deck board for the tread and our final board.

You might notice that the bottom riser board is much taller than the other two. The reason for that is we left a full-width board and just tack-screwed it on so the owner can scribe it to a finish patio later on. This gives him the opportunity to dial it in so it looks perfect. The last thing we have to do is put in plugs on the deck boards, on the riser boards. And we’ve got to remember: no plugs on this board.

RELATED STORIES

  • Adding Deck Fascia
  • Finish Stairs With Finesse
  • Adding Fascia on an Elevated Deck

Sign up for eletters today and get the latest how-to from Fine Homebuilding, plus special offers.

Signing you up...

This site is protected by reCAPTCHA and the Google Privacy Policy and Terms of Service apply.
See all newsletters
See all newsletters
×

Get home building tips, offers, and expert advice in your inbox

Signing you up...

This site is protected by reCAPTCHA and the Google Privacy Policy and Terms of Service apply.
See all newsletters
See all newsletters

Videos in the Series

  • Designing a Small Deck with a Big Role

    Learn how to design a freestanding, three-step landing deck that's prepped for paving.

  • Post and Beam Layout on a Small Freestanding Deck

    Learn how to build a long-lasting, resilient deck frame starting with post-base connections, posts, and beams.

  • Framing and Flashing a Small Deck

    Mike Guertin details the best way to build a durable deck frame.

  • Building Wraparound Box-Frame Stairs on a Deck

    This framing method is an attractive alternative to cutting stringers.

  • Installing Deck and Border Boards

    In this video, learn how to install decking boards by using spacer blocks to allow for proper water drainage.

  • Installing Risers and Treads on Wraparound Deck Stairs

    Follow Mike Guertin's recommendations for a deck that will stay free of mold and debris.

New Feature

Fine Homebuilding Forums

Ask questions, offer advice, and share your work

About This Video Series

Sponsored by Trex® In this video series, Mike Guertin takes you through the step-by-step process of creating a small but visually appealing and functional deck. In each video, he reveals some of his expert tips on enhancing the durability of any deck — no matter the size. The homeowners wanted to make the deck area more than a standard entryway to their home; they hoped for it to become a focal point of their backyard.… More about this Video Series

Log in or create an account to post a comment.

Sign up Log in

Become a member and get full access to FineHomebuilding.com

Up Next

Video Shorts

Featured Story

FHB Podcast Segment: Gutter Covers 101

Gutter covers may be riskier than you think.

Featured Video

Video: Build a Fireplace, Brick by Brick

Watch mason Mike Mehaffey construct a traditional-style fireplace that burns well and meets current building codes.

Related Stories

  • English Arts & Crafts Sensibility at Rumford Hall
  • Fastening an Exterior Door With Brick Mold
  • Hazard-Free Hot Tubs
  • Deck Details for Durability

Discussion Forum

Recent Posts and Replies

  • |
  • |
  • |
  • |
  • |
  • |
View More Create Post

Highlights

Fine Homebuilding All Access
Fine Homebuilding Podcast
Tool Tech
Plus, get an extra 20% off with code GIFT20

"I have learned so much thanks to the searchable articles on the FHB website. I can confidently say that I expect to be a life-long subscriber." - M.K.

Get home building tips, offers, and expert advice in your inbox

Signing you up...

This site is protected by reCAPTCHA and the Google Privacy Policy and Terms of Service apply.
See all newsletters
See all newsletters

Video

View All Videos
  • How to Space and Install Pergola Rafters
  • How to Lay Out Post Bases for a Pergola
  • Angle Bracing for a Pergola
  • Raising and Bracing Pergola Posts
View All

Decks

View All Decks Articles
  • Fix for Fast-Drying Paint
  • No-Downside Decking
  • Spacer for Deck Boards
View All Decks Articles

Fine Homebuilding Magazine

  • Issue 330 - April/May
    • Deck Details for Durability
    • FAQs on HPWHs
    • 10 Tips for a Long-Lasting Paint Job
  • Issue 329 - Feb/Mar 2025
    • Smart Foundation for a Small Addition
    • A Kominka Comes West
    • Making Small Kitchens Work
  • Issue 328 - Dec/Jan 2024
    • How a Pro Replaces Columns
    • Passive House 3.0
    • Tool Test: Compact Line Lasers
  • Issue 327 - November 2024
    • Repairing Damaged Walls and Ceilings
    • Plumbing Protection
    • Talking Shop
  • Issue 326 - October 2024
    • Paint Behind Strike Plates
    • Conceal Cut Ends
    • Ladder Slip Solution

Fine Home Building

Newsletter Sign-up

  • Fine Homebuilding

    Home building tips, offers, and expert advice in your inbox.

  • Green Building Advisor

    Building science and energy efficiency advice, plus special offers, in your inbox.

  • Old House Journal

    Repair, renovation, and restoration tips, plus special offers, in your inbox.

Signing you up...

This site is protected by reCAPTCHA and the Google Privacy Policy and Terms of Service apply.
See all newsletters

Follow

  • Fine Homebuilding

    Dig into cutting-edge approaches and decades of proven solutions with total access to our experts and tradespeople.

    Start Free Trial Now
    • Facebook
    • Instagram
    • X
    • LinkedIn
  • GBA Prime

    Get instant access to the latest developments in green building, research, and reports from the field.

    Start Free Trial Now
    • Facebook
    • YouTube
  • Old House Journal

    Learn how to restore, repair, update, and decorate your home.

    Subscribe Now
    • Facebook
    • Instagram
    • X

Membership & Magazine

  • Online Archive
  • Start Free Trial
  • Magazine Subscription
  • Magazine Renewal
  • Gift a Subscription
  • Customer Support
  • Privacy Preferences
  • About
  • Contact
  • Advertise
  • Careers
  • Terms of Use
  • Site Map
  • Do not sell or share my information
  • Privacy Policy
  • Accessibility
  • California Privacy Rights

© 2025 Active Interest Media. All rights reserved.

Fine Homebuilding receives a commission for items purchased through links on this site, including Amazon Associates and other affiliate advertising programs.

X
X
This is a dialog window which overlays the main content of the page. The modal window is a 'site map' of the most critical areas of the site. Pressing the Escape (ESC) button will close the modal and bring you back to where you were on the page.

Main Menu

  • How-To
  • Design
  • Tools & Materials
  • Video
  • Blogs
  • Forum
  • Project Guides
  • Reader Projects
  • Magazine
  • Members
  • FHB House

Podcasts

  • FHB Podcast
  • ProTalk

Webinars

  • Upcoming and On-Demand

Podcasts

  • FHB Podcast
  • ProTalk

Webinars

  • Upcoming and On-Demand

Popular Topics

  • Kitchens
  • Business
  • Bedrooms
  • Roofs
  • Architecture and Design
  • Green Building
  • Decks
  • Framing
  • Safety
  • Remodeling
  • Bathrooms
  • Windows
  • Tilework
  • Ceilings
  • HVAC

Magazine

  • Current Issue
  • Past Issues
  • Magazine Index
  • Subscribe
  • Online Archive
  • Author Guidelines

All Access

  • Member Home
  • Start Free Trial
  • Gift Membership

Online Learning

  • Courses
  • Project Guides
  • Reader Projects
  • Podcast

More

  • FHB Ambassadors
  • FHB House
  • Customer Support

Account

  • Log In
  • Join

Newsletter

Get home building tips, offers, and expert advice in your inbox

Signing you up...

This site is protected by reCAPTCHA and the Google Privacy Policy and Terms of Service apply.
See all newsletters
See all newsletters

Follow

  • X
  • YouTube
  • instagram
  • facebook
  • pinterest
  • Tiktok

Join All Access

Become a member and get instant access to thousands of videos, how-tos, tool reviews, and design features.

Start Your Free Trial

Subscribe

FHB Magazine

Start your subscription today and save up to 70%

Subscribe

We hope you’ve enjoyed your free articles. To keep reading, become a member today.

Get complete site access to expert advice, how-to videos, Code Check, and more, plus the print magazine.

Start your FREE trial

Already a member? Log in