Fixing Rotted Windowsills
An expert weighs in with advice for a reader's question on a wood preserver for his rotting wood sill. Learn more about this timeless topic.
While some forum topics are of-the-moment, some questions will never become irrelevant, and wood rot is one of these. Twenty years ago, reader darrel posted a question about rotted windowsills, and recently a slew of readers revived the thread. Here’s darrel’s post:
The house we own now has had aluminum cladding over the window trim for several years. It was either hiding rot, or caused rot, and now I’m in the process of replacing a few windows, and rebuilding the trim on most of the rest.
Not a big deal. The only ‘gotcha’ is that a few of the otherwise good windows (just need new brick molding) have slightly rotted sills. Mainly soft-spots in the corners. I don’t want to put in a new sill (as that would require rebuilding the entire window) and so a few people have recommended that I just strip down the windows and then use some sort of penetrating wood preserver.
Can anyone recommend a good wood preserving product that is relatively safe for a clumsy homeowner? It sounds like the best stuff to use would be something that I’d apply after first drilling several holes in the damaged wood to make sure the preservative gets down in the wood properly.
FastEddie1 was the first responder here: I think there is an article in the current issue (FHB #156, Repairing Rotten Trim by John Michael Davis) about a guy in New Orleans that does repairs, and he names specific products. I have had good luck with Bondo. Dig out all the damaged wood, apply Bondo, sand, and paint. Two problems: it hardens quickly (that’s also a plus) and you end up with a smooth finish, so if you wanted texture you would have to get a little creative.
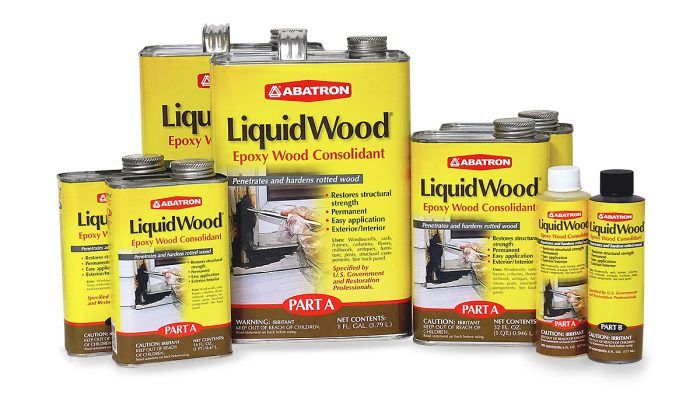
Norm Kerr was up next. He mentioned the wood epoxy made by Abatron that comes in two forms: a liquid for pouring into the rotted wood to consolidate the flimsy fibers, and a paste for building up the surface after using the consolidator. He said that it works great, though it’s pricey, and that it’s much easier than replacing wood that’s otherwise sound.
Phillgiles agreed with Norm. He said that the liquid works like magic, but he thought the filler was less magical: So there’s still a place for Bondo or West System (use the balloons to make filler paste). I’ve also tried one that looks like a barber pole, only brown and white; you cut off a piece the size of a chaw, mix it in your palm, and fill in the cracks.
The next comment came from archyll, who said that Bondo isn’t a good choice because it traps moisture and creates further rot: Great temporary repair but not long lasting.
FastEddie1 came back to agree but added that any epoxy or a decent layer of paint will trap moisture: The key is to either design, build, or rebuild it so that moisture can weep out.
Darrel thanked his advisors and said that he’s familiar with Bondo but that was looking for a preservative, not a filler.
Fast-forward twenty years and RF Burns writes that he’s a bit late to the thread, having just found the site. His house has Pella aluminum-clad wood windows, and one north-facing window had bad rot on the bottom rail. It was an operable window, so he removed it and used Bondo to fix the rot. He thought the water had gotten between the cladding and the glass and then rotted the wood. He asks if anyone knows of a way to seal the aluminum to the glass and if they can recommendation a wood preservative.
[email protected] writes: Echoing Norm-Abatron. You apply the two-part hardener onto the rotten area and let it dry 24+ hours at minimum. Then mix the two-part filler and apply with a putty knife. A disposable brush dipped in some paint thinner is great for blending the edges. It dries so hard you can fasten screws into it. Great product and I’ve used it on sills many times. I no longer use Bondo as I find this product to be superior.
Next up, coolwillie recommends Woodlife, a wood preservative that soaks into the wood. He says you can paint or apply epoxy over it; that Bondo is made for cars, not wood; and that he’s also a user of Abatron.
Jbrown painting enters the thread: Wood preserver/sealer provides a durable barrier against water penetration, preventing rotting and warping that can occur over time. It also acts as a shield against harmful UV rays, which can cause fading and discoloration. By applying this product to your window sills, you can ensure their longevity and maintain their natural beauty for years to come. One of the greatest advantages of using a wood preserver/sealer is its ease of application. With just a few simple steps, you can effectively protect your window sills from environmental damage. The product is formulated to be user-friendly, allowing even those with minimal DIY skills to achieve professional-looking results. Investing in a high-quality wood preserver/sealer is not only a wise decision for preserving the condition of your window sills but also an environmentally conscious choice. By extending the lifespan of your window sills through proper treatment, you reduce waste by minimizing the need for replacement materials.
Billiiiiii is also a fan of preservation and advises the use of products such as Boracare or Copper-Green Wood Preservative. He says that the products are effective at treating and preventing rot. He then offers a step-by-step approach to fix rotted sills:
1. Prepare the area: Start by removing any loose or damaged wood around the rotted areas. Clean the surface to ensure the preservative can penetrate properly.
2. Drill holes: As you mentioned, drilling holes in the damaged wood is a good practice. This allows the preservative to penetrate deeper and reach all affected areas.
3. Apply the preservative: Follow the instructions on the product label carefully. Typically, you would apply the wood preservative generously to the affected areas, making sure it soaks into the wood. Use a brush or spray applicator for even coverage.
4. Allow drying: Let the preservative dry as per the manufacturer’s recommendations. This may take some time, so be patient.
5. Replace brick molding: After the preservative has dried, you can proceed to replace the brick molding, ensuring that the repaired wood is structurally sound.
6. Seal and paint: Seal the repaired area with an appropriate wood sealer, and then paint it to match the rest of the window trim for a uniform appearance.
Safety-wise, when working with wood preservatives, it’s important to wear appropriate protective gear, including gloves and safety glasses, and to work in a well-ventilated area to minimize exposure. Follow all safety precautions mentioned on the product’s label.
Before starting the project, you may also want to consult with a local hardware store or a professional in your area to ensure you select the right wood preservative for your specific needs and to get any additional tips for your particular situation.
An expert weighs in
We asked former FHB editor Matt Millham his thoughts on this. Here’s what he had to say:
If I didn’t know better, I’d think this question was a setup for an ad for Abatron. Their wood consolidant and epoxy products were the first thing that came to mind when I saw this question, and lots of others had already weighed in recommending it.
Ian Schwandt introduced me to Abatron when he was working on a project for Hudson Valley Preservation. Part of a 1750’s timber-frame home’s oak sill, and the bottom couple feet of a post that sat on it, had partially rotted out. Ian and his crew removed the wood that was too far gone, drenched the rest in Abatron’s LiquidWood, and then scribed and scarfed in replacement parts.
The repair here—some rot in windowsills—is far simpler. If the rot were more extensive, I’d take Ian’s remove-and-replace approach: Cut out the worst of it, save the rest, and replace what’s gone with either the same species or something equivalent. But this sounds like a relatively minor rot repair.
Start by drying the affected area. Wet wood won’t absorb treatments very well. Abatron recommends maximum 17% moisture in the wood, which you’ll want to check with a moisture meter. If you’re a glutton for punishment, a heat gun or hair dryer can work. If you have time on your side, tent the area to divert the weather and let it dry naturally. Then scrape away the paint or finish, if any is left.
Abatron tells us we can leave spongy wood and its LiquidWood will harden it right up, but I wouldn’t if the sponge is shallow and confined to small areas. It’s not hard to remove this decayed wood, but it can be a bit of a pain to replace if the damage is extensive. If extensive, hit it with a wire brush to get the worst of it, then drill 1/8-in. holes in the affected area about an inch apart and staggered, stopping when you hit hard wood or are halfway through the piece—whichever happens first. If limited to smaller areas—say a trench across the top of the sill where a crack had allowed water to penetrate—removing most of the spongy stuff with a scraper or chisel would be my preference.
Once the worst of the rot is gone and holes (if needed) are drilled, apply the two-part LiquidWood liberally (follow the instructions for mixing and wait times). Start with the drilled holes. Plastic needle syringes can get in deep. When the tip is as deep as it can go, start pushing the plunger and backing out at the same time to get as much product and as little air as possible in the hole. Once those are full, use a cheap chip brush to coat the rest of the area.
Abatron’s LiquidWood is also the thinner for its WoodEpox, which is what I’d recommend for a filler. Some people and resources will tell you to wait for the LiquidWood to get tacky before filling the voids with WoodEpox, and that’s generally a good idea, but it’s not necessary if the wood you’re repairing is in generally decent shape. The worry as I see it is that if you try to fill the voids too soon with WoodEpox, you might sponge out the LiquidWood before the actual wood has absorbed it. That’s a legitimate concern. If you’re new enough to this to be asking how to do it, wait for the LiquidWood to tack before filling.
Mix the WoodEpox according to the instructions. The weird thing about it is that the larger the mass of WoodEpox, the faster it sets. A ball of it will set faster than a flattened pancake. This info is in the instructions, and it’s something to pay attention to if you’re taking it slow. Fill the voids from the bottom up in layers if necessary to reduce air bubbles. You’ll want to overfill slightly, but not too much. Whatever you fill beyond the finished surface you’ll have to pare back.
Tooling soft WoodEpox can be tedious. If you drag a dry putty knife or similar instrument to try to flatten it, it will tear. As mentioned earlier, LiquidWood is used to thin it, and it can also be used to make it easier to tool. After slightly overfilling the area with WoodEpox, brush some LiquidWood over it and then tool it. Still, leave it slightly proud of the finished surface and allow it to harden. Then you can shape it to its final form with sanding, scraping, chiseling, sawing—whatever works.
When it’s all fixed, and primed and painted with durable exterior coatings, consider how you’ll keep water from getting to these sills. If they can’t get wet, they won’t rot. Overhangs and drip caps can direct water away to prevent it from being a problem for water-sensitive materials, as wood is.
—Chuck Bickford is a contributing editor. Matt Millham is a carpenter with North River Design/Build in Stone Ridge, NY.
Photos from abatron.com
RELATED STORIES