FHB Logo Facebook LinkedIn Email Pinterest Twitter X Instagram Tiktok YouTube Plus Icon Close Icon Navigation Search Icon Navigation Search Icon Arrow Down Icon Video Guide Icon Article Guide Icon Modal Close Icon Guide Search Icon Skip to content
Subscribe
Log In
  • How-To
  • Design
  • Tools & Materials
  • Restoration
  • Videos
  • Blogs
  • Forum
  • Magazine
  • Members
  • FHB House
  • Podcast
Log In
Q&A Spotlight

Tips on Ceiling Repair

Find out your options for applying a seamless drywall patch on a textured ceiling.

By Charles Bickford, Myron R. Ferguson

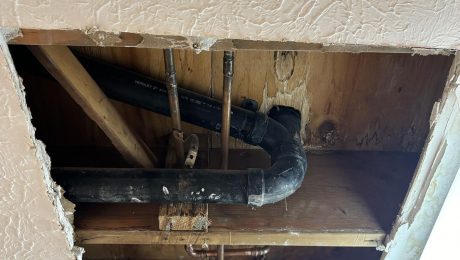
Member LargePeopleLiveHere posted that recently, he had a leak in a water pipe in a very textured kitchen ceiling. He had to remove a section of drywall to access the pipe and is planning to repair the hole with a patch with extra blocking, drywall, tape, and compound. He’d like to know if there’s any other prep required, such as removing any other damaged, damp drywall or concealing the water stains, which he was planning on painting with a stain-blocker.

The topic of this Q&A Spotlight is: How can this homeowner fashion a drywall patch that blends seamlessly in the surrounding ceiling?

Patching is one thing, but that texture…

Calvin’s advice is to remove any drywall that’s still damp and to square up the hole. He says to fill any voids with compound after fastening the patch and before applying the tape, then to tape and finish. He has less handy advice concerning how to match the texture, though, and recommends that the poster think about hiring a pro.

John Bowne agrees that cutting back the frayed drywall is a good idea. He also suggests scraping back the existing texture around the patch to make a smoother tape job. Other recommendations include using an oil-based primer or Zinsser pigmented shellac to conceal the water stains, and even replacing the entire drywall ceiling.

The original texture technique is the subject of some debate. Bobbomax thinks the finish looks like the texture was applied with a thin layer of diluted mud that was dabbed with a wadded-up plastic bag. He thinks that it’s very difficult to reproduce, and that an earlier post recommending replacing the entire ceiling might be a good idea.

JohnOlson thinks the whole idea of textured ceilings is a bad idea and thinks this particular texture was created by loading compound onto a brush and slapping it onto the drywall.

Our expert weighs in

We asked Myron Ferguson, drywaller and frequent FHB contributor, for his advice, and this is what he had to say:

What I see are two repairs. The first is the drywall repair, which I believe is the easier of the two. The second is matching the texture, which should look good after painting. Hopefully, you noticed the leak, removed the bad drywall, and repaired the plumbing soon enough so that mold did not start to grow.

Your idea of floating two edges of the repair by screwing a furring strip behind the edges parallel to the joists is good. This will make for a smoother repair. First, make sure the drywall is dry before starting the repair. If it is still wet and sagging in places, use a T-support or some other method to hold the drywall up and flatten it out while it dries. (You’ll have a hard time doing this when the drywall has dried out.) Enlarge the hole away from the joists and if possible, remove the damaged and/or stained areas. I have found that is better to remove the stained parts, rather than just sealing them with a stain blocker, especially if you are texturing. The wet texture may pull the stain through, even if sealed.

Before you attach the new piece of drywall, see if you can smooth out the texture with a sharp taping knife or even a sander with a coarse-grit paper at least 12 in. from the hole. Taper the edge of the texture into the surrounding texture. This will be helpful when blending in the texture by minimizing the bump you could create between the old and the new.

I usually use a setting compound to embed the tape and for the first fill coat when doing repairs because it speeds up the process, but you can just use an all-purpose drying-type compound if you prefer. When the repair is finished, make sure the edges are sanded out smooth.

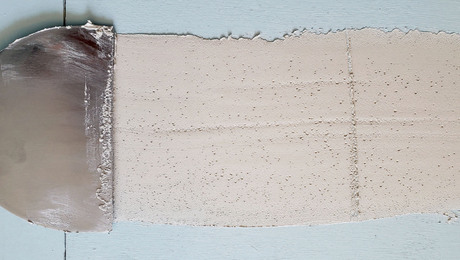
Now to repair the texture. This looks to me like a “stomp” texture; I think it was done with a specially-designed brush, possibly a crow’s foot texture brush. You can use joint compound as your texture material. Just mix up a small batch that’s thinned with a little water, apply it with a ½-in.-nap paint roller, and use the brush to create the texture. Practice on a scrap piece of drywall before trying it on the ceiling. You’ll have to adjust the consistency of the mix until you can create a match.

Because you have the old textured edges tapered out to the smooth patched area, it should be easier to blend. Don’t be afraid to apply the texture over the edge and onto the old texture.

Matching the textures is the hardest part. If the edges don’t blend in perfectly, you can use a sanding or wet sponge to help them blend. If you can’t get the repaired-area texture to match well enough, you may have to consider rolling on a thin layer of compound over the entire ceiling and then using the texture brush to create a more uniform texture.

Another thing to consider, especially if you were able to blend in the repaired-area texture, is that now you will have to paint the entire ceiling. So just as when you do a drywall repair on a smooth surface, you will need to prime the repaired area. I recommend priming the entire ceiling and then finishing with a flat white ceiling paint. You can see how I’ve done this type of repair in a video on my YouTube channel.

Chuck Bickford is a contributing editor. Myron Ferguson is a professional drywaller and certified building-performance analyst.


RELATED STORIES

  • Common Remodeling Drywall Repairs
  • Repairing Water Damage
  • An Easy Textured Ceiling

Sign up for eletters today and get the latest how-to from Fine Homebuilding, plus special offers.

Signing you up...

This site is protected by reCAPTCHA and the Google Privacy Policy and Terms of Service apply.
See all newsletters
See all newsletters
×

Get home building tips, offers, and expert advice in your inbox

Signing you up...

This site is protected by reCAPTCHA and the Google Privacy Policy and Terms of Service apply.
See all newsletters
See all newsletters

New Feature

Fine Homebuilding Forums

Ask questions, offer advice, and share your work

View Comments

  1. r5portals | Mar 09, 2024 03:34pm | #1

    I do better:
    https://plasterrepairhowto.blogspot.com/2016/05/a-16-square-knockdown-texture-field.html

    Sandable acrylic putty is the key. I offer free samples of my own material, that I call Flexible Grout. Please read the header paragraph above the blog post

  2. r5portals | Mar 09, 2024 03:49pm | #2

    Please read more about Flexible Grout at my principal free-sharing blog:
    https://energyconservationhowto.blogspot.com/search/label/Flexible%20Grout

    This is not a commercial leapfrog of Fine Homebuilding resources. Please help me to create demand and availability of this valuable material, ideally through Custom:
    https://www.custombuildingproducts.com/product_categories/grout-materials.

    My material is very similar in application and performance to Custom Fusion Pro, except that my brother's invention is forever sandable. It is best field-mixed for large projects, from equal weights of four common raw materials. Its' first application was in quick and lasting replacement of always-failing silicone, foolishly hiding cracks of hotel bath tile-wall corners.

Log in or create an account to post a comment.

Sign up Log in

Become a member and get full access to FineHomebuilding.com

More Q&A Spotlight

View All
  • Leveling Foundation Walls
  • Tips on Ceiling Repair
  • Fixing Rotted Windowsills
  • Replace Rotten Boards in a Roof Overhang
View All

Up Next

Video Shorts

Featured Story

Fix Air Leaks in Old Houses

Simple air-sealing measures and spray-applied sealant lower energy bills and increase comfort without the need to tear the house apart.

Featured Video

Video: Build a Fireplace, Brick by Brick

Watch mason Mike Mehaffey construct a traditional-style fireplace that burns well and meets current building codes.

Related Stories

  • FHB Podcast Segment: Drywall-Free Half Wall Finish
  • FHB Podcast Segment: A Cost-Effective Approach to Insulating and Air-Sealing Floor Trusses
  • Air Barrier Under Wood Paneling
  • Repairing Damaged Walls and Ceilings

Discussion Forum

Recent Posts and Replies

  • |
  • |
  • |
  • |
  • |
  • |
View More Create Post

Highlights

Fine Homebuilding All Access
Fine Homebuilding Podcast
Tool Tech
Plus, get an extra 20% off with code GIFT20

"I have learned so much thanks to the searchable articles on the FHB website. I can confidently say that I expect to be a life-long subscriber." - M.K.

Get home building tips, offers, and expert advice in your inbox

Signing you up...

This site is protected by reCAPTCHA and the Google Privacy Policy and Terms of Service apply.
See all newsletters
See all newsletters

Video

View All Videos
  • FHB Podcast Segment: A Cost-Effective Approach to Insulating and Air-Sealing Floor Trusses
  • Podcast 503: Not Quite a Scrape-Off, Too Tight for Insulation, and Weather-Beaten Felt Paper
  • Taping Drywall Ceilings
  • Hang Drywall on the Ceiling the Right Way
View All

Drywall

View All Drywall Articles
  • Air Barrier Under Wood Paneling
  • FHB Podcast Segment: Ductwork in a Vented Attic
  • Prevent Bubbles in Joint Compound
View All Drywall Articles

Fine Homebuilding Magazine

  • Issue 330 - April/May
    • Deck Details for Durability
    • FAQs on HPWHs
    • 10 Tips for a Long-Lasting Paint Job
  • Issue 329 - Feb/Mar 2025
    • Smart Foundation for a Small Addition
    • A Kominka Comes West
    • Making Small Kitchens Work
  • Issue 328 - Dec/Jan 2024
    • How a Pro Replaces Columns
    • Passive House 3.0
    • Tool Test: Compact Line Lasers
  • Issue 327 - November 2024
    • Repairing Damaged Walls and Ceilings
    • Plumbing Protection
    • Talking Shop
  • Issue 326 - October 2024
    • Paint Behind Strike Plates
    • Conceal Cut Ends
    • Ladder Slip Solution

Fine Home Building

Newsletter Sign-up

  • Fine Homebuilding

    Home building tips, offers, and expert advice in your inbox.

  • Green Building Advisor

    Building science and energy efficiency advice, plus special offers, in your inbox.

  • Old House Journal

    Repair, renovation, and restoration tips, plus special offers, in your inbox.

Signing you up...

This site is protected by reCAPTCHA and the Google Privacy Policy and Terms of Service apply.
See all newsletters

Follow

  • Fine Homebuilding

    Dig into cutting-edge approaches and decades of proven solutions with total access to our experts and tradespeople.

    Start Free Trial Now
    • Facebook
    • Instagram
    • X
    • LinkedIn
  • GBA Prime

    Get instant access to the latest developments in green building, research, and reports from the field.

    Start Free Trial Now
    • Facebook
    • YouTube
  • Old House Journal

    Learn how to restore, repair, update, and decorate your home.

    Subscribe Now
    • Facebook
    • Instagram
    • X

Membership & Magazine

  • Online Archive
  • Start Free Trial
  • Magazine Subscription
  • Magazine Renewal
  • Gift a Subscription
  • Customer Support
  • Privacy Preferences
  • About
  • Contact
  • Advertise
  • Careers
  • Terms of Use
  • Site Map
  • Do not sell or share my information
  • Privacy Policy
  • Accessibility
  • California Privacy Rights

© 2025 Active Interest Media. All rights reserved.

Fine Homebuilding receives a commission for items purchased through links on this site, including Amazon Associates and other affiliate advertising programs.

X
X
This is a dialog window which overlays the main content of the page. The modal window is a 'site map' of the most critical areas of the site. Pressing the Escape (ESC) button will close the modal and bring you back to where you were on the page.

Main Menu

  • How-To
  • Design
  • Tools & Materials
  • Video
  • Blogs
  • Forum
  • Project Guides
  • Reader Projects
  • Magazine
  • Members
  • FHB House

Podcasts

  • FHB Podcast
  • ProTalk

Webinars

  • Upcoming and On-Demand

Podcasts

  • FHB Podcast
  • ProTalk

Webinars

  • Upcoming and On-Demand

Popular Topics

  • Kitchens
  • Business
  • Bedrooms
  • Roofs
  • Architecture and Design
  • Green Building
  • Decks
  • Framing
  • Safety
  • Remodeling
  • Bathrooms
  • Windows
  • Tilework
  • Ceilings
  • HVAC

Magazine

  • Current Issue
  • Past Issues
  • Magazine Index
  • Subscribe
  • Online Archive
  • Author Guidelines

All Access

  • Member Home
  • Start Free Trial
  • Gift Membership

Online Learning

  • Courses
  • Project Guides
  • Reader Projects
  • Podcast

More

  • FHB Ambassadors
  • FHB House
  • Customer Support

Account

  • Log In
  • Join

Newsletter

Get home building tips, offers, and expert advice in your inbox

Signing you up...

This site is protected by reCAPTCHA and the Google Privacy Policy and Terms of Service apply.
See all newsletters
See all newsletters

Follow

  • X
  • YouTube
  • instagram
  • facebook
  • pinterest
  • Tiktok

Join All Access

Become a member and get instant access to thousands of videos, how-tos, tool reviews, and design features.

Start Your Free Trial

Subscribe

FHB Magazine

Start your subscription today and save up to 70%

Subscribe

We hope you’ve enjoyed your free articles. To keep reading, become a member today.

Get complete site access to expert advice, how-to videos, Code Check, and more, plus the print magazine.

Start your FREE trial

Already a member? Log in