A Deep Dive Into Continuous Exterior Insulation
From durability to energy efficiency, continuous exterior insulation is an accessbile approach to a high-performance wall.
Continuous exterior insulation (CEI) is an added layer of insulation installed to the outside of the structural sheathing. The material options for CEI range from rigid foam to mineral wool to wood-fiber boards, and all have their own specific characteristics and advantages. There are also many ways to install CEI and integrate windows and doors, flashings, rainscreens, siding, and trim. In this article, builder Josh Salinger describes the pros and cons of some material options for CEI, and uses two illustrated examples of CEI installations to describe possible ways to integrate windows and flashing details and keep the control layers clearly defined.
How Birdsmouth Design-Build Does CEI
In our work at Birdsmouth Design-Build in Portland, Ore., we have five non-negotiables that should be part of any new-home build or remodel: durability, health, resiliency, comfort, and energy efficiency. We often include continuous exterior insulation (CEI) as part of our wall assemblies because it addresses all these goals in our climate zone, Marine 4. But CEI can work in all climate zones. It is an effective strategy for builders in cold climate zones looking to improve durability, comfort, and energy efficiency, and those in hot-humid climate zones looking to manage interior moisture and create efficient and comfortable homes. In some areas, it may be the easiest path to meeting the most current energy codes (the 2021 International Residential Code, or IRC). And it can be an effective way to improve an existing home, too, particularly when re-siding.
CEI is an added layer of insulation to the exterior of a wall assembly, installed to the outside of the structural sheathing and behind the cladding. The material options for CEI range from rigid foam to mineral wool to wood-fiber boards, and all have their own specific characteristics and advantages. There are also many ways to install CEI and integrate windows and doors, flashings, rainscreens, siding, and trim. There may be 10 perfectly good ways to build a wall with CEI, but the specific one that you end up choosing will depend on what your team is familiar with, what materials are available, the project budget, the project’s climate zone, and your risk tolerance.
Incorporating all the details required for continuous exterior insulation (CEI) can be a bit of a head-scratcher if you’ve never built this way before. It’s more complex than the typical 2×4 or 2×6 code-built wall that many builders are familiar with, and it can affect the placement of the four control layers—water control, air control, vapor control, and thermal control. In this article I hope to clarify how to choose and install CEI based on some simple building science principles and share two examples of real-world installations with window details.
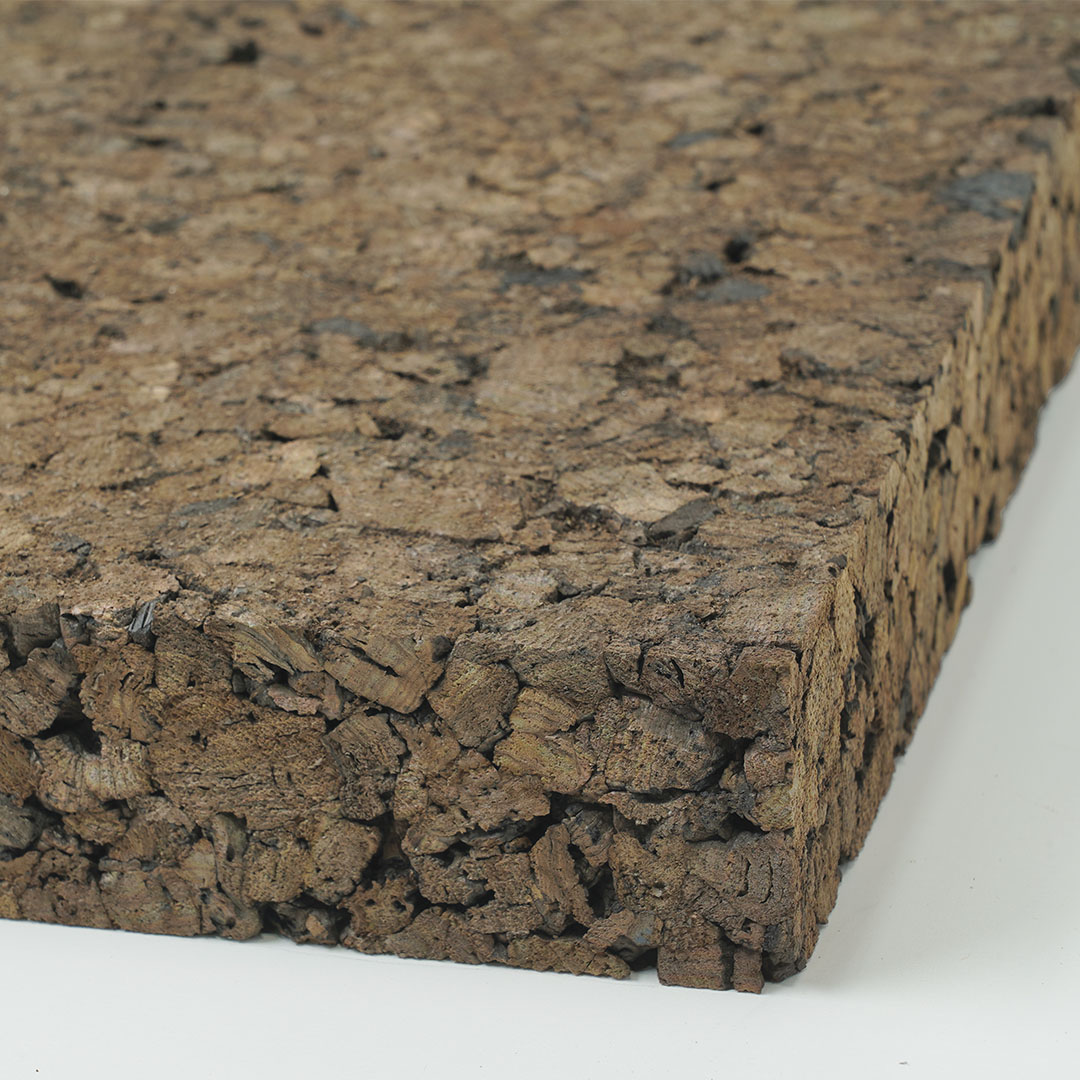
What should I use for CEI?The choices for exterior insulation can be daunting, especially when considering how insulation will affect a particular wall assembly. There are rigid plastic-foam options such as expanded polystyrene (EPS), extruded polystyrene (XPS), and polyisocyanurate (polyiso), with many variations in thickness and facings. There is also mineral wool and wood-fiber boards, which also have various properties. Beyond these common types, there’s cork, fiberglass board, hemp, wool, and more. The characteristics to look for in a CEI material option depend on your project goals. These characteristics include R-value, permeability, whether the material is hydrophilic or hydrophobic, its compressive strength or density, whether it is an air barrier or allows air to pass through it, its embodied carbon and other environmental considerations, how long it can be left exposed to the elements before degrading, whether it experiences thermal drift (the ability for its R-value to degrade with time or temperature), i’s fire-resistance class (typically denoted as Class A, B, or C with A being the most fire-resistant), its cost, and its availability. Other things to consider include how a material is cut and what tools are needed to install it, whether the material is difficult to handle (such as mineral wool, which requires gloves and a mask to install), what fasteners are needed to install it, and if the material has a profile such as an interlocking tongue-and-groove edge that makes installation easier. Any one of these considerations may tip the scales in favor of one material over another. If you’re building in a Wildland Urban Interface zone, the fire rating may take precedent over all others since it will be mandated by the local jurisdiction (and good sense). In other circumstances, a particular choice may be unavailable locally, or the cost may be prohibitive. In others yet, a particular vapor permeance may be beneficial to manage the amount of water vapor entering or leaving an assembly, or the environmental impacts may trump all others from the client’s standpoint. The labor needed to install a more compressive material such as Type 1 EPS or mineral wool, along with the cost of fasteners, may drive a builder toward a less compressive material such as XPS. Avoiding tiny white balls of EPS foam microplastics all over a job site might be a priority; the decision might come down to the ability to cut a crisp 11° angle in cork. The choice is often based on a variety of factors.
|
Do It for the Durability
Among all the benefits of continuous exterior insulation, one benefit stands above the rest: increased durability. Moisture is a home’s biggest enemy, and CEI makes a wall assembly more durable by controlling moisture accumulation at what is typically the least permeable layer of the wall: the sheathing. This isn’t bulk water—that’s controlled by the water control layer—it’s water vapor.
In cold climates during the winter, the air inside of our homes is more humid than the outdoor air. Because of the laws of thermodynamics, water vapor wants to equalize and travel from high concentrations to lower concentrations—a phenomenon called vapor drive. This means that vapor drive in buildings tends to move from inside to outside during winter in cold climates. In hot-humid climates, vapor drives from outside to inside. In both instances, vapor will travel through materials until it reaches a surface that’s the least vapor-permeable, where it may accumulate. If it’s not able to dry, it can lead to mold, rot, and eventually, structural failure.
In a wall assembly, the vapor control layer is the one that is the least permeable (more on permeability to come). In many walls, this is the sheathing, which can either get frost on it or get damp if it is cold enough for long enough. With the right R-value for the climate zone and wall assembly, CEI keeps the sheathing warm enough that this phenomenon is greatly reduced or eliminated, and the potential for mold growth and degradation is reduced, too. This is why a wall with CEI is one of the most durable assemblies you can build.
Of course, durability isn’t the only benefit of continuous exterior insulation. Another important benefit is increased R-value and reduced energy losses via thermal bridging. Thermal bridging is the movement of heat energy via conduction from warm areas to cold areas. In common wood-frame wall construction, with studs every 16 in. or 24 in. on center and insulation only in the stud cavities, the studs (and plates, headers, etc.) have a R-value of only about R-1.25 per in. Even though the cavity insulation can be as much as R-5 per in. or higher, heat energy will travel along the more thermally conductive studs and be lost to the universe if there is no thermal break.
This is where CEI comes into play. In a typical 16 in. on-center wall, about 25% of the wall is solid wood. This represents a large potential for thermal losses. By placing CEI to the outside of the wall, this thermal bridge is broken and the energy losses are stemmed significantly. This not only leads to a more energy-efficient building with smaller HVAC loads, but also creates a more comfortable home for the occupants. It’s like having a warm sweater wrapped around your building.
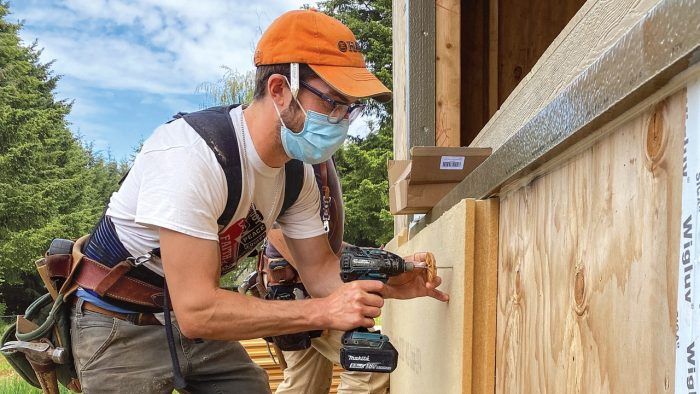
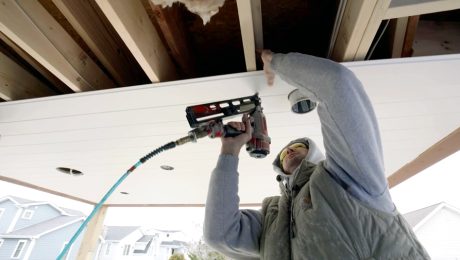
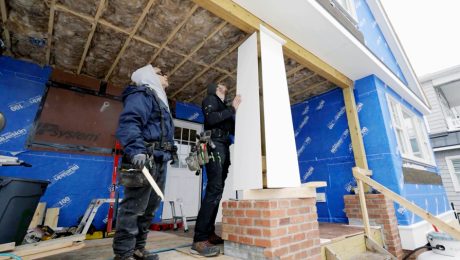
Bucking the Thermal Bridge Installing flanged windows on walls with CEI can be a head-scratcher. How do you attach the flanges if there is insulation in the way? How do you flash the window to the water control layer? What about connecting the air barrier? If the CEI is compressive, how does the flange not squish into the CEI or get damaged during installation? ThermalBuck is a product designed to address all these issues and simplify the installation of flanged windows in a CEI wall while breaking a common thermal bridge. It extends the mounting point to be flush with the continuous exterior insulation or rainscreen battens and allows for a successful integration of the four control layers. The installation of the flanged window with this product is straightforward and should be familiar to builders. One difference is that the window fasteners are longer than a typical installation and penetrate through the buck and directly into the framing of the window rough opening. ThermalBuck has been lab tested and shown to carry large, heavy windows with very little deflection, and has passed lab testing for air infiltration and water penetration, so there should be no worries about its structural performance or issues with compromising the control layers. You can find it at thermalbuck.com. |
Perms Are Important
The materials that you may consider for CEI have a range of properties from R-value to fire resistance (see the material write-ups above), but one characteristic will have a significant impact on how a wall assembly works, and that’s permeability. There are some products, such as mineral wool or wood-fiber board, that are vapor open—water vapor can readily pass through them—and others, such as foil-faced polyisocyanurate (polyiso), that are considered vapor-closed—water vapor isn’t effectively able to pass through. Specifically, the vapor permeability of a product is expressed in perms. The lower the number, the less permeable the material is.
It’s important to note that the perm rating of a product is often related to its thickness, and increasing the thickness will decrease the permeability. For example, extruded polystyrene rigid foam (XPS) may have a rating of 0.52 perms per in. If you install 2 in. of the product, the rating halves to 0.25 perms. If you add another inch, it halves yet again to 0.125. At this point, water vapor will effectively be stopped from passing through the material. This isn’t necessarily a bad thing, but it is important to know that a wall with 3 in. of this XPS will not be able to dry to the exterior, so you’ll need to be sure that it can dry to the interior.
Having a low-perm material on the exterior in hot-humid climates can be an effective strategy because here, vapor wants to move inward for much of the year. This mitigates water vapor diffusion from the moister outdoor air and the potential for accumulation on the cool back side of the drywall. A good rule of thumb is to create a warm-side vapor-control layer, which essentially means that the lowest-perm material is always on the warm side of the assembly, no matter the climate.
Another rule of thumb is to avoid a wall that can’t dry in either direction (sometimes referred to as a “double vapor barrier”). The classic example is a thick layer of foam insulation on the exterior and vinyl wallpaper on the interior. Unable to dry, any moisture that gets into this assembly can quickly turn the wall into mulch.
Finally, you may also see vapor permeability expressed in classes, particularly as the IRC refers to “vapor retarders,” which are materials used to slow or limit vapor drive. There are three classes: A Class I vapor retarder has less than 0.1 perms. A Class II vapor retarder has between 0.1 and 1.0 perms. A Class III vapor retarder is between 1.0 and 10 perms. Anything over 10 perms is considered vapor open—it doesn’t appreciably slow the movement of water vapor. So, to know if your CEI qualifies as one of these classes of vapor retarders, you’ll need to know its perm rating.
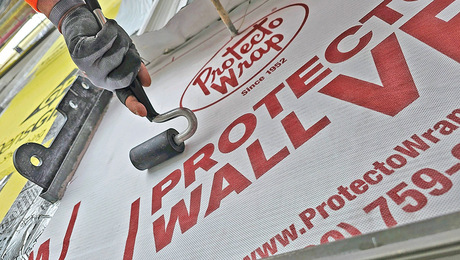
Another aspect of CEI materials is whether they are hydrophilic or hydrophobic. This refers to the material’s ability to either wick water (phylic, or “love”) or shed water (phobic, or “aversion”). Continuous exterior insulation such as paper-faced polyiso is hydrophilic and will happily lap up water. Others, such as some of the wood-fiber boards, are also more toward the hydrophilic end of the spectrum. When using insulations such as these, it is smart to place the water-resistive barrier (WRB) to the outside of the CEI as this will keep bulk water from damaging the insulation. Of course, you can place the WRB outside of any CEI, and there may be good reasons for it. For instance, if you want to install a flanged window and detail the WRB and flashings in a manner that most closely resembles a typical install, you can put the WRB to the outside.
Other CEI products such as mineral wool or XPS are hydrophobic and their performance isn’t significantly affected by water. With these products, you could install the WRB to the inside of the CEI, but each material will not act exactly the same. Mineral wool will readily drain water through itself while XPS can trap bulk water between itself and the sheathing. If you are using a plastic-foam product like XPS, assume that at some point in the building’s life, water will get behind it. This is why it is recommended to use a bumpy or crinkled WRB behind the foam, to create enough space between the insulation and the sheathing to reduce hydrostatic pressure and allow water to drain via gravity. This has no appreciable effect on the thermal performance of the continuous exterior insulation. Of course, if you are using a drainable WRB, you will want to detail the flashings to the WRB, so windows or window bucks will be installed at the structural sheathing plane.
CEI At Work: XPS With Flanged Outie WindowsFor any wall assembly, we need to define the four control layers. Here, the bulk water control layer will be the WRB, which is set to the outside of the XPS insulation. The air control layer is the plywood sheathing with taped seams. The vapor control layer will be the XPS CEI. At 1.5 perms per in., this is the least-permeable component in the assembly (at 2 in., it will be 0.75 perms, or a Class II vapor retarder). The thermal control layer of this wall begins with the drywall, and includes the 5-1⁄2 in. of dense-pack cellulose in the stud cavities, the sheathing, and the XPS exterior insulation, for a total nominal R-value of approximately R-32. 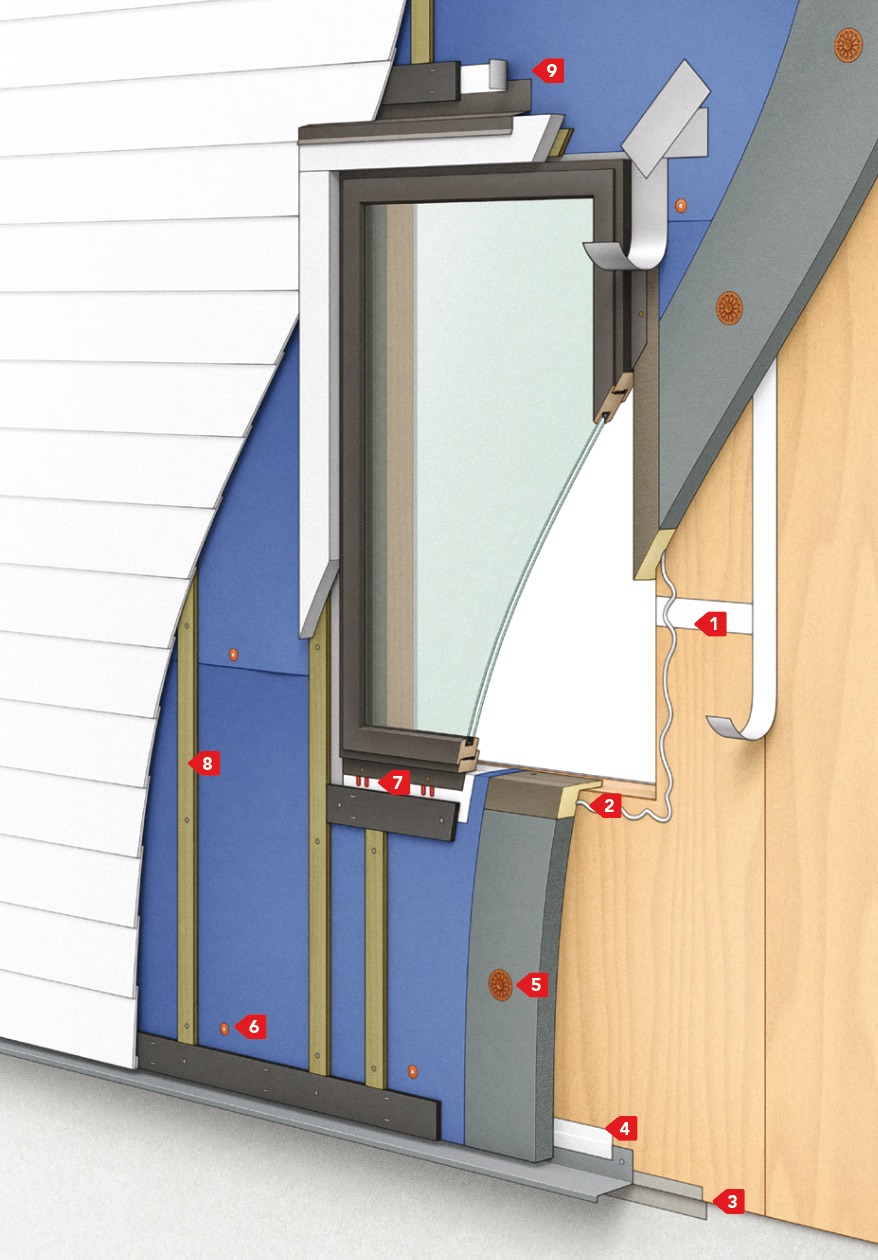
|
CEI Thickness: It’s About R-Value
There are several factors that influence the optimal thickness of CEI. It may be the local jurisdiction’s energy code, the cost implications of using thicker continuous exterior insulation and long fasteners, the climate zone, energy-efficiency targets, program goals such as Passive House or LEED, the relative thickness of the CEI in relation to the thickness of the interior insulation, embodied carbon, or aesthetic choices. From a durability perspective, you want to make sure the CEI is thick enough to keep the sheathing warm and prevent moisture accumulation. And this is why it’s more important to think about R-value than thickness.
One thing to be cognizant of is that the greater the R-value of the interior cavity insulation, the colder the sheathing is likely to be in the winter. It is important to be sure that the proportion of interior to exterior insulation isn’t decreasing the effectiveness of the CEI from keeping the sheathing warm. It is possible to calculate this ratio based on the R-value of a wall’s cavity insulation, or you can reference Table R702.7(3) in the IRC, which provides minimal R-values for CEI by climate zone for 2×4 and 2×6 walls.
From a practical installation perspective, any exterior insulation more than 1 in. thick will require a nontypical-length fastener, which can get expensive, require special tools, or be time consuming to install. To support most claddings on furring strips or battens, the fastener must be set at least 11/2 in. into the framing. Assuming at least a ½-in. rainscreen batten, 1 in. of CEI, and ½-in. sheathing, this would require a 3½-in. fastener—a common 16d nail that most framing guns are designed for. Going more than 1 in. thick with the continuous exterior insulation means switching to either a specialty framing nailer that shoots larger nails (our Bostich BRT130 nailer can handle nails up to 51/8 in. long) or using a structural screw, which can slow production and add both labor and material costs.
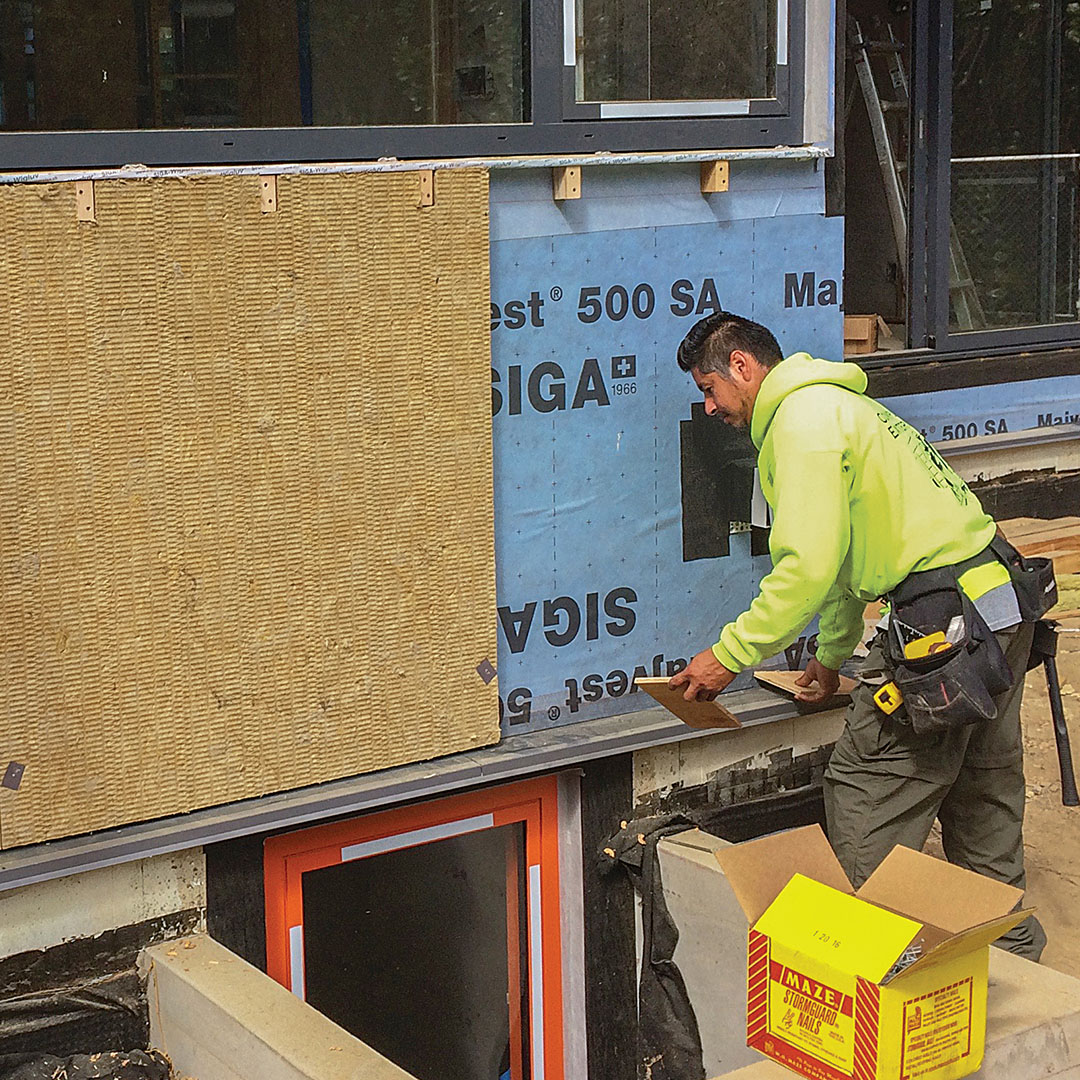
CEI at Work: Mineral Wool With a Flangeless Innie WindowsOn this assembly, the water and air control layers are combined in a self-adhered membrane. The thermal control layer includes the gypsum board on the interior, 5-1⁄2 in. of dense-pack cellulose in the wall, 1⁄2-in. plywood sheathing, and then two layers of 1-1⁄2-in. mineral-wool insulation with seams offset from one another for a total of 3 in. of CEI. The total R-value is around R-34. The vapor control layer in this assembly will be the plywood sheathing, as it is the least permeable of all the components. The latex-painted drywall is permeable enough for the wall to dry to the interior. However, with a vapor-open WRB and mineral-wool CEI, this wall assembly will also allow for drying to the exterior. 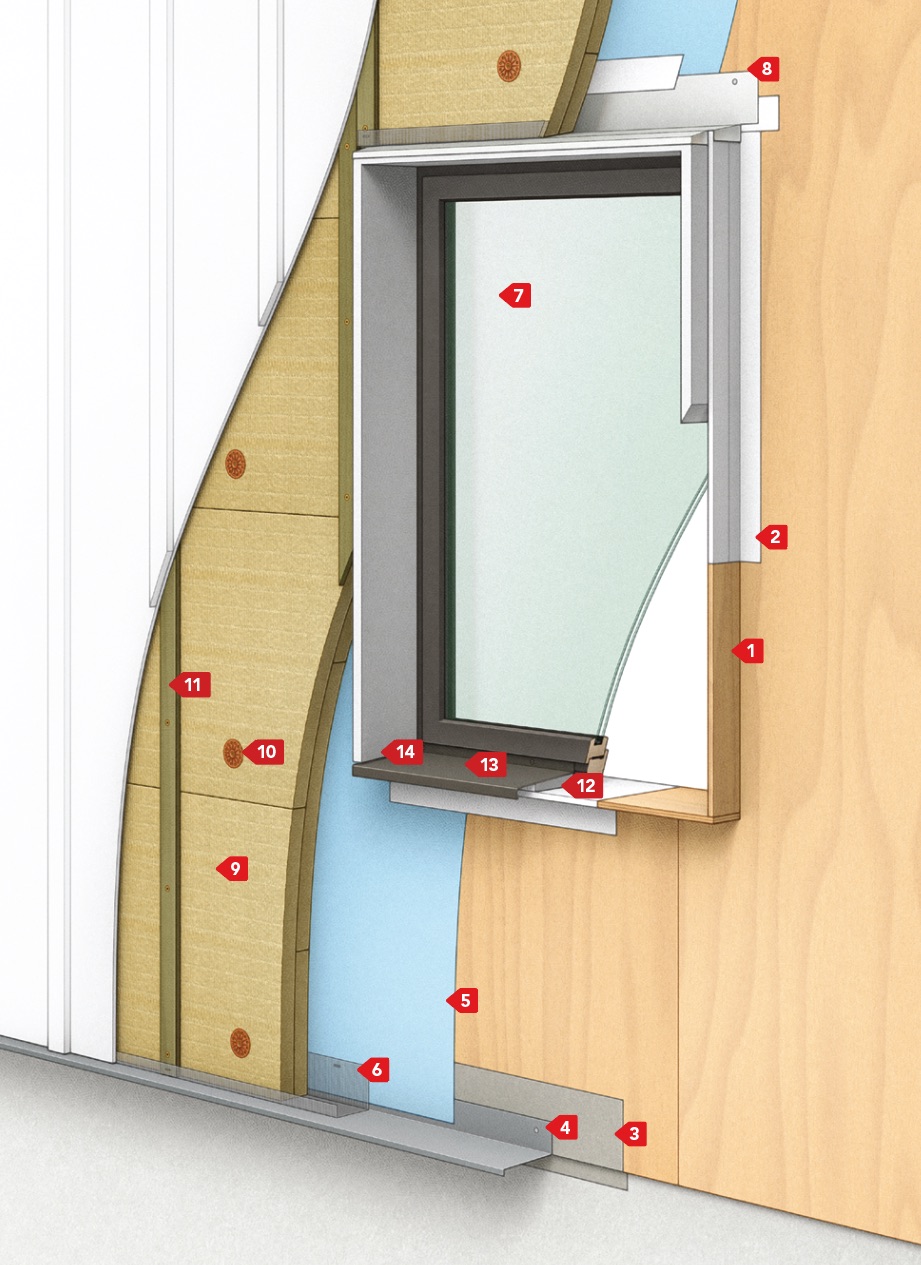
|
Continuous Control Layers Are the Goal
In a wall with the structural sheathing as the outermost layer, the installation of the four control layers along with the windows and doors is straightforward, with many tried-and-true options to choose from. However, as soon you add CEI to the outside of the sheathing, you are potentially changing the locations of the control layers and affecting the how windows and doors are installed, how siding is fastened, and how penetrations are flashed.
For an “outie” window, for example (one that is installed at the same plane as the continuous exterior insulation), the WRB may need to be installed to the outside of the insulation, as mentioned earlier. This way, a flanged window can be used and integrated with the WRB. You can still locate the air barrier at the sheathing by taping the seams. If this wall has XPS CEI, it will be the vapor control layer too because it is less permeable than the plywood sheathing. The thermal control layer is the entirety of the wall from the drywall, through the cellulose insulation, including the plywood and the XPS itself because all of these materials have an R-value and are in contact with one another. This may be the method most easy for a first-time builder to adopt, particularly with the ThermalBuck used for window installation.
If a flangeless window is installed in the middle of the wall—an “innie” window—and mineral-wool CEI is used, the control layers might be arranged differently. A self-adhered WRB could be applied to the sheathing to act as both bulk water control and the air barrier. Because the mineral wool and the WRB are vapor open, the vapor control layer in this assembly is the plywood sheathing, as it is the least-permeable component. Thermally, the mineral wool is still doing the job of keeping the sheathing warm enough to prevent moisture accumulation. Again, the thermal control layer includes everything from the interior gypsum all the way to the exterior edge of the mineral wool. This assembly, with 3 in. of mineral wool CEI (as shown in the drawing to the left), demonstrates a bit higher-performing foam-free wall that could be used in a cold climate. However, integrating the flangeless window in a site-made plywood buck with a self-adhered WRB and rainscreen details may be a bit more challenging to the uninitiated.
Both of these examples use different materials, arranged differently, but the four control layers are all present and the sheathing is kept warm enough by the CEI material to minimize moisture risks. No matter what continuous exterior insulation material you choose, and where you decide to install windows, this should be your goal.
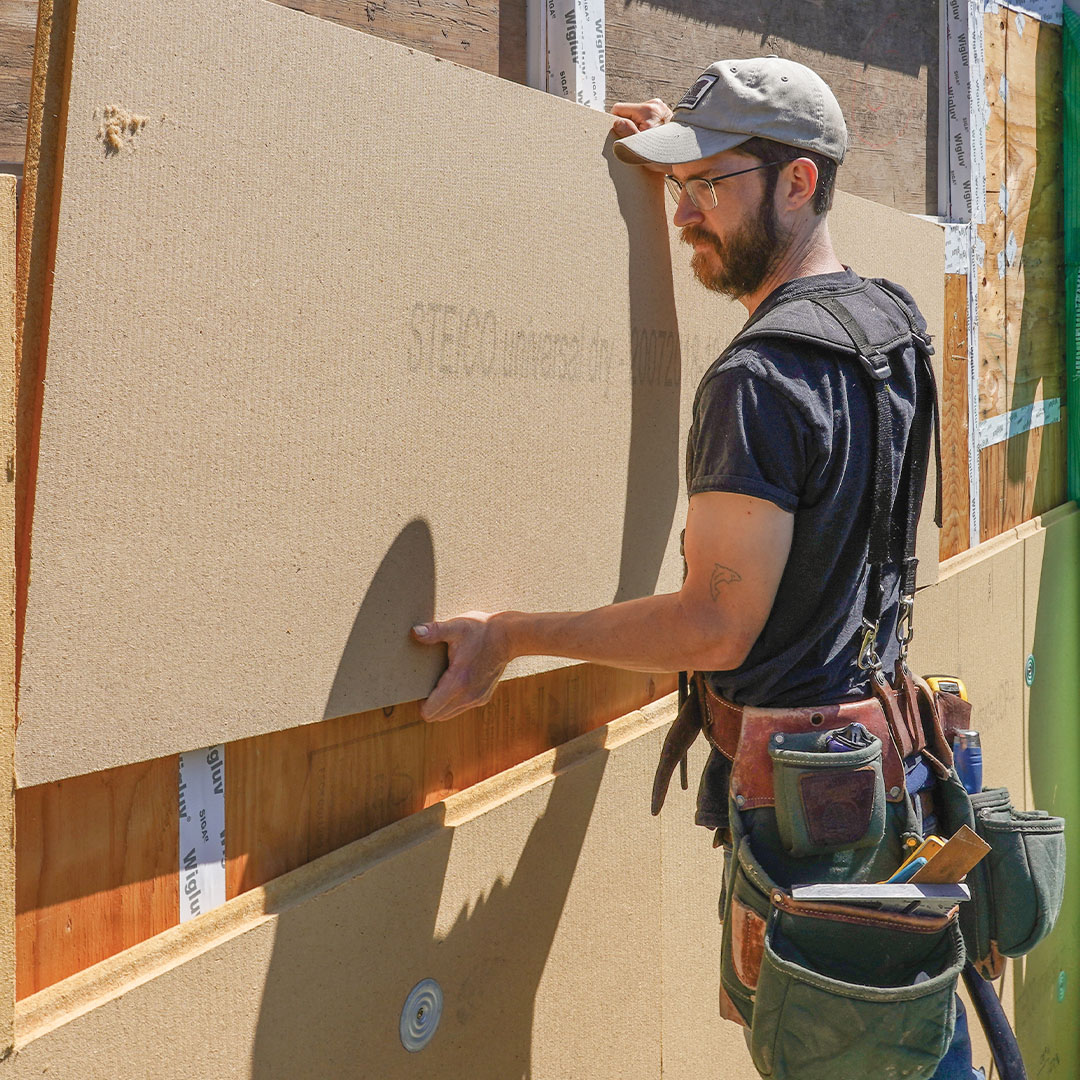
Installation NotesCertain CEI materials may be easier to cut, handle, and install than others. Some, such as cork or wood-fiber board, can be cut with a circular saw, can hold a crisp angle, and don’t create noxious smells, drifts of plastic balls, or splinters. That said, cutting wood-fiber board on a hot day will gunk up your sawblade, and the fibers do stick to the installer. Other materials, such as the foam plastics, can be cut with a utility or drywall taping knife, or a handsaw, but cutting a whole home’s worth of foam board with a knife may be inefficient and more difficult with higher-density foam. Hot wire cutters can melt through the plastic foams, but create a pretty noxious smell. For others, such as mineral wool, a serrated knife works well where a utility knife would dull quickly and tear the material. 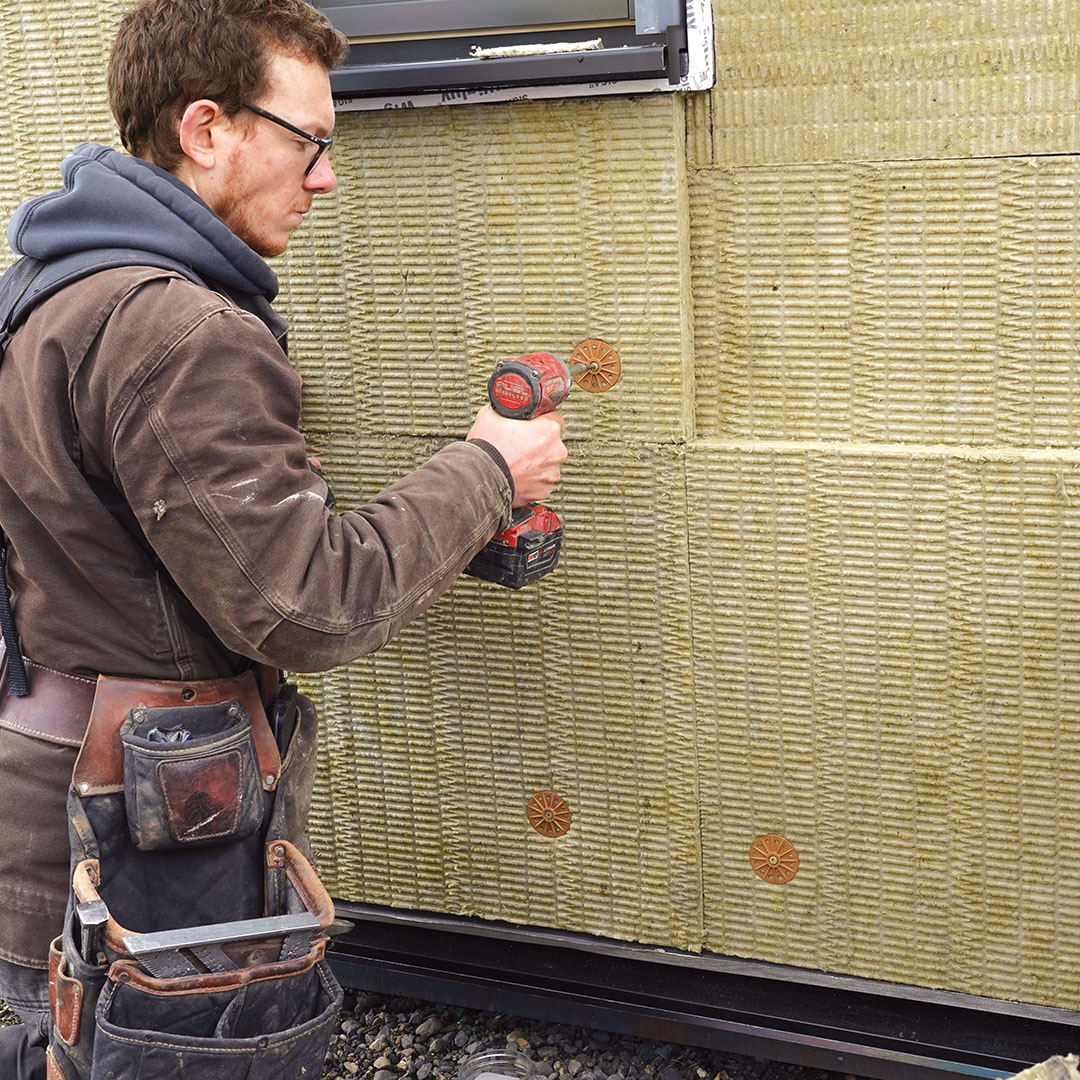 Other characteristics, such as the panel-edge profile, can also make installation easier. Some products, such as cork and wood-fiber board, have a tongue-and-groove profile that locks one piece into the next. One nice thing about this profile is that you can avoid the small gaps you often get when butting the edges of two flat-edged sheets together. With a tongue-and-groove product, the tongue keys into the groove of the adjacent piece, mitigating the gap and creating a more continuous thermal layer. With a flat-edged panel, builders sometimes use multiple layers of continuous exterior insulation to offset the seams and create a continuous layer, especially with some of the foams that are prone to shrinkage. The tongue-and-groove profile also means that the board edges don’t have to land on the framing layout. Compressivity of exterior insulation is also something you’ll need to consider. It’s common that siding over CEI is installed on furring strips or battens to create a rainscreen gap. When aggressive structural screws are used to fasten the battens, they can deform the CEI. EPS foam comes in various densities, for example. A Type 1 EPS foam can support about 5 lb. per sq. in. (psi), whereas a Type 9 may support 25 psi or more. Wood-fiber and mineral-wool boards are rated at 10 psi and 11 psi, respectively. These more-compressive materials can easily be crushed, which can lead to all sorts of headaches when installing siding. The goal here is for the rainscreen battens to be in plane for flat and smooth siding. One solution is to use a screw that has a reverse thread at the top that can be backed in and out to adjust the battens. These fasteners can be expensive, though. XPS, polyiso, and cork can have ratings between 25 psi and 60 psi, which means that even the most aggressive fasteners won’t crush them. |
It Works for Us
There are other high-performance walls that work, and plenty of builders that have found a wall system that works for them. But if you are looking to build a high-quality home in any climate zone that will stand the test of time, there aren’t many wall assemblies that can boast the same level of durability from a practical and science-based perspective as one with CEI. Keeping the vapor control layer warm, be it in the winter in a cold climate or in an air-conditioned home in a hot-humid climate, prevents moisture accumulation and prevents mold, decay, and damage. For our company and our goal of designing and building high-quality, healthy, and long-lasting homes that minimize their impact on the environment, CEI has become the solution of choice. It is my hope that understanding the concepts behind why continuous exterior insulation is an effective option and seeing some real-life installations will help bridge these gaps.
— Josh Salinger is the owner of Birdsmouth Design-Build in Portland, Ore. Photos courtesy of the author, except where noted.
RELATED STORIES
- Exterior Insulation: Strategies for Success in the Field and Staying on Budget
- The Case for Continuous Insulation
- Install a Window in a Wall With Continuous Exterior Insulation
This post contains affiliate links, which means Fine Homebuilding may receive a small commission, at no cost to you, if you make a purchase through a link. As an Amazon Associate we earn from qualifying purchases.
Fine Homebuilding Recommended Products
Fine Homebuilding receives a commission for items purchased through links on this site, including Amazon Associates and other affiliate advertising programs.

Disposable Suit

Caulking Gun

Respirator Mask


View Comments
How would you install/frame a door with CEI on the walls? I cannot seem to find any resources on this aspect. TIA.
Hi Jonas,
The short answer is that doors can be installed very similarly to windows, generally with a buck that spans the framing, insulation, and any additional wall width from a rainscreen or other siding detail. Flashing all around the door can also be similar to windows.
You can install the door at the plane of the exterior wall, sometimes called an outie installation, or inset the door in plane with the interior wall, sometimes called an Innie installation. In either case, you'll need to install extension jambs on one side of the door or the other.
When installing a door to the exterior with thick walls, sometimes you need to modify the interior to allow the door to swing fully open. I've seen splayed and stepped openings for this. You also may need to find a way to support the sill if it extends out over insulation. We covered that recently, for concrete slabs, but something similar can be done on a wood framed floor, even if it means losing a bit of insulation below the door to nail on blocking. Check out: https://www.finehomebuilding.com/2024/07/16/supporting-doors-over-foundation-foam
If you install the door to the interior, you'll need to extend the sill towards the exterior too. You can buy sill extenders, but this is generally a custom solution that I have seen executed in a number of ways - wood, stone, tile, etc. - but no matter how you solve it, it is important to keep that sill extension sloping to the exterior. You may need to raise the bottom of the door, or drop the subfloor below the door, to make this work.
I'll send the author a link to this question and maybe he'll hop on an add some details. In the meantime, this may also be helpful: https://www.finehomebuilding.com/2012/07/12/windows-and-doors-in-double-stud-walls
Hi Jonas,
I think Brian did a nice job with his response and I also recommend the links he provided.
Installing doors is a lot like installing flangeless windows (or vice-versa). People often ask how to install flangeless windows when they have been installing doors without flanges for a long time, but I digress...
As Brian mentions, one needs to determine where to locate the door in the wall assembly, either towards the interior or exterior. We typically install them to the interior for a number of reasons, one is that we can bear the weight of the often heavy doors directly on the foundation stem wall (typically over a structural thermal break, such as a Type IX EPS foam). The other reason is that with an inswing door, one wants to be able to open it greater than 90 degrees. Setting them to the interior also protects the doors and the interiors from rain and weather, too.
As is shown with the plywood window buck in the article, one can extend the buck to flush out with the CEI and then install one's door wherever one chooses within this buck. The door is installed with fasteners through the jamb or with clips. Then one can use tapes, gaskets or sealants to connect the air, water, vapor and thermal control layers. Water control on the exterior on the top and sides and air control from the interior on all four sides. Then one can craft extension jambs for the interior or exterior (or both if somewhere in the middle) to finish it out.
The sill pans will need to be attached to the door threshold on the exterior (or on nicer Euro-style doors, tucked into a groove beneath it) and sloped to the exterior. We have had good luck with off the shelf sill extenders that we purchase at a local hardware supply store. As always, one will want to make sure one preps the rough opening to drain positively to the exterior and give the water an escape path to drain away to. It is worth sketching this detail out on paper at a minimum (or have your designer draw it) to make sure you have the correct height, positive drainage, and control layers all detailed correctly.
The challenge with doors in exterior insulation is making sure to connect all four control layers successfully. I find it useful to draw the control layers in different colors on the plans to make sure they are comprehensive. I do this prior to the install so I can be efficient when handling large and expensive doors. I use red for air, blue for water, green for vapor and yellow for thermal. Be sure to flash the head of the door on the exterior and depending on one's insulation choice and trim detail the flashing strategy may change. Either way one will want to make sure to connect the flashing to the primary water control layer and not just the 'water shedding layer'