FHB Logo Facebook LinkedIn Email Pinterest Twitter X Instagram Tiktok YouTube Plus Icon Close Icon Navigation Search Icon Navigation Search Icon Arrow Down Icon Video Guide Icon Article Guide Icon Modal Close Icon Guide Search Icon Skip to content
Subscribe
Log In
  • How-To
  • Design
  • Tools & Materials
  • Restoration
  • Videos
  • Blogs
  • Forum
  • Magazine
  • Members
  • FHB House
  • Podcast
Log In
Video

Creating and Installing PVC Tapered Columns

Watch Justin Cline demonstrate how to craft tapered columns using PVC VERSATEX sheets for a clean and symmetrical finish.

By Justin Cline

Sponsored by VERSATEX

In this video we follow Justin Cline, lead carpenter at Eldon Builders, into the shop where he breaks down 3/4-in. PVC VERSATEX sheet goods to make the parts for the tapered columns detailed for the front of the house. Before heading to the job site, Justin will glue and assemble the parts into half-columns for transport and installation.

Justin Cline: Today, we’re going to produce a couple of tapered columns for the front elevation of the building. Ultimately, it ends up as a trapezoid. So, one of the bigger challenges that I face is making sure that both angles on each side mirror and are symmetrical to each other.

Narration: The first step is to rip the 4×8 sheets in half to make manageable-size pieces. Then, using a half-sheet, Justin snaps a reference line dead center to lay out the taper.

Justin: For everything I do, that establishes my center and that makes sure I’m perfectly mirrored on either side for this taper. So, I’m going to start off my center, 9-1/4-in., and verify. I have 18-1/2 in—that’s my base. That is what the drawing has specified. So, now I have these marks the same to the center and I’m going to put my height, 7-1/4-in.

This is the top, which is smaller in dimension than the bottom. So, it’s very important that I just continue to work everything back off my center mark. It will produce a perfectly mirrored edge every time. Okay, so now I’m going to connect one dot to the other and I’ll have that at a 45° bevel because these are going to be mitered to produce a nice clean edge. So, now I just line up my other side mark to mark. Cut that with the track saw. That is our tapered piece.

Next, before I make my template, I’m going to cut this to length. These are a couple of off blocks here. All that does is hold my track up, so we get a nice flat cut. This is exactly what I want. Perfectly mirrored, symmetrical, and now I will make a template off of this. So, to do that, line up one edge here flush. Make sure we’re nice and flat. All I do is trace this outline. You can pretty much use any type of plywood. I chose to use MDF here because it’s easy enough to work with and it’s rigid but lightweight. So, now I have a template and I can make multiple pieces exactly the same.

Narration: Using the template, Justin makes quick work of tracing and cutting until all the parts are ready for glue up.

Justin: So, for the glue up I’m going to use the tape method. So, right now I’m tearing off a couple pieces of tape, 6 to 8 in. long, I’d say. We’re going to stick them down to the show side of our tapered column wrap, and I will flip this over. So, here I have the sticky side of the tape up. Push those miters right against each other, and line up our top edge. We’ll also be flush at the bottom edge. Just give it a little bit of extra pressure here where we have our tape, and now we just need some glue.

I like to aim for the middle of that 45° miter. Gravity is going to push that adhesive down a little bit. I like to wait usually just a few seconds. The adhesive will warm up the cells in the VERSATEX and that will give you a longer time to work it. I like to get the miter tight, put a shot there, and I check that my tape is still holding.

Now, I use the tape to act as a clamp—you like it, you just stick it. The tape does not have a really strong adhesive on it, so it’s more of just a short term. I’m going to go back over and check my miter. If I have any troubled spots, I use a stainless-steel trim screw. It gives me a little bit of mechanical fastening to kind of stop any sort of risk of damage in transport and that’ll lock the miter together until your glue sets up. Now that I got all the pieces together that I can here in the shop, it’s just a matter of getting it to the job site and putting it together.

Preparing to install tapered columns on-site

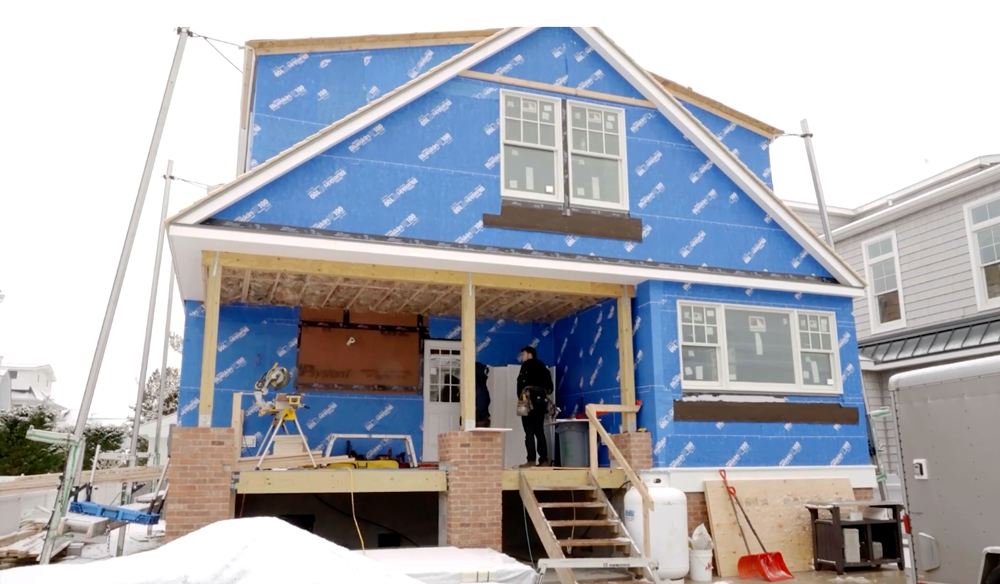
Today we’re on the front entry. This is the elevation. I have a contiguous band that integrates the window trim. It’s going to wrap around here. Everything maintains a nice, straight level line. So, here I have a line. That height is the contiguous band, and trim, and tablature that runs around the front elevation.

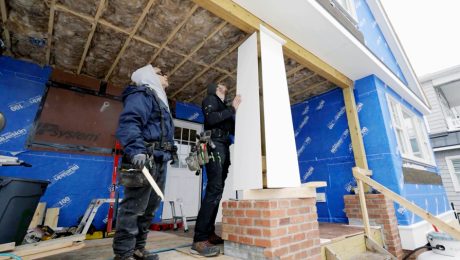
So, right now I am just making my marks a little bit bolder, which are my centerlines of the pier and I go up plumb from there through the post, so I have something to reference for framing out the differences in the post. So, here I have my height marked out and labeled. I have a center mark to reference for plumb. That gives me positive alignment and I’ll fasten that for solid backing. I have my arrow; make sure we don’t switch it around with this gentle taper. So, here the tapered column is held just above the bluestone cap that will be installed later. It does not fit to the concrete you see here.

So, when I put the blocking on, I won’t actually cut this square. It’ll have a 1.5° angle that matches the tapered column we have produced. That is consistent on the top as well as the bottom. I leave my blocks just a hair short in length. This gives me space to maneuver the VERSATEX tapered column to fit for plumb. So, here I’m just making sure everything lines up the way I need it to. This block is the same as the other side. Again, this is just an alignment thing. Center mark is good hitting my other block. This is all level and square to the pier.

Narration: Before bringing in the first column section, Justin mills up half a cap piece to use as a guide for placement.

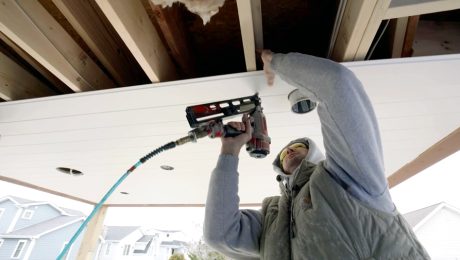
Justin: The top of this VERSATEX cap is on my level reference line that wraps around the house. I have a center mark and a center mark lining up here; a center mark and a center mark over here. Packing fits that same centerline. This capital was glued up perfectly square. Now, it’s just a matter of fitting my column to it. We’ll tack that down. I’m going to use an 18-ga. nailer for this. If I need to move this around later for whatever reason, I can simply just bend the nails over.

Narration: For temporary support, Justin packs out the base with 2x scraps. Then he bridges the tapered blocking for more fastening substrate, installing a 2x nailer that mirrors the angle.

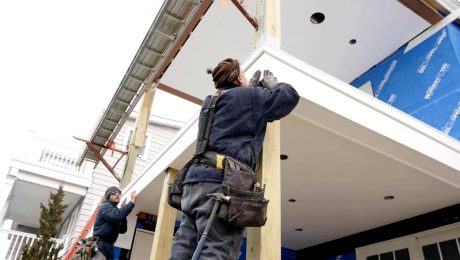
Justin: Here I have the VERSATEX tapered column wraps. I’m just going to transfer some center marks for reference that lineup on the framing. My top is secure. Again, lining up my center marks that I have on my pier as well as my capital. I was happy with my fit. My miters fit good. All my centerlines lined up. Just got to put an additional nail or two in and we’re ready for the glue. Okay, so for here, we have a larger-scale glue up, so we’ll do each joint at the same time.

We’ll do a nice generous bead here, right down the middle. Plenty of surface area for this glue to stick to. Okay, let’s put the piece up. We will use the 18-ga. brad nailer on any slight discrepancies, but the screws do most of the work until the glue sets up. It’s a nice strong bond and we’ll wipe away any excess glue from the pressure of squeezing out. I’m really happy with this fit on my tapered column. Now we’ll do a capital and a base at the time when we finish the rest of the trim on the house.

RELATED STORIES

  • Rejuvenating an Old Porch
  • Installing PVC Trim in a Coastal Environment
  • Making Classical Columns

Sign up for eletters today and get the latest how-to from Fine Homebuilding, plus special offers.

Signing you up...

This site is protected by reCAPTCHA and the Google Privacy Policy and Terms of Service apply.
See all newsletters
See all newsletters
×

Get home building tips, offers, and expert advice in your inbox

Signing you up...

This site is protected by reCAPTCHA and the Google Privacy Policy and Terms of Service apply.
See all newsletters
See all newsletters

Videos in the Series

  • Installing a PVC Porch Ceiling

    Justin Cline of Eldon Builders demonstrates the process of installing VERSATEX Stealth Beadboard on a porch ceiling during a comprehensive house remodel .

  • Wrapping PVC Box Beams

    Learn how Justin Cline builds out box beams with VERSATEX PVC trimboards in the shop before installing them on-site.

  • Creating and Installing PVC Tapered Columns

    Watch Justin Cline demonstrate how to craft tapered columns using PVC VERSATEX sheets for a clean and symmetrical finish.

New Feature

Fine Homebuilding Forums

Ask questions, offer advice, and share your work

About This Video Series

Sponsored by VERSATEX In this job-site video series, Justin Cline of Eldon Builders walks through the process of trimming out a porch remodel on the coast of New Jersey. Watch Justin demonstrate installation tips, techniques, and best practices to join and install VERSATEX PVC trim to combat expansion and contraction in a coastal environment with quality craftsmanship.   More about this Video Series

Log in or create an account to post a comment.

Sign up Log in

Become a member and get full access to FineHomebuilding.com

Up Next

Video Shorts

Featured Story

Fix Air Leaks in Old Houses

Simple air-sealing measures and spray-applied sealant lower energy bills and increase comfort without the need to tear the house apart.

Featured Video

Video: Build a Fireplace, Brick by Brick

Watch mason Mike Mehaffey construct a traditional-style fireplace that burns well and meets current building codes.

Related Stories

  • English Arts & Crafts Sensibility at Rumford Hall
  • Fastening an Exterior Door With Brick Mold
  • Hazard-Free Hot Tubs
  • 10 Tips for a Long-Lasting Paint Job

Discussion Forum

Recent Posts and Replies

  • |
  • |
  • |
  • |
  • |
  • |
View More Create Post

Highlights

Fine Homebuilding All Access
Fine Homebuilding Podcast
Tool Tech
Plus, get an extra 20% off with code GIFT20

"I have learned so much thanks to the searchable articles on the FHB website. I can confidently say that I expect to be a life-long subscriber." - M.K.

Get home building tips, offers, and expert advice in your inbox

Signing you up...

This site is protected by reCAPTCHA and the Google Privacy Policy and Terms of Service apply.
See all newsletters
See all newsletters

Video

View All Videos
  • FHB Podcast Segment: When to Use Coil Stock on Fascia and Rake Trim
  • Wrapping PVC Box Beams
  • Installing a PVC Porch Ceiling
  • Creating and Installing PVC Tapered Columns
View All

Trimwork

View All Trimwork Articles
  • Template for Bullnose Base Corners
  • Simple Miter Measurements
  • Conceal Cut Ends
View All Trimwork Articles

Fine Homebuilding Magazine

  • Issue 330 - April/May
    • Deck Details for Durability
    • FAQs on HPWHs
    • 10 Tips for a Long-Lasting Paint Job
  • Issue 329 - Feb/Mar 2025
    • Smart Foundation for a Small Addition
    • A Kominka Comes West
    • Making Small Kitchens Work
  • Issue 328 - Dec/Jan 2024
    • How a Pro Replaces Columns
    • Passive House 3.0
    • Tool Test: Compact Line Lasers
  • Issue 327 - November 2024
    • Repairing Damaged Walls and Ceilings
    • Plumbing Protection
    • Talking Shop
  • Issue 326 - October 2024
    • Paint Behind Strike Plates
    • Conceal Cut Ends
    • Ladder Slip Solution

Fine Home Building

Newsletter Sign-up

  • Fine Homebuilding

    Home building tips, offers, and expert advice in your inbox.

  • Green Building Advisor

    Building science and energy efficiency advice, plus special offers, in your inbox.

  • Old House Journal

    Repair, renovation, and restoration tips, plus special offers, in your inbox.

Signing you up...

This site is protected by reCAPTCHA and the Google Privacy Policy and Terms of Service apply.
See all newsletters

Follow

  • Fine Homebuilding

    Dig into cutting-edge approaches and decades of proven solutions with total access to our experts and tradespeople.

    Start Free Trial Now
    • Facebook
    • Instagram
    • X
    • LinkedIn
  • GBA Prime

    Get instant access to the latest developments in green building, research, and reports from the field.

    Start Free Trial Now
    • Facebook
    • YouTube
  • Old House Journal

    Learn how to restore, repair, update, and decorate your home.

    Subscribe Now
    • Facebook
    • Instagram
    • X

Membership & Magazine

  • Online Archive
  • Start Free Trial
  • Magazine Subscription
  • Magazine Renewal
  • Gift a Subscription
  • Customer Support
  • Privacy Preferences
  • About
  • Contact
  • Advertise
  • Careers
  • Terms of Use
  • Site Map
  • Do not sell or share my information
  • Privacy Policy
  • Accessibility
  • California Privacy Rights

© 2025 Active Interest Media. All rights reserved.

Fine Homebuilding receives a commission for items purchased through links on this site, including Amazon Associates and other affiliate advertising programs.

X
X
This is a dialog window which overlays the main content of the page. The modal window is a 'site map' of the most critical areas of the site. Pressing the Escape (ESC) button will close the modal and bring you back to where you were on the page.

Main Menu

  • How-To
  • Design
  • Tools & Materials
  • Video
  • Blogs
  • Forum
  • Project Guides
  • Reader Projects
  • Magazine
  • Members
  • FHB House

Podcasts

  • FHB Podcast
  • ProTalk

Webinars

  • Upcoming and On-Demand

Podcasts

  • FHB Podcast
  • ProTalk

Webinars

  • Upcoming and On-Demand

Popular Topics

  • Kitchens
  • Business
  • Bedrooms
  • Roofs
  • Architecture and Design
  • Green Building
  • Decks
  • Framing
  • Safety
  • Remodeling
  • Bathrooms
  • Windows
  • Tilework
  • Ceilings
  • HVAC

Magazine

  • Current Issue
  • Past Issues
  • Magazine Index
  • Subscribe
  • Online Archive
  • Author Guidelines

All Access

  • Member Home
  • Start Free Trial
  • Gift Membership

Online Learning

  • Courses
  • Project Guides
  • Reader Projects
  • Podcast

More

  • FHB Ambassadors
  • FHB House
  • Customer Support

Account

  • Log In
  • Join

Newsletter

Get home building tips, offers, and expert advice in your inbox

Signing you up...

This site is protected by reCAPTCHA and the Google Privacy Policy and Terms of Service apply.
See all newsletters
See all newsletters

Follow

  • X
  • YouTube
  • instagram
  • facebook
  • pinterest
  • Tiktok

Join All Access

Become a member and get instant access to thousands of videos, how-tos, tool reviews, and design features.

Start Your Free Trial

Subscribe

FHB Magazine

Start your subscription today and save up to 70%

Subscribe

We hope you’ve enjoyed your free articles. To keep reading, become a member today.

Get complete site access to expert advice, how-to videos, Code Check, and more, plus the print magazine.

Start your FREE trial

Already a member? Log in