FHB Logo Facebook LinkedIn Email Pinterest Twitter X Instagram Tiktok YouTube Plus Icon Close Icon Navigation Search Icon Navigation Search Icon Arrow Down Icon Video Guide Icon Article Guide Icon Modal Close Icon Guide Search Icon Skip to content
Subscribe
Log In
  • How-To
  • Design
  • Tools & Materials
  • Restoration
  • Videos
  • Blogs
  • Forum
  • Magazine
  • Members
  • FHB House
  • Podcast
Log In
Old House Journal - How-To

Restoring Polychromed Light Fixtures

Tips on refreshing vintage, painted light fixtures—with sensitivity and respect.

Old House Journal - February 2024
From Old House Journal
The author brushes on flat acrylic paint that closely matches the original color found on a sister chandelier. There will be a series of layers, with paint blending and shading, to get the proper effect.

Given my taste for the grand and ornate, it’s out of necessity that I’ve had to learn techniques for restoring vintage light fixtures. Restoring color and patina is time consuming and requires a lot of patience. It helps that I am an artist with an eye for subtle differences in hue and tone, and that I have knowledge of the right materials to refresh these old finishes without altering or repainting a fixture. My goal is always to maintain as much of the original finish as possible.

Mixed Metals

While many early-20th-century fixtures are brass, others are cast-iron, bronze, or made of “white” metals ranging from zinc to aluminum. Fixtures I’ve worked with made closer to the 1930s tend to have interchangeable parts—often with different metals all in the same fixture. So always take the base metal into account when restoring or refreshing the finish.

I especially love polychromed (or multi-color) fixtures, which require extra care to restore. The colors on old polychromed fixtures were applied with air brushes, sometimes not very neatly. Pink, gold, and blue were common, but the most popular color combination seems to be burgundy and green.

The two chandeliers during restoration and touchup. The one at the top has the original paint colors, while the other has been restored to match.

The author enhanced and changed the original palette slightly to be cohesive with the peacock colors she favors.

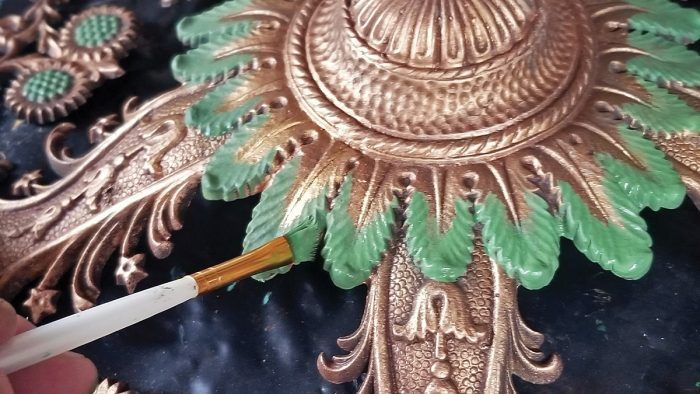
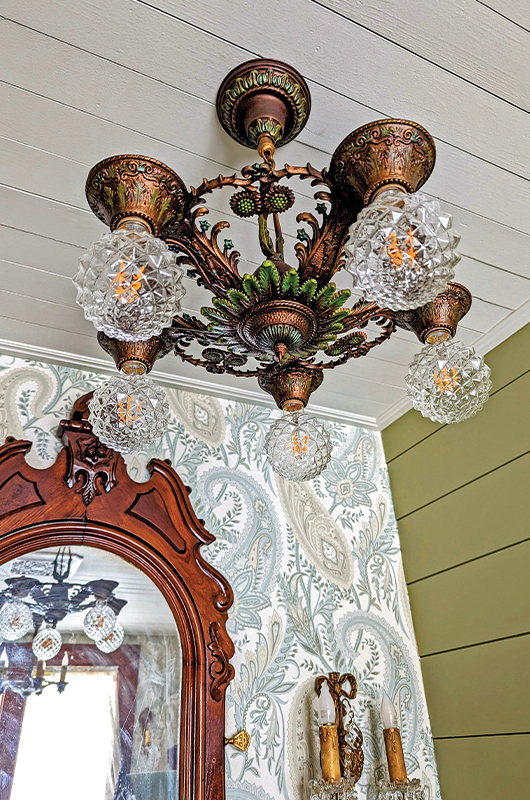
When I found two identical polychromed chandeliers with an openwork sunflower pattern, their finishes didn’t match. One had the original finish and paint colors, while the other had been repainted in a much brighter polychrome scheme.

One of the finished chandeliers in place. It’s been fitted with “pineapple” bulbs that create a sparkle effect in the room.

It had to be completely stripped and painstakingly refinished to match the one with the original colors. It was a massive project. Once the second fixture was stripped and rinsed with water, I began with a base coat of a dark coppery brown, then added various metallic waxes.

I always spray on a clear sealer after laying down wax, to keep it from smudging. The next step was to apply acrylic paint in a flat finish, in colors closely matched to those on the unretouched chandelier. The paint itself goes on in layers, with shading to get the proper effect.

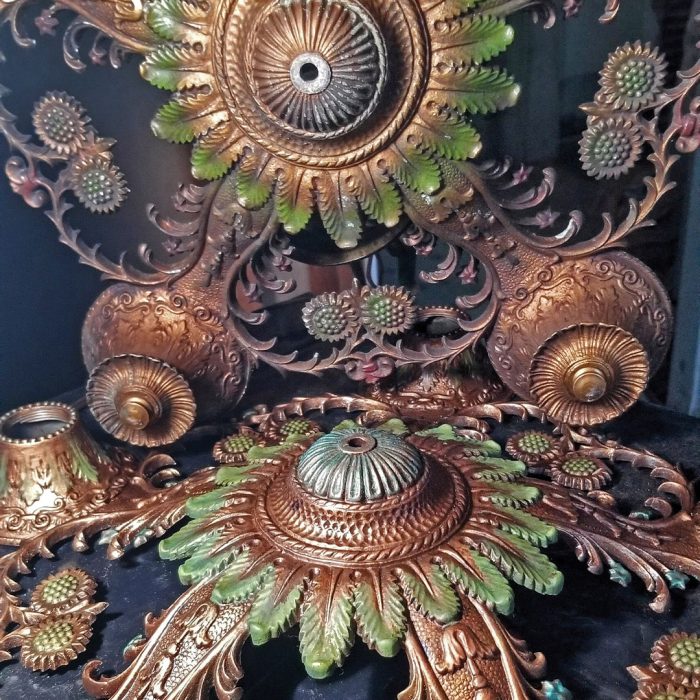
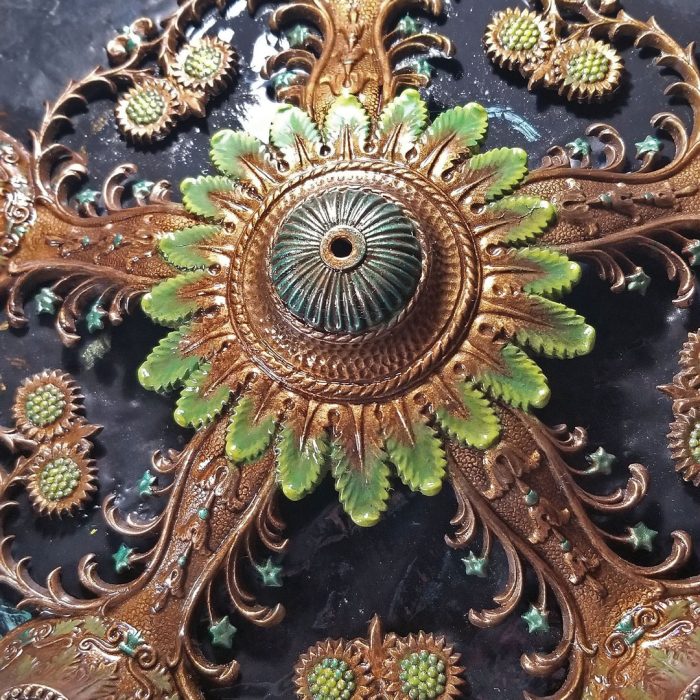
Wherever the color graduates, or changes shades—along the flower blossoms, for example—I started with a richer color, then blended in a lighter color toward the tips, more-or-less by eye and with some trial and error. After the paint layers were done, I enhanced the colors where needed with various metallic waxes, sealed them, then finally began aging and antiquing the finish to match the original.

The results are beautiful: two historic chandeliers with period-appropriate, polychrome schemes, hung up together in a single room. Anyone would think the patina is original and the fixtures had always looked identical.

Simple Cleaning

To preserve the finish on a painted or polychromed fixture, avoid cleaning or soaking it, even in a gentle solution of Ivory Liquid or Simple Green. Cleansers and soaking may dissolve the paint. Disassemble the fixture and clean the parts individually, using Q-tips or cotton balls dipped into a dilute solution of the cleaner. Then wipe the cleaned parts with a soft, nonabrasive cloth such as an old cotton T-shirt or cotton diaper. Avoid using paper towels, which can burnish surfaces. — Mary Ellen Polson

Pretty as a Peacock

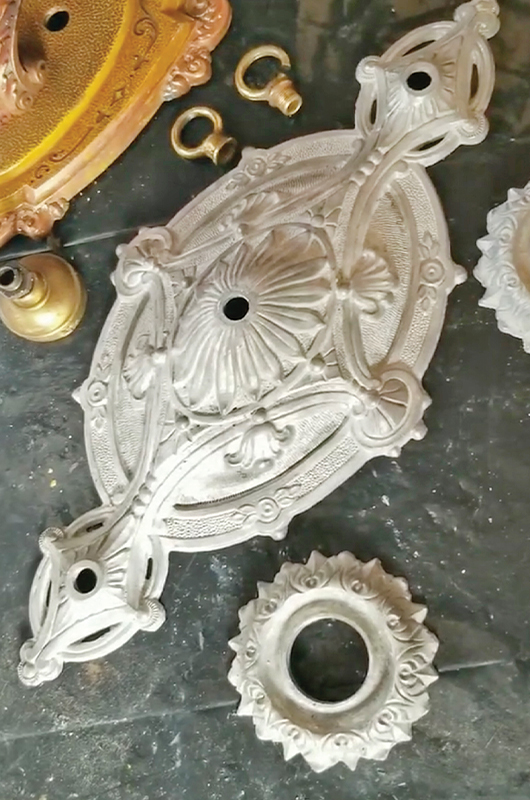
One recent project, a cast-aluminum Art Deco ceiling light, had already been partially stripped without disassembly. It was a flaking mess and very little of the original finish remained. Using an eco-friendly paste stripper (Dumond Smart Strip), I removed the rest of the paint. You can also use citrus-based or soy-based strippers for thickly coated paint, like Soy Gel, but beware that it will likely remove whatever paint is left underneath.

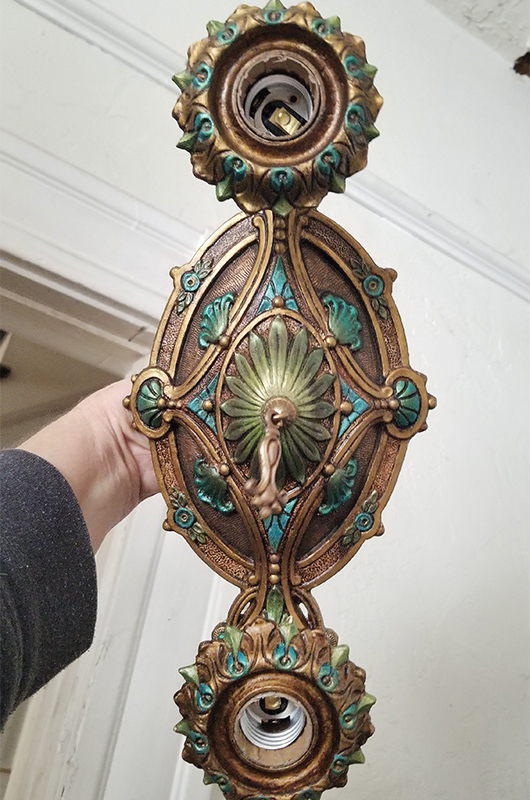
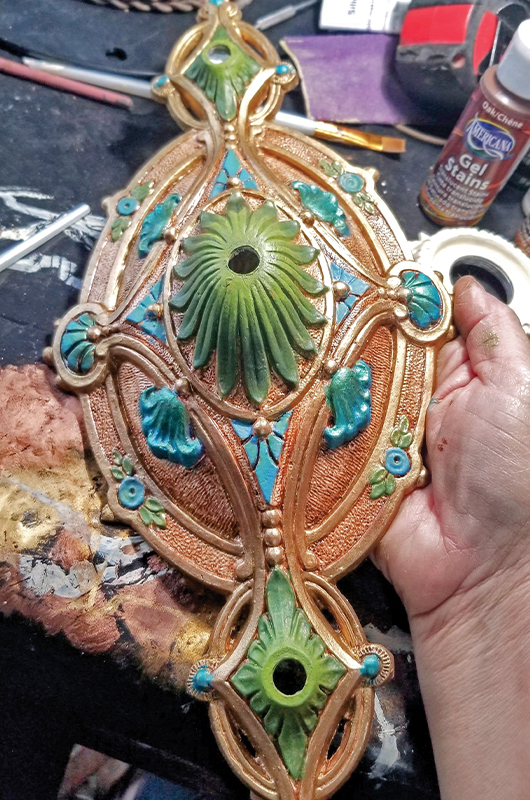
Starting from scratch, I sprayed on a gold undercoat and then laid in color with acrylic paint in a green, teal, and gold palette, along with wax metallic colors. I sprayed a layer of clear-coat sealer between layers of paint or colored wax. This prevents smudging previous work or muddying the colors.

As I worked, I toned down or brightened up colors until everything looked balanced and cohesive. After another coat of sealer, I antiqued the entire surface. Finally, I brushed on metallic gold wax to brighten and enhance certain areas. After a final coat of sealer, this Art Deco peacock was ready for its new home in my powder room.
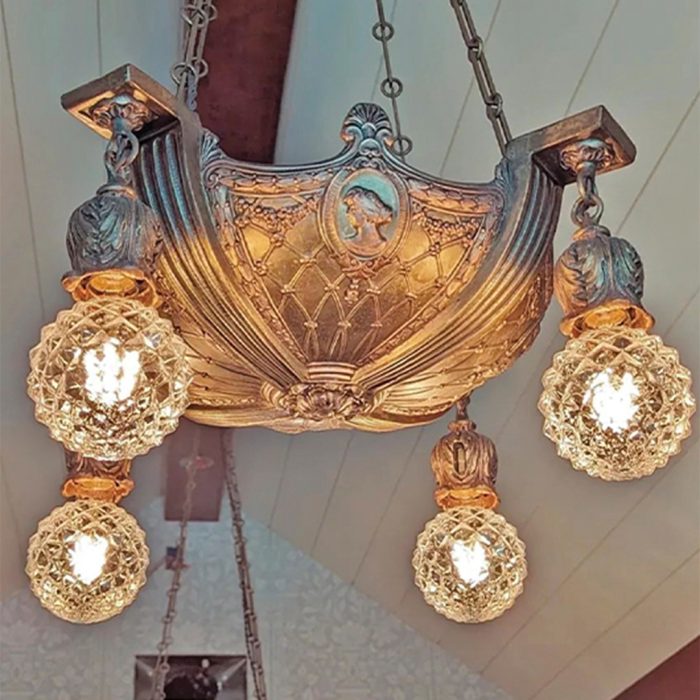
This is the fixture first stripped to bare metal.

Finished: after stripping away layers of paint on a cast-aluminum ceiling fixture, the author created her own period-inspired color scheme using acrylic paints and metallic wax in a process that required many steps and retouching.

This is the fixture after colors were set but before it was gilded and aged.

Beaux Arts Bowls

A few years ago, I found a pair of cast-iron, Beaux Arts bowl fixtures on eBay. Adorned with bas-relief cameos, acanthus-leaf garlands, floral swags, tufting, and rosettes, the lights still had the original sockets, covers, and hanging chains—a rare find.

These gently restored bowl fixtures are fitted with sparkling “pineapple” shades.

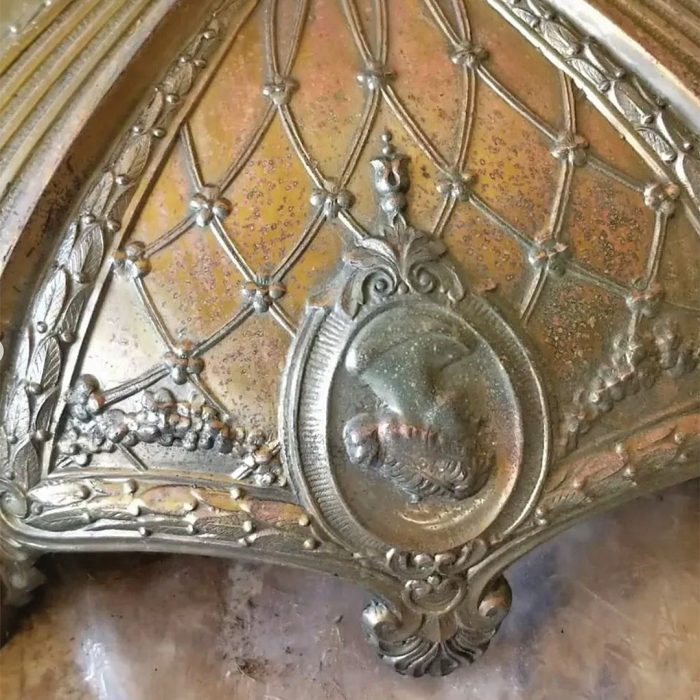
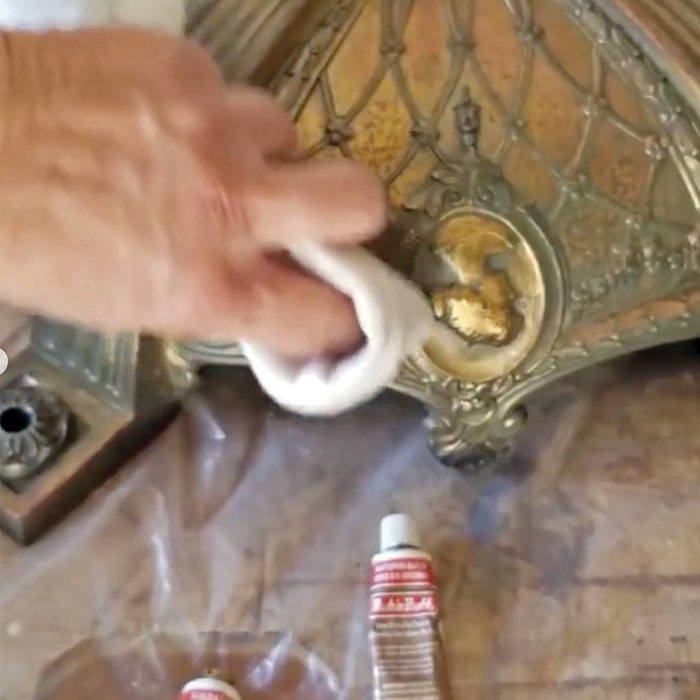
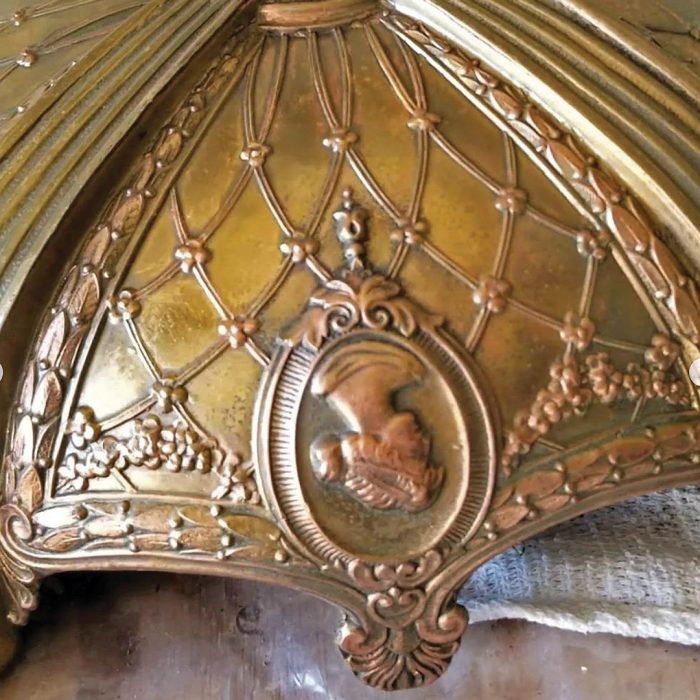
The original bronze plating was very much intact but the colors were dull. I decided to touch-up the finish, using my favorite metallic waxes. Like so many of my projects involving restoring finish colors, it meant labor-intensive trial and error.

1. The finish appears to have been in brass tones with copper highlights. The cameos had gotten especially dull.

2. To clean and brighten a cameo, I tapped a soft cloth into a blend of Gold Leaf and Autumn Gold metallic waxes from Rub ’n Buff, then gently rubbed the surface.

3. After each layer of metallic wax, I sprayed the bowl with clear matte or satin enamel sealer to protect it from later touchups, then applied a dark antiquing wax for patina, finishing with a coat of sealer.

— Written by Gina Bellous; Old House Journal reader and blogger.

RELATED STORIES

  • Beaux Arts Lighting of the Teens and Twenties
  • Rescuing Old Hardware
  • DIY Refinishing of Victorian Doors

Sign up for eletters today and get the latest how-to from Fine Homebuilding, plus special offers.

Signing you up...

This site is protected by reCAPTCHA and the Google Privacy Policy and Terms of Service apply.
See all newsletters
See all newsletters
×

Get home building tips, offers, and expert advice in your inbox

Signing you up...

This site is protected by reCAPTCHA and the Google Privacy Policy and Terms of Service apply.
See all newsletters
See all newsletters

New Feature

Fine Homebuilding Forums

Ask questions, offer advice, and share your work

Log in or create an account to post a comment.

Sign up Log in

Become a member and get full access to FineHomebuilding.com

Up Next

Video Shorts

Featured Story

Fix Air Leaks in Old Houses

Simple air-sealing measures and spray-applied sealant lower energy bills and increase comfort without the need to tear the house apart.

Featured Video

Micro-Adjust Deck-Baluster Spacing for an Eye-Deceiving Layout

No math, no measuring—just a simple jig made from an elastic band is all you need to lay out a good-looking deck railing.

Related Stories

  • Rescuing Old Hardware
  • Period Kitchen for an Arts & Crafts House
  • Preserving a Greek Revival Farmhouse
  • Preservation Meets Today’s Tastes & Modern Lifestyle

Discussion Forum

Recent Posts and Replies

  • |
  • |
  • |
  • |
  • |
  • |
View More Create Post

Highlights

Fine Homebuilding All Access
Fine Homebuilding Podcast
Tool Tech
Plus, get an extra 20% off with code GIFT20

"I have learned so much thanks to the searchable articles on the FHB website. I can confidently say that I expect to be a life-long subscriber." - M.K.

Get home building tips, offers, and expert advice in your inbox

Signing you up...

This site is protected by reCAPTCHA and the Google Privacy Policy and Terms of Service apply.
See all newsletters
See all newsletters

Video

View All Videos
  • FHB Podcast Segment: Shower Wall and Tub Surround Panels Explained
  • Advantages of a High-Performance Heat-Pump Water Heater
  • Wall-Mounted Fan Coil Unit for an Air-to-Water Heat Pump
  • Podcast Episode 99 — Working with Wood
View All

Appliances

View All Appliances Articles
  • Hard-to-Use Electrical Outlets
  • FAQs on HPWHs
  • The Best Way to Protect Heat Pumps from Rain and Snow
View All Appliances Articles

Fine Homebuilding Magazine

  • Issue 330 - April/May
    • Deck Details for Durability
    • FAQs on HPWHs
    • 10 Tips for a Long-Lasting Paint Job
  • Issue 329 - Feb/Mar 2025
    • Smart Foundation for a Small Addition
    • A Kominka Comes West
    • Making Small Kitchens Work
  • Issue 328 - Dec/Jan 2024
    • How a Pro Replaces Columns
    • Passive House 3.0
    • Tool Test: Compact Line Lasers
  • Issue 327 - November 2024
    • Repairing Damaged Walls and Ceilings
    • Plumbing Protection
    • Talking Shop
  • Issue 326 - October 2024
    • Paint Behind Strike Plates
    • Conceal Cut Ends
    • Ladder Slip Solution

Fine Home Building

Newsletter Sign-up

  • Fine Homebuilding

    Home building tips, offers, and expert advice in your inbox.

  • Green Building Advisor

    Building science and energy efficiency advice, plus special offers, in your inbox.

  • Old House Journal

    Repair, renovation, and restoration tips, plus special offers, in your inbox.

Signing you up...

This site is protected by reCAPTCHA and the Google Privacy Policy and Terms of Service apply.
See all newsletters

Follow

  • Fine Homebuilding

    Dig into cutting-edge approaches and decades of proven solutions with total access to our experts and tradespeople.

    Start Free Trial Now
    • Facebook
    • Instagram
    • X
    • LinkedIn
  • GBA Prime

    Get instant access to the latest developments in green building, research, and reports from the field.

    Start Free Trial Now
    • Facebook
    • YouTube
  • Old House Journal

    Learn how to restore, repair, update, and decorate your home.

    Subscribe Now
    • Facebook
    • Instagram
    • X

Membership & Magazine

  • Online Archive
  • Start Free Trial
  • Magazine Subscription
  • Magazine Renewal
  • Gift a Subscription
  • Customer Support
  • Privacy Preferences
  • About
  • Contact
  • Advertise
  • Careers
  • Terms of Use
  • Site Map
  • Do not sell or share my information
  • Privacy Policy
  • Accessibility
  • California Privacy Rights

© 2025 Active Interest Media. All rights reserved.

Fine Homebuilding receives a commission for items purchased through links on this site, including Amazon Associates and other affiliate advertising programs.

X
X
This is a dialog window which overlays the main content of the page. The modal window is a 'site map' of the most critical areas of the site. Pressing the Escape (ESC) button will close the modal and bring you back to where you were on the page.

Main Menu

  • How-To
  • Design
  • Tools & Materials
  • Video
  • Blogs
  • Forum
  • Project Guides
  • Reader Projects
  • Magazine
  • Members
  • FHB House

Podcasts

  • FHB Podcast
  • ProTalk

Webinars

  • Upcoming and On-Demand

Podcasts

  • FHB Podcast
  • ProTalk

Webinars

  • Upcoming and On-Demand

Popular Topics

  • Kitchens
  • Business
  • Bedrooms
  • Roofs
  • Architecture and Design
  • Green Building
  • Decks
  • Framing
  • Safety
  • Remodeling
  • Bathrooms
  • Windows
  • Tilework
  • Ceilings
  • HVAC

Magazine

  • Current Issue
  • Past Issues
  • Magazine Index
  • Subscribe
  • Online Archive
  • Author Guidelines

All Access

  • Member Home
  • Start Free Trial
  • Gift Membership

Online Learning

  • Courses
  • Project Guides
  • Reader Projects
  • Podcast

More

  • FHB Ambassadors
  • FHB House
  • Customer Support

Account

  • Log In
  • Join

Newsletter

Get home building tips, offers, and expert advice in your inbox

Signing you up...

This site is protected by reCAPTCHA and the Google Privacy Policy and Terms of Service apply.
See all newsletters
See all newsletters

Follow

  • X
  • YouTube
  • instagram
  • facebook
  • pinterest
  • Tiktok

Join All Access

Become a member and get instant access to thousands of videos, how-tos, tool reviews, and design features.

Start Your Free Trial

Subscribe

FHB Magazine

Start your subscription today and save up to 70%

Subscribe

We hope you’ve enjoyed your free articles. To keep reading, become a member today.

Get complete site access to expert advice, how-to videos, Code Check, and more, plus the print magazine.

Start your FREE trial

Already a member? Log in