FHB Logo Facebook LinkedIn Email Pinterest Twitter X Instagram Tiktok YouTube Plus Icon Close Icon Navigation Search Icon Navigation Search Icon Arrow Down Icon Video Guide Icon Article Guide Icon Modal Close Icon Guide Search Icon Skip to content
Subscribe
Log In
  • How-To
  • Design
  • Tools & Materials
  • Restoration
  • Videos
  • Blogs
  • Forum
  • Magazine
  • Members
  • FHB House
  • Podcast
Log In

Fine Homebuilding Project Guides

Drywall

Guide Home
  • Drywall Basics
  • Tools and Materials
  • Hanging Drywall
  • Taping and Sanding
  • Special Installations
  • Drywall Repairs
  • Plaster
How-To

Install and Finish Drywall Series: 7 Tips for the Best Basic Finish

Pro drywall installer Myron Ferguson shares techniques that will help you get smoother seams with almost no sanding.

By Myron R. Ferguson

Jump to all the videos in this series

I start finishing drywall by laying down one coat of joint compound and embedding a layer of tape into the compound. Then, I add another layer of compound over the tape to conceal it. So, at this point the wall should have embedded tape with a fill coat on top of it. Adding a third coat of compound will bring the walls to a normal level of finish for a drywall job.

Follow these 7 tips to make the job go smoothly:

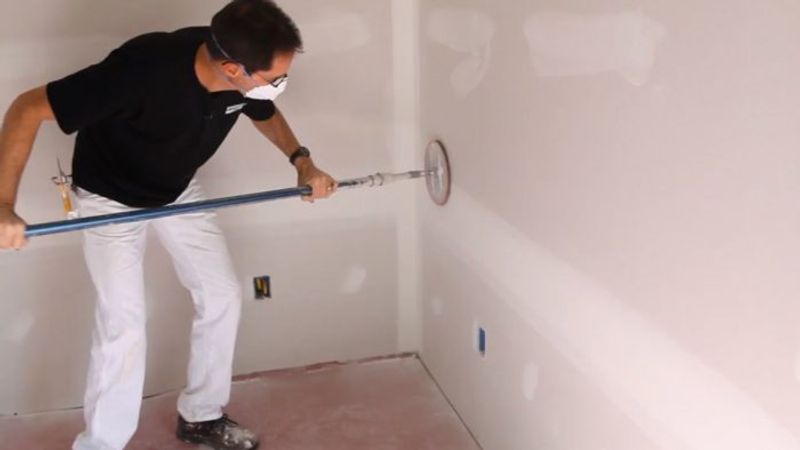
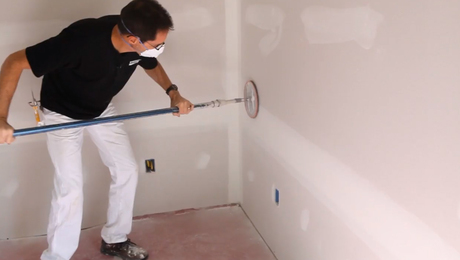
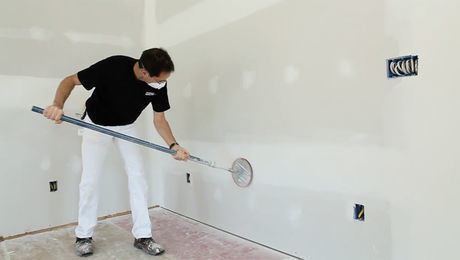
1. Use your trowel to check the wall for smoothness

First check to see how smooth the seam is. Use a trowel; hold it over the seam to see how flat it is. The compounds don’t have to be built up; this layer of compound’s only purpose is to smooth out any imperfections. This final coat is the most critical coat. The finish needs to be as smooth as possible.
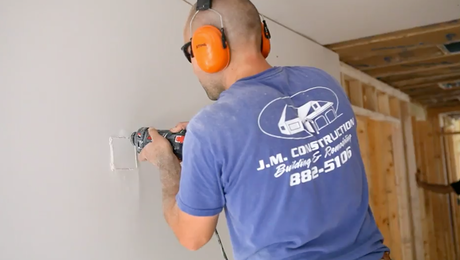
2. Don’t over sand

Before beginning to apply the final coat over the seams lightly sand the wall. It’s better described as brushing. The average room takes me about six minutes to sand. This is one job where you don’t want to work too hard.

3. Add small amounts of water for the perfect consistency

The consistency of the compound is difficult to describe. Every bucket is a little different; scoop into the compound and put it on your trowel and see how it stays on the trowel. This scoop is beginning to slide down a little, but not running off. This is probably the consistency I want. Once you start applying, if you find you’re working a little harder, thin it a little with water.

4. Apply top coat wider than previous coats

When taping seams, apply the compound with a wide taping knife; I’m using a 12-in.-wide knife. Apply the compound just a little bit wider than what is already there. Then remove the compound. Begin removing along the bottom edge. To keep the bottom edge feathered out, apply a little more pressure on the leading edge of the knife. Then do the same thing for the top, applying more pressure towards the outside. To remove compound from the center, use very light pressure.

5. Use a steep angle to remove compound

The way the knife is held affects how it moves the material. To remove compound, hold the knife so it’s standing pretty much on edge.

6. Use a shallow angle to apply the compound

Holding the knife at a lower angle to the wall will push the compound along in front of the knife instead of scraping it off. To smooth compound keep the knife flatter.

7. Apply three coats to all fasteners

I cover all the fasteners in strips rather than individually. It’s easier and faster. For each coat, put the compound on and remove it. Don’t build the compound up and keep the edges feathered out.

You need to apply and let the compound dry three times to get good coverage on all your fasteners.

Sign up for eletters today and get the latest how-to from Fine Homebuilding, plus special offers.

Signing you up...

This site is protected by reCAPTCHA and the Google Privacy Policy and Terms of Service apply.
See all newsletters
See all newsletters

Videos in the Series

  • Series Introduction: Install and Finish Drywall

    In this video series, a drywall expert shares his no-nonsense tips for making the job go smoother, and for getting a perfect finish every time.

  • Install and Finish Drywall: 7 Tips for an Accurate Takeoff

    Ordering the proper materials is really important because your main goal is to reduce the lineal footage of seams that you're going to have to tape later.

  • Install and Finish Drywall: 7 Fixes Before Delivery

    Prep your framing so that drywall sits flat and is easy to fasten securely.

  • Install and Finish Drywall: 9 Secrets to an Effortless Install

    These straightforward steps will make any drywall-hanging job easier.

  • Install and Finish Drywall: 9 Rules for Hanging a Vaulted Ceiling

    Cover cathedral ceilings faster and easier by following a few basic rules.

  • Install and Finish Drywall Series: 7 Tips for the Best Basic Finish

    Pro drywall installer Myron Ferguson shares techniques that will help you get smoother seams with almost no sanding.

  • Install and Finish Drywall Series: 6 Steps to a Level-5 Finish

    High-gloss paint and harsh lighting will show every imperfection in your walls unless you take this additional step to eliminate surface differences.

Previous: Prepping for Taping Next: Levels of Drywall Finishing

Guide

Drywall

Chapter

Taping and Sanding

Log in or create an account to post a comment.

Sign up Log in

Become a member and get full access to FineHomebuilding.com

Drywall

Drywall

Trusted, comprehensive guidance for choosing, hanging, taping, sanding, and repairing drywall—the right way

View Project Guide

View All Project Guides »

Become a member and get unlimited site access, including the Drywall Project Guide.

Start Free Trial

Drywall Basics
  • Types and Uses of Drywall
  • Planning the Job
Tools and Materials
  • Hanging Tools
  • Taping Tools and Materials
  • Sanding and Finishing Tools and Materials
Hanging Drywall
  • Prep for Hanging
  • Measuring and Cutting Drywall
  • Guidelines for Hanging and Fastening Drywall
  • Hanging Ceilings
  • Hanging Walls
  • Hanging Airtight Drywall
  • Trim Accessories/Corner Beads
Taping and Sanding
  • Taping Basics
  • Taping Seams
  • Taping Inside and Outside Corners
  • Sanding
Special Installations
  • Tricky Transitions
  • Curved Surfaces
  • Other Special Installations
  • Decorating with Drywall
Drywall Repairs
  • Patching Holes, Cracks, and More
Plaster
  • Working with Lime Plaster
  • Plaster Repair
  • Classic Plaster Techniques

Fine Home Building

Newsletter Sign-up

  • Fine Homebuilding

    Home building tips, offers, and expert advice in your inbox.

  • Green Building Advisor

    Building science and energy efficiency advice, plus special offers, in your inbox.

  • Old House Journal

    Repair, renovation, and restoration tips, plus special offers, in your inbox.

Signing you up...

This site is protected by reCAPTCHA and the Google Privacy Policy and Terms of Service apply.
See all newsletters

Follow

  • Fine Homebuilding

    Dig into cutting-edge approaches and decades of proven solutions with total access to our experts and tradespeople.

    Start Free Trial Now
    • Facebook
    • Instagram
    • X
    • LinkedIn
  • GBA Prime

    Get instant access to the latest developments in green building, research, and reports from the field.

    Start Free Trial Now
    • Facebook
    • YouTube
  • Old House Journal

    Learn how to restore, repair, update, and decorate your home.

    Subscribe Now
    • Facebook
    • Instagram
    • X

Membership & Magazine

  • Online Archive
  • Start Free Trial
  • Magazine Subscription
  • Magazine Renewal
  • Gift a Subscription
  • Customer Support
  • Privacy Preferences
  • About
  • Contact
  • Advertise
  • Careers
  • Terms of Use
  • Site Map
  • Do not sell or share my information
  • Privacy Policy
  • Accessibility
  • California Privacy Rights

© 2025 Active Interest Media. All rights reserved.

Fine Homebuilding receives a commission for items purchased through links on this site, including Amazon Associates and other affiliate advertising programs.

X
X
This is a dialog window which overlays the main content of the page. The modal window is a 'site map' of the most critical areas of the site. Pressing the Escape (ESC) button will close the modal and bring you back to where you were on the page.

Main Menu

  • How-To
  • Design
  • Tools & Materials
  • Video
  • Blogs
  • Forum
  • Project Guides
  • Reader Projects
  • Magazine
  • Members
  • FHB House

Podcasts

  • FHB Podcast
  • ProTalk

Webinars

  • Upcoming and On-Demand

Podcasts

  • FHB Podcast
  • ProTalk

Webinars

  • Upcoming and On-Demand

Popular Topics

  • Kitchens
  • Business
  • Bedrooms
  • Roofs
  • Architecture and Design
  • Green Building
  • Decks
  • Framing
  • Safety
  • Remodeling
  • Bathrooms
  • Windows
  • Tilework
  • Ceilings
  • HVAC

Magazine

  • Current Issue
  • Past Issues
  • Magazine Index
  • Subscribe
  • Online Archive
  • Author Guidelines

All Access

  • Member Home
  • Start Free Trial
  • Gift Membership

Online Learning

  • Courses
  • Project Guides
  • Reader Projects
  • Podcast

More

  • FHB Ambassadors
  • FHB House
  • Customer Support

Account

  • Log In
  • Join

Newsletter

Get home building tips, offers, and expert advice in your inbox

Signing you up...

This site is protected by reCAPTCHA and the Google Privacy Policy and Terms of Service apply.
See all newsletters
See all newsletters

Follow

  • X
  • YouTube
  • instagram
  • facebook
  • pinterest
  • Tiktok

Join All Access

Become a member and get instant access to thousands of videos, how-tos, tool reviews, and design features.

Start Your Free Trial

Subscribe

FHB Magazine

Start your subscription today and save up to 70%

Subscribe

We hope you’ve enjoyed your free articles. To keep reading, become a member today.

Get complete site access to expert advice, how-to videos, Code Check, and more, plus the print magazine.

Start your FREE trial

Already a member? Log in