FHB Logo Facebook LinkedIn Email Pinterest Twitter X Instagram Tiktok YouTube Plus Icon Close Icon Navigation Search Icon Navigation Search Icon Arrow Down Icon Video Guide Icon Article Guide Icon Modal Close Icon Guide Search Icon Skip to content
Subscribe
Log In
  • How-To
  • Design
  • Tools & Materials
  • Restoration
  • Videos
  • Blogs
  • Forum
  • Magazine
  • Members
  • FHB House
  • Podcast
Log In

Fine Homebuilding Project Guides

Drywall

Guide Home
  • Drywall Basics
  • Tools and Materials
  • Hanging Drywall
  • Taping and Sanding
  • Special Installations
  • Drywall Repairs
  • Plaster
How-To

Drywall Sanding Overview

No one enjoys this necessary step in the drywall finishing process, but here's some advice to help get you through it.

By Myron R. Ferguson

If taping is my favorite part of a drywalling job, I’d have to say that sanding is my least favorite. The dust makes the job unpleasant, and it is tedious, time-consuming, and fairly difficult work. It takes me almost as much time to sand and clean up as it does to apply one coat of joint compound (just under an hour for a typical 12-ft. by 12-ft. room). However, sanding is the final step in the drywalling process. And, in my opinion, it’s also the most important. It’s your last chance before painting to turn a so-so taping job into a quality finished job.

Some tapers claim to be so skillful at taping that they don’t need to sand at all. In my experience as a drywall contractor, however, I believe that a beautiful finished job requires at least some sanding after the final coat. (Depending on your taping ability, you may need to sand between coats as well.) Nevertheless, there are times when I have not sanded ceilings prior to texturing. In most light, those ceilings look just fine. Most customers, however, aren’t satisfied with a finished job that looks good in most light. They want a job that looks good all the time and in any light.

The goal of sanding is to remove excess joint compound, smooth out tool and lap marks, flatten crowned areas, and feather the edges of compound to blend into untaped surfaces. Because you have to sand all taped seams, corners, and fastener heads, you end up going over a large percentage of the drywall surface. For that reason, give yourself plenty of time to sand. A rushed sanding job can compromise even the best hanging and taping job. But if you take your time and have the right attitude (just keep in mind that once you’re done you can start painting), the results are rewarding.

Aim for a uniform surface
Aim for a uniform surface: The goal of sanding is to smooth out the joint compound and to blend the edges into the drywall face paper so that you’re left with a flat, uniform surface.


Getting Ready to Sand

Sanding drywall joint compound generates a lot of dust. Many of the ingredients in joint compound, such as talc, calcite, mica, gypsum, silica, and clay, can irritate your eyes, nose, throat, and respiratory tract. Protect yourself by ventilating the room and wearing a dust mask that is approved for protection against nontoxic dust and mist.

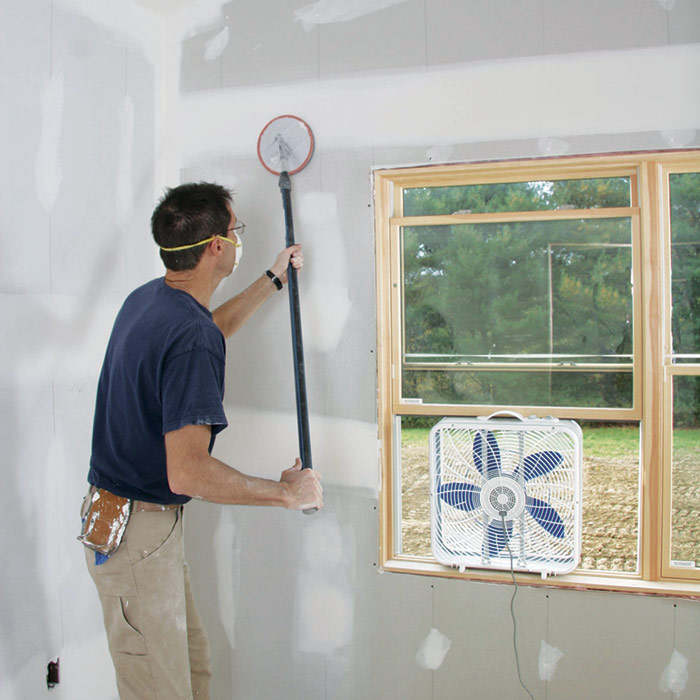
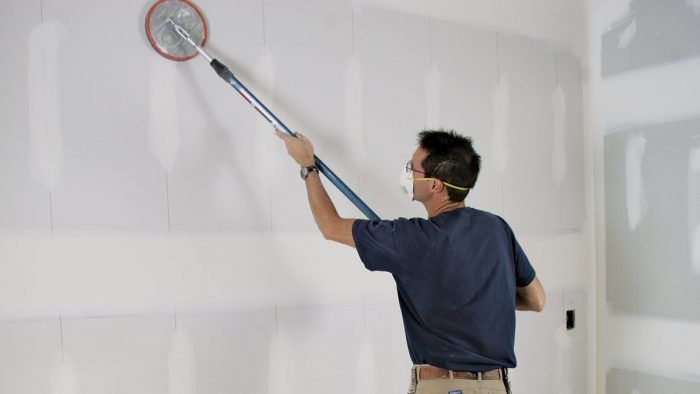
Make sure the mask fits snugly. When you breathe, air should not enter around the edges. If air does get in, you’ll notice white dust on your face around the edges of the mask when you take it off after sanding. Change the filter or mask when breathing becomes difficult. It’s also a good idea to wear a hat and a pair of safety goggles for protection against fine dust, especially when you’re sanding overhead.

Attaching a sander to a shop vac can keep up to 95 percent of the sanding dust from becoming airborne. This greatly reduces the worker’s exposure to dust and helps keep the area cleaner. Pole sanders also reduce your exposure to dust, because you stand farther away from the work surface.

Protect the workplace

You not only need to protect yourself while sanding, but also the room you’re working in. Most likely, a lot of the protection has already been put in place. When it comes time to sand, however, you may need to tighten things up a bit (unless, of course, you’re drywalling in new construction). On a remodeling job, remove all furnishings or cover them with drop cloths and plastic before drywalling. The fine dust generated during sanding can infiltrate the tiniest of cracks, so make sure you seal under all doors (including kitchen cabinets) to keep the dust from spreading. Seal the edges of the plastic with masking tape.


THINK AHEAD: To keep out dust, cover the front of kitchen cabinets and built-ins with plastic sheeting. Seal the entire perimeter of the sheeting with masking or painter’s tape.


Try to contain the dust within the work area. And resist the temptation to open all the windows—it can create a draft that may actually push dust into other parts of the building. Instead, install a fan in a window to blow air out of the work area and get the dust moving in the right direction. In addition, hang plastic over doorways to isolate the rooms where you are working from other areas.


dust mask

Managing Dust

The fine dust particles created during sanding are, at the very least, a nuisance. The dust is inevitable, but also manageable—collect or expel as much of the resulting dust as possible. Always protect your eyes and wear a dust mask approved for protection against nontoxic dust and mist. The mask should fit comfortably and form a tight seal around the edges.


Create less dust
Create less dust: Certain types of compound cut down on the amount of dust that lingers in the air as you sand. Dust still falls to the floor, but using the right compound helps create a more comfortable workplace.

Blow the dust outside
Blow the dust outside: To pull dust out of a room, install a portable fan in a window and close off other openings. Closing off openings helps create a vacuum to prevent dust from entering other rooms.

Seal off living space
Seal off living space: To protect areas from dust and debris, create a temporary wall with light plastic. The telescopic poles shown here hold the plastic against the ceiling and the floor.


Sign up for eletters today and get the latest how-to from Fine Homebuilding, plus special offers.

Signing you up...

This site is protected by reCAPTCHA and the Google Privacy Policy and Terms of Service apply.
See all newsletters
See all newsletters
Previous: Taping Outside Corner Beads on Drywall Next: The Drywall Sanding Process

Guide

Drywall

Chapter

Taping and Sanding

Log in or create an account to post a comment.

Sign up Log in

Become a member and get full access to FineHomebuilding.com

Drywall

Drywall

Trusted, comprehensive guidance for choosing, hanging, taping, sanding, and repairing drywall—the right way

View Project Guide

View All Project Guides »

Become a member and get unlimited site access, including the Drywall Project Guide.

Start Free Trial

Drywall Basics
  • Types and Uses of Drywall
  • Planning the Job
Tools and Materials
  • Hanging Tools
  • Taping Tools and Materials
  • Sanding and Finishing Tools and Materials
Hanging Drywall
  • Prep for Hanging
  • Measuring and Cutting Drywall
  • Guidelines for Hanging and Fastening Drywall
  • Hanging Ceilings
  • Hanging Walls
  • Hanging Airtight Drywall
  • Trim Accessories/Corner Beads
Taping and Sanding
  • Taping Basics
  • Taping Seams
  • Taping Inside and Outside Corners
  • Sanding
Special Installations
  • Tricky Transitions
  • Curved Surfaces
  • Other Special Installations
  • Decorating with Drywall
Drywall Repairs
  • Patching Holes, Cracks, and More
Plaster
  • Working with Lime Plaster
  • Plaster Repair
  • Classic Plaster Techniques

Fine Home Building

Newsletter Sign-up

  • Fine Homebuilding

    Home building tips, offers, and expert advice in your inbox.

  • Green Building Advisor

    Building science and energy efficiency advice, plus special offers, in your inbox.

  • Old House Journal

    Repair, renovation, and restoration tips, plus special offers, in your inbox.

Signing you up...

This site is protected by reCAPTCHA and the Google Privacy Policy and Terms of Service apply.
See all newsletters

Follow

  • Fine Homebuilding

    Dig into cutting-edge approaches and decades of proven solutions with total access to our experts and tradespeople.

    Start Free Trial Now
    • Facebook
    • Instagram
    • X
    • LinkedIn
  • GBA Prime

    Get instant access to the latest developments in green building, research, and reports from the field.

    Start Free Trial Now
    • Facebook
    • YouTube
  • Old House Journal

    Learn how to restore, repair, update, and decorate your home.

    Subscribe Now
    • Facebook
    • Instagram
    • X

Membership & Magazine

  • Online Archive
  • Start Free Trial
  • Magazine Subscription
  • Magazine Renewal
  • Gift a Subscription
  • Customer Support
  • Privacy Preferences
  • About
  • Contact
  • Advertise
  • Careers
  • Terms of Use
  • Site Map
  • Do not sell or share my information
  • Privacy Policy
  • Accessibility
  • California Privacy Rights

© 2025 Active Interest Media. All rights reserved.

Fine Homebuilding receives a commission for items purchased through links on this site, including Amazon Associates and other affiliate advertising programs.

X
X
This is a dialog window which overlays the main content of the page. The modal window is a 'site map' of the most critical areas of the site. Pressing the Escape (ESC) button will close the modal and bring you back to where you were on the page.

Main Menu

  • How-To
  • Design
  • Tools & Materials
  • Video
  • Blogs
  • Forum
  • Project Guides
  • Reader Projects
  • Magazine
  • Members
  • FHB House

Podcasts

  • FHB Podcast
  • ProTalk

Webinars

  • Upcoming and On-Demand

Podcasts

  • FHB Podcast
  • ProTalk

Webinars

  • Upcoming and On-Demand

Popular Topics

  • Kitchens
  • Business
  • Bedrooms
  • Roofs
  • Architecture and Design
  • Green Building
  • Decks
  • Framing
  • Safety
  • Remodeling
  • Bathrooms
  • Windows
  • Tilework
  • Ceilings
  • HVAC

Magazine

  • Current Issue
  • Past Issues
  • Magazine Index
  • Subscribe
  • Online Archive
  • Author Guidelines

All Access

  • Member Home
  • Start Free Trial
  • Gift Membership

Online Learning

  • Courses
  • Project Guides
  • Reader Projects
  • Podcast

More

  • FHB Ambassadors
  • FHB House
  • Customer Support

Account

  • Log In
  • Join

Newsletter

Get home building tips, offers, and expert advice in your inbox

Signing you up...

This site is protected by reCAPTCHA and the Google Privacy Policy and Terms of Service apply.
See all newsletters
See all newsletters

Follow

  • X
  • YouTube
  • instagram
  • facebook
  • pinterest
  • Tiktok

Join All Access

Become a member and get instant access to thousands of videos, how-tos, tool reviews, and design features.

Start Your Free Trial

Subscribe

FHB Magazine

Start your subscription today and save up to 70%

Subscribe

We hope you’ve enjoyed your free articles. To keep reading, become a member today.

Get complete site access to expert advice, how-to videos, Code Check, and more, plus the print magazine.

Start your FREE trial

Already a member? Log in