FHB Logo Facebook LinkedIn Email Pinterest Twitter X Instagram Tiktok YouTube Plus Icon Close Icon Navigation Search Icon Navigation Search Icon Arrow Down Icon Video Guide Icon Article Guide Icon Modal Close Icon Guide Search Icon Skip to content
Subscribe
Log In
  • How-To
  • Design
  • Tools & Materials
  • Restoration
  • Videos
  • Blogs
  • Forum
  • Magazine
  • Members
  • FHB House
  • Podcast
Log In

Fine Homebuilding Project Guides

Drywall

Guide Home
  • Drywall Basics
  • Tools and Materials
  • Hanging Drywall
  • Taping and Sanding
  • Special Installations
  • Drywall Repairs
  • Plaster
How-To

Installing Corner Beads

Protect drywall corners with one of the various beads available—in metal, vinyl, or PVC.

By Myron R. Ferguson
Protect the edges :Corner bead resists impact and provides a straight edge for taping.

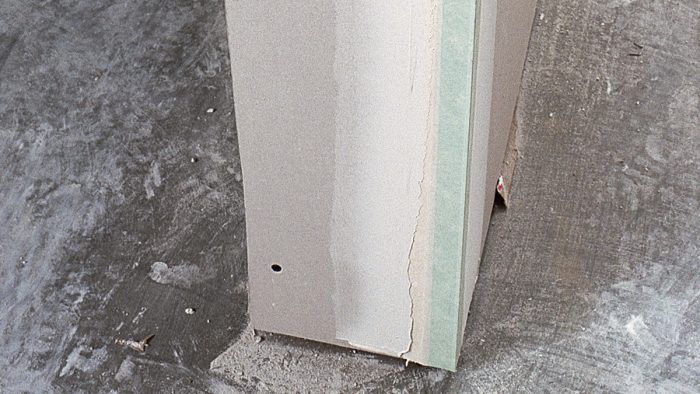
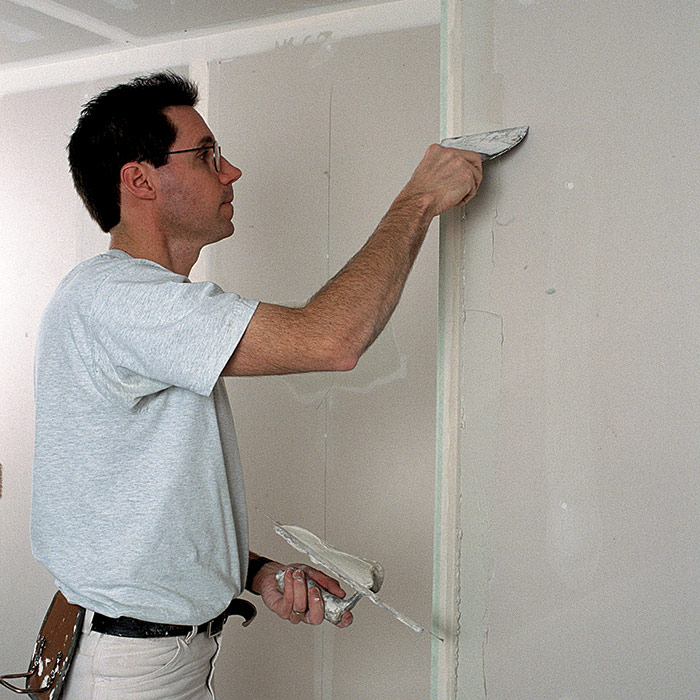
After the drywall has been attached, all outside corners, uncased openings, beams, and soffits should be protected with corner bead. Corner bead resists impact and forms a straight raised edge for taping. Whenever possible, it should be installed in one piece. For standup beads on walls, cut the bead with snips approximately 1/2 in. short of the ceiling height, but push it tight against the ceiling. The baseboard will cover the gap along the floor. The gap at the floor reduces the risk of the bead binding and coming loose or cracking should the wall settle. If more than one piece is required, butt the beads together —don’t overlap them. Make sure that the butted ends are even with each other and that they lie straight.

There are a number of corner and trim beads available. The following is a brief explanation of how they are attached.


Metal beads

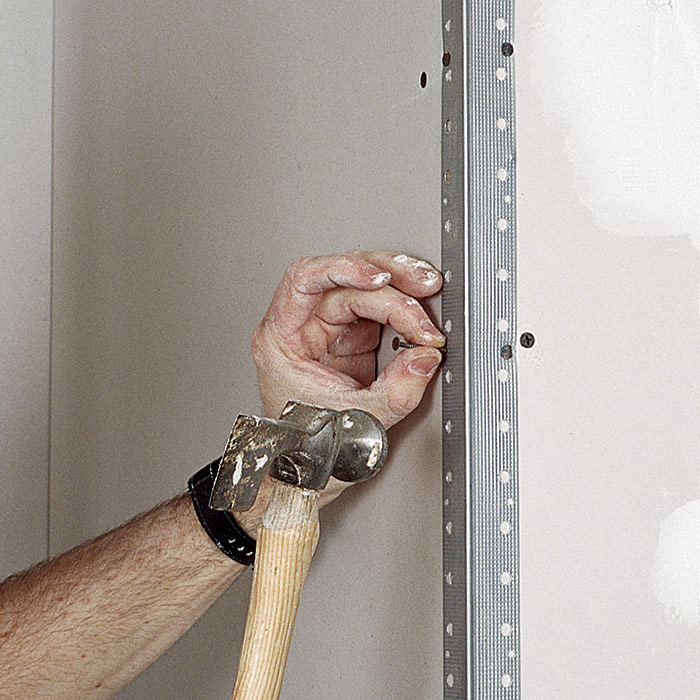
When attached to drywall hung over wood framing, galvanized metal bead is usually nailed in place. When attaching it to drywall hung over metal framing, I like to use a corner crimper and 9/16-in. staples that go through the drywall and into the framing. When using screws, nails, or staples, attach the bead every 8 in., placing pairs of fasteners opposite each other on either side of the corner.

There is also a metal bead with barbed edges that hold the bead in place, requiring a minimal number of fasteners. Use hand pressure or a rubber mallet to push the bead into the drywall. A fastener at each end or at the center may be necessary to help align this type of bead.

WORK SMART: Make sure the edges of corner bead lie flat against the wall (they shouldn’t stick out past the raised bead on the outside corner edge). Use more fasteners if the edges don’t hug the wall tightly.


Cut it short
Cut it short: For wall installations, keep the bead off the floor about 1⁄2 in. to avoid potential problems should the building move or settle.
Nail on metal bead
Nail on metal bead: Attach corner bead before taping. When installing metal bead, place nails on both sides of the bead and space the pairs about 8 in. apart.
Or use a crimper: A corner crimper provides an alternative to nailing. Crimp the bead every 4 in. to 6 in.

Coat the corner bead
Coat the corner bead: Tape-on corner beads can be run through a tool that leaves compound on the back side of the bead. The compound works as an adhesive to hold the bead in place.

Roll it on
Roll it on: A 90-degree roller tool helps embed the bead in the compound and pulls it tighter against the drywall.


PVC beads

Corner bead made of PVC is both durable and easy to install. Joint compound is used to hold the bead in place. I prefer to use a tool that applies the compound to the back of the bead and then use a roller tool to press the bead into place on the corner. These beads and the ones I explain on the following pages are all easily attached to drywall, whether it has been installed over wood or metal framing. And all of them greatly reduce the cracking at the corners that is common with regular metal bead.
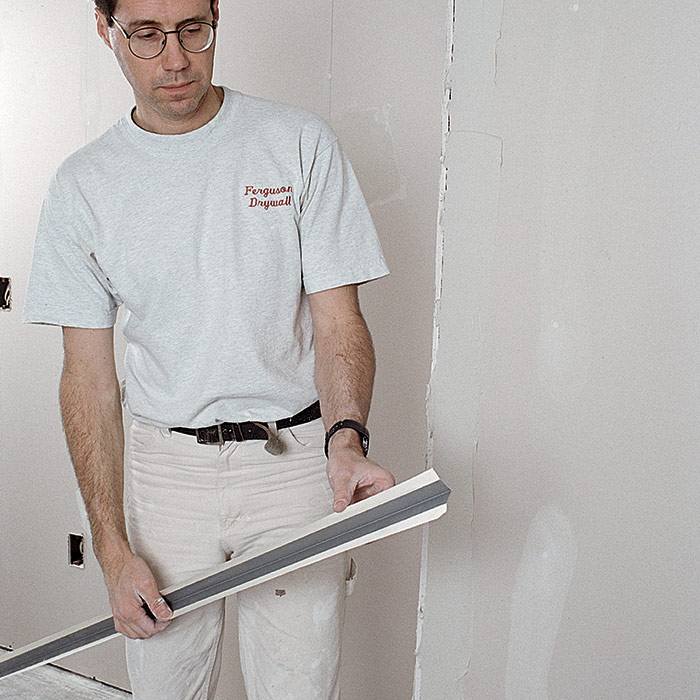
 

Vinyl beads

There are many different vinyl beads on the market, and all of them can be installed using any one of three methods. First, dry-fit the bead for length and check the fit. From there, you have three options. The first is to attach both legs of the bead every 6 in. to 10 in. with 1/2-in.-long staples. The second is to spray vinyl adhesive on the drywall and then on the bead, and then immediately attach the bead to the corner, pressing the legs into place. You can also use staples in addition to adhesive to create an even stronger corner. The third option is to set the bead in joint compound and then press the bead into place until the compound exudes through the holes. Then press and smooth the legs into place using a taping knife.


Attaching Vinyl Beads

Vinyl bead is more durable than metal bead, especially if it is fastened with adhesive and then stapled.
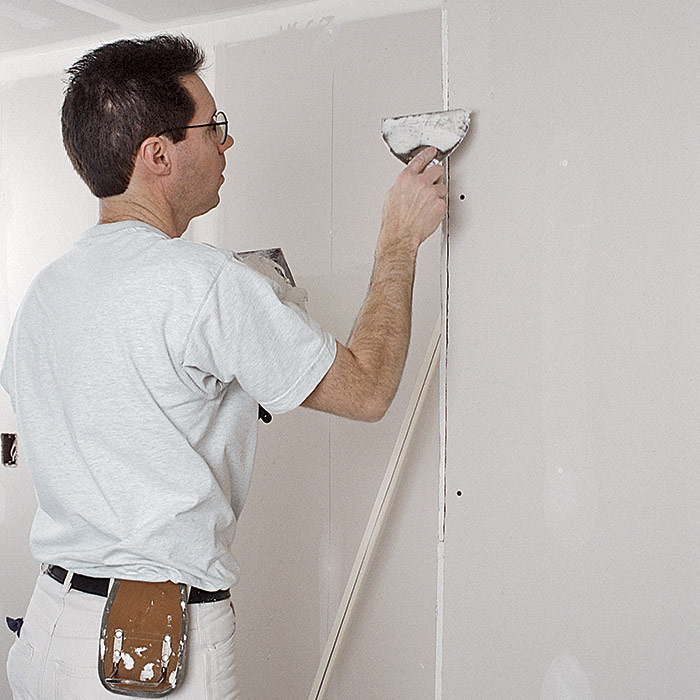
Spray it down
Spray it down: To attach vinyl bead to the drywall, spray an even coat of adhesive along the corner.

Lay on the bead
Lay on the bead: The adhesive holds the bead in place over the seam in the corner.

Secure it in place
Secure it in place: Stapling the bead ensures that it will stand up to the inevitable bumps against the corner.


Paper-faced beads

Both the paper-faced metal and the paper-faced plastic beads that I have used are installed with joint compound. Because edge seams often intersect corner beads, paper-faced beads are installed after the seams have been taped and coated with the first layer of joint compound. The compound fills the tape between panels and provides a more level surface for the corner bead. You can use either a taping knife or a corner roller to set the bead in the compound. Each brand and type (square or bullnose) has its own specially designed roller tool. Whichever method you use, press the bead into place and embed the paper flanges flat against the wall.

Prepare the corner bead
Prepare the corner bead: Start by trimming the corner bead to length, making sure to cut it 1⁄2 in. or so shy of the floor.

Coat the wall
Coat the wall: Apply an even coat of joint compound to the wall.

Roll it on
Roll it on: Use a 90-degree roller tool to embed the corner bead into the joint compound.

Smooth the corners
Smooth the corners: Use a taping knife to remove excess joint compound.


Shaped beads and their accessories

Bullnose corner beads have been around for a while now, but they’ve recently become quite popular. And they do add a refined look to the drywall job. On one of the first jobs I ever used the bullnose style all I had done was attach the bead and I was already getting compliments. They are available in diameter sizes ranging from 3/8 in. to 1-1/2 in. There are many accessories that go along with the styles: to make the transition from bullnose to straight, and for inside or outside corners. There is even a chamfer-style bead that is a good alternative for customers who want to keep straight lines but still like a little flair.

An array of options
An array of options: Numerous trim accessories make work easier for the bead installer, finisher, and trim carpenter.


WORK SMART: If you’re working with the larger bullnose beads, cut the drywall short to accommodate the curve of the bead.


Sign up for eletters today and get the latest how-to from Fine Homebuilding, plus special offers.

Signing you up...

This site is protected by reCAPTCHA and the Google Privacy Policy and Terms of Service apply.
See all newsletters
See all newsletters
Previous: How to Hang Airtight Drywall on Exterior Walls Next: Crisp Corners for Drywall

Guide

Drywall

Chapter

Hanging Drywall

Log in or create an account to post a comment.

Sign up Log in

Become a member and get full access to FineHomebuilding.com

Drywall

Drywall

Trusted, comprehensive guidance for choosing, hanging, taping, sanding, and repairing drywall—the right way

View Project Guide

View All Project Guides »

Become a member and get unlimited site access, including the Drywall Project Guide.

Start Free Trial

Drywall Basics
  • Types and Uses of Drywall
  • Planning the Job
Tools and Materials
  • Hanging Tools
  • Taping Tools and Materials
  • Sanding and Finishing Tools and Materials
Hanging Drywall
  • Prep for Hanging
  • Measuring and Cutting Drywall
  • Guidelines for Hanging and Fastening Drywall
  • Hanging Ceilings
  • Hanging Walls
  • Hanging Airtight Drywall
  • Trim Accessories/Corner Beads
Taping and Sanding
  • Taping Basics
  • Taping Seams
  • Taping Inside and Outside Corners
  • Sanding
Special Installations
  • Tricky Transitions
  • Curved Surfaces
  • Other Special Installations
  • Decorating with Drywall
Drywall Repairs
  • Patching Holes, Cracks, and More
Plaster
  • Working with Lime Plaster
  • Plaster Repair
  • Classic Plaster Techniques

Fine Home Building

Newsletter Sign-up

  • Fine Homebuilding

    Home building tips, offers, and expert advice in your inbox.

  • Green Building Advisor

    Building science and energy efficiency advice, plus special offers, in your inbox.

  • Old House Journal

    Repair, renovation, and restoration tips, plus special offers, in your inbox.

Signing you up...

This site is protected by reCAPTCHA and the Google Privacy Policy and Terms of Service apply.
See all newsletters

Follow

  • Fine Homebuilding

    Dig into cutting-edge approaches and decades of proven solutions with total access to our experts and tradespeople.

    Start Free Trial Now
    • Facebook
    • Instagram
    • X
    • LinkedIn
  • GBA Prime

    Get instant access to the latest developments in green building, research, and reports from the field.

    Start Free Trial Now
    • Facebook
    • YouTube
  • Old House Journal

    Learn how to restore, repair, update, and decorate your home.

    Subscribe Now
    • Facebook
    • Instagram
    • X

Membership & Magazine

  • Online Archive
  • Start Free Trial
  • Magazine Subscription
  • Magazine Renewal
  • Gift a Subscription
  • Customer Support
  • Privacy Preferences
  • About
  • Contact
  • Advertise
  • Careers
  • Terms of Use
  • Site Map
  • Do not sell or share my information
  • Privacy Policy
  • Accessibility
  • California Privacy Rights

© 2025 Active Interest Media. All rights reserved.

Fine Homebuilding receives a commission for items purchased through links on this site, including Amazon Associates and other affiliate advertising programs.

X
X
This is a dialog window which overlays the main content of the page. The modal window is a 'site map' of the most critical areas of the site. Pressing the Escape (ESC) button will close the modal and bring you back to where you were on the page.

Main Menu

  • How-To
  • Design
  • Tools & Materials
  • Video
  • Blogs
  • Forum
  • Project Guides
  • Reader Projects
  • Magazine
  • Members
  • FHB House

Podcasts

  • FHB Podcast
  • ProTalk

Webinars

  • Upcoming and On-Demand

Podcasts

  • FHB Podcast
  • ProTalk

Webinars

  • Upcoming and On-Demand

Popular Topics

  • Kitchens
  • Business
  • Bedrooms
  • Roofs
  • Architecture and Design
  • Green Building
  • Decks
  • Framing
  • Safety
  • Remodeling
  • Bathrooms
  • Windows
  • Tilework
  • Ceilings
  • HVAC

Magazine

  • Current Issue
  • Past Issues
  • Magazine Index
  • Subscribe
  • Online Archive
  • Author Guidelines

All Access

  • Member Home
  • Start Free Trial
  • Gift Membership

Online Learning

  • Courses
  • Project Guides
  • Reader Projects
  • Podcast

More

  • FHB Ambassadors
  • FHB House
  • Customer Support

Account

  • Log In
  • Join

Newsletter

Get home building tips, offers, and expert advice in your inbox

Signing you up...

This site is protected by reCAPTCHA and the Google Privacy Policy and Terms of Service apply.
See all newsletters
See all newsletters

Follow

  • X
  • YouTube
  • instagram
  • facebook
  • pinterest
  • Tiktok

Join All Access

Become a member and get instant access to thousands of videos, how-tos, tool reviews, and design features.

Start Your Free Trial

Subscribe

FHB Magazine

Start your subscription today and save up to 70%

Subscribe

We hope you’ve enjoyed your free articles. To keep reading, become a member today.

Get complete site access to expert advice, how-to videos, Code Check, and more, plus the print magazine.

Start your FREE trial

Already a member? Log in