FHB Logo Facebook LinkedIn Email Pinterest Twitter X Instagram Tiktok YouTube Plus Icon Close Icon Navigation Search Icon Navigation Search Icon Arrow Down Icon Video Guide Icon Article Guide Icon Modal Close Icon Guide Search Icon Skip to content
Subscribe
Log In
  • How-To
  • Design
  • Tools & Materials
  • Restoration
  • Videos
  • Blogs
  • Forum
  • Magazine
  • Members
  • FHB House
  • Podcast
Log In

Fine Homebuilding Project Guides

Drywall

Guide Home
  • Drywall Basics
  • Tools and Materials
  • Hanging Drywall
  • Taping and Sanding
  • Special Installations
  • Drywall Repairs
  • Plaster
How-To

A Hybrid Approach to Lime Plaster

Drywall backing speeds the way to a textured, durable, old-world finish.

By Ace McArleton Issue 278 - Oct/Nov 2018

Synopsis: While drywall has replaced plaster as the go-to material for walls and ceilings, it does not replace the look, feel, and durability of hand-applied plaster. Ace McArleton describes his approach to plastering, which involves using drywall as a base (primed with sand and glue) for lime plaster. The article describes the proportions of lime, sand, and water used to achieve a durable plaster that will trowel on easily, and then walks through the process of taping the walls followed by different techniques for using trowels to apply plaster to the field, around trim, and over outside corners. Watch the related video to see the process in action.


Traditional plastering is a slow, laborious process, so it’s no wonder that when drywall came on the scene, it quickly replaced plaster as the go-to material for walls and ceilings in American homes.

But while drywall replaced plaster in function, it doesn’t replicate the look, feel, and durability of hand-applied plaster. Unlike drywall, plaster is a truly custom finish that can be sculpted and troweled to any number of desired shapes and textures. One of my favorite types is lime plaster—a strong, environmentally friendly, beautiful finish that has been around for millennia.

finished lime plaster walls
A warm glow: Rich with texture, lime plaster has a high index of refraction that brings a subtle warmth to this Vermont home.

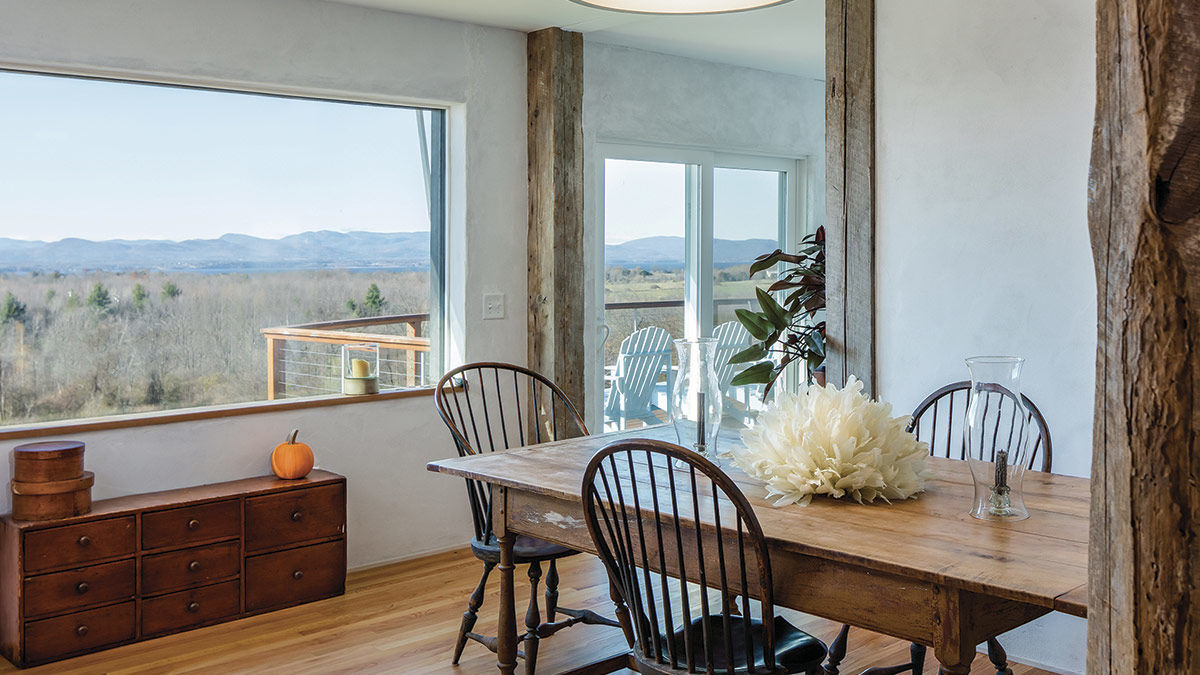
Made of a mix of sand, lime, and water, lime plaster has a high index of refraction, giving surfaces a warm glow that subtly changes color and tone as the sun shifts. The textures created by the sand and the plasterer’s trowel work can add even more dimensions of interest.
By contrast, the flat, smooth finish that drywall is meant to achieve in much of the United States is, by design, one-dimensional. When texture is added, it often just mimics traditional plasters.

Still, we like drywall. It’s a key component of our hybrid plastering approach, which takes advantage of some of drywall’s efficiency, availability, and strength, and melds it with the beauty of true lime plaster. Depending on the details, complexity, and size of the project, this method of plastering runs from $5 to $9 per sq. ft. This approach is more labor intensive than standard drywalling, but not nearly so laborious and costly as a standard three-coat plastering process.

Drywall replaces lath

Drywall provides a solid base for lime plaster, and goes up faster than the wood lath of the recent past. The drywall is hung in standard fashion, but it doesn’t get taped, so we don’t worry as much about the number of seams and can use shorter drywall panels, which makes it easier to estimate and hang.

establish the thickness of plaster
Screed to tape. Use painter’s tape to establish the thickness of the plaster, setting it to 1/4 in. to 1/2 in. out from the wall on all of the trim, ceilings, and windows. The tape serves as rudimentary screed lines, and it protects adjacent surfaces from the mess of plastering.

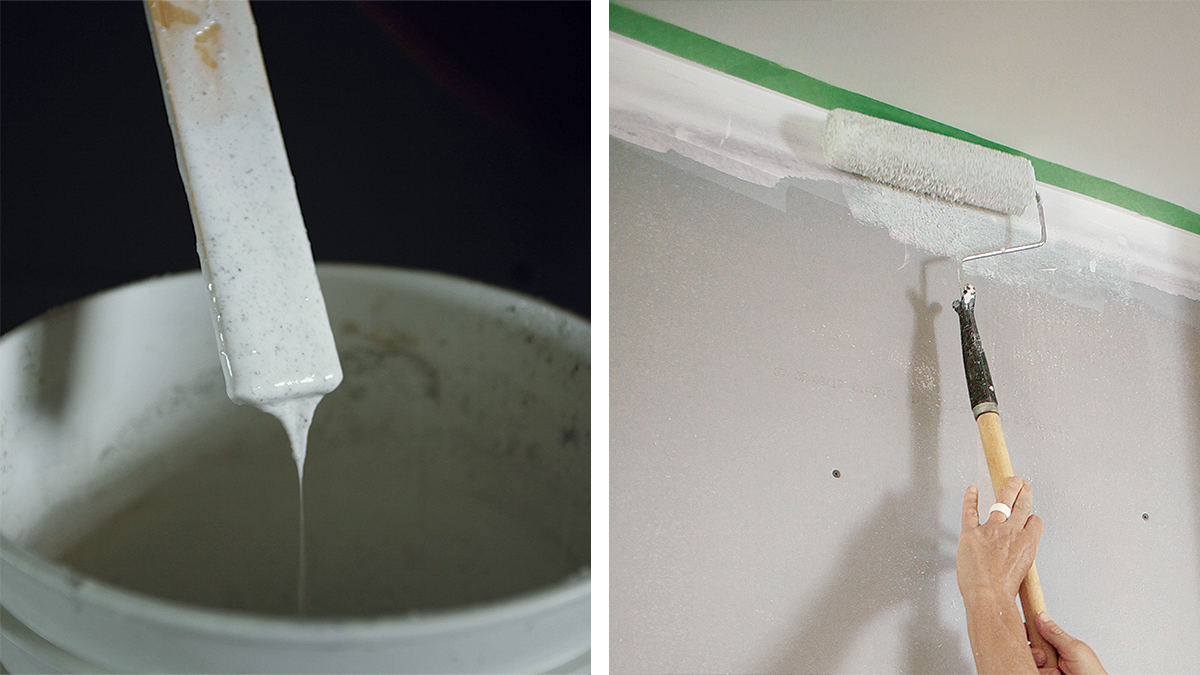
Typically we use standard drywall, which is designed to tolerate wetting from drywall compound and water-based paint, and tolerates wetting from lime plaster much the same. We prime the drywall with a mixture of sand and Elmer’s Glue-All (a PVA glue, which is similar to PVA-based primers). We roll and brush this slurry on just like paint to give the wall some tooth to help hold the plaster. We haven’t had issues with lime plaster failing on bare drywall, but taking this extra step is a cheap insurance policy, and it dries quickly.

giving drywall tooth
Give it some tooth. Brush and roll a mix of sand and PVA glue onto the bare drywall to give it some tooth to help hold the plaster.

On this job, the drywall contractor installed blueboard, which is made to serve as a base for veneer gypsum plasters. We’ve found that the extra expense of blueboard isn’t necessary, but it doesn’t hurt either.

The right mix is key

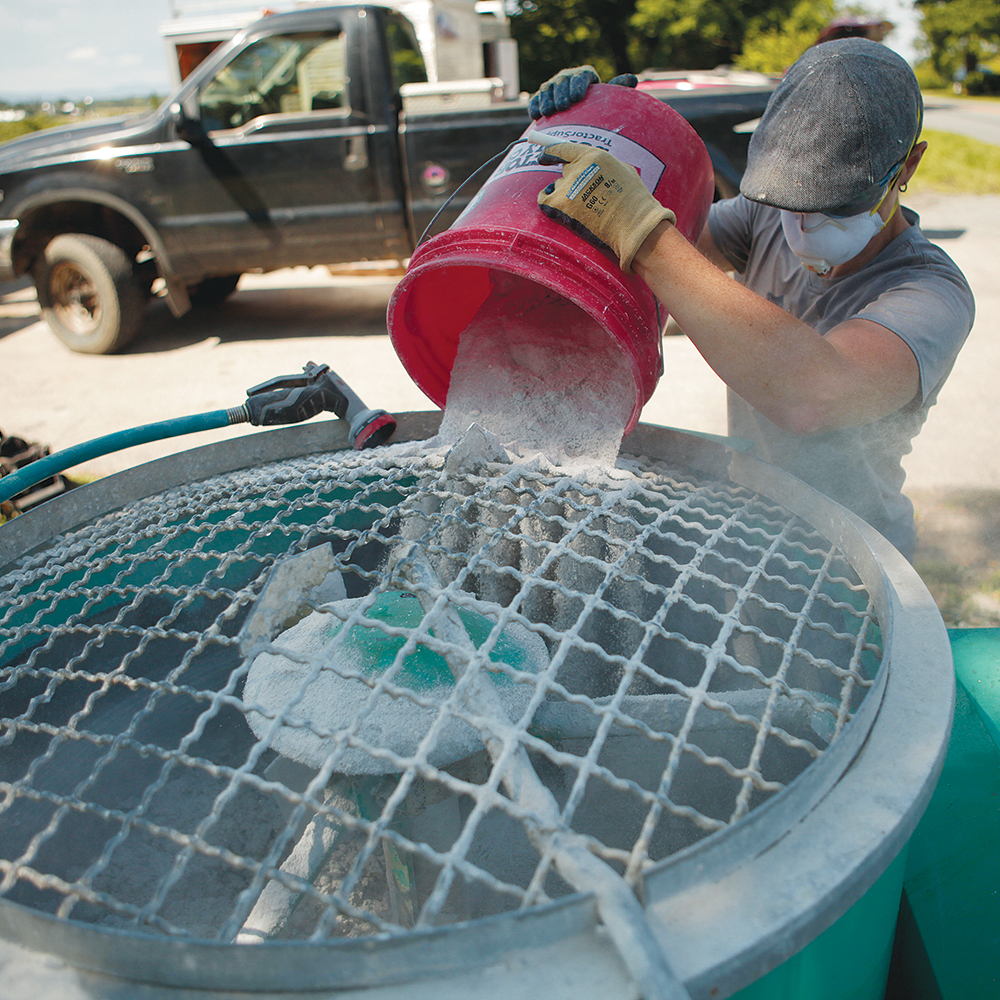
The lime plaster used here has two primary components: sand and hydrated lime. If you think about it like a brick wall, the sand is the brick, which provides the structure, and the lime is the mortar that holds it together. The sand needs to be sharp and clean and have a variety of grain sizes, but none any larger than about one-fifth the thickness of the plaster layer. Larger grain sizes give the plaster a coarser texture; for smoother finishes, use finer sand.

For finish plasters, we typically use limestone sand because its light color creates a bright plaster, and Type S mason’s lime, which is commonly found in 50-lb. bags from local building supply yards. Ask for the freshest bags—the longer the product might have been exposed to moisture and air, the less active the contents will be.

mixing lime plaster
Master the mix. For this process, the ratio of hydrated lime to sand should generally be at least 1:2, but no less than 1:4. Wear a suitable respirator when mixing to avoid breathing in the lime.

plaster ball test
Ball test. Form a ball of plaster. It shouldn’t fall apart when tossed, and should stick to the inside wall of a wheelbarrow when thrown against it.

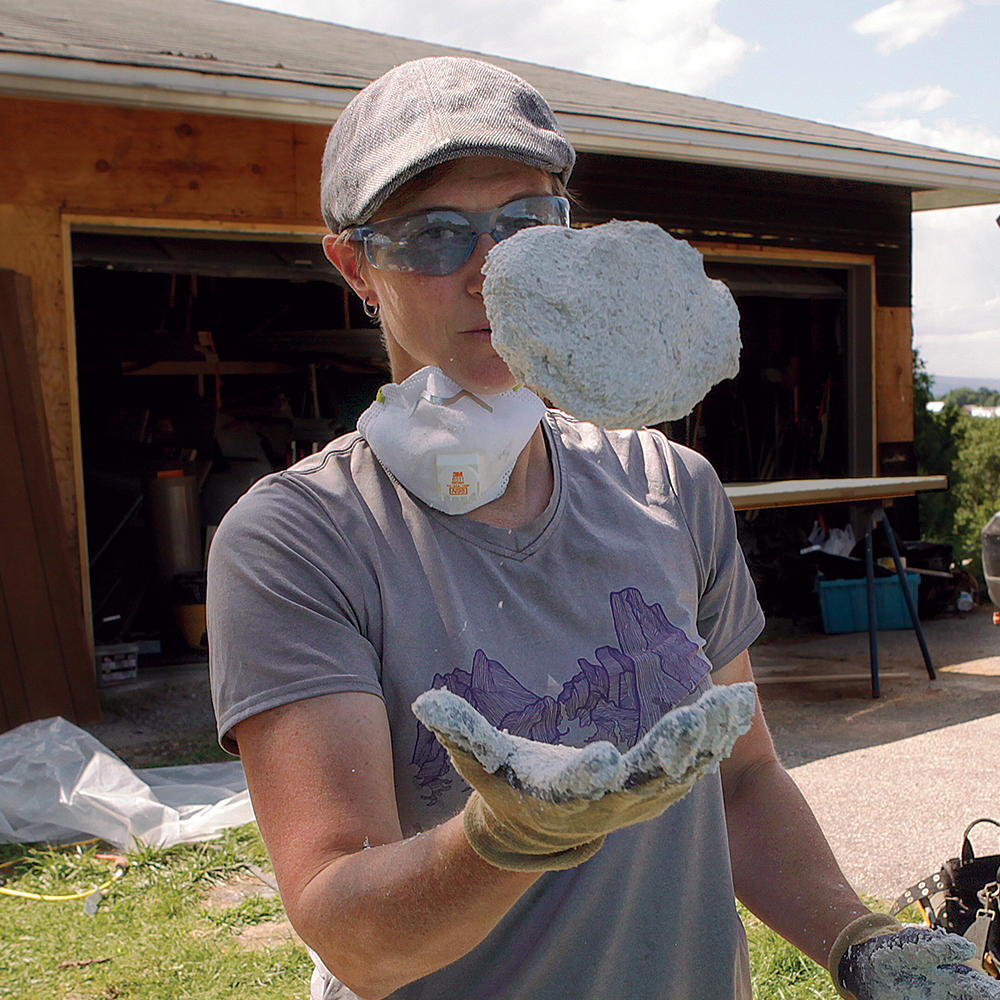
Getting the proportions of lime, sand, and water just right is critical to creating a durable plaster that will trowel on easily. For this process, the lime to sand ratio shouldn’t be more than 1:2, or less than 1:4. The mix used here is one part Type S mason’s lime to three parts sand. Add water a little at a time until the plaster can be formed into a ball that doesn’t fall apart when tossed, and that sticks to the inside wall of a wheelbarrow when thrown against it.

It’s better to add too little water at first than too much—too much water will cause hairline cracks to form as the water evaporates and the plaster shrinks. The less water, the less shrinkage. Still, water is needed to activate the lime and make a workable plaster. After mixing, give the lime 24 hours to activate—keeping it covered—before applying the plaster.

setup for plaster
Plasterer’s setup. Set mortar boards at a comfortable height, and temper the plaster with spritzes of water as needed to maintain its consistency. Dedicate a worker to refilling mortar boards so the plasterers can focus on plastering.

Unlike cement stucco or gypsum plaster, hydrated lime plaster sets only when exposed to air, and will stay soft indefinitely if kept sealed from it. This is distinct from hydraulic lime, which will even set under water.

Hydrated lime hardens in two ways—first by drying, but more importantly by curing, during which the hydrated lime absorbs carbon dioxide from the air and recrystallizes into limestone. The process of making lime from limestone drives off carbon dioxide, but because CO2 is reabsorbed during the curing process, it’s a desirable material for green building.

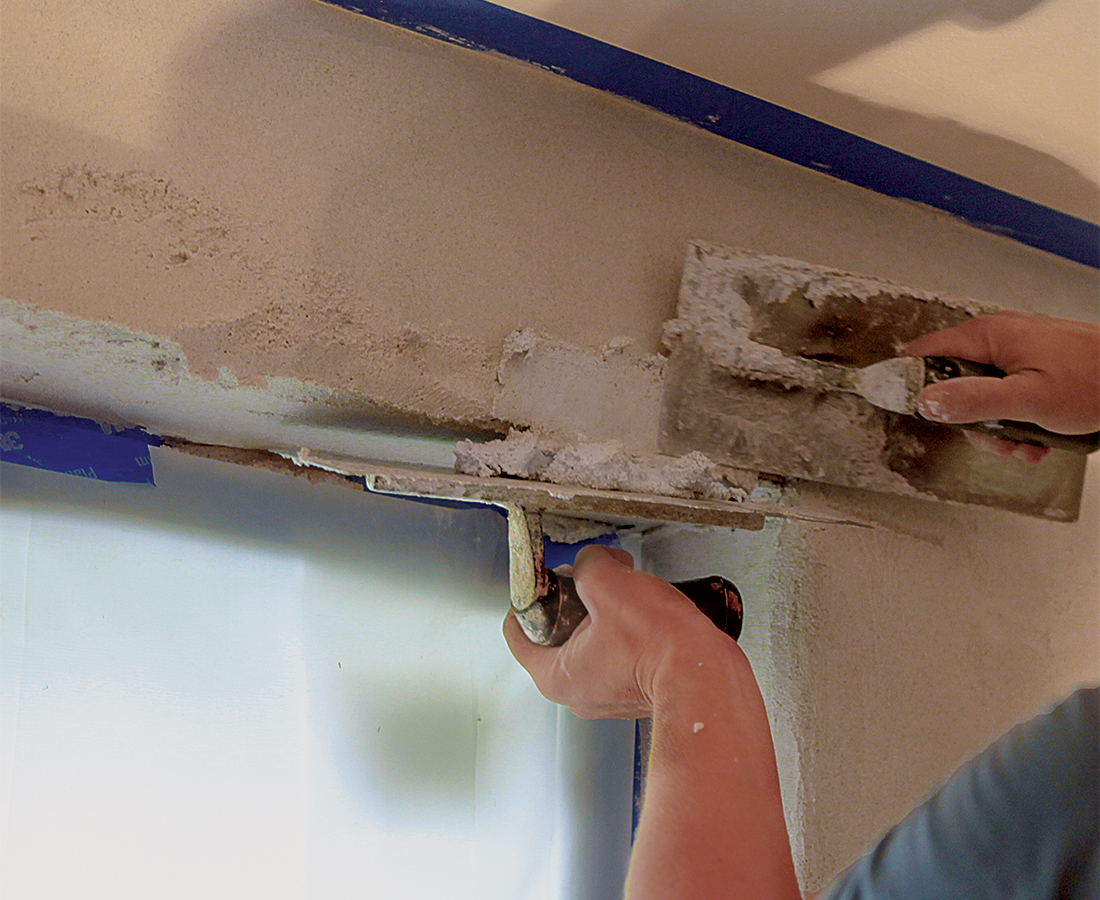
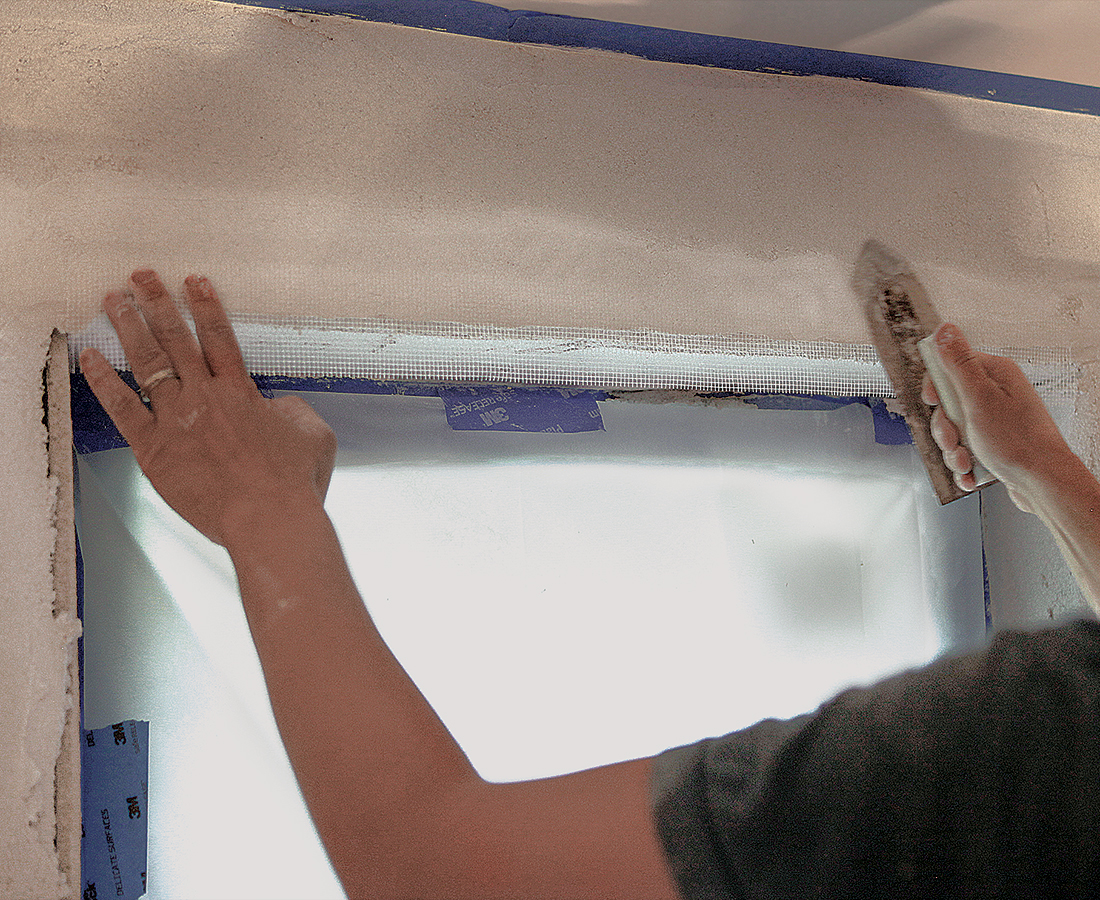
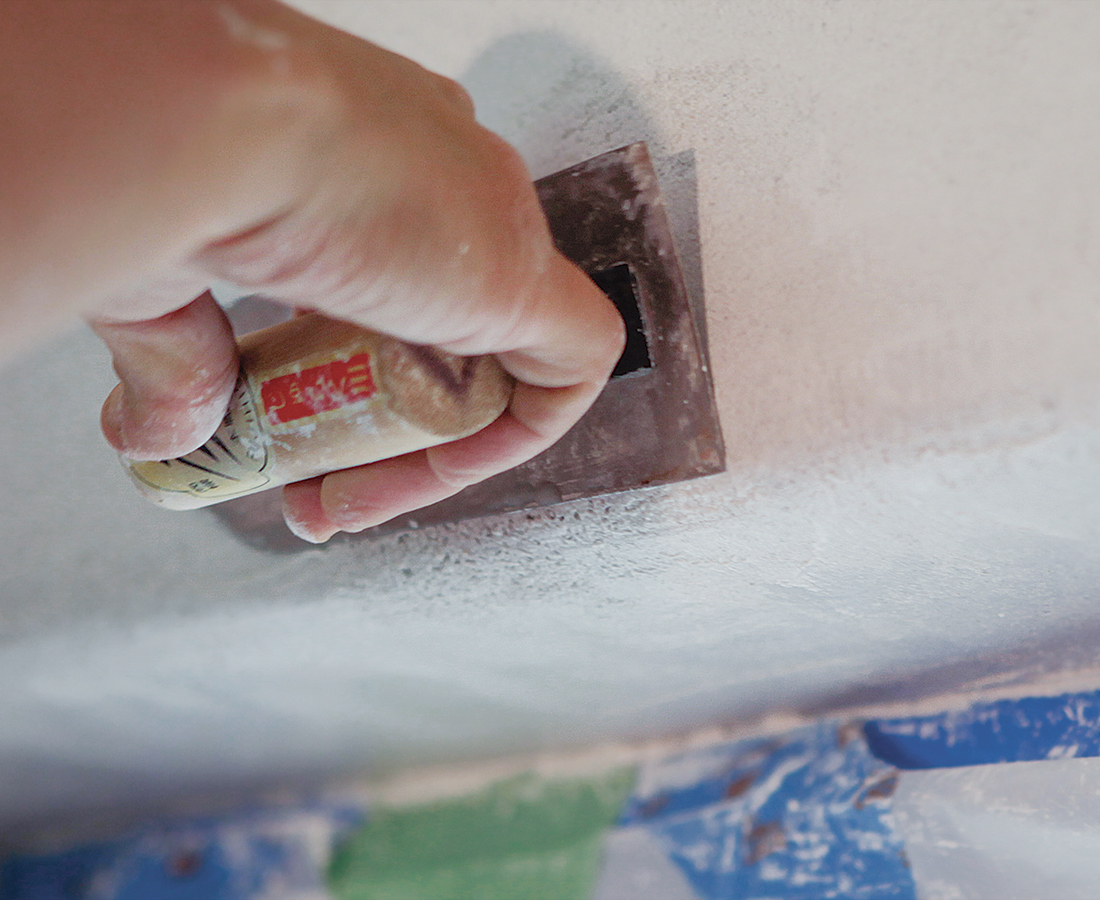
Trowels and textures

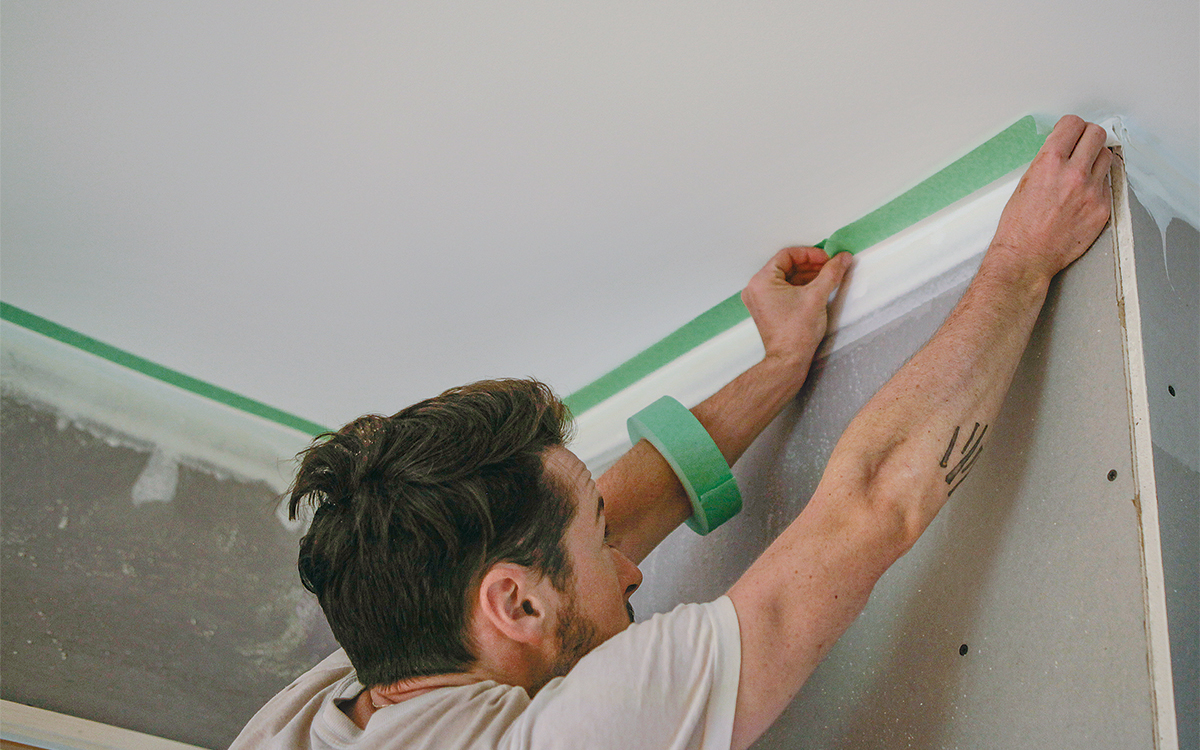
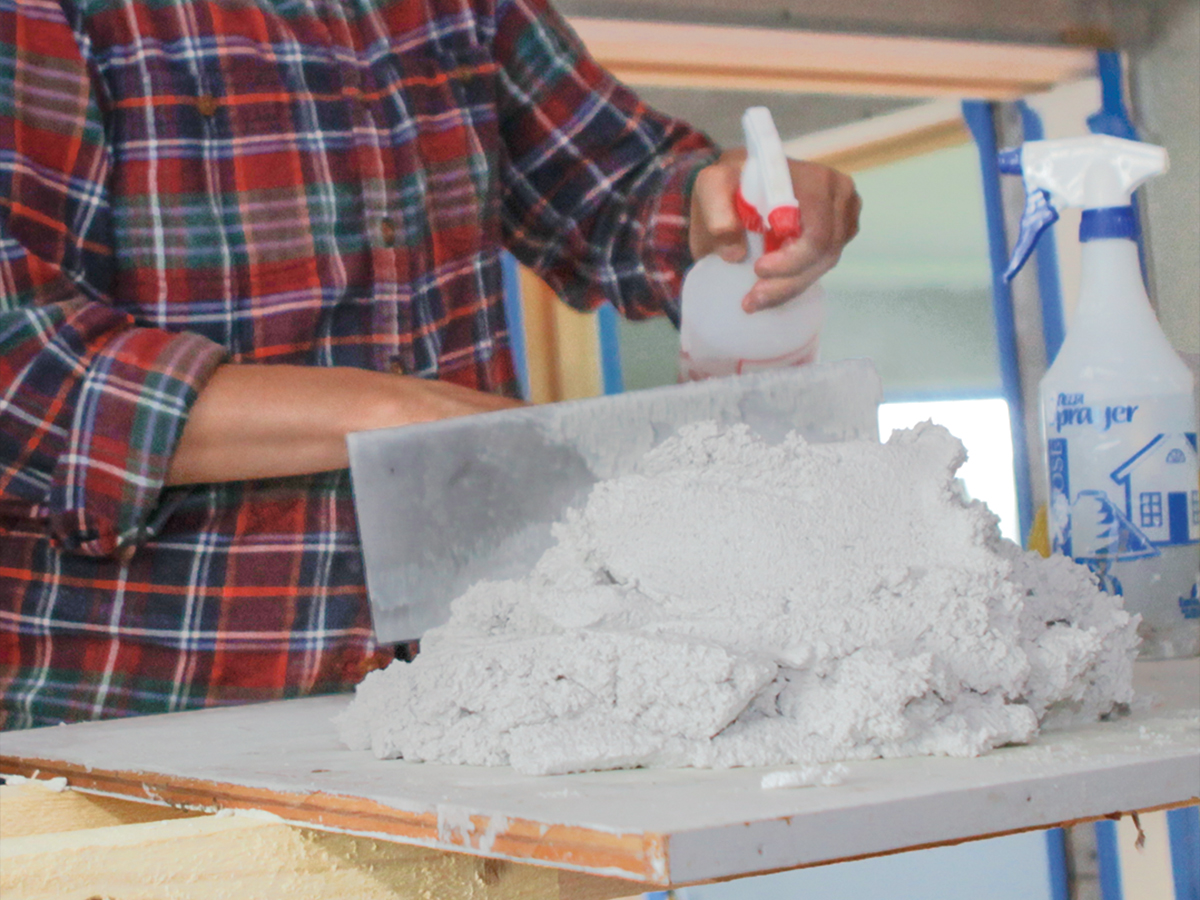
Coats of lime plaster need to be thin to absorb enough carbon dioxide to cure properly. When plastering over drywall, we use a single coat that’s 1/4 in. to 1/2 in. thick. To aid in getting the thickness right, we use painter’s tape to set reference lines on the trim, ceilings, and windows. The tape serves as rudimentary screed lines, and protects adjacent surfaces from errant plaster.

plaster around wall trim
Finish to finish. It’s easier to mold wet plaster to solid trim than it is to scribe solid trim to rock-hard plaster, so install trim before plastering. Rabbet the backside of large wood trim and tuck plaster behind it to prevent gapping as the trim expands and contracts.

getting plaster on the wall
Get it on. Use two trowels to quickly pick up and transfer loads of plaster to the wall. When one arm gets tired, switch arms without switching tools. Square-edged plaster trowels are ideal for applying large amounts of plaster to the field of a wall or ceiling.

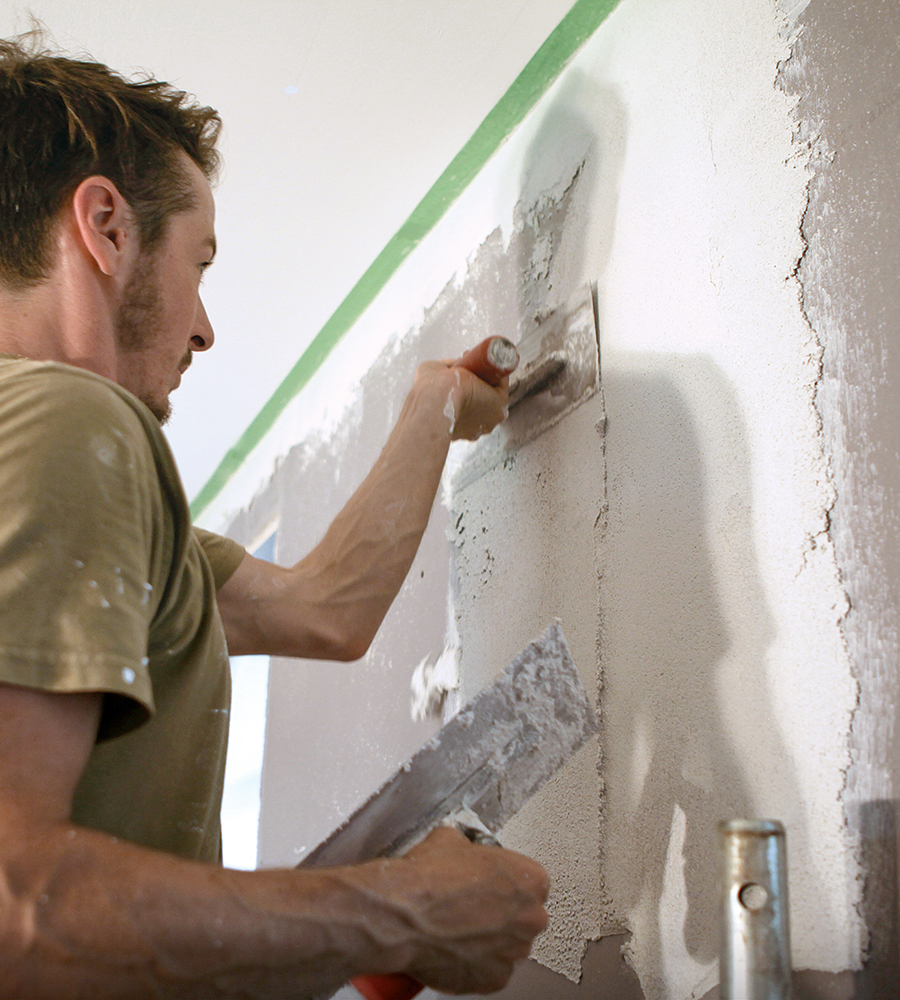
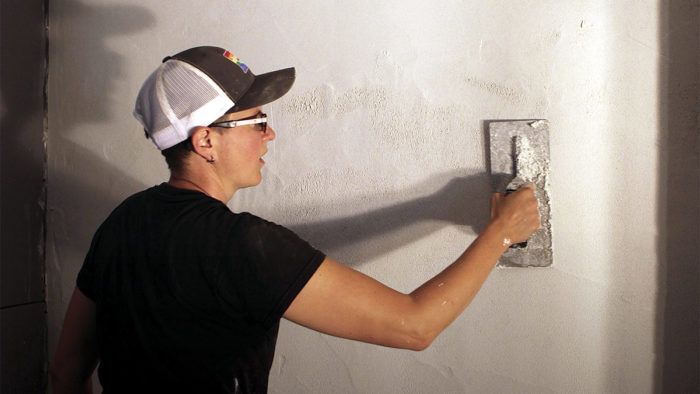
The mechanics of getting plaster onto the wall and achieving the desired texture take practice, and would take volumes to explain, but there are some general guidelines. Lime plaster has a long open time, which can be stretched out by tempering the plaster on the wall with spritzes of water—but do this with caution. Too much water can weaken the plaster and cause cracking. It’s also important to not overwork the plaster, as the heat and friction generated by troweling can also weaken it.

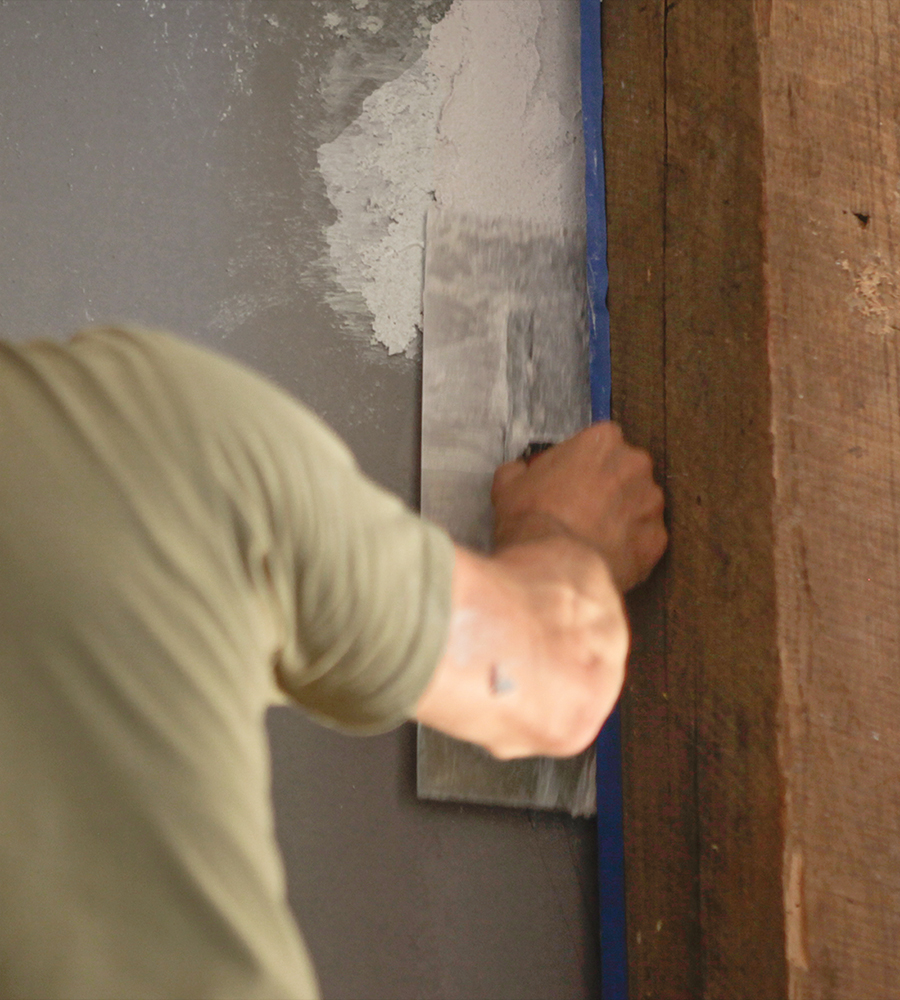
Rectangular plaster trowels and round-edged pool trowels are best for getting lime plaster onto the field of walls and moving it around. Both of these tools are large and can load and smooth large amounts of material with each stroke. For small areas, corners, and returns, use a small pointing trowel or margin trowel to get the plaster in just the right spot.

smooth plaster with a pool trowel
Smooth it out. Use a pool trowel to smooth the plaster without leaving tool marks behind. For added texture, smooth with a square-edged trowel first, then a pool trowel after the plaster has firmed up a bit.

use japanese trowel for lime plaster
Before it sets. Remove the tape screed lines while the plaster is still wet so it doesn’t get trapped. If the plaster pulls away where it overlaps the tape, smooth it out with a small margin trowel or flexible Japanese trowel.

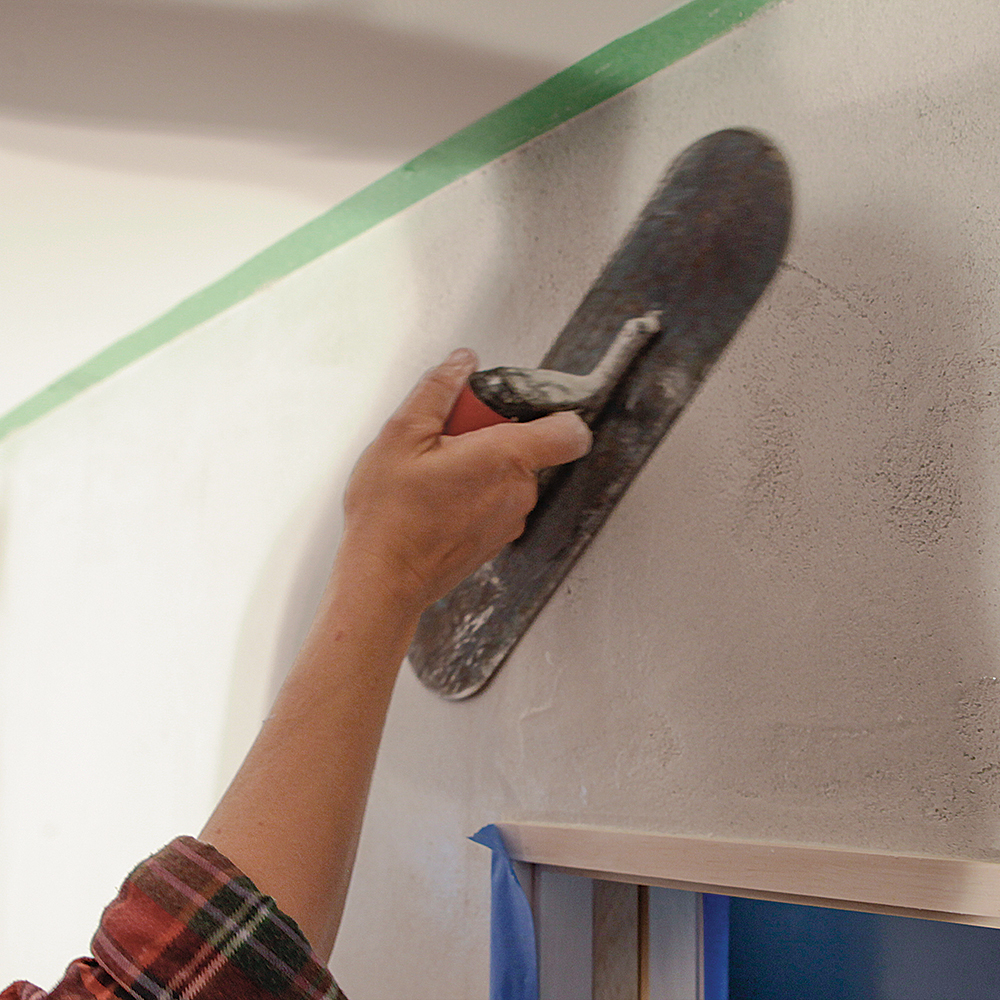
Start plastering at the top of an inside or outside corner, and use the tape screed line on the ceiling to establish the thickness of the plaster. Starting at the top and working down is crucial to preventing dropped plaster from marring the work you’ve already done.

Don’t worry about getting the surface flat right away; it’s more important to get enough material on the wall to be able to move it around. After getting enough plaster on the wall to cover about 10 sq. ft., use large trowels and bodyweight to trowel it to the right thickness. Once that’s established, use the edge of that section as a reference to extend the field of plaster across the top half of the wall. Before moving to the bottom of the wall, trowel the plaster flat with a pool trowel. As it hardens, it gets harder to smooth.

plastering tricky areas
Two-trowel technique. Use two trowels— one to apply plaster, and one to hold material and catch drops— when working areas where the plaster has a harder time sticking, such as outside corners.

reinforcing plaster with drywall mesh
Fiber reinforcement. Reinforce inside and outside corners with drywall mesh tape to add strength and prevent cracking. Apply a layer of plaster, embed the tape, and apply more plaster to bury the tape.

easing plaster outside corners
Round it out. To ease outside corners, move the trowel from one plane to the next, keeping the trowel’s trailing edge in contact with the surface to round it over.

The plaster will be leather-hard in about four hours, and takes three to seven days to cure. Because it needs some water to cure, it may be necessary to occasionally spritz the walls with water, but tarping the walls with fabric or plastic isn’t necessary for indoor applications.

For more on Lime Plaster:

  • VIDEO: Lime-Plaster Installation Over Drywall
  • A Short Guide to Lime-Plaster Trowels
  • Add Color to Lime-Plaster Walls
  • From Rock to Dust to Rock Again: An In-Depth Look at Hydrated Lime
  • Lime-Plaster Transformation: A Slideshow


To view the article as a PDF, please click the View PDF button below.

Sign up for eletters today and get the latest how-to from Fine Homebuilding, plus special offers.

Signing you up...

This site is protected by reCAPTCHA and the Google Privacy Policy and Terms of Service apply.
See all newsletters
See all newsletters
View PDF
Next: Lime-Plaster Installation Over Drywall

Guide

Drywall

Chapter

Plaster

View Comments

  1. karlaudi | Jan 22, 2019 05:55pm | #1

    My first, built in late 1941, and my third and current home, built in 1954, used drywall button board as "lath" and then were covered in smooth plaster on all interior wall and ceiling surfaces.

    My second home, built in 1951, used standard drywall with a skim coat applied in a manner that mimicked a randomly textured plaster wall on all interior wall and ceiling surfaces.

Log in or create an account to post a comment.

Sign up Log in

Become a member and get full access to FineHomebuilding.com

Drywall

Drywall

Trusted, comprehensive guidance for choosing, hanging, taping, sanding, and repairing drywall—the right way

View Project Guide

View All Project Guides »

Become a member and get unlimited site access, including the Drywall Project Guide.

Start Free Trial

Drywall Basics
  • Types and Uses of Drywall
  • Planning the Job
Tools and Materials
  • Hanging Tools
  • Taping Tools and Materials
  • Sanding and Finishing Tools and Materials
Hanging Drywall
  • Prep for Hanging
  • Measuring and Cutting Drywall
  • Guidelines for Hanging and Fastening Drywall
  • Hanging Ceilings
  • Hanging Walls
  • Hanging Airtight Drywall
  • Trim Accessories/Corner Beads
Taping and Sanding
  • Taping Basics
  • Taping Seams
  • Taping Inside and Outside Corners
  • Sanding
Special Installations
  • Tricky Transitions
  • Curved Surfaces
  • Other Special Installations
  • Decorating with Drywall
Drywall Repairs
  • Patching Holes, Cracks, and More
Plaster
  • Working with Lime Plaster
  • Plaster Repair
  • Classic Plaster Techniques

Fine Home Building

Newsletter Sign-up

  • Fine Homebuilding

    Home building tips, offers, and expert advice in your inbox.

  • Green Building Advisor

    Building science and energy efficiency advice, plus special offers, in your inbox.

  • Old House Journal

    Repair, renovation, and restoration tips, plus special offers, in your inbox.

Signing you up...

This site is protected by reCAPTCHA and the Google Privacy Policy and Terms of Service apply.
See all newsletters

Follow

  • Fine Homebuilding

    Dig into cutting-edge approaches and decades of proven solutions with total access to our experts and tradespeople.

    Start Free Trial Now
    • Facebook
    • Instagram
    • X
    • LinkedIn
  • GBA Prime

    Get instant access to the latest developments in green building, research, and reports from the field.

    Start Free Trial Now
    • Facebook
    • YouTube
  • Old House Journal

    Learn how to restore, repair, update, and decorate your home.

    Subscribe Now
    • Facebook
    • Instagram
    • X

Membership & Magazine

  • Online Archive
  • Start Free Trial
  • Magazine Subscription
  • Magazine Renewal
  • Gift a Subscription
  • Customer Support
  • Privacy Preferences
  • About
  • Contact
  • Advertise
  • Careers
  • Terms of Use
  • Site Map
  • Do not sell or share my information
  • Privacy Policy
  • Accessibility
  • California Privacy Rights

© 2025 Active Interest Media. All rights reserved.

Fine Homebuilding receives a commission for items purchased through links on this site, including Amazon Associates and other affiliate advertising programs.

X
X
This is a dialog window which overlays the main content of the page. The modal window is a 'site map' of the most critical areas of the site. Pressing the Escape (ESC) button will close the modal and bring you back to where you were on the page.

Main Menu

  • How-To
  • Design
  • Tools & Materials
  • Video
  • Blogs
  • Forum
  • Project Guides
  • Reader Projects
  • Magazine
  • Members
  • FHB House

Podcasts

  • FHB Podcast
  • ProTalk

Webinars

  • Upcoming and On-Demand

Podcasts

  • FHB Podcast
  • ProTalk

Webinars

  • Upcoming and On-Demand

Popular Topics

  • Kitchens
  • Business
  • Bedrooms
  • Roofs
  • Architecture and Design
  • Green Building
  • Decks
  • Framing
  • Safety
  • Remodeling
  • Bathrooms
  • Windows
  • Tilework
  • Ceilings
  • HVAC

Magazine

  • Current Issue
  • Past Issues
  • Magazine Index
  • Subscribe
  • Online Archive
  • Author Guidelines

All Access

  • Member Home
  • Start Free Trial
  • Gift Membership

Online Learning

  • Courses
  • Project Guides
  • Reader Projects
  • Podcast

More

  • FHB Ambassadors
  • FHB House
  • Customer Support

Account

  • Log In
  • Join

Newsletter

Get home building tips, offers, and expert advice in your inbox

Signing you up...

This site is protected by reCAPTCHA and the Google Privacy Policy and Terms of Service apply.
See all newsletters
See all newsletters

Follow

  • X
  • YouTube
  • instagram
  • facebook
  • pinterest
  • Tiktok

Join All Access

Become a member and get instant access to thousands of videos, how-tos, tool reviews, and design features.

Start Your Free Trial

Subscribe

FHB Magazine

Start your subscription today and save up to 70%

Subscribe

We hope you’ve enjoyed your free articles. To keep reading, become a member today.

Get complete site access to expert advice, how-to videos, Code Check, and more, plus the print magazine.

Start your FREE trial

Already a member? Log in