
Plastering and Plaster Repair
Traditional plastering is a master craft, but repairs are comparatively straightforward.
People have used plaster in buildings since prehistoric times. Archaeologists have unearthed plaster walls and floors dating to 6000 B.C. in Mesopotamia. And the hieroglyphics of early Egypt were painted on plaster walls. In North America, plaster had been the preferred wall and ceiling surface until after World War II, when gypsum drywall entered the building boom. Although drywall represents a historic shift in building technology, the shift was more one of evolution than revolution because drywall’s core material is gypsum rock—the same material used since ancient times to make plaster.
Plastering
This section is limited to plaster repairs because applying plaster takes years to master (though a hybrid approach to lime plaster is a good option for getting the look and durability of plaster without all of the hassle). The tools needed for plaster repair are much the same as those needed for drywall repair: a screw gun or cordless drill; 6-in. and 12-in. taping knives; a mason’s hawk; and a respirator if you’ll be removing or cutting into plaster. There’s a lot of grit, so wear goggles, too.
Anatomy of a plaster job
Traditional plastering has several steps:
- Nail the lath to the framing.
- Trowel a scratch coat of plaster onto the lath. The wet plaster of this coat oozes through the gaps in the lath and becomes a mechanical key when it hardens.
- Trowel on, then roughen the brown coat after it has set slightly.
- Trowel on a finish, or white coat, which becomes the final, smooth surface.
In the old days, plasterers often mixed animal hair into scratch and brown coats to help them stick. As a result, old plaster that’s being torn out is nasty stuff to breathe. The finish coat was usually a mixture of gauging plaster and lime for uniformity. Scratch coats and brown coats were left rough and were often scratched with a plasterer’s comb before they set completely so the next coat would have grooves to adhere to. Finish coats were quite thin (1/16 in.) and very hard.
Lath can be a clue to a house’s age. The earliest wood lath was split from a single board so that when the board was pulled apart (side to side), it expanded like an accordion. Although metal lath was available by the late 1800s (it was patented in England a century earlier), split-wood lath persisted because it could be fashioned on site with little more than a hatchet. By 1900, however, most plasterers had switched from lime plaster to gypsum plaster, which dried much faster. And about the same time, plasterers began using small paper-coated panels of gypsum instead of wood or metal lath. Called gypsum lath or rock lath, the panels were so easy to install that they dominated the market by the 1930s. But time and techniques march on. After World War II, drywall all but replaced plaster as a residential surface.
Repair or Replace Plaster?To decide whether plaster should be repaired or replaced, first assess how well it is attached to the lath. To do this, near stains, cracks, holes, or sagging sections, press the plaster with your hand. If the plaster is springy, it has probably separated from its lath and must be reattached before you try to repair it.
|
Plastering
|
|
|
|
Small Repairs
Small cracks or holes in plaster can be filled with patching plaster or Fix-It-All patching compound, which dries fast and is super strong. Because joint compound is softer, sands easily, and sets slower than patching plaster, it’s easier to work with. Setting-type joint compounds are better for patching than drying-type joint compounds, which just aren’t as strong. To ensure a good bond, strip paint from the surfaces you’re patching and sand the adjacent areas lightly before applying compound.
Small cracks in plaster are repaired by stripping surface paint, cleaning loose plaster, and undercutting the cracks slightly with a knife or a small, sharp-pointed lever-type can opener (also called a “church key”). Undercutting allows the patching material to harden and form a key that won’t fall out. Before patching, wet the exposed plaster well and brush on a polyvinyl acetate (PVA) bonder such as Plaster-Weld or Elmer’s White Glue to bond the patch to the old plaster.
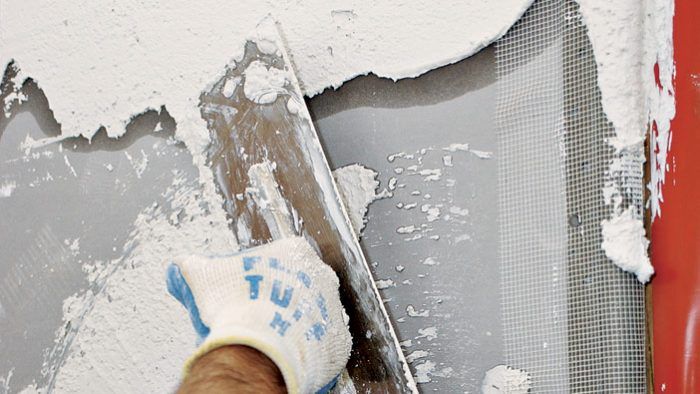
Over the crack, stretch a length of self-adhering fiberglass mesh. Then use a taping knife to spread the joint compound or patching plaster over the tape. Sand the first coat of joint compound lightly, leaving it a little rough so the second coat adheres better. Then apply the second coat, feathering it out to blend in the patch’s edges.
When the patch dries, sand it lightly with fine, 220-grit sandpaper, wipe it clean, allow it to dry thoroughly, and prime the patch with PVA primer.
Just Wiggle Your FingersTo mix plaster, pour it into water as you wiggle your fingers in the bottom of the pan. Mixed that way, the plaster will set slowly and will be usable longer. If you pour water into plaster, on the other hand, it will start setting within 5 minutes. Plaster is easier to clean up if you mix it in a plastic tub. Allow it to dry, then strike or twist the bottom of the tub to make the plaster fall out in chunks. |
Large cracks often accompany sections of bowed or sagging plaster, which have pulled free from the lath. If the plaster is sound—not crumbling—you can reattach it to the lath using type W drywall screws and plaster washers, which fit under the heads of the screws. A screw gun is good for this operation.
However, before you attach the screws, mark their locations on the plaster, and use a spade bit to countersink a hole 1/8 in. deep for each washer. Sunk below the surface of the plaster, the screw heads and washers will be easy to cover with patching compound.
Place screws and washers every 8 in. to 10 in. on both sides of the crack and anywhere else the plaster seems springy and disconnected from the lath. Once you’ve stabilized the crack in this manner, scrape, tape, and fill it, as described earlier.
Small holes, the size of an electrical outlet, are easy to fill if the lath is still in place. Remove any loose plaster, brush out the debris, wet the lath and the surrounding plaster well, brush on a PVA bonder, and trowel in patching material. Leave the first coat a little rough, let it dry well, and apply bonder again before troweling in a second, smooth coat.
If the hole has no lath behind it, you’ll need to add some. Scrape the loose plaster from the edge of the hole. As shown in “Patching Holes in Plaster,” cut a piece of metal lath larger than the hole and loop a short piece of wire through the middle of the lath. Then, holding the ends of the wire, slide the lath into the hole. To pull the lath tight against the back of the hole, insert a pencil into the front of the loop and turn the pencil like an airplane propeller until the wire is taut. The pencil spanning the hole holds the lath in place.
After wetting the lath and surrounding plaster, spread a rough coat of compound into the hole. When the coat has set, unwind the wire, remove the pencil, and push the wire into the wall cavity. The hardened plaster will hold the metal lath in place. Trowel on the finish coat.
Large holes with lath intact should be partially patched with a piece of drywall slightly smaller than the hole. Because a hole with square corners is easier to patch than an irregular one, square up the edges of plaster using an oscillating multitool with an abrasive wheel. (Wear safety glasses.) Be careful not to cut through the lath. Use type W drywall screws to attach the drywall to the lath behind, stretch self-adhering fiberglass mesh tape around the perimeter of the patch, and apply joint compound or patching plaster as described earlier. For best results, the drywall should be slightly thinner than the existing plaster so you have some room to build up and feather out the patch.
As an alternative, pegboard is a dandy substrate for these patches because you can cut it easily with a jigsaw to fit irregular holes. Hold a sheet of 1/4-in. pegboard over the plaster, eyeball and trace the shape of the patch through the holes in the pegboard, and screw the pegboard to the lath—textured side out. The patching plaster will ooze through the holes in the pegboard and harden in the same manner that plaster keys into the spaces between lath strips.
