FHB Logo Facebook LinkedIn Email Pinterest Twitter X Instagram Tiktok YouTube Plus Icon Close Icon Navigation Search Icon Navigation Search Icon Arrow Down Icon Video Guide Icon Article Guide Icon Modal Close Icon Guide Search Icon Skip to content
Subscribe
Log In
  • How-To
  • Design
  • Tools & Materials
  • Restoration
  • Videos
  • Blogs
  • Forum
  • Magazine
  • Members
  • FHB House
  • Podcast
Log In

Fine Homebuilding Project Guides

Drywall

Guide Home
  • Drywall Basics
  • Tools and Materials
  • Hanging Drywall
  • Taping and Sanding
  • Special Installations
  • Drywall Repairs
  • Plaster
How-To

Taping Inside Corners

This two-coat approach is the best way to tape these potentially tricky areas.

By Myron R. Ferguson

Inside corners are a little more difficult to tape than flat seams, because it can be tricky to get one side of the corner smooth without roughing up the other side. I prefer to use paper tape on inside corners. Mesh tape is a little more difficult to work with but it can be used in corners as well. Just remember that mesh tape doesn’t hold a crease well and it’s easy to cut or sand through.

Using mesh tape
Using mesh tape: If you use mesh tape on inside corners, apply it before the compound. Push the tape tight into the corner so it is centered and free of wrinkles.

Generally, the paper tape is embedded in a layer of joint compound and then covered with one or two thin coats. One coat is usually enough, but sometimes two are necessary (industry recommendations call for only one coat over inside corners).

First coat

The method I’ve used for years is to apply the undiluted compound (all-purpose or taping) right from the bucket with a 4-in. or 5-in. taping knife. Spread a layer about 4 in. wide and 1/8 in. thick or less into each edge of the corners. Make sure the entire inside corner is covered with compound, with no dry areas or unfilled gaps between the panels.

An alternative is to apply the compound with a 4-in. corner roller. You’ll need to thin the compound with a little water, but in one swipe the roller gives you an even layer of compound on both sides of the corner. This method is quite a bit faster than using a taping knife and works well with a mechanical corner roller and finishers.

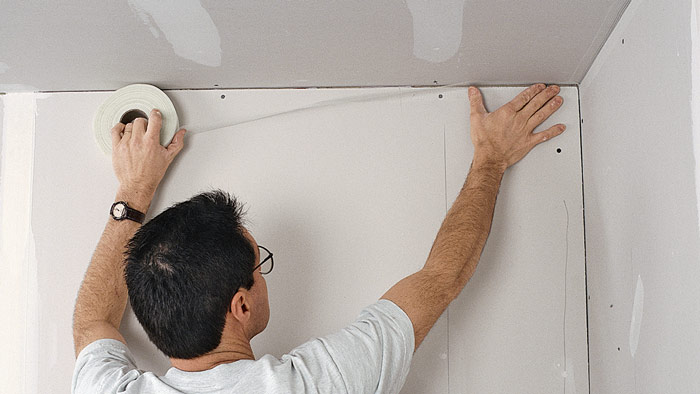
Fold the tape along its crease and lightly press it into the corner every 12 in. or so, keeping the tape pulled tight as you go. Now embed the tape into the compound with a 4-in. or 5-in. taping knife, working on one side of the corner at a time.


Taping Inside Corners

Though taping inside corners is a bit more finicky than taping flat seams, the procedure is largely the same: Lay on a thin layer of compound, set tape over the seam, and embed it in place.

Spread the compound
Spread the compound: For inside corners, apply the embedding coat of compound to each side with a taping knife. An alternative is to apply slightly diluted compound with a 4-in. corner roller.

Apply the tape
Apply the tape: Position the folded, precreased paper tape in the corner. Pull it tight and press it into the compound every foot or so. Tear the end of the tape to a slight point that fits the corner.

Embed the tape
Embed the tape: Use a drywall knife to embed the tape into the corner one edge at a time. Remove the wrinkles and feather the edges.


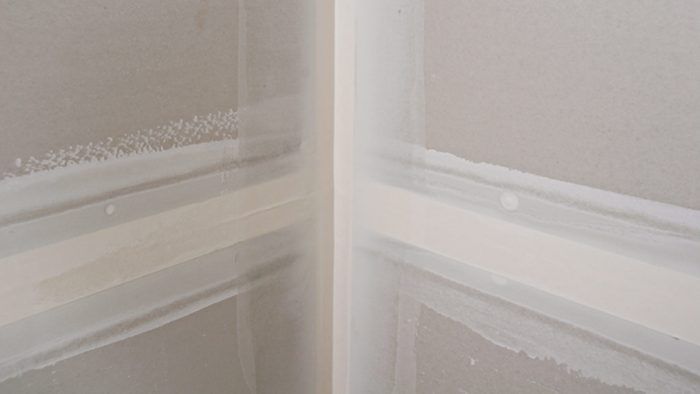
It takes some practice to embed the tape on each side of the corner without accidentally pulling it loose, wrinkling it, or leaving too much joint compound underneath. Start with light trowel pressure to embed the tape, and then go over it a few more times with increased pressure to force out the excess joint compound. When you’re finished, the first coat on the inside corners should be free of wrinkles and the edges of the compound should be feathered.


Filling Large Gaps

Drywall isn’t always hung perfectly. A problem you sometimes run into when taping inside corners, especially in older homes, is large gaps in the corners between panels. Gaps are typically caused by out-of-square or off-level walls or ceilings or by errors made during measuring.

Sometimes a gap can simply be filled with compound, but if it’s wider than 1/2 in. or so, the compound will fall out. The best remedy for this problem is to first put a layer or two of self-adhesive mesh tape into the corner. When you apply the joint compound, the mesh holds it in place. The paper tape can then be positioned in the corner in the normal way.

Allow a little extra time for the corner to dry before applying the next coat of compound, because the extra thick layer of joint compound can crack if it is second-coated too soon.

Drywall isn’t always hung perfectly. A problem you sometimes run into when taping inside corners, especially in older homes, is large gaps in the corners between panels. Gaps are typically caused by out-of-square or off-level walls or ceilings or by errors made during measuring. Sometimes a gap can simply be filled with compound, but if it’s wider than 1/2 in. or so, the compound will fall out. The best remedy for this problem is to first put a layer or two of self-adhesive mesh tape into the corner. When you apply the joint compound, the mesh holds it in place. The paper tape can then be positioned in the corner in the normal way. Allow a little extra time for the corner to dry before applying the next coat of compound, because the extra thick layer of joint compound can crack if it is second-coated too soon.
Pretape over large gaps: Larger gaps in corners may not hold compound when prefilling. It helps to cover the gap with mesh tape first.

Cover the mesh
Cover the mesh: Force compound through the tape so the gap is filled and the compound stays in place. When the compound is set or dried you can install precreased paper tape.


Second coat

The best method for hand taping inside corners is to tape one side at a time, allowing the first side to dry before taping the other. Each side must be carefully smoothed and feathered. With this method, one side is taped as the job is second-coated and the other side is taped during the third coat. In other words, the completed corner ends up with only one coat of compound over the tape on each side, which means you need to apply the compound a little thicker than you do on flat seams. Because it’s difficult to get one coat as smooth as two, a little extra sanding and light touch-up work may be necessary later. This method is faster than double-coating each side, and it provides excellent results.

WORK SMART: For best results on inside corners, use a flexible 6-in. taping knife for the second coat.


Inside Corners: The Second Coat

Don’t try to apply compound to both sides of an inside corner at the same time. Cover one side of the corner when you second-coat flat seams on the walls. Then allow that coat to dry and work the adjacent corner when you apply the third coat to the walls.

One wall at a time
 One wall at a time: When second-coating inside corners coat only one side of a corner at a time. Let it dry before you coat the other side.

Smooth the corner
Smooth the corner: The opposite, uncoated edge stays cleaner if you square the taping knife to the corner.


A clean start
A clean start: When you finish an inside corner one edge at a time, sand or scrape off any excess chunks of compound before applying the final coat to the opposite edge.

Before applying compound to the second edge, let the first edge dry and scrape or sand off any chunks of dried compound. Be careful when sanding over exposed tape because it may peel off or you may sand right through it. When applying compound to the second side of an inside corner, use the same techniques used for taping the first edge.


WORK SMART: When taping an inside corner on a wall, work from top to bottom. When taping a long inside corner where the wall meets the ceiling, work from the center toward the ends.


Fine Homebuilding Recommended Products

Fine Homebuilding receives a commission for items purchased through links on this site, including Amazon Associates and other affiliate advertising programs.

Handy Heat Gun

This heat gun is great for drying joint compound, primer and paint when patching drywall and plaster walls. Plus it can soften adhesive, get a very cold small engine to start, and shrink heat-shrink tubing.
Buy at Amazon

Reliable Crimp Connectors

These reliable, high-quality connectors from Wirefy work on 10-22-gauge wire have heat-shrink insulation to keep out water and road salt.
Buy at Amazon

8067 All-Weather Flashing Tape

Available in 2- to 12-in. widths, this is a good general-purpose flashing tape that sticks well to most things. It features a two-piece release paper, water-shedding layers, and good UV resistance.
Buy at Amazon

Sign up for eletters today and get the latest how-to from Fine Homebuilding, plus special offers.

Signing you up...

This site is protected by reCAPTCHA and the Google Privacy Policy and Terms of Service apply.
See all newsletters
See all newsletters
Previous: Finishing Drywall With Seamless Results Next: Taping and Finishing Drywall Corners

Guide

Drywall

Chapter

Taping and Sanding

Log in or create an account to post a comment.

Sign up Log in

Become a member and get full access to FineHomebuilding.com

Drywall

Drywall

Trusted, comprehensive guidance for choosing, hanging, taping, sanding, and repairing drywall—the right way

View Project Guide

View All Project Guides »

Become a member and get unlimited site access, including the Drywall Project Guide.

Start Free Trial

Drywall Basics
  • Types and Uses of Drywall
  • Planning the Job
Tools and Materials
  • Hanging Tools
  • Taping Tools and Materials
  • Sanding and Finishing Tools and Materials
Hanging Drywall
  • Prep for Hanging
  • Measuring and Cutting Drywall
  • Guidelines for Hanging and Fastening Drywall
  • Hanging Ceilings
  • Hanging Walls
  • Hanging Airtight Drywall
  • Trim Accessories/Corner Beads
Taping and Sanding
  • Taping Basics
  • Taping Seams
  • Taping Inside and Outside Corners
  • Sanding
Special Installations
  • Tricky Transitions
  • Curved Surfaces
  • Other Special Installations
  • Decorating with Drywall
Drywall Repairs
  • Patching Holes, Cracks, and More
Plaster
  • Working with Lime Plaster
  • Plaster Repair
  • Classic Plaster Techniques

Fine Home Building

Newsletter Sign-up

  • Fine Homebuilding

    Home building tips, offers, and expert advice in your inbox.

  • Green Building Advisor

    Building science and energy efficiency advice, plus special offers, in your inbox.

  • Old House Journal

    Repair, renovation, and restoration tips, plus special offers, in your inbox.

Signing you up...

This site is protected by reCAPTCHA and the Google Privacy Policy and Terms of Service apply.
See all newsletters

Follow

  • Fine Homebuilding

    Dig into cutting-edge approaches and decades of proven solutions with total access to our experts and tradespeople.

    Start Free Trial Now
    • Facebook
    • Instagram
    • X
    • LinkedIn
  • GBA Prime

    Get instant access to the latest developments in green building, research, and reports from the field.

    Start Free Trial Now
    • Facebook
    • YouTube
  • Old House Journal

    Learn how to restore, repair, update, and decorate your home.

    Subscribe Now
    • Facebook
    • Instagram
    • X

Membership & Magazine

  • Online Archive
  • Start Free Trial
  • Magazine Subscription
  • Magazine Renewal
  • Gift a Subscription
  • Customer Support
  • Privacy Preferences
  • About
  • Contact
  • Advertise
  • Careers
  • Terms of Use
  • Site Map
  • Do not sell or share my information
  • Privacy Policy
  • Accessibility
  • California Privacy Rights

© 2025 Active Interest Media. All rights reserved.

Fine Homebuilding receives a commission for items purchased through links on this site, including Amazon Associates and other affiliate advertising programs.

X
X
This is a dialog window which overlays the main content of the page. The modal window is a 'site map' of the most critical areas of the site. Pressing the Escape (ESC) button will close the modal and bring you back to where you were on the page.

Main Menu

  • How-To
  • Design
  • Tools & Materials
  • Video
  • Blogs
  • Forum
  • Project Guides
  • Reader Projects
  • Magazine
  • Members
  • FHB House

Podcasts

  • FHB Podcast
  • ProTalk

Webinars

  • Upcoming and On-Demand

Podcasts

  • FHB Podcast
  • ProTalk

Webinars

  • Upcoming and On-Demand

Popular Topics

  • Kitchens
  • Business
  • Bedrooms
  • Roofs
  • Architecture and Design
  • Green Building
  • Decks
  • Framing
  • Safety
  • Remodeling
  • Bathrooms
  • Windows
  • Tilework
  • Ceilings
  • HVAC

Magazine

  • Current Issue
  • Past Issues
  • Magazine Index
  • Subscribe
  • Online Archive
  • Author Guidelines

All Access

  • Member Home
  • Start Free Trial
  • Gift Membership

Online Learning

  • Courses
  • Project Guides
  • Reader Projects
  • Podcast

More

  • FHB Ambassadors
  • FHB House
  • Customer Support

Account

  • Log In
  • Join

Newsletter

Get home building tips, offers, and expert advice in your inbox

Signing you up...

This site is protected by reCAPTCHA and the Google Privacy Policy and Terms of Service apply.
See all newsletters
See all newsletters

Follow

  • X
  • YouTube
  • instagram
  • facebook
  • pinterest
  • Tiktok

Join All Access

Become a member and get instant access to thousands of videos, how-tos, tool reviews, and design features.

Start Your Free Trial

Subscribe

FHB Magazine

Start your subscription today and save up to 70%

Subscribe

We hope you’ve enjoyed your free articles. To keep reading, become a member today.

Get complete site access to expert advice, how-to videos, Code Check, and more, plus the print magazine.

Start your FREE trial

Already a member? Log in