FHB Logo Facebook LinkedIn Email Pinterest Twitter X Instagram Tiktok YouTube Plus Icon Close Icon Navigation Search Icon Navigation Search Icon Arrow Down Icon Video Guide Icon Article Guide Icon Modal Close Icon Guide Search Icon Skip to content
Subscribe
Log In
  • How-To
  • Design
  • Tools & Materials
  • Restoration
  • Videos
  • Blogs
  • Forum
  • Magazine
  • Members
  • FHB House
  • Podcast
Log In

Fine Homebuilding Project Guides

Drywall

Guide Home
  • Drywall Basics
  • Tools and Materials
  • Hanging Drywall
  • Taping and Sanding
  • Special Installations
  • Drywall Repairs
  • Plaster
How-To

Hanging Walls

After the ceiling, walls are usually plain sailing—whether hung horizontally or vertically.

By Myron R. Ferguson

Once you’ve attached all the ceilings, it’s time to start working on the walls. It is usually a lot easier to hang walls than ceilings. You’ll probably have to make more cuts for electrical boxes and other openings, but at least you’re not working over your head. Before hanging walls, it’s a good idea to mark the location of the wall studs on the ceiling and floor to make them easier to locate once they are covered. Also, mark the location of electrical boxes and other openings that will be cut out after the drywall is attached.

As with ceilings, you can hang wall panels in one of two ways—horizontally or vertically. In commercial work, walls are often higher than 9 ft., so it sometimes makes sense to hang drywall vertically to reduce seams. On walls that are longer than 16 ft., hanging drywall vertically helps eliminate butted seams. However, for walls that are 8 ft. high or less (or 9 ft. high if I’m using 54-in. panels), I usually prefer to hang drywall horizontally. Here’s why:

  • It decreases the linear footage of seams that need taping by up to 25 percent.
  • It provides extra bracing strength, because more studs are tied together.
  • It makes the seams easier to hide, because light usually shines along finished seams, which makes them less obvious. When the seams are perpendicular to the studs, they simply flow over any studs that may not be perfectly straight, helping hide imperfections.
  • It makes the seams easier to tape, because they are at a convenient working height.

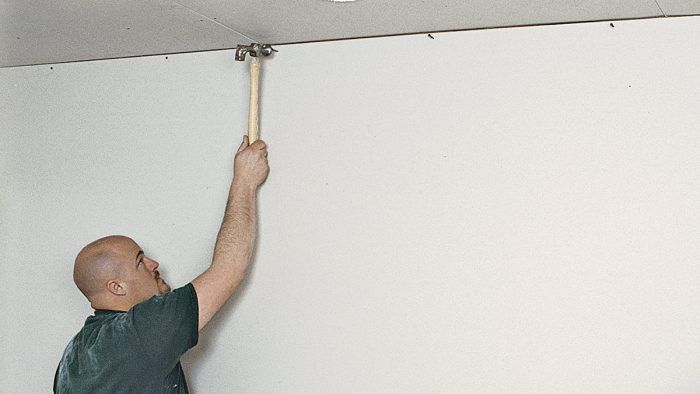
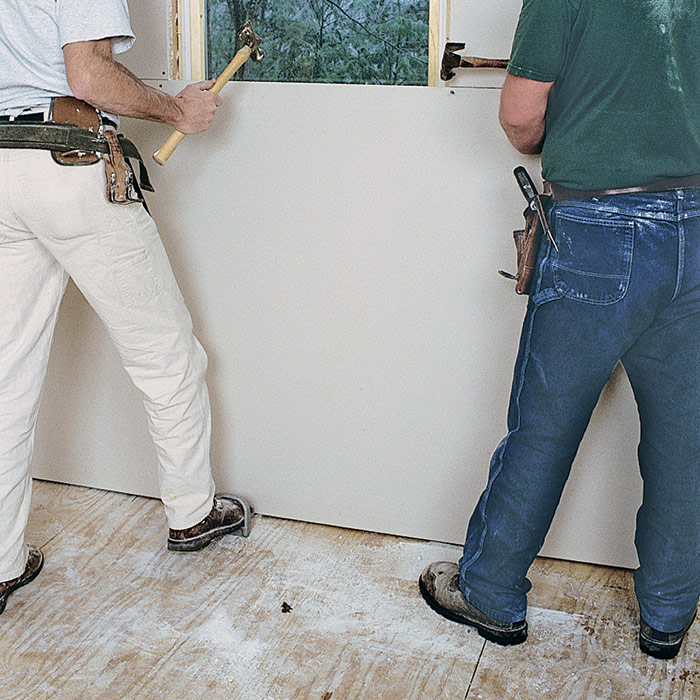
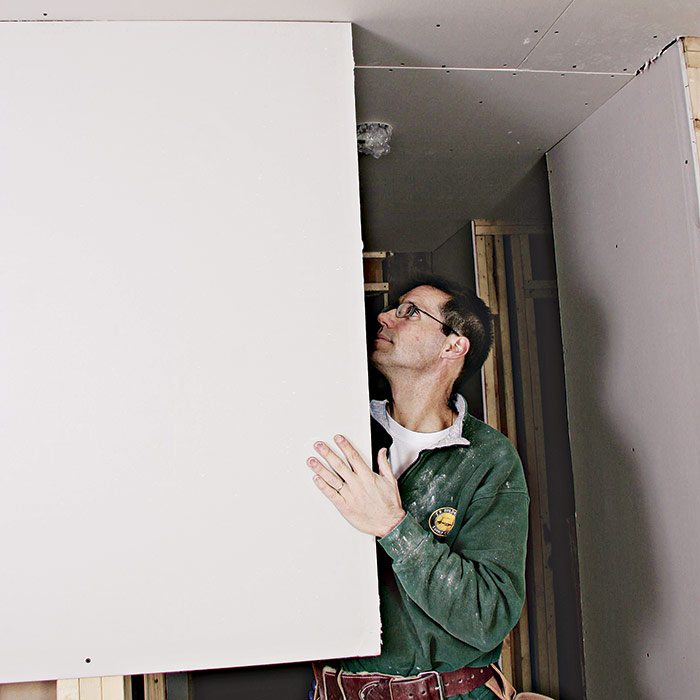
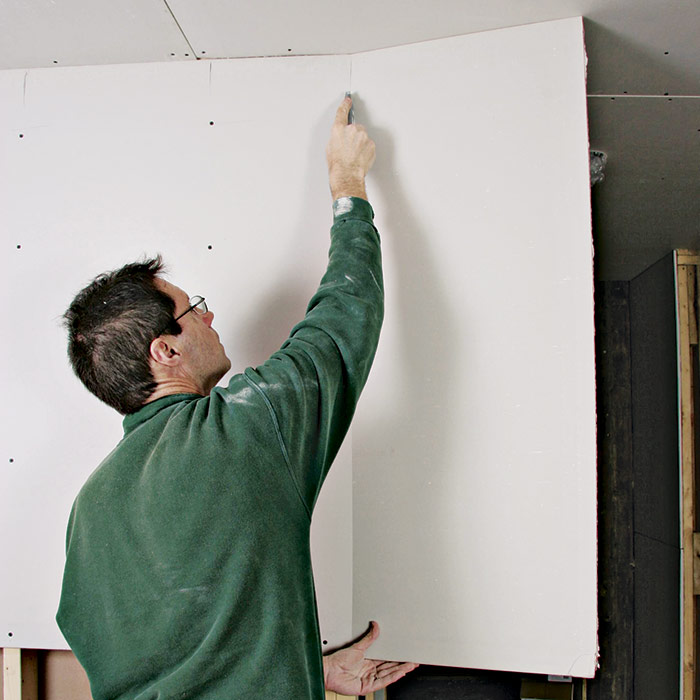
To hang drywall horizontally, hang the top panel first, fitting it tightly against the ceiling. If the wall has a window, cut the panel to length, carry it over, and then use a utility knife to score the back side of the drywall at the top of the window opening. To save time, stand the panel on the floor exactly below where it will be attached, leaning it against the studs. Start nails about 1 in. down, lining them up with each stud. Lift the panel up against the ceiling and drive the nails home.

Position the fasteners
Position the fasteners: When hanging panels high on the wall, start nails or screws along the top edge of the top panel before lifting the sheet into place.

Attach the panel: Lift the panel up against the ceiling and tap the nails into the framing members.

After the top of the panel is tacked in place, cut out any openings, including door and window openings. Then fasten the rest of the panel to the framing. Next, cut the bottom panel to fit against the top panel. This panel should be about 1/2 in. shorter in height so that it doesn’t fit tightly against the floor and break apart when it is fastened into place. Cutting the panel a little short also leaves room for you to slide a panel lifter or a prybar underneath to help lift the drywall into place.


WORK SMART: Before lifting the top panel into place, lean it against the wall and tack in nails at the stud locations. Lift and position the panel and drive the nails home. If using screws, you can mark the location of every stud with a pencil at trim time.


drywall panel lifter

Keep it off the floor
Keep it off the floor: A panel lifter slides under a sheet of drywall and, as its name suggests, lifts the panel into place so that you can focus on attaching it.

Most electrical outlets are located near the floor, so tack only the top of the panel in place, and then cut out the electrical boxes. Remember not to put too much pressure on the panel, which could cause the face to break apart around the box.

As with ceilings, butted seams should be staggered and placed away from the center of a wall. Butted seams can also be located above doors and above or below windows to create a shorter seam. Try to keep the seam at least 8 in. in from the edge of an opening, because the wall is more stable there. Also, the slight crown that forms during taping could affect the trim miter joint if the seam is located at the corner.

When hanging panels on an outside corner, run the panels long and trim them after they’re attached (you can use the same technique on a bottom panel that adjoins a door opening). Running the panel long means taking one less measurement, and it also allows for a little more flexibility. If the framing isn’t square or plumb at the outside corner, the panel can be cut to fit the exact angle so that there won’t be wide gaps under the corner bead.

Leave it long
Leave it long: A panel can be attached full length and trimmed afterwards along an outside corner wall. Here, the author is scoring the backside of the panel along the stud with a utility knife.

Cut off the excess
Cut off the excess: Snap the panel forward and cut along the creased edge with a utility knife to free the waste.

Hanging Gable Walls

For the gable ends of a room with a cathedral or sloped ceiling, I usually hang the bottom panel first (see the drawing below). The floor is a good flat surface from which to measure, and the bottom panel usually has a square end for at least part of the height. For longer runs it is a good idea to snap a line on the wall and install the drywall to the line, so that an uneven floor doesn’t create unnecessary gaps in the drywall seams. And remember to shim panels off the floor to allow for settling and to prevent potential moisture from wicking up into the drywall.

Setting the panels on top of each other makes it easier to hold them in place, especially when the ceiling is high. Note that you should not locate or fasten a butted seam on the center support of the gable end. The building may move or settle at that point, causing stress to the drywall. Don’t forget to think about where the seams will fall as you stack the panels up; you may need to start out with a panel ripped in height to avoid having a seam fall on a transition point or a header on the wall.

From the ground up
From the ground up: When hanging a gable wall, begin at the bottom of the wall and work your way up to the angled ceiling.
Measure the angles
Measure the angles: Use a drywaller’s T-square to lay out measurements for an angled cut.
Give the drywall a job
Give the drywall a job: Setting the second panel on top of the first helps to hold it in place as you fasten drywall to the framing.

Measuring gable walls


Hanging a Garage

Garages, which are typically large rooms with high ceilings, require a somewhat different hanging strategy than most rooms within a house. Garage ceilings are usually too large to cover without butted seams, so I almost always hang the drywall perpendicular to the joists. If the ceiling is over 9 ft. high, I often hang the garage walls parallel to the studs—that is, vertically rather than horizontally. By standing the panels on end, I avoid having any butted seams on the walls. If you hang wall panels vertically, just make sure that the studs are reasonably straight and that the seams fall on the studs.


Attaching Drywall to Metal Framing

Drywall can be hung on metal framing in much the same way as it is on wood framing, but there are a couple of things to note. Metal studs and joists are made out of a thin piece of steel bent into a C-shaped stud. Before attaching drywall to the metal studs, check to see which direction the open side of the stud faces (they should all be installed in the same direction). On a long wall that will have butted seams or when hung vertically, the drywall should be attached from the end that the open side of the stud faces (see drawing below).

For the seams to end up flat, the drywall must be attached in the proper sequence. Fasten the edge of the first panel to the unsupported open edge of the stud. Screw on the entire length of the panel before attaching the abutting panel. If the panel were first attached to the solid side and then to the unsupported side, the screw might deflect the open end and force the panel edges outward. When screwing on the rest of the panel, keep the screws closer to the solid edge of the stud. (Note that you should always use screws, not nails, when fastening drywall to metal framing).

Attaching Drywall to Metal Framing


Sign up for eletters today and get the latest how-to from Fine Homebuilding, plus special offers.

Signing you up...

This site is protected by reCAPTCHA and the Google Privacy Policy and Terms of Service apply.
See all newsletters
See all newsletters
Previous: Hang Drywall on the Ceiling the Right Way Next: How to Hang Drywall on Walls

Guide

Drywall

Chapter

Hanging Drywall

View Comments

  1. iatoolman | Jan 26, 2022 07:22pm | #1

    This is very bad advice. I'm a master carpenter of 25 years, most of the last 5 has been commercial drywall and steel stud framing. Never do a floating butt seam because it's a weak point and not worth the extra time. You always stand up sheets under 12' because then there's never a butt seam, there's not a band at the top to make it harder for finisher, and not a band at the floor to make it harder for low baseboard. And nails? Never, ever. Those are guaranteed to pop later. Screws only. And no one in commercial construction uses a panel lift for low ceilings. It takes too much extra time for the little help it provides.

Log in or create an account to post a comment.

Sign up Log in

Become a member and get full access to FineHomebuilding.com

Drywall

Drywall

Trusted, comprehensive guidance for choosing, hanging, taping, sanding, and repairing drywall—the right way

View Project Guide

View All Project Guides »

Become a member and get unlimited site access, including the Drywall Project Guide.

Start Free Trial

Drywall Basics
  • Types and Uses of Drywall
  • Planning the Job
Tools and Materials
  • Hanging Tools
  • Taping Tools and Materials
  • Sanding and Finishing Tools and Materials
Hanging Drywall
  • Prep for Hanging
  • Measuring and Cutting Drywall
  • Guidelines for Hanging and Fastening Drywall
  • Hanging Ceilings
  • Hanging Walls
  • Hanging Airtight Drywall
  • Trim Accessories/Corner Beads
Taping and Sanding
  • Taping Basics
  • Taping Seams
  • Taping Inside and Outside Corners
  • Sanding
Special Installations
  • Tricky Transitions
  • Curved Surfaces
  • Other Special Installations
  • Decorating with Drywall
Drywall Repairs
  • Patching Holes, Cracks, and More
Plaster
  • Working with Lime Plaster
  • Plaster Repair
  • Classic Plaster Techniques

Fine Home Building

Newsletter Sign-up

  • Fine Homebuilding

    Home building tips, offers, and expert advice in your inbox.

  • Green Building Advisor

    Building science and energy efficiency advice, plus special offers, in your inbox.

  • Old House Journal

    Repair, renovation, and restoration tips, plus special offers, in your inbox.

Signing you up...

This site is protected by reCAPTCHA and the Google Privacy Policy and Terms of Service apply.
See all newsletters

Follow

  • Fine Homebuilding

    Dig into cutting-edge approaches and decades of proven solutions with total access to our experts and tradespeople.

    Start Free Trial Now
    • Facebook
    • Instagram
    • X
    • LinkedIn
  • GBA Prime

    Get instant access to the latest developments in green building, research, and reports from the field.

    Start Free Trial Now
    • Facebook
    • YouTube
  • Old House Journal

    Learn how to restore, repair, update, and decorate your home.

    Subscribe Now
    • Facebook
    • Instagram
    • X

Membership & Magazine

  • Online Archive
  • Start Free Trial
  • Magazine Subscription
  • Magazine Renewal
  • Gift a Subscription
  • Customer Support
  • Privacy Preferences
  • About
  • Contact
  • Advertise
  • Careers
  • Terms of Use
  • Site Map
  • Do not sell or share my information
  • Privacy Policy
  • Accessibility
  • California Privacy Rights

© 2025 Active Interest Media. All rights reserved.

Fine Homebuilding receives a commission for items purchased through links on this site, including Amazon Associates and other affiliate advertising programs.

X
X
This is a dialog window which overlays the main content of the page. The modal window is a 'site map' of the most critical areas of the site. Pressing the Escape (ESC) button will close the modal and bring you back to where you were on the page.

Main Menu

  • How-To
  • Design
  • Tools & Materials
  • Video
  • Blogs
  • Forum
  • Project Guides
  • Reader Projects
  • Magazine
  • Members
  • FHB House

Podcasts

  • FHB Podcast
  • ProTalk

Webinars

  • Upcoming and On-Demand

Podcasts

  • FHB Podcast
  • ProTalk

Webinars

  • Upcoming and On-Demand

Popular Topics

  • Kitchens
  • Business
  • Bedrooms
  • Roofs
  • Architecture and Design
  • Green Building
  • Decks
  • Framing
  • Safety
  • Remodeling
  • Bathrooms
  • Windows
  • Tilework
  • Ceilings
  • HVAC

Magazine

  • Current Issue
  • Past Issues
  • Magazine Index
  • Subscribe
  • Online Archive
  • Author Guidelines

All Access

  • Member Home
  • Start Free Trial
  • Gift Membership

Online Learning

  • Courses
  • Project Guides
  • Reader Projects
  • Podcast

More

  • FHB Ambassadors
  • FHB House
  • Customer Support

Account

  • Log In
  • Join

Newsletter

Get home building tips, offers, and expert advice in your inbox

Signing you up...

This site is protected by reCAPTCHA and the Google Privacy Policy and Terms of Service apply.
See all newsletters
See all newsletters

Follow

  • X
  • YouTube
  • instagram
  • facebook
  • pinterest
  • Tiktok

Join All Access

Become a member and get instant access to thousands of videos, how-tos, tool reviews, and design features.

Start Your Free Trial

Subscribe

FHB Magazine

Start your subscription today and save up to 70%

Subscribe

We hope you’ve enjoyed your free articles. To keep reading, become a member today.

Get complete site access to expert advice, how-to videos, Code Check, and more, plus the print magazine.

Start your FREE trial

Already a member? Log in