
What Can Go Wrong with Your Drywall Taping
Learn how to correct these common problems (or better yet avoid them in the first place).
As you might have figured out after reading some of my other articles about drywall, the joints between panels can be a potential problem area. Some problems become apparent during taping, whereas others may not be noticeable until after the surface has been painted. In this article, I’ll describe the most common problems, explain how to correct them, and suggest ways to avoid them in the first place.
Photographing
Photographing can occur when a wall or ceiling is coated with glossy paint (including high-gloss, semigloss, and satin finishes). Under direct natural light, the seams and strips of taped fasteners may still show through, even though they were taped and sanded correctly. This is because the panel surface and the taped joints have different porosities and textures. This condition can be prevented by skim coating the entire surface before painting or by applying a good-quality primer-sealer or a flat latex paint before applying the finish coat of paint. If you notice photographing after the drywall has been painted, lightly sand the surface using 150-grit sandpaper, and then paint it with a good-quality flat latex paint before recoating it with the finish paint.
Crowned and concave seams
Crowned seams occur when taping compound is applied too heavily and the center of the seam is left higher than the surface of the panels. When light shines across the seams, they become quite obvious. If the seams have not been painted, the crowned areas can be sanded down with 120-grit or 150-grit paper. If they have already been painted, it is difficult to sand these areas, which is why it’s important to look for crowned seams during the final check. You can conceal the seams by widening the band of compound on each side of the crowned area. Feather the joint compound on each side, being careful not to raise the crowned area any higher. Check the joint with a straightedge when the compound is dry. If the crown has been corrected, apply a finish coat of compound before sanding.
Concave seams are the exact opposite of crowned seams. These defects, which appear as slight depressions along the taped seams when light shines across the joints, are usually the result of not applying the joint compound heavily enough during the second coat. Oversanding also causes concave seams. To correct the problem, reapply the second and third coats of joint compound.
Pitting
Pitting looks like a series of small pits or craters on the taped finish surface. The pits are small air bubbles that were not properly filled or that were exposed during sanding. Air bubbles result from overmixing or undermixing the joint compound. Small air bubbles may also appear on a wet surface if insufficient pressure is applied when smoothing the joint compound.
If a large number of air bubbles appear as you tape, keep going over the joints with the trowel, applying more pressure until most of the bubbles are gone. Going the opposite direction with the trowel also helps reduce bubbles. If you don’t notice the bubbles until the surface has been painted, apply a thin finish coat over the problem areas. Then sand and prime the areas before repainting.
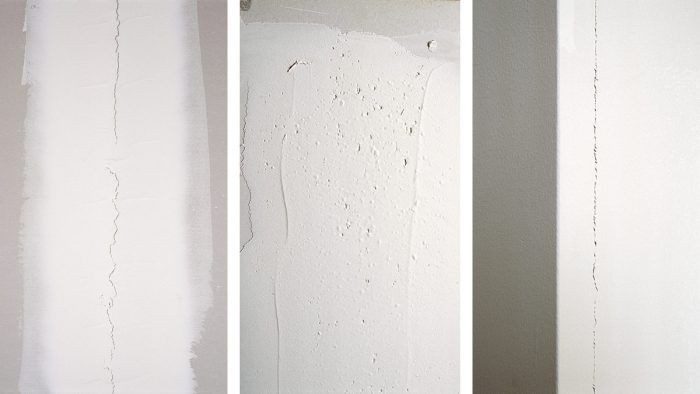
Cracked and shrinking seams
If seams crack during the taping process, it’s usually because the joint compound dried too quickly—often as a result of direct high heat or sunlight. As long as the tape and the joint compound are still solid, you can retape the cracked area. Make sure that the seam is thoroughly dry and use enough pressure to force the compound into the crack. If the tape is cracked or the compound is loose, you’ll have to remove the affected areas. Cracked seams can be avoided by lowering the heat to increase the drying time. If the outside temperature is warm (above 80°F), close the windows so the airflow won’t dry the compound too quickly.
Although it may sound contradictory, cracked seams may also result from joint compound drying too slowly. If a second coat is applied over a first coat that is still damp, the compound may shrink excessively. As the compound dries, cracks form where the compound is thickest. Any loose areas should be removed and filled with joint compound before retaping and finishing. To avoid this problem, make sure the building is heated more efficiently (to at least 60°F to 65°F) and keep the humidity low by opening or closing windows, running fans, raising the temperature, or using a dehumidifier. In addition, make sure the previous coat of joint compound is thoroughly dry before applying the next coat.
Shrinkage that appears along the center of taped seams after sanding is a related problem that is also caused by taping over joint compound that has not thoroughly dried. Remember that joint compound usually dries on the outside edges first, so a seam that appears dry may still be wet underneath. To correct the slightly recessed area caused by shrinkage, apply a layer of compound to fill the area, and then sand it lightly.
Bubbled tape
Bubbled or loose paper tape is caused by a poor bond between the tape and the joint compound. If the tape is not properly embedded in the compound, it can come loose and raise a bubble. The bubble may be a round spot only 1/2 in. in diameter, or it may run the entire length of a seam. Small bubbles can be cut out with a utility knife and retaped. For larger, loose areas, remove the entire section of tape and embed new tape, then apply a second and a third coat of joint compound. To avoid bubbled or loose tape, make sure that you apply a thick enough layer of joint compound before you embed the tape and apply enough pressure with the taping knife to embed it properly.
Popped nails and screws
Nail and screw pops don’t usually show up until several months or years after the original taping job, but they do occasionally become apparent before painting. When sanding fasteners, a pole sander applies quite a bit of pressure against the panel. If a screw or nail has not pulled the panel tight against the framing, the pressure of the pole sander can push the panel tight and pop the fasteners, raising a pronounced bump on the surface or exposing the fastener head.
If fastener pops appear before you paint, refasten the panel while applying hand pressure next to the fastener to ensure that the panel is tight against the framing. The loose screws or nails should be reset or removed. Retape the fasteners with three thin coats of joint compound. If the drywall surface is damaged around the fastener, first place a piece of mesh tape over the damaged area.
Cracked or loose corner bead
Sometimes you’ll find a crack that looks as if someone has drawn a line with a pencil about 1 in. or so in from the corner along the length of the bead. Or the corner will appear wrinkled, with some compound missing here and there. The corner bead can also be ridged out, creating an indentation where it meets the wall. These problems are more common with nail- or crimp-on metal beads and are usually the result of structural movement or settling.
To repair the crack, remove loose material, nail again where necessary, and apply a layer or two of joint compound to refinish the bead. Make sure that there is a 1/2-in. gap between the bead and the floor.
|
|
|
| THINK AHEAD: Using a tape-on or glue-on corner bead greatly reduces problems with edge cracking in the first place. |
