FHB Logo Facebook LinkedIn Email Pinterest Twitter X Instagram Tiktok YouTube Plus Icon Close Icon Navigation Search Icon Navigation Search Icon Arrow Down Icon Video Guide Icon Article Guide Icon Modal Close Icon Guide Search Icon Skip to content
Subscribe
Log In
  • How-To
  • Design
  • Tools & Materials
  • Restoration
  • Videos
  • Blogs
  • Forum
  • Magazine
  • Members
  • FHB House
  • Podcast
Log In

Fine Homebuilding Project Guides

Drywall

Guide Home
  • Drywall Basics
  • Tools and Materials
  • Hanging Drywall
  • Taping and Sanding
  • Special Installations
  • Drywall Repairs
  • Plaster
How-To

Mechanical Taping

If you're planning on doing a lot of drywall taping, automatic tools are worth considering—either to buy or rent.
By Myron R. Ferguson
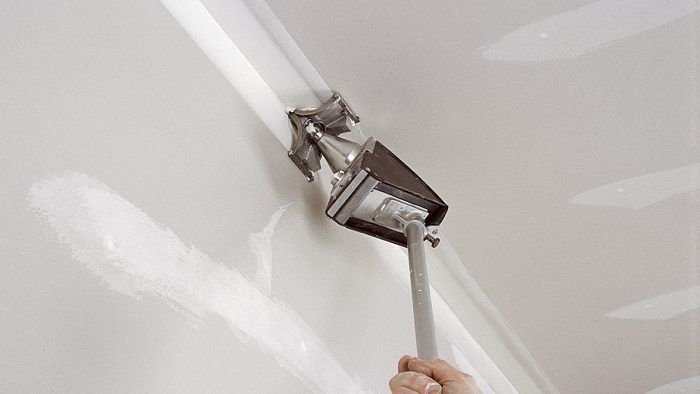
Hand- or air-powered
Hand- or air-powered: With some newer versions of mechanical tools, the compound is forced out of the tool head with air pressure rather than manual pressure.

In my early years as a drywaller, I preferred hand taping to using mechanical taping tools. Times change and so have the tools and my opinions on using them. Now I’m really hooked on mechanical taping tools because they speed up the work and produce a quality application with a consistency that hand taping cannot match.

Mechanical tools are available for each step in the taping process. Here, I’ll briefly describe how each mechanical taping tool is used. If you want more information, many manufacturers offer classes on how to use their products. In some cases, you can rent the tools to get the feel for them and to see if you like them.

Don’t expect these tools to turn you into a master taper overnight. They are quite heavy, and it will take some time to get used to them. In most cases, the taper must push the tool along the seam and use manual pressure to force the compound through the tool.


Mechanical vs. Hand Taping

The pros and cons of each taping method are listed here.

Mechanical Taping

  • Produces consistent uniform results.
  • Once mastered (usually only a day or two), is faster than hand taping, especially on larger jobs.
  • Often requires a class to learn proper use.
  • Requires only some of the tools. For example, you can use only boxes for finishing seams.
  • Requires tools that are quite expensive to rent or purchase; need to use them on a regular basis to offset the cost.
  • Requires less sanding than hand-taped jobs.
  • Doesn’t require an entire set of tools for each person. Two or three people can stay busy with only one set.

Hand Taping

  • Is always necessary for difficult sections and areas that need special attention, such as crowned seams.
  • Takes quite a while to master.
  • Doesn’t require a large investment to obtain a complete set of tools.


The basic tool is the automatic taper, which applies the tape and the proper amount of joint compound simultaneously as the tool head is rolled along the seam or inside corner. After the tape and compound are applied, a corner roller is used to embed the tape in the inside corners. A 3-in. adjustable corner finisher is used to clean and feather the compound after the corner roller embeds the tape. The corner finisher can also apply and smooth the finish coat on the inside corners; to do this, joint compound must flow into the finisher and then onto the corner.

An angle applicator is essentially a box attached to the corner finisher and filled with joint compound. The joint compound is forced out of the box and through the corner finisher, which in turn smoothes and feathers the joint compound.

Flat boxes, also known as mud boxes, are used to apply and smooth joint compound over taped joints during the second and third coats. What I like most about them is the uniform results they produce. Flat boxes come in three widths—7 in., 10 in., and 12 in. I use a combination of 10-in. and 12-in. boxes. The box width determines the seam width, but you can adjust the blade trowel edge to achieve a precise crown on the compound.

Joint-compound loading pumps (or mud pumps) are designed for the many tools that need to be filled with joint compound. The pump comes with different attachments that fill the automatic taper and the mud boxes. The drywall pump that I use is lightweight, stable, and easy to clean, and it has a reversible handle for left- or right-handed pumping.

For those people who like the idea of automatic tools but don’t want to spend so much money, or simply can’t justify buying an automatic taper because it isn’t always the best choice of tools, there are less expensive, more basic tools available. With these, a long tube is filled with thinned compound and then a special mud shoe (they come in various styles for different jobs) is attached to the end. As the compound is forced out of the tube through the mud shoe the proper amount of compound is applied to the seam or inside corner. The tape is then applied and embedded by hand.


Mechanical Taping Tools

The basis of mechanical taping tools is the mud pump, which has a variety of nozzles for fitting different taping tools: from an automatic taper, which applies both the tape and the proper amount of compound in a single pass, to flat boxes and angle boxes.

mud pump

Tape and mud in one pass
Tape and mud in one pass: An automatic taper simultaneously applies tape and joint compound to a joint.

Embed the tape
Embed the tape: After the tape and compound are applied to an inside corner with an automatic taper, a corner roller is used to embed the tape.

Smooth the walls
Smooth the walls: A flat box applies joint compound over taped seams: 7-in., 10-in., and 12-in. boxes are available.

Clean up the corners
Clean up the corners: A corner finisher is designed to follow a corner roller. It smoothes excess compound left during the embedding process.

Finish the corners
Finish the corners: An angle box has a corner finisher attachment that is used to apply the final coat to an inside corner.


Hand-Powered Compound Tubes

More economical than mud pumps are simple automatic tools that use hand pressure to force compound out of a tube and through a mud shoe attachment. When using these tools, tape is usually still applied and embedded the old fashioned way—by hand. But there are tools available to apply and embed the tape.

Lay on the compound
Lay on the compound: Compound is applied to an inside corner for the final coat using hand pressure to force compound out of a tube.

Finish the taping
Finish the taping: The compound is then smoothed out with a corner finishing head.


Sign up for eletters today and get the latest how-to from Fine Homebuilding, plus special offers.

Signing you up...

This site is protected by reCAPTCHA and the Google Privacy Policy and Terms of Service apply.
See all newsletters
See all newsletters
Previous: One-Day Taping Next: What Can Go Wrong with Your Drywall Taping

Guide

Drywall

Chapter

Taping and Sanding

Log in or create an account to post a comment.

Sign up Log in

Become a member and get full access to FineHomebuilding.com

Drywall

Drywall

Trusted, comprehensive guidance for choosing, hanging, taping, sanding, and repairing drywall—the right way

View Project Guide

View All Project Guides »

Become a member and get unlimited site access, including the Drywall Project Guide.

Start Free Trial

Drywall Basics
  • Types and Uses of Drywall
  • Planning the Job
Tools and Materials
  • Hanging Tools
  • Taping Tools and Materials
  • Sanding and Finishing Tools and Materials
Hanging Drywall
  • Prep for Hanging
  • Measuring and Cutting Drywall
  • Guidelines for Hanging and Fastening Drywall
  • Hanging Ceilings
  • Hanging Walls
  • Hanging Airtight Drywall
  • Trim Accessories/Corner Beads
Taping and Sanding
  • Taping Basics
  • Taping Seams
  • Taping Inside and Outside Corners
  • Sanding
Special Installations
  • Tricky Transitions
  • Curved Surfaces
  • Other Special Installations
  • Decorating with Drywall
Drywall Repairs
  • Patching Holes, Cracks, and More
Plaster
  • Working with Lime Plaster
  • Plaster Repair
  • Classic Plaster Techniques

Fine Home Building

Newsletter Sign-up

  • Fine Homebuilding

    Home building tips, offers, and expert advice in your inbox.

  • Green Building Advisor

    Building science and energy efficiency advice, plus special offers, in your inbox.

  • Old House Journal

    Repair, renovation, and restoration tips, plus special offers, in your inbox.

Signing you up...

This site is protected by reCAPTCHA and the Google Privacy Policy and Terms of Service apply.
See all newsletters

Follow

  • Fine Homebuilding

    Dig into cutting-edge approaches and decades of proven solutions with total access to our experts and tradespeople.

    Start Free Trial Now
    • Facebook
    • Instagram
    • X
    • LinkedIn
  • GBA Prime

    Get instant access to the latest developments in green building, research, and reports from the field.

    Start Free Trial Now
    • Facebook
    • YouTube
  • Old House Journal

    Learn how to restore, repair, update, and decorate your home.

    Subscribe Now
    • Facebook
    • Instagram
    • X

Membership & Magazine

  • Online Archive
  • Start Free Trial
  • Magazine Subscription
  • Magazine Renewal
  • Gift a Subscription
  • Customer Support
  • Privacy Preferences
  • About
  • Contact
  • Advertise
  • Careers
  • Terms of Use
  • Site Map
  • Do not sell or share my information
  • Privacy Policy
  • Accessibility
  • California Privacy Rights

© 2025 Active Interest Media. All rights reserved.

Fine Homebuilding receives a commission for items purchased through links on this site, including Amazon Associates and other affiliate advertising programs.

X
X
This is a dialog window which overlays the main content of the page. The modal window is a 'site map' of the most critical areas of the site. Pressing the Escape (ESC) button will close the modal and bring you back to where you were on the page.

Main Menu

  • How-To
  • Design
  • Tools & Materials
  • Video
  • Blogs
  • Forum
  • Project Guides
  • Reader Projects
  • Magazine
  • Members
  • FHB House

Podcasts

  • FHB Podcast
  • ProTalk

Webinars

  • Upcoming and On-Demand

Podcasts

  • FHB Podcast
  • ProTalk

Webinars

  • Upcoming and On-Demand

Popular Topics

  • Kitchens
  • Business
  • Bedrooms
  • Roofs
  • Architecture and Design
  • Green Building
  • Decks
  • Framing
  • Safety
  • Remodeling
  • Bathrooms
  • Windows
  • Tilework
  • Ceilings
  • HVAC

Magazine

  • Current Issue
  • Past Issues
  • Magazine Index
  • Subscribe
  • Online Archive
  • Author Guidelines

All Access

  • Member Home
  • Start Free Trial
  • Gift Membership

Online Learning

  • Courses
  • Project Guides
  • Reader Projects
  • Podcast

More

  • FHB Ambassadors
  • FHB House
  • Customer Support

Account

  • Log In
  • Join

Newsletter

Get home building tips, offers, and expert advice in your inbox

Signing you up...

This site is protected by reCAPTCHA and the Google Privacy Policy and Terms of Service apply.
See all newsletters
See all newsletters

Follow

  • X
  • YouTube
  • instagram
  • facebook
  • pinterest
  • Tiktok

Join All Access

Become a member and get instant access to thousands of videos, how-tos, tool reviews, and design features.

Start Your Free Trial

Subscribe

FHB Magazine

Start your subscription today and save up to 70%

Subscribe

We hope you’ve enjoyed your free articles. To keep reading, become a member today.

Get complete site access to expert advice, how-to videos, Code Check, and more, plus the print magazine.

Start your FREE trial

Already a member? Log in