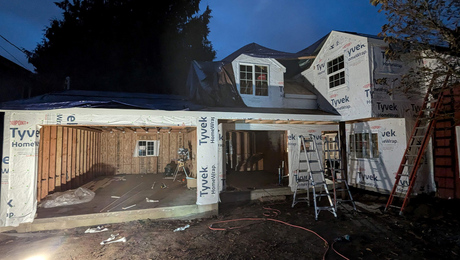
Watertight Chimney Cricket
Easy-to-make tools simplify the framing, while time-tested flashing techniques make it last a lifetime.
The purpose of a chimney cricket is to divert any water that runs down the roof above the chimney to the sides, preventing water from pooling against the chimney and causing leaks. In this article, mason John Carroll walks through the process of framing a chimney cricket using his math-free technique of matching the cricket to the roof pitch. He describes how to make a watertight chimney cricket by building the cricket and installing it on the roof, and then adding step flashing and counterflashing to ensure that any water that falls on the roof above this chimney will flow down the two valleys of the cricket and spill out several inches wide of the chimney’s sides.
Let’s Dive In
Steeped-sloped roofs (those with a pitch of 4:12 or steeper) rarely leak in the field of the shingles. Most problems occur when the flow of water is interrupted by projections and obstacles like pipes and vents. And due to their size and masonry construction, chimneys are a particularly troublesome obstacle to the free flow of water.
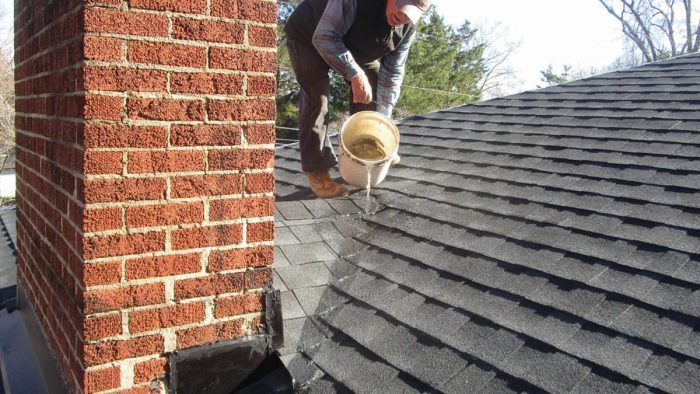
The chimney shown here was built in 1957. It houses the flues for two fireplaces and a gas-fired furnace. To accommodate these three items, the chimney was built over 5 ft. wide. Unfortunately, it is located on the bottom edge of the roof, parallel with the eaves. This means that all the water that falls on the 5-ft. swath of the roof above runs down to the broad back of the chimney.

To prevent water infiltration, the original roofer used a simple, galvanized steel, L-shaped pan flashing. Although this pan worked tolerably well for a while, it was definitely not the best solution to quickly shed water around the chimney. The leaves and twigs that piled up on the flashing slowed down the water even more and caused the sheet-metal pan to deteriorate prematurely. When I tore off the shingles, I ran into rotten wood, which indicated that there had been leaks. These leaks had gone unnoticed because the damage occurred in the 2-ft.-wide eaves, and not inside the living space.
Building a cricket to divert the water before it reaches the chimney is a far better solution. Crickets were not often used in 1957, but today they are required by the International Residential Code (IRC) for all chimneys that have a side facing uphill that is 30 in. or wider. In my opinion, crickets are a good idea for all chimneys that have a side facing uphill, regardless of size. During the discussion with the homeowner about installing a new roof, I recommended building a cricket and reflashing the chimney and was given the green light to do so.
Visualize the Layout
The ridge of the cricket should be level, and for aesthetic reasons and to simplify construction, I wanted the pitch of the cricket sides to be the same as the roof. The pitch of this roof turned out to be 45/8:12. These in-between pitches are common on older hand-framed roofs. While this cricket is a fairly advanced framing project, the process of laying out and building this three-dimensional triangle can be broken down into manageable parts. The key to success is not math—it’s visualization.
I always try to create drawings to help me visualize a project before I build it. After drawing a side elevation on a piece of paper, I laid out a full-size drawing of the cricket on a sheet of plywood. I only needed two critical dimensions: the pitch of the roof and the width of the chimney. In addition to serving as a visual aid, this drawing helped me measure, cut, and assemble the actual cricket.

Create a Full-Size Layout
This chimney is 62 in. wide, but I built the cricket 68 in. wide so that the valleys would extend past the edges 3 in. on each side. I started with a full-size drawing on a sheet of plywood: I created the 68-in. baseline, marked the center of the gable at 34 in., and used a drywall T-square to draw a line perpendicular to the baseline. I then needed to determine the height of the gable end that abuts the chimney—this was the only real math I did on the project. I wanted the cricket’s gable end to match the roof pitch of 4-5⁄8:12. So, I divided the distance to the center of the gable (34 in.) by 12, and multiplied that number by 4-5⁄8, which is approximately 13-1⁄16 in. I marked the centerline at 13-1⁄16 in. and drew a line to each end point on the baseline on the full-size drawing to represent the gable end.
 |
 |
Next, I needed to find the total length of the bottom of the cricket, the part that lays on the roof. Because the pitch of the cricket is the same as the roof pitch, this means the length of the bottom of the cricket will be the same measurement as the hypotenuse of the gable (36-7⁄16 in.). I extended the centerline out 36-7⁄16 in., connected that point to the ends of the baseline, and my drawings were done. Another advantage of using the same pitch as the roof is that I know the length of the ridge board is 34 in., the same as one-half the bottom of the gable—again, no math required.
Build the Frame on the Ground
Start With the Gable End
To frame the gable, I simply stack three pieces of 2×6. Before I assemble them, I rip the bottom board at 21°, which is the angle formed by a 4-5⁄8:12 pitch. After lining up the three pieces, I mark the triangular layout on them using the drawing as a guide, then cut along the layout lines. I screw the 2×6 pieces together with 6-in. structural wood screws and 3-1⁄2-in. construction screws.
The top of the ridge board needs a double bevel that comes to a point to form the peak of the roof. To center the bevel on the ridge board, I set my tablesaw to cut at 21° and place the fence at 5 in. from the blade. I run the material through once, then flip it end over end and run it through a second time. Although the overall length of the ridge is 34 in., I have to deduct the thickness of the gable end (1-1⁄2 in.), so I make the ridge board 32-1⁄2 in. long. I will later reduce the length of the ridge board a second time to account for the thickness of the sleeper. The end of the ridge board that abuts the gable is a standard 90° cut. The cut at the other end has to conform to the pitch of the roof, which I mark using my homemade rafter jig.
Scribe and Cut the Sleeper Angles
The 2×10 sleepers hold the cricket together so that I can haul it up onto the roof and fasten it securely to the roof decking. To lay out the top miters on the sleepers, I set a scrap of wood along the sloping line representing the valley. Then I set another scrap of wood over the first, placed along the ridge.
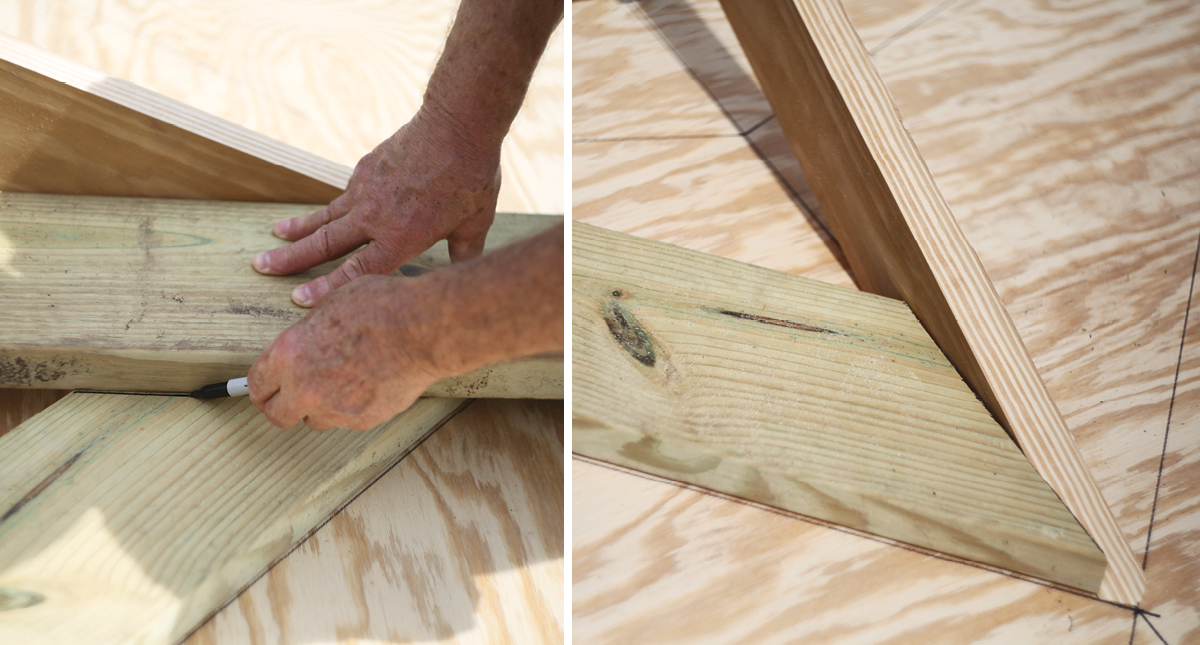
After scribing along the edge of this second scrap, I use my miter-saw gauge to determine the angle, which is 47°. I use the same process to determine the 43° angle at the bottom of the valley. I cut the top miters that intersect the ridge board square and set the saw to a 21° bevel to cut the bottom miters, which match the pitch of the roof and the gable end of the cricket.
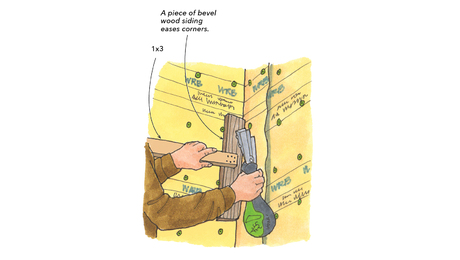
Scribe and Cut the Sleeper Bevels
Instead of math, I use a simple visual technique to figure out the angle of the bevel along the sleepers. First, I create the same compound cut that the sleepers will have on a scrap 2×6. I then scribe a line on the end of the scrap using the gable end as a guide.

After scribing the line, I measure over from the edge to where the line intersects with the top of the sleeper, which is 2-3⁄4 in. I then transcribe that information to a flat scrap of plywood, 1-1⁄2 in. up and 2-3⁄4 in. over. Using a speed square, I determine that I need to cut a 61° angle on the sleepers. To rip this very acute angle, I use a Big Foot.
I remove the ridge board from the gable-end assembly and cut it along the line I made earlier to allow for the thickness of the sleepers. I put the two sleepers on the drawing and tie them together with screws at the top. Then, I fasten the gable end to the sleepers and install the ridge to the gable and sleepers. Because the ridge of this cricket is over 30 in. long, it needs one pair of jack rafters near the middle. I measure the length and lay out both the top and the bottom miters of these jack rafters with my rafter jig.
Install the Cricket and Flash the Chimney
Cut in Reglets and Install the Chimney Apron
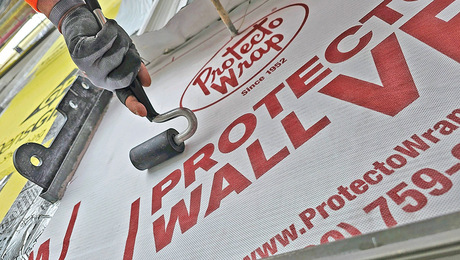
After removing the shingles and old flashing, I cut in horizontal reglets for the apron and counterflashing using a 4-in. grinder with a diamond blade and a chisel. To keep the reglets at a consistent depth of 1 in., I drew a guide line on the wheel of my grinder with a marker. To hold the vertical leg of the apron in place and to ensure that water flowing down the face of the chimney runs over the outside of the flashing, I need to waterproof the top edge. To achieve both of these objectives, I make two bends at the top of the apron.
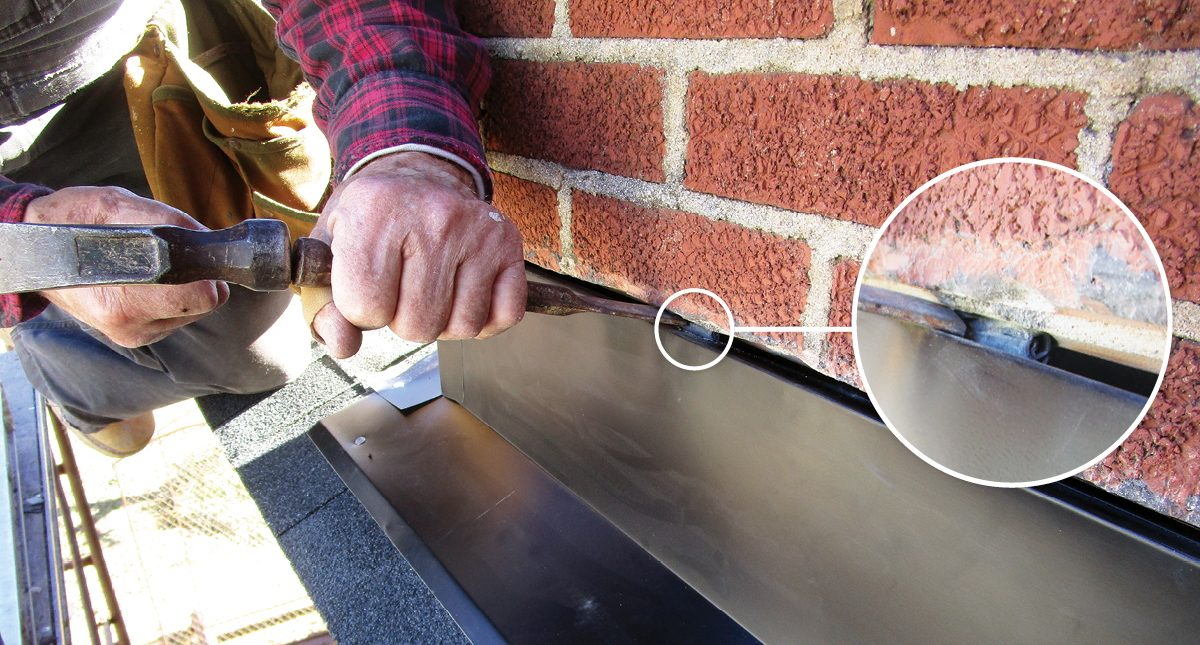
The horizontal bend put the top of the apron 1 in. deep into the reglet. The smaller, 1⁄2-in. vertical bend at the end of the horizontal bend serves to block any water that might seep into the reglet from getting on the wrong side of the flashing, and it helps hold the reglet and apron in the mortar joint. Using a brake, I made this aluminum apron 70 in. long, which is 8 in. longer than the width of the chimney. The front of the chimney is only 8 in. from the edge of the roof. So, there is only one course of shingles below the apron flashing. After cutting and installing the starter shingles and the first course of shingles, I install the apron over the top. The apron flashing on a chimney goes on the same way as an apron flashing on the front of a dormer.
I begin by holding the apron in place with 4 in. projecting beyond each corner. I then mark the back side of the apron by scribing along the sides of the chimney. From the outside edges of the vertical leg of the apron, I cut down at an angle to where the vertical and horizontal legs intersect at the corners. I then bend the ends of the vertical legs around the sides of the chimney and trim their bottoms so that they will clear the shingles next to the chimney. After setting the apron in place and tucking the top into the reglet, I attach the apron to the chimney with lead wedges.
 |
 |
These wedges are rolled-up pieces of lead flashing. The lead is about 1⁄8 in. thick, and the pieces are 1 in. wide and about 2-1⁄2 in. long. After rolling up the lead strips, I place them in the reglet and pack them tight with a plugging chisel. Once the top of the apron is secure, I face-nail the horizontal leg of the flashing with roofing nails, fold down the remaining triangle at each edge, and secure those to the roof with nails as well. I cover the exposed nail heads on the apron with a polyurethane sealant.
Install Shingles, Step Flashing, and the Cricket Frame
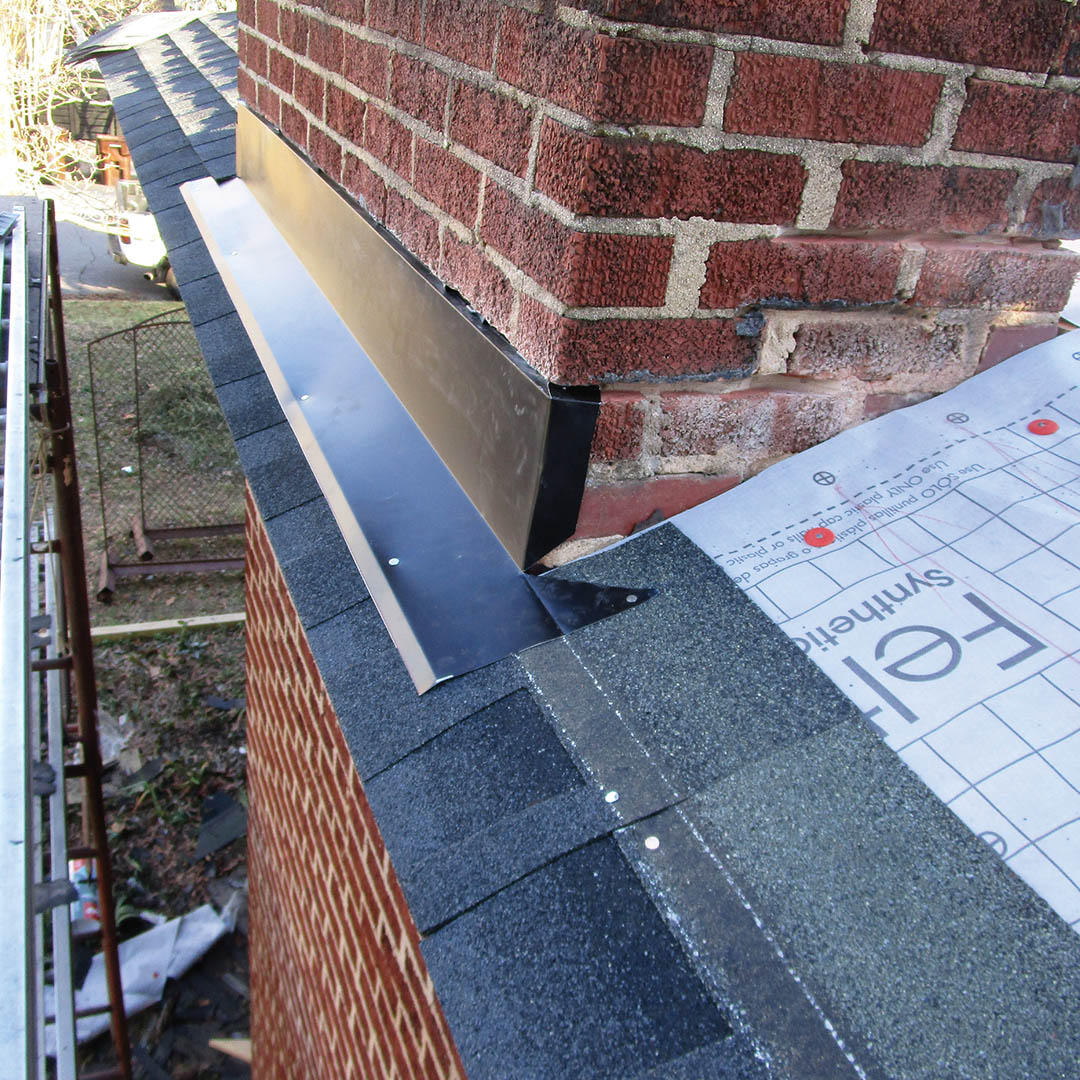
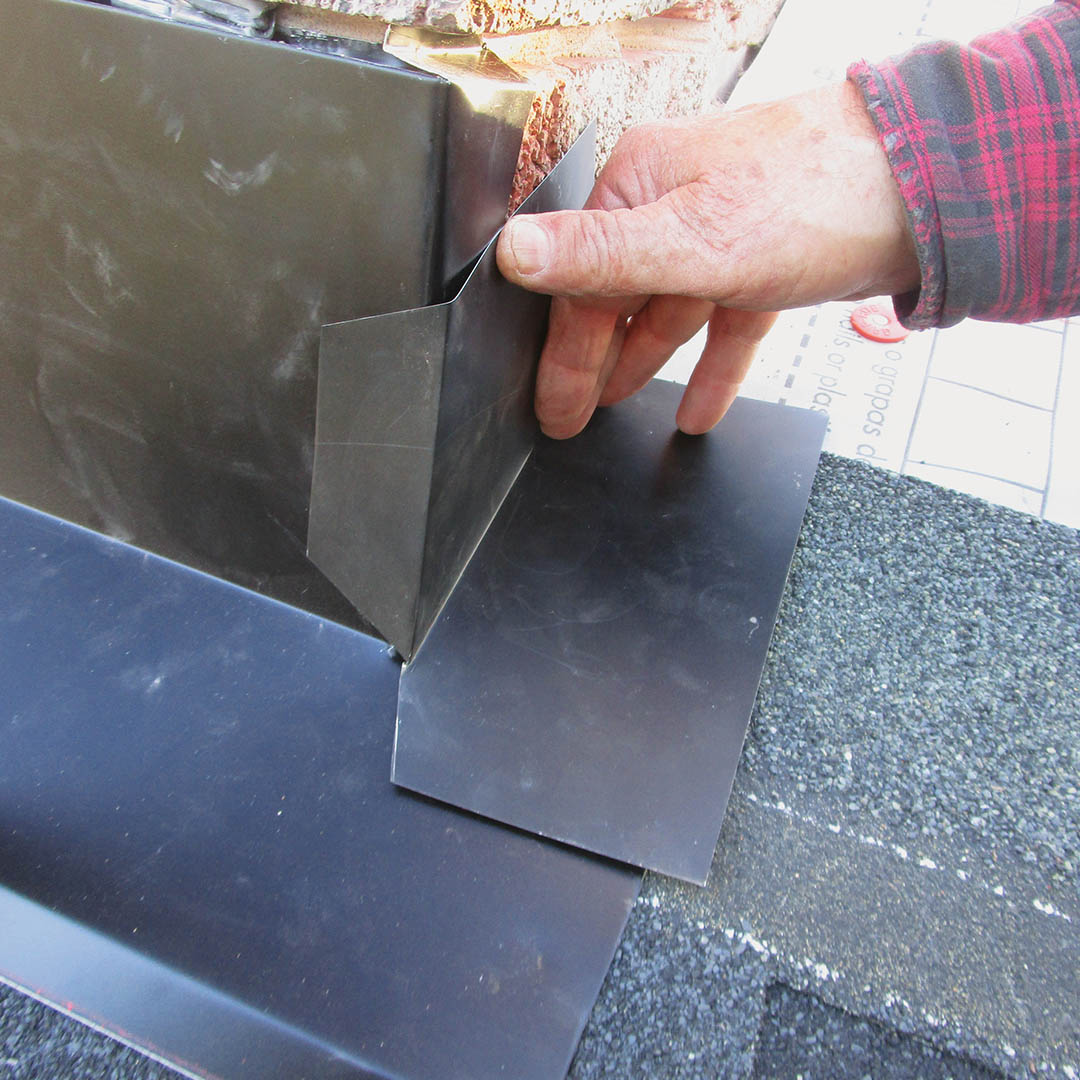
I install the shingles and step flashing along the sides of the chimney with one piece of step flashing per shingle course. The 8-in.-long, prebent step flashing overlaps the singles by 2-3⁄8 in. The first pieces of step flashing wrap tightly around the corner of the chimney and overlap the apron. I scribe and cut them similar to the corners of the apron, but here I trim off the small triangle piece rather than folding it down. Once the shingles and flashing are installed just past the top corners, I lay the cricket frame in place over that top row. Before securing it to the roof deck with screws, I slip a piece of flashing under each side of the cricket where it projects beyond the sides of the chimney.
Once the cricket is fastened, I install the plywood decking, and then fold the flashing over the top of the plywood and cover it all with self-adhering underlayment. I carefully wrap the first piece of step flashing around the corners like I wrapped the flashing on the lower corners around the apron, and then install a step flashing for every course of shingles as I did on the sides of the chimney. As I install the shingles on the cricket, I weave the valley in with the main roof (see “Four Ways to Shingle a Valley” on FineHomebuilding.com). At the top, I cut two pieces of step flashing halfway up the bend, push them together at the cuts, and bend them over the peak of the cricket.
Install Counterflashing
I use my brake to fabricate rectangular pieces of counterflashing that have the same profile as the vertical leg of the apron. After measuring from the reglet to the roof, I use my 4-5⁄8:12 rafter jig to mark the correct angle along the bottom of the piece. I use the same procedure I’ve described for the apron and step flashing to overlap and wrap the counterflashing around the corners. As I work my way up the chimney, I overlap each piece of counterflashing 1 in. over the piece below.
 |
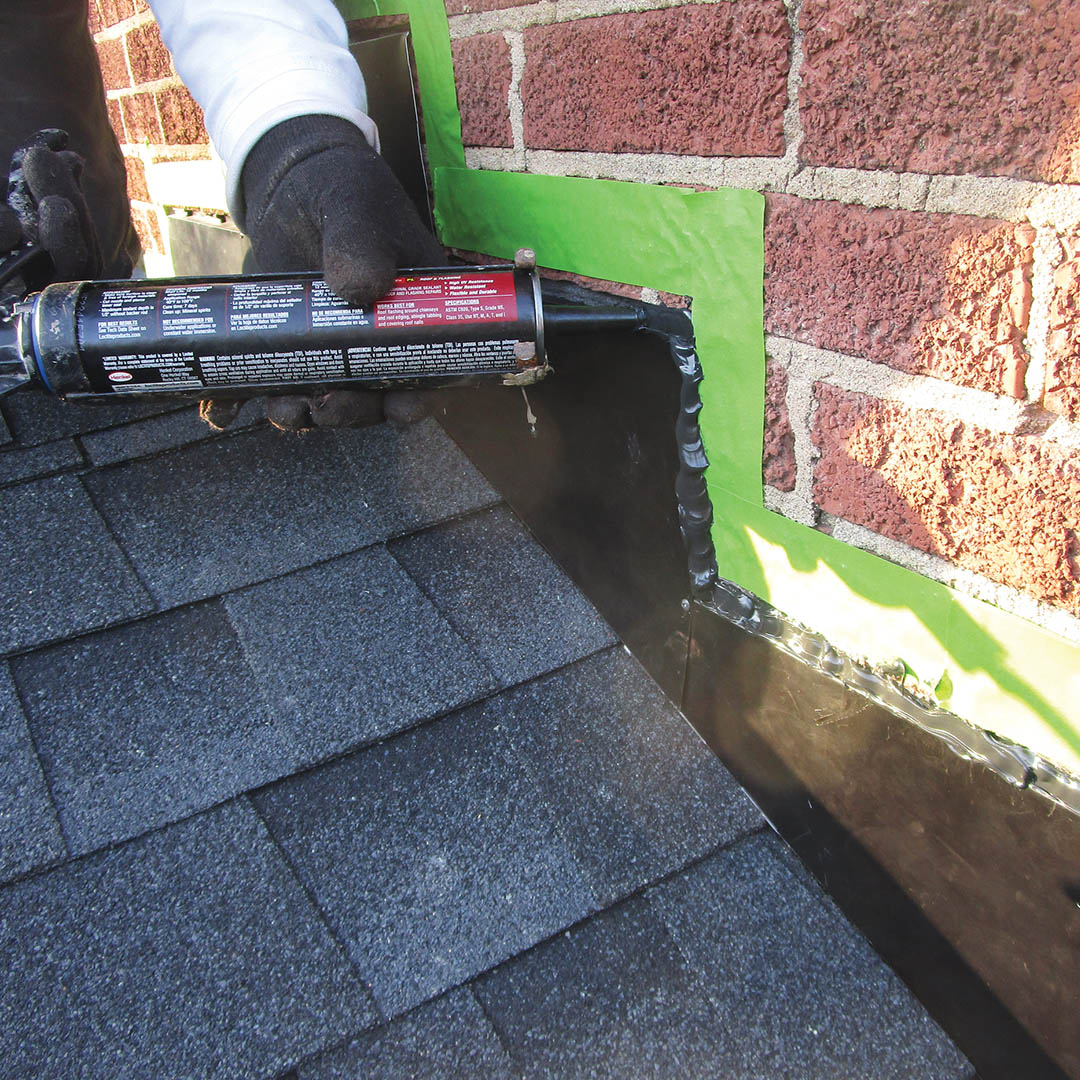 |
I anchor the top edge into the reglets with lead wedges and fasten the upper pieces to the pieces below with 1⁄8-in. aluminum pop rivets. On this chimney, I installed nine sections of counterflashing. I use masking tape to cover the bricks as I apply the same polyurethane sealant I used on the apron nail heads at the seam where the flashing edges meet the brick.
Tear Off the Roof Last
Because this chimney is a wide structure at the bottom of the roof, it was difficult to protect the area uphill from it with tarps or synthetic underlayment. Instead of relying on a temporary roof cover, I kept an eye on the weather forecast and tried to get the new cricket, roof, and flashing installed as quickly as possible when the weather was fair. To reduce the time that the house was vulnerable to water damage from rain, I built the cricket on the ground before I tore the shingles off that section of the roof. An added benefit was that it was easier to build on the ground. In addition to framing the cricket in advance, I also got as much of the flashing and preparation work done on the chimney as I could before I tore into the old roof and flashing.
Flashing a brick chimney is similar to flashing a framed wall, but with an added layer of difficulty. On a framed wall, the water-resistive barrier (WRB) and siding overlap the vertical leg of the flashing and prevent water from getting behind it. Flashing the face of a finished cladding like brick means that a roofer has to come up with an alternate way to direct the water running down the brick over the vertical leg of the flashing, which involves cutting reglets (grooves) in the mortar joints with a grinder.

I planned on reusing the reglet that was already there for the front piece of flashing, which is often called the apron flashing. On the sides of the chimney, the original roofer did not use counterflashing but rather cut in reglets for each piece of the step flashing, so I had to lay out and cut in new reglets for the counterflashing. Counterflashing serves the same function as siding does on a framed wall; namely, it directs the water that flows down the face of the bricks out and over the step flashing.
I laid out the locations for the new reglets before I tore the shingles off the chimney side of the roof. I used a grinder with a diamond blade and a chisel to cut in the new reglets. Then I cleaned the entire roof off with a blower and installed synthetic underlayment on the deck. Only after I installed the apron, shingles, and step flashing up and around the top corners did I set the cricket in place and then flash each side of the cricket that sticks out past the chimney. Then I secured the cricket with screws, fastened the plywood in place, and finished installing the underlayment and shingles.
— John Carroll; mason and builder in Durham, N.C. | Photos by Matthew Carroll Navey.
From Fine Homebuilding #323
RELATED STORIES
Fine Homebuilding Recommended Products
Fine Homebuilding receives a commission for items purchased through links on this site, including Amazon Associates and other affiliate advertising programs.

Peel & Stick Underlayment

Roofing Gun

QuikDrive PRO300s


View Comments
While I applaud the author on the construction of this cricket, I have questions & concerns regarding the flashing fabrication & installation at a couple of critical locations that, if not addressed, will lead to water penetration of the assembly. That is, unless you are using properly soldered copper for your flashing, you will have a continuous pinhole thru all layers of your flashing & counterflashing at these locations: 1. Where the ridge of the cricket intersects the masonry rise structure of the roof cricket, and, 2. Where the bottom corner apron turns the corner to go up the sloping roof at the bottom flashing vertical faces/sloping roof intersections.
Note that I brought up this issue/concern and started a thread in Forums that was never answered on how to eliminate this condition.
So, how do you recommend resolving this issue?