FHB Logo Facebook LinkedIn Email Pinterest Twitter X Instagram Tiktok YouTube Plus Icon Close Icon Navigation Search Icon Navigation Search Icon Arrow Down Icon Video Guide Icon Article Guide Icon Modal Close Icon Guide Search Icon Skip to content
Subscribe
Log In
  • How-To
  • Design
  • Tools & Materials
  • Restoration
  • Videos
  • Blogs
  • Forum
  • Magazine
  • Members
  • FHB House
  • Podcast
Log In

Fine Homebuilding Project Guides

Foundations and Masonry Work

Guide Home
  • Concrete & Masonry Basics
  • Building Foundations
  • Waterproofing Foundations
  • Retrofits and Add-ons
  • Masonry in the Landscape
  • Brick
How-To

Rebuilding a Brick Chimney

Temporary repairs are the common solution to a failing chimney, but often a better choice is tearing down and rebuilding.

By Brendan Mostecki Issue 201

Synopsis: Although most homeowners probably don’t think much about their chimneys, they should. When problems become apparent, it’s often too late for simple repairs. Mason Brendon Mostecki says that when chimney problems arise, the best bet is often tearing down and rebuilding. Mostecki says that chimney life depends on a few factors: climate, usage, construction. To replace a chimney for a long life, Mostecki starts rebuilding the bricks on a stable base, then works to get the height right. He also promotes regular maintenance to enhance a chimney’s life span. This article includes a sidebar about choosing proper brick size when rebuilding or repairing a chimney.


Magazine extra: Watch Brendan Mostecki inspect a failing chimney and detail his recommendations for its reconstruction.

Chimneys are a lot like toilets: You tend to take them for granted until they are leaking water on the floor. I think chimneys are at a bigger disadvantage, though, because they’re high up on the roof and are therefore way down on most to-do lists when it comes to regular maintenance. As a result, chimneys are often left to the elements until they are crumbling. The good news is that most old chimneys can be deconstructed and rebuilt without much trouble.

How long should a chimney last?

I’m often asked this question, and I always say the same thing: anywhere from one year to 100 years. The answer might sound evasive, but it’s not a simple equation. There are several factors that determine the life span of a chimney.

  • Climate: Does the chimney sit in the shade for most of the day, where it will likely be plagued by moss and algae? This vegetation holds water against the chimney, which can lead to premature deterioration. Is the house exposed to frequent rain, sleet, and snow or repeated swings in temperature? If water soaks into the bricks and mortar, and then freezes, the expansion leads to cracks.
  • Usage: Is the chimney used to vent the furnace and fireplace, or just a fireplace? A constant trickle of heat from a furnace usually makes the chimney warm enough in the winter to keep snow and ice from building up. But if the chimney lies dormant most of the year, and then is heated suddenly to a high temperature by a roaring fire on a cold Christmas morning, you are likely to start seeing problems.
  • Construction: How the chimney was built is the most important consideration. Cored bricks need less maintenance because the mortar in the holes acts as a buffer that helps to absorb moisture that seeps into the joints. Unless sealed frequently, solid bricks are more prone to separating from mortar joints. Problems also can result from mortar that is mixed with too much sand, too much water, or not enough of either. Finally, the temperature during installation — too hot or too cold — can affect the way the mortar sets up and the concrete crown cures.

Person removing the bricks one at a time and place them into 5-gal. buckets.Don’t demolish; deconstruct. The existing chimney should be taken apart the same way it was put together, piece by piece. A 3-lb. sledgehammer works best for loosening the bricks in a small chimney in poor condition. If the chimney is large or if the mortar bonds are strong, use a rotary hammer. Remove the bricks one at a time, place them into 5-gal. buckets, then carry the buckets off the roof. If the flue tiles are in good condition, remove them carefully and reuse them on the new chimney to save money. At the least, use an angle grinder to cut the flues into four flat pieces, which can be used as a base for pouring the new chimney cap.

Maintenance matters

Assuming a competent mason, the right materials, and an average environment, a minimally maintained chimney will likely last from 15 to 30 years before it needs a major maintenance overhaul, a crown replacement, or a rebuild. As with most things, regular maintenance will help to extend this life span. I recommend that the chimney be sealed twice a year for the first two years, then every other year after that. I’ve had great luck with Umaco’s transparent penetrating sealers (www.umaco.com). For a matte look, choose a breathable sealer. If the high-gloss look doesn’t bother you and you really want to seal the chimney thoroughly, use a nonbreathable sealer.

If cracks appear, I seal them using a silicone caulk with a masonry bonding strength of 10. Before applying caulk, I clean the crack with a brush; then I apply the silicone to both the crack and to the area surrounding the crack.
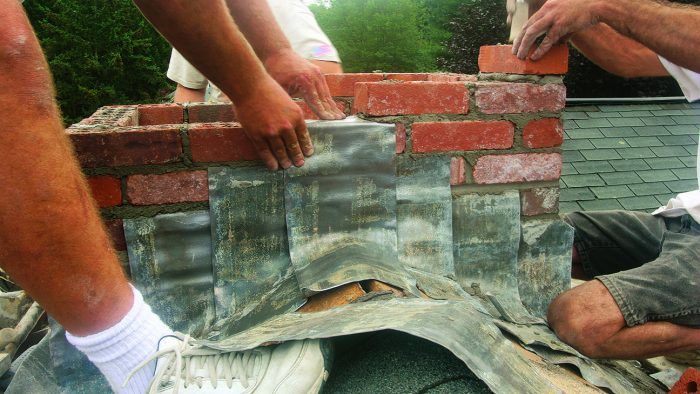
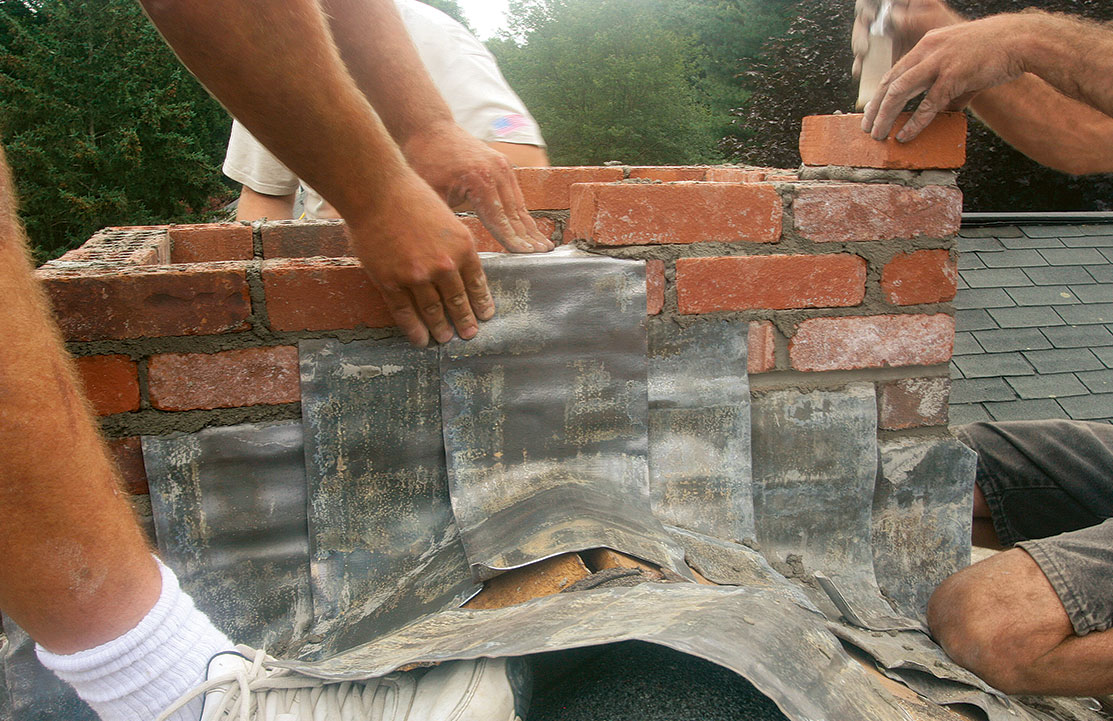
Start on a stable base

To hide any slight changes in color or brick layout, I prefer to deconstruct the old chimney to below where the new lead flashing will be installed. The starting point should be a stable course of bricks.

When it’s time to rebuild, mix a batch of mortar, but don’t wing it on this step. Mixing mortar is all about consistency. I mix my own batches on site using sand, cement, and water, but you can also buy mortar mix that just requires water. I combine one 80-lb. bag of type-S cement, three 5-gal. buckets of fine sand, and 31⁄2 gal. to 4 gal. of clean water. If mixing by hand, I cut the quantities in half. The mortar should look smooth and fluffy.


Safety note

Brendan and his crew feel comfortable working on this roof using only roof jacks and planks, but OSHA guidelines call for the use of fall protection.


Leave the lead long. The apron flashing should cover the entire lower face of the chimney and wrap a few inches around the corners, where it will be covered by the side cap flashing. To lock the flashing in place, use the point of a trowel to push the soft lead into the holes in the brick. Once cured, the mortar joint will hold the lead tightly. The flashing needs to be folded back when the roofing underlayment is installed, so leave plenty of extra flashing material to work with.
Mortar joints that won’t crack. With the apron flashing in place, set a brick at each corner, check for square, then fill in toward the middle. Leave the mortar joint above the lead flashing tight (just less than 3⁄8 in.); too wide, and the joint could crack as the roofers are moving the lead around.

Flash as you go. As the chimney is built, work toward the ridge as you install additional pieces of side cap flashing, overlapping each piece about 3 in. over the adjacent piece. Check each piece of lead for plumb as you work; then tie it into the holes in the brick.

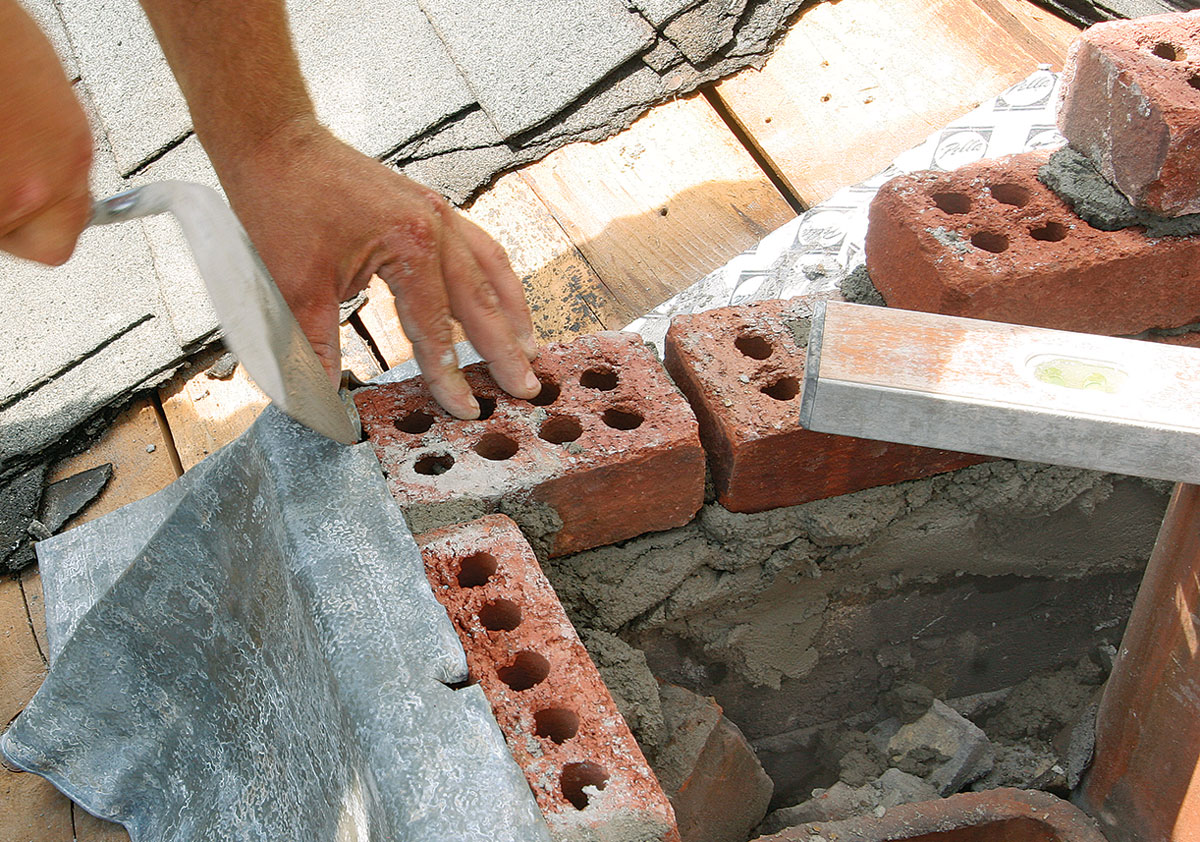
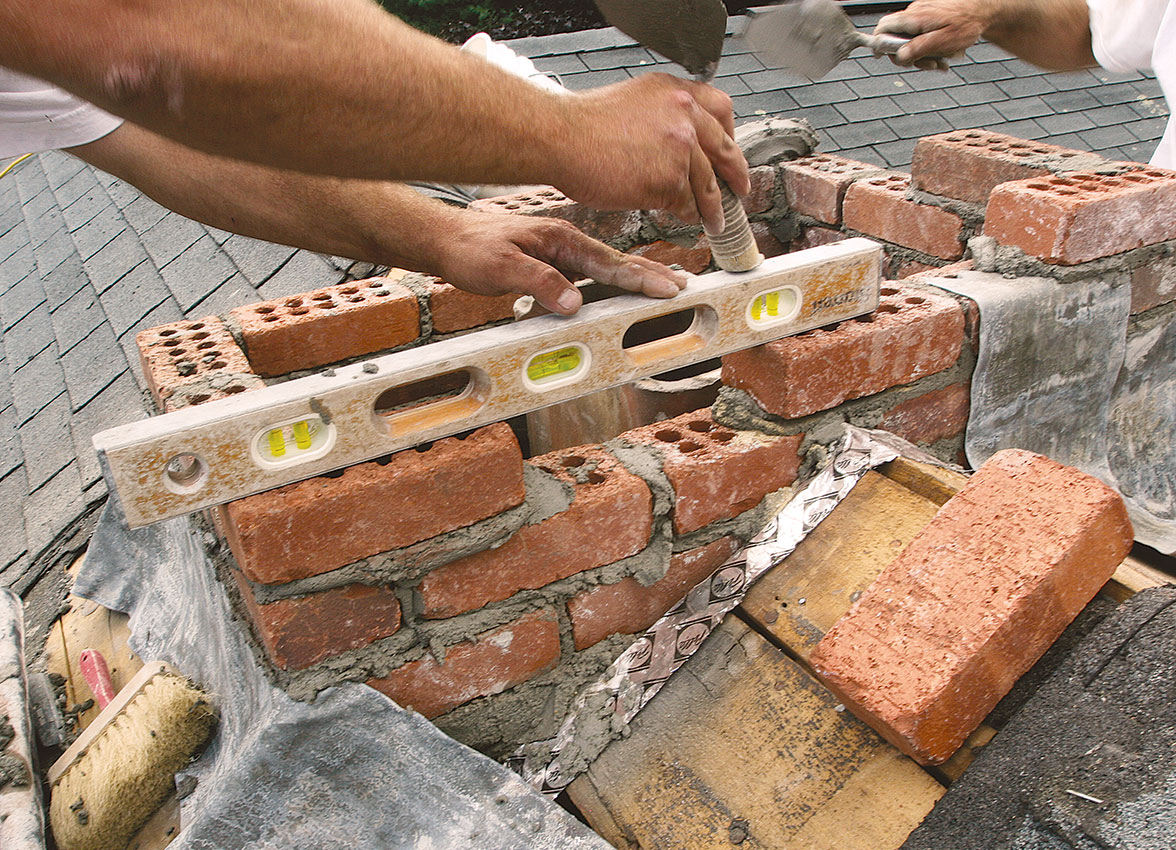
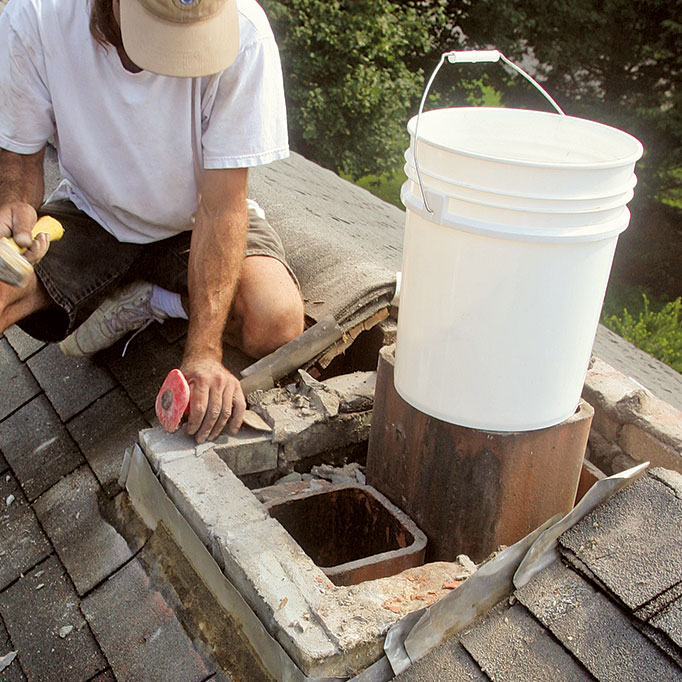
Not every older chimney needs to be torn down and rebuilt. Often, the deterioration is limited to the chimney’s concrete crown, which takes the most abuse from sunlight, snow, and ice. In this case, the crown can be chiseled away and repoured. If the clay flue tile is in poor condition, it’s most easily repaired at the same time, before the new crown is poured. If the mortar joints between bricks are loose or crumbling, they can be cut back with an angle grinder, washed with acid, and repointed with fresh mortar.


Rebuilding a Brick ChimneyBrendan Mostecki is a mason in Leominster, Mass.

Photos by Justin Fink.

From Fine Homebuilding #201

Click the View PDF button below to read the entire article:

Sign up for eletters today and get the latest how-to from Fine Homebuilding, plus special offers.

Signing you up...

This site is protected by reCAPTCHA and the Google Privacy Policy and Terms of Service apply.
See all newsletters
See all newsletters
View PDF
Next: Repointing a Brick Chimney

Guide

Foundations and Masonry Work

Chapter

Brick

Log in or create an account to post a comment.

Sign up Log in

Become a member and get full access to FineHomebuilding.com

Foundations and Masonry Work

Foundations and Masonry Work

Trusted, comprehensive guidance from the pros for working with concrete and masonry

View Project Guide

View All Project Guides »

Become a member and get unlimited site access, including the Foundations and Masonry Work Project Guide.

Start Free Trial

Concrete & Masonry Basics
  • Choosing & Mixing Concrete
  • Concrete & Masonry Tools & Techniques
Building Foundations
  • Foundation Basics
  • Foundation Footings
  • Insulated Concrete Forms (ICFs)
Waterproofing Foundations
  • Waterproofing Strategies
  • Foundation Drains
Retrofits and Add-ons
Masonry in the Landscape
  • Patios, Walkways, and Driveways
  • Retaining Walls
  • Dry Stone Walls
  • Fire Pits
Brick

Fine Home Building

Newsletter Sign-up

  • Fine Homebuilding

    Home building tips, offers, and expert advice in your inbox.

  • Green Building Advisor

    Building science and energy efficiency advice, plus special offers, in your inbox.

  • Old House Journal

    Repair, renovation, and restoration tips, plus special offers, in your inbox.

Signing you up...

This site is protected by reCAPTCHA and the Google Privacy Policy and Terms of Service apply.
See all newsletters

Follow

  • Fine Homebuilding

    Dig into cutting-edge approaches and decades of proven solutions with total access to our experts and tradespeople.

    Start Free Trial Now
    • Facebook
    • Instagram
    • X
    • LinkedIn
  • GBA Prime

    Get instant access to the latest developments in green building, research, and reports from the field.

    Start Free Trial Now
    • Facebook
    • YouTube
  • Old House Journal

    Learn how to restore, repair, update, and decorate your home.

    Subscribe Now
    • Facebook
    • Instagram
    • X

Membership & Magazine

  • Online Archive
  • Start Free Trial
  • Magazine Subscription
  • Magazine Renewal
  • Gift a Subscription
  • Customer Support
  • Privacy Preferences
  • About
  • Contact
  • Advertise
  • Careers
  • Terms of Use
  • Site Map
  • Do not sell or share my information
  • Privacy Policy
  • Accessibility
  • California Privacy Rights

© 2025 Active Interest Media. All rights reserved.

Fine Homebuilding receives a commission for items purchased through links on this site, including Amazon Associates and other affiliate advertising programs.

X
X
This is a dialog window which overlays the main content of the page. The modal window is a 'site map' of the most critical areas of the site. Pressing the Escape (ESC) button will close the modal and bring you back to where you were on the page.

Main Menu

  • How-To
  • Design
  • Tools & Materials
  • Video
  • Blogs
  • Forum
  • Project Guides
  • Reader Projects
  • Magazine
  • Members
  • FHB House

Podcasts

  • FHB Podcast
  • ProTalk

Webinars

  • Upcoming and On-Demand

Podcasts

  • FHB Podcast
  • ProTalk

Webinars

  • Upcoming and On-Demand

Popular Topics

  • Kitchens
  • Business
  • Bedrooms
  • Roofs
  • Architecture and Design
  • Green Building
  • Decks
  • Framing
  • Safety
  • Remodeling
  • Bathrooms
  • Windows
  • Tilework
  • Ceilings
  • HVAC

Magazine

  • Current Issue
  • Past Issues
  • Magazine Index
  • Subscribe
  • Online Archive
  • Author Guidelines

All Access

  • Member Home
  • Start Free Trial
  • Gift Membership

Online Learning

  • Courses
  • Project Guides
  • Reader Projects
  • Podcast

More

  • FHB Ambassadors
  • FHB House
  • Customer Support

Account

  • Log In
  • Join

Newsletter

Get home building tips, offers, and expert advice in your inbox

Signing you up...

This site is protected by reCAPTCHA and the Google Privacy Policy and Terms of Service apply.
See all newsletters
See all newsletters

Follow

  • X
  • YouTube
  • instagram
  • facebook
  • pinterest
  • Tiktok

Join All Access

Become a member and get instant access to thousands of videos, how-tos, tool reviews, and design features.

Start Your Free Trial

Subscribe

FHB Magazine

Start your subscription today and save up to 70%

Subscribe

We hope you’ve enjoyed your free articles. To keep reading, become a member today.

Get complete site access to expert advice, how-to videos, Code Check, and more, plus the print magazine.

Start your FREE trial

Already a member? Log in