
Forming and Pouring Footings
Creating straight, level, and sturdy footings is the first step in building a long-lasting home. Here's how to do it right.
Synopsis: Good foundations start with good footings. In this first of two articles on the topic, the authors show how to lay out and form concrete footings for a full foundation, with some tips for adding steel rebar and a keyway once the concrete has been placed.
The techniques in this older Fine Homebuilding article have stood the test of time, and they’re just as useful today as they were years ago.
Part I of a two-part series on foundations: In the next issue of Fine Homebuilding (#120), we’ll take a look at forming and pouring a foundation on top of these footings.
Over the years, we’ve built homes on almost every type of foundation imaginable. However, a concrete foundation always seemed to provide the best base for a home built in Rhode Island, our part of the country. In 1996, Rick bought a concrete-forms company, and our firsthand knowledge of footings and foundations increased exponentially.
Why footings?Trudging through 2 ft. of snow can be a real nuisance. Strap on a pair of skis, though, and nuisance becomes recreation. The extra surface area of the skis distributes your weight over a greater area so that you don’t sink into the snow. The same principle of load distribution is why we put footings under house foundations. Footings are reinforced-concrete platforms at least twice as wide as the foundation they support and usually a foot deep. They are required by most local codes, especially if an area has soils with questionable bearing capacity, such as loose sand, silt or clay. A wet site is another prime candidate for footings. —R. A. and M. G. |
With every house, we do everything in our power to keep the house and its foundation from settling and cracking, which can cause problems ranging from drywall cracks and sloping floors to doors that won’t close. The best preventive medicine is putting the foundation on top of poured-concrete footings.
The price for this medicine is usually reasonable. On a 26-ft. by 38-ft. house, footings add only about $600 to $700 to the cost of the house. Prospective homeowners will spend that much in a blink to upgrade a kitchen. We figure that it makes more sense to upgrade the whole house by adding footings to ensure that the new kitchen stays put.
Getting the footings in the right spot
Most of the footings called for in our work are a foot high and 2 ft. wide. We normally reinforce footings with a double row of 1/2-in. (#4) steel rebar unless plans specify otherwise. For the project featured in this article, the soil at the bottom of the excavated hole was like beach sand, so footings were a must. We went with standard-size footings to support the 10-in. wide by 8-ft. high foundation walls that would be poured on top.
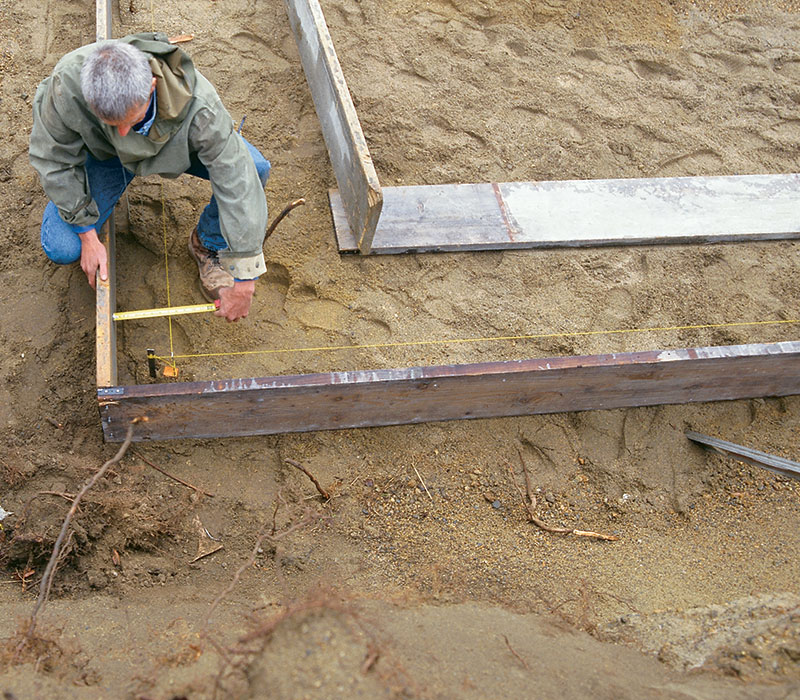
But before we can think about footings, we have to lay out the location of the foundation. We begin by establishing two starting points, the corners at both ends of one foundation wall. With most houses, there are a couple of survey-or stakes outside the hole with the offsets (the distance to the edge of the foundation wall) written on them.
For most jobs we find corner points by running a string between the stakes. We measure in the offset amount and then drop a couple of plumb lines to the floor of the foundation hole.
We drive stakes (usually foundation-form rods) into the ground at the two points; the measurement between the two rods should be the length of the wall as indicated on the plans. If the points are off an inch or two, we adjust them until the measurement is correct. If there is a large gap between our measurement and the plan, we call the surveyor back. For the house in this article, setbacks were tight, so the surveyor set two exact foundation corner points on the floor of the hole.
High-school geometry and a construction calculator
The best way to locate the rest of the corners or points from the two reference points is to use diagonal measurements, just like we learned in high-school math. Unlike in high school, however, we depend on a calculator to do the math.
Before jumping into the hole, we sit down with the blueprints and the calculator. In about ten minutes we figure out our diagonals so that every corner on the plans has two reference measurements. Then it’s just a matter of measuring those distances from the original two points to find the other foundation corners. The quickest method is to have two crew members hold tapes at the original reference points. A third crew member pulls the tapes tight and crosses them, moving the tapes until the calculated measurements from the comers meet each other. A stake is then driven into the ground to mark the point. We always double-check our measurements between the corners to make sure the foundation dimensions are right on.
The house in this article has a garage with a connecting breezeway that meets the house at an angle. To locate the corners of the breezeway, we triangulate from the foundation corners we’ve just found for the main body of the house. Again, we double-check all our dimensions to be sure they gibe with the plan. Once stakes have been driven at every corner, we run a string from one to the other, sort of like a giant connect-the-dots game. The result is an outline of the entire foundation.
Laying out the footings
Measurements are taken from surveyors’ stakes (1) and transferred to the floor of the excavated hole to locate one foundation wall. The ends of the wall are then located precisely with a measuring tape (2). All other corners are located by triangular measurements from those points (3). Three people and two tapes make the process go quicker.
|
|
|
|
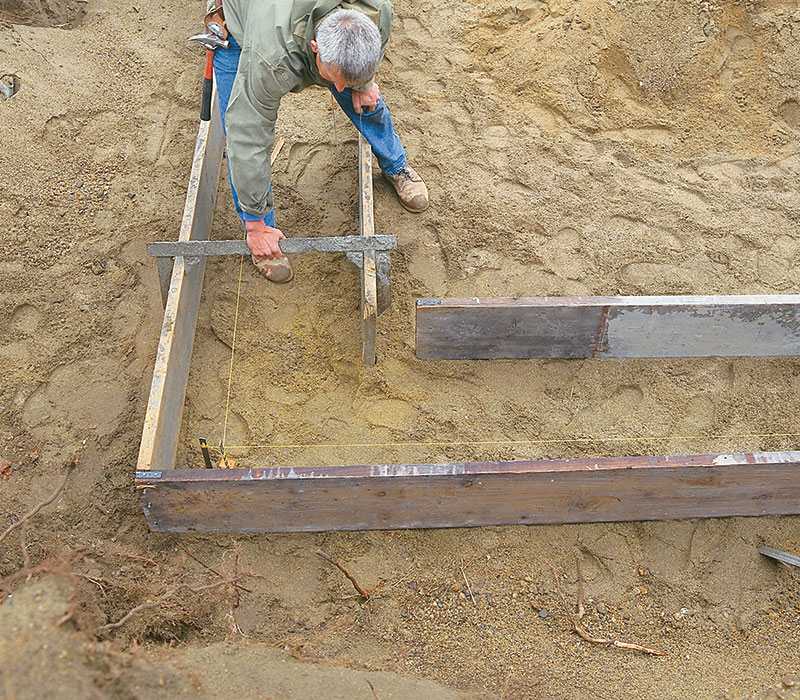
Setting up the forms
Starting at one corner, the outside forms are set at a given distance off the foundation line (4). Brackets are then slipped over the forms that keep the inside form exactly 2 ft. away from the outside (5). The footing height is then set with a transit and marked on the inside of the form.
|
|
|
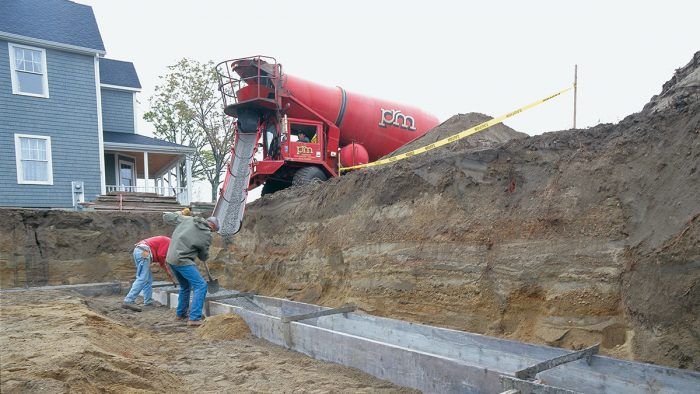
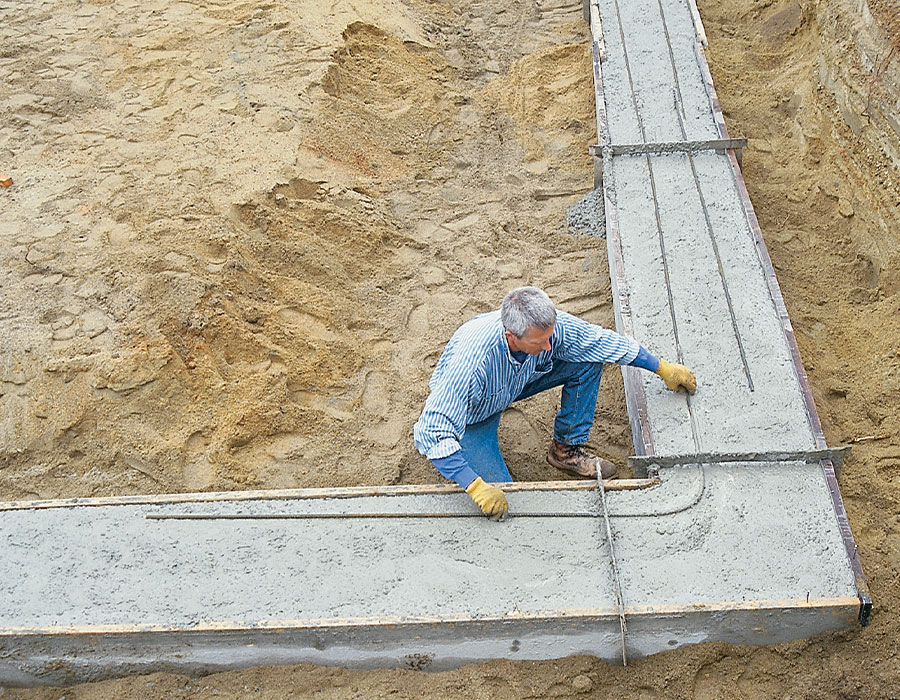
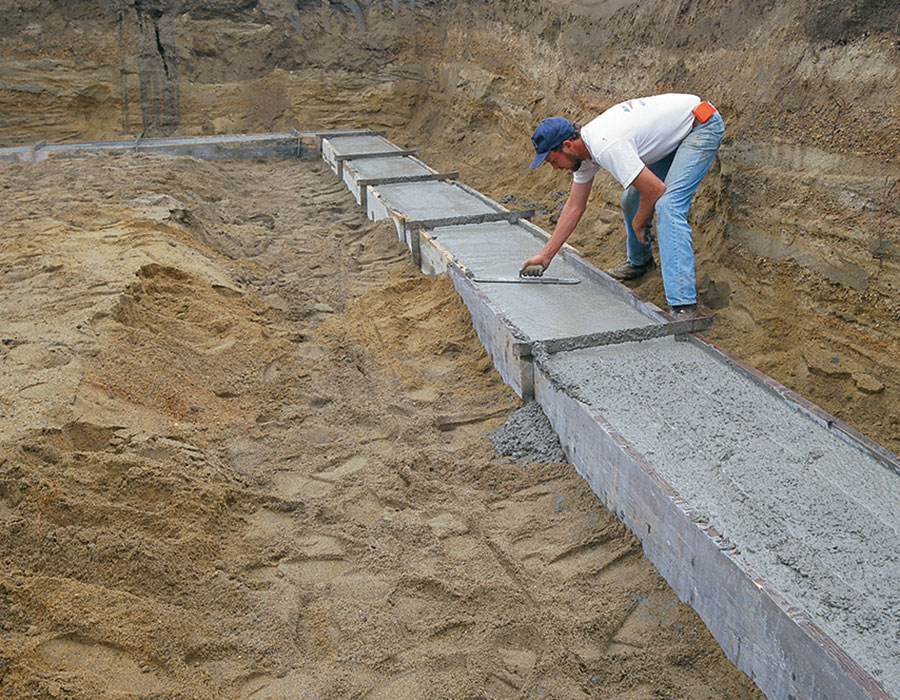
Pouring the footings
The footing forms are filled to grade, and the concrete is worked with the flat side of a shovel until the footings are level. Then -in. rebar is pushed down into the fresh concrete (6). The top is troweled smooth (7), and a keyway is formed by dragging a 2×4 down the center of the footing (8). While the concrete is still green, the corner of the foundation is marked on the footing (9).
|
|
|
|
|
|
Footings are built for strength and function, not aesthetics
With the outline in place, we’re ready to start setting forms. We use 2x12s connected by steel form brackets that hold the inside and outside forms exactly 2 ft. apart (photo 5, above). Rick had these brackets custom made, but there has been enough interest in them that he hopes to be offering them for sale soon.
We locate the forms so that the foundation walls will be centered on the footings. The foundation walls for this house were 10 in. wide, so we subtracted 10 in. from the footing width of 24 in. To leave equal amounts of footing on both sides of the foundation wall, we divided the re maining 14 in. in half to give us 7 in. of exposed footing on both sides of the walls.
Because the string we’ve set indicates the outside of the foundation wall, we start by nailing two 2x12s together to form an outside corner. We then set our corner 7 in. away from the string. A form bracket locks the inside form plank at the proper width. We continue this process around the perimeter of the foundation. Form brackets are dropped every 4 ft. or so. Where two planks butt, we toenail the tops together and put form brackets on both sides of the butt joint.
We keep many different lengths of form stock on hand, so we rarely need to cut a piece. When we come to a small jog, such as the inside corner of the angled breezeway, we simply form the whole area off. The extra concrete used is negligible. When two planks don’t quite meet, we bridge the gap with a short piece, and if a plank is a little long, we just run it by the adjacent plank and tack the two together. Forming footings is forgiving because the finished product is buried. The major concern with footings is strength and function, not how they look.
When we need a footing that is wider than 2 ft. or if we’re forming a large area such as a bulkhead pad, we secure the forms in a different manner. We run -in. wide perforated-steel strapping beneath the planks across the bottom of the footing. The strapping is run up the outside of the form planks and nailed to keep the bottoms of the planks from spreading. The tops are then held at the proper width with a length of 1×3 nailed between the two planks.
Footing height is set with a transit
Once all the forms are in place, we backfill against potential weak points such as butt joints or the larger areas where we couldn’t use form brackets. Backfilling prevents the concrete from getting underneath the planks and lifting them up during the pour. At this point we transfer the foundation lines to the tops of the forms for future reference. The string is removed, but the stakes are left in the ground as a visual reference to make sure that the forms don’t shift during the pour.
Next, using a builder’s transit, we set the grade to make sure the top of the footing is poured to the same level. First, we find the lowest point on the forms by checking the height of the planks at every corner and at several points in between. The low point becomes the grade for the footing. We mark a yardstick to the measurement at the low point on the forms. Then we work our way back around the footing, installing grade nails every few feet on the inside of the forms. To mark the grade, we hold a 6d nail against the bottom of the yardstick and move it up or down until it’s at the right height. The nail is then hammered in about halfway.
The excavators we work with usually leave the foundation hole less than 2 in. out of level. But if we see that some parts of the footing are too shallow because the bottom of the hole is too high after we shoot the grade, we dig out inside the forms until the proper depth is reached. If we undermine the planks in the process, we backfill the outside of the form. We also spray a light coat of form-release oil on the inside of the 2xs.
Let the concrete fly
Now we’re ready for the concrete. The best foundation holes have clear access for the cement trucks all the way around the hole. Good access makes the pour go more quickly because the truck can shoot concrete into the forms without our having to drag it with shovels. If access is a problem, we usually start the pour at the most difficult spot for the truck to reach and work our way out.
The concrete chute is moved slowly along the forms, allowing the concrete to fill up to the grade nails. For sections that can’t be reached with the truck’s chute, we drag the concrete along the forms until those areas are filled. When the pour is finished, we begin installing a double row of -in. steel rebar around the footing.
Although rebar is not required for residental footings here in the Northeast, we believe that its added strength is cheap insurance. For commercial footings that are required to take many times the load of a typical house, we wire the rebar together and set it on chairs that keep it at a specific height during the pour. However, the additional cost of the labor and the materials usually rules out this option when we’re doing residential projects.
Instead, rebar is placed atop the wet concrete about 6 in. in from each form. For angles or 90° corners, we bend the rebar around a knee until it’s at the desired angle. Rebar is then inserted under the brackets and pushed down about 8 in. into the concrete, using the shovel as a gauge. As rebar is pushed in, we jiggle it with the shovel to remove any trapped air.
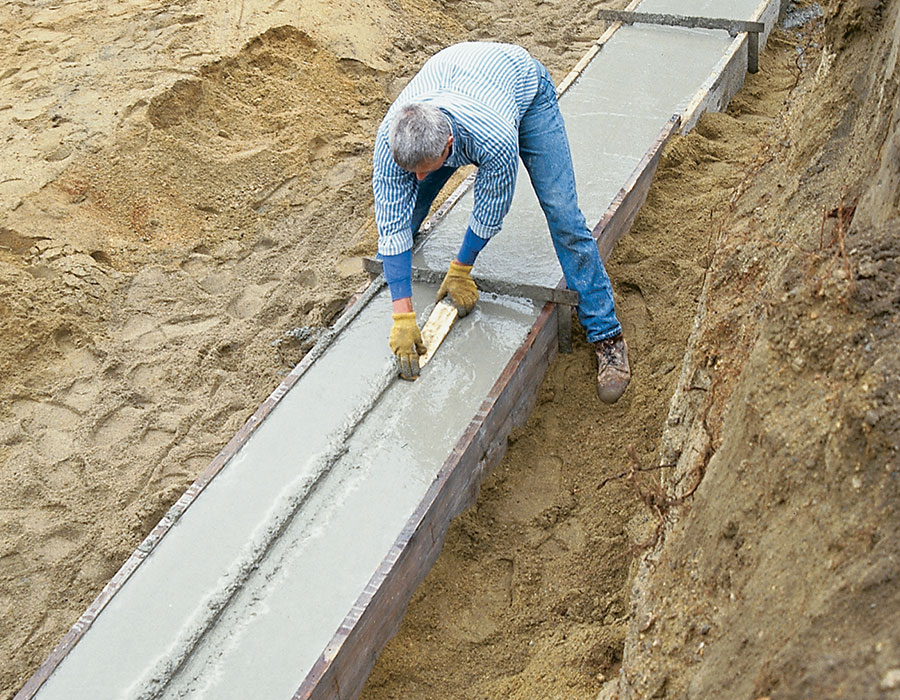
A 2×4 cuts the keyway
We level the concrete by vigorously pushing it with the flat of the shovel until the concrete is at finish grade. We add or remove a shovelful of concrete to adjust the level and to rework the concrete until the grade nails are exactly half-exposed.
After the concrete is leveled to the grade nails, we gently lift up all the form brackets a couple of inches, which makes our last two jobs easier. The first job is troweling the top of the footing to provide a smooth surface for snapping chalklines for the foundation walls. The smooth surface also makes it easier to sweep off the dirt that always gets on the footing while the forms are being stripped.
The final part of the pour is making a keyway, centered on top of the footing, that will lock the foundation walls in place. We usually make our keyway 1-1/2 in. deep and 3-1/2 in. wide, or the size of a 2×4 laid flat. We simply press a short piece of 2×4 into the concrete and drag it down the center of the footing. By now the concrete should have cured enough for the 2×4 to leave a significant depression.
Cutting a keyway this way causes a slight buildup of displaced concrete, and we’ve found that concrete built up in the corners can interfere with setting the foundation forms plumb. To avoid this problem, we end the keyway short of each corner or angle in the foundation. Because corners and angles are the strongest parts of a foundation wall, we aren’t worried about compromising integrity at these points.
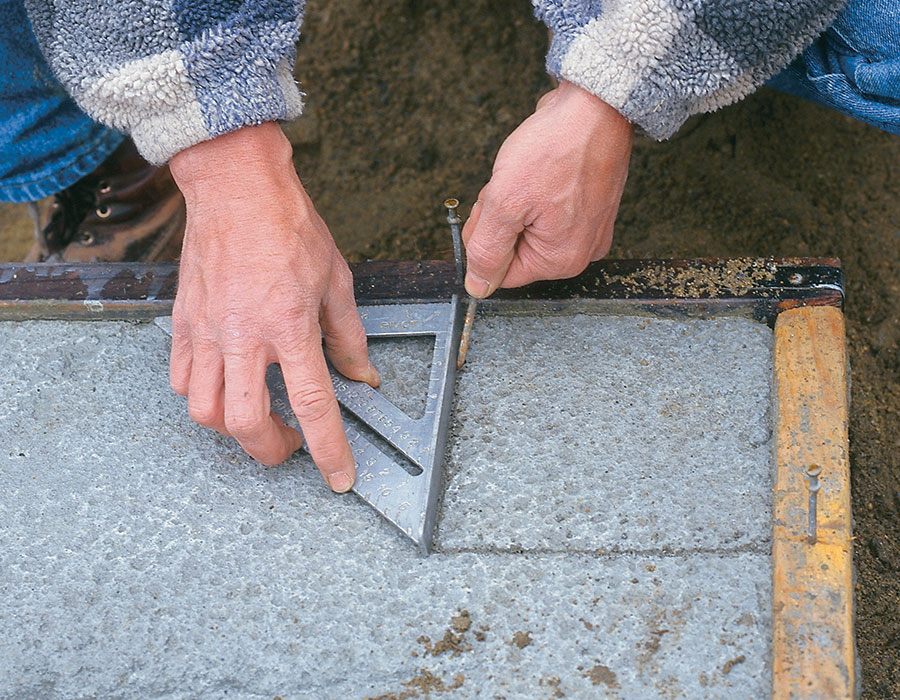
Before stripping the forms, we square off the foundation-line marks on the forms and mark the foundation corners in the green concrete. A long steel bar makes short work of popping the brackets, and with the duplex nails, removing the forms is a breeze.
—Rick Arnold and Mike Guertin are contributing editors to Fine Homebuilding, residential-building consultants and builders from North Kingstown and East Greenwich, Rhode Island.
Photos by Roe A. Osborn.
From Fine Homebuilding #119
Fine Homebuilding Recommended Products
Fine Homebuilding receives a commission for items purchased through links on this site, including Amazon Associates and other affiliate advertising programs.

Smart String Line

Plate Level
Original Speed Square
