
Four Ways to Shingle a Valley
Builder Mike Guertin shows three conventional ways and one newer method for weatherproofing this crucial roof detail.
Synopsis: This article illustrates four different methods of shingling a valley, comparing the advantages and disadvantages of woven, open metal, closed cut, and Long Island valleys and describing the author’s techniques for preparing and installing each one.
A lot of today’s new home designs include multiple gables and roof configurations. When two roof planes meet at an inside corner, a valley is created. Because valleys collect and channel a greater volume of water than a single roof plane, I always make an extra effort to design and build them as watertight as possible.
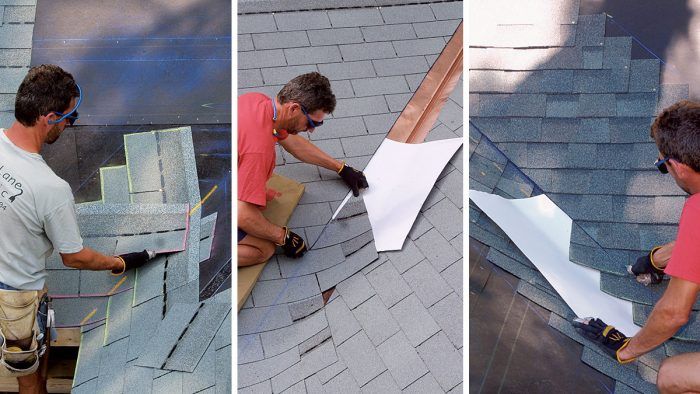
For this article, I mocked up a section of roof to show four ways to shingle valleys. The mock-up allows me to show all four methods in a similar context. I used three-tab shingles for two of the methods and laminated shingles for the other two. When shingling a roof with three tab shingles, it’s easiest to shingle the roof planes first, working toward the valley. Laminated shingles let you start in the valley and work outward, which can be an advantage in some situations.
 |
 |
Woven |
Open metal |
| The shingles from both roof planes overlap on each course. | Metal liner or flashing lines the valley and is left exposed. |
| Advantages
• Shingles don’t need to be cut. • Shingles don’t rely on asphalt roof cement to be sealed. • Interlocking weave provides double coverage, which makes it the most weatherand wind-resistant choice. |
Advantages
• Variety of metals can be used. • Metal valley creates the most decorative appearance. • Method works well with laminated shingles (no bulky look or telegraphing). • Metal valley is durable. |
| Disadvantages
• Both sides must be shingled at the same time, which slows installation. • Hollows under the weave can be punctured when stepped on. • Hollows in the weave make the valley look uneven from the ground. • There is a greater potential for splitting from thermal changes. • Extra-thick laminated shingles may make the valley look bulky. |
Disadvantages
• Metal valley has to be prefabricated. • This method relies on proper shingle overlap and roof cement to keep out water. • Nailing through metal must be avoided. • Metal valleys tend to be more expensive. • Metal valleys require cutting shingle edges and dubbing shingle corners from both roof planes. |
 |
 |
Closed-cut |
New: Long Island valleys |
| Shingles from one roof plane cross the valley and are lapped by shingles from the other side, which are cut in a line along the valley. | This new method starts out like a cut valley, but instead of lapping and cutting the shingles on the second side, you form the “cut” line with a row of shingles turned on edge that run up the valley. |
| Advantages
• The two converging roof planes don’t have to be shingled at the same time. • Cut valleys are usually faster than weaving. • Cut valleys provide a crisp look. |
Advantages
• This method looks like a cut valley without cutting shingle edges or dubbing corners. • This technique is faster than any other valleyshingling method. |
| Disadvantages
• Cut valleys provide single coverage through the center of the valley. • Shingles from one side have to be cut back and dubbed. • Cut edge must be sealed with roof cement. |
Disadvantages
• This method works only with laminated shingles. • Long Island valley system is not yet approved by shingle manufacturers. |
Preparing a roof: All valleys start the same
Regardless of the shingling method, every successful valley installation begins with proper roof preparation. Taking the right steps before applying the shingles not only goes a long way toward preventing roof leaks, but it also helps to cushion the shingles (or metal valley) against the ragged edges of the roof sheathing at the centerline of the valley.
In the past, I’ve used several different methods to prepare a valley, including lining the valley with aluminium coil flashing or roll roofing, and even cementing together layers of #30 felt paper with asphalt roof cement (a messy job). Today, fortunately, we have a simpler and more effective material at our disposal: waterproof shingle underlayment (WSU). Examples are Grace Ice & Water Shield, (W. R. Grace; www.na.graceconstruction.com), Weatherwatch (GAF; www.gaf.com) and MoistureWrap (Tamko; www.tamko.com). These peel-and-stick membranes seal around nails and are pretty easy to work with. A release sheet on the back keeps the membrane from adhering until you remove it.
I begin the prep work by sweeping off any sawdust or other debris. I also set any sheathing nails that stick up from the roof plane and could puncture or wear through the WSU or shingles. As with any asphalt-shingling job, I install a 9-in. to 12-in. strip of WSU along the eaves’ edges, and I crosslap the strips at the valley. These strips go under the drip edge.
I overlap the inside corner of the drip edge at the valley to minimize sharp edges that could cut into the WSU over time. Because I build in snow country and along the coast, I include extra protection along the eaves. After rolling out full 3-ft. widths of WSU over the drip edge and up the roof sheathing, I again overlap the WSU at the valley.
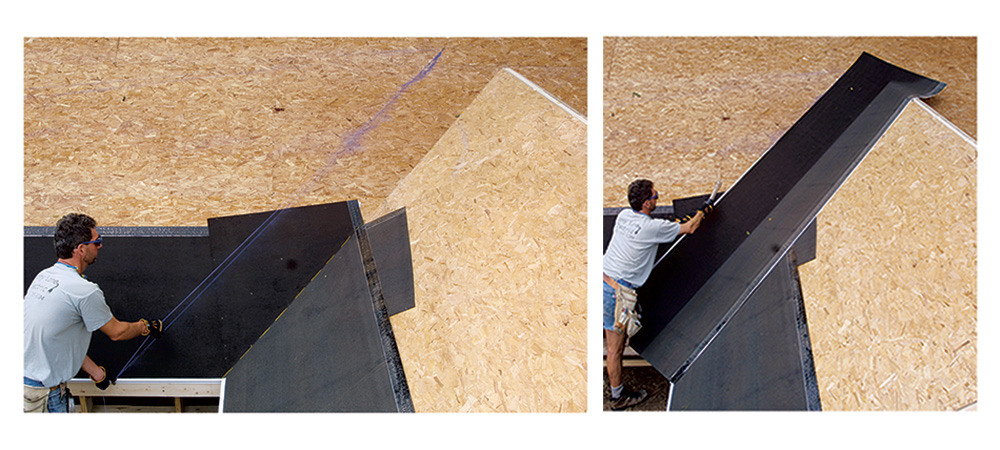
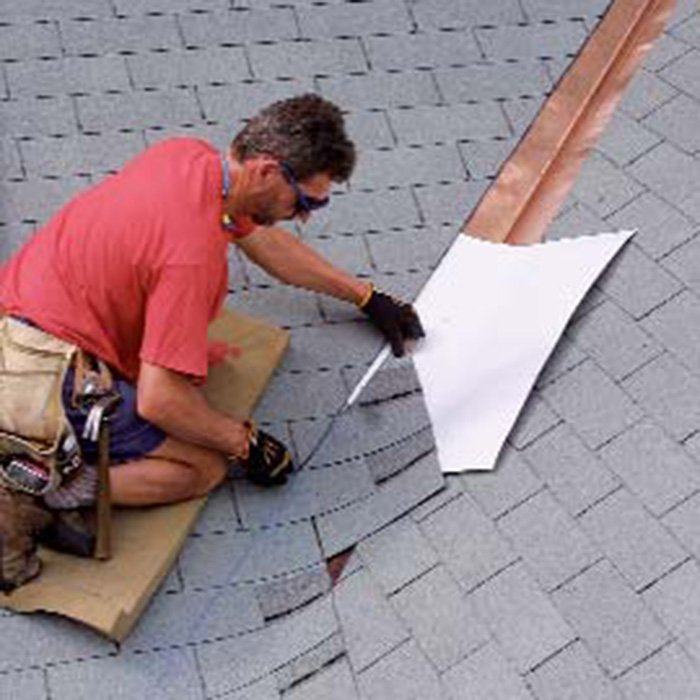
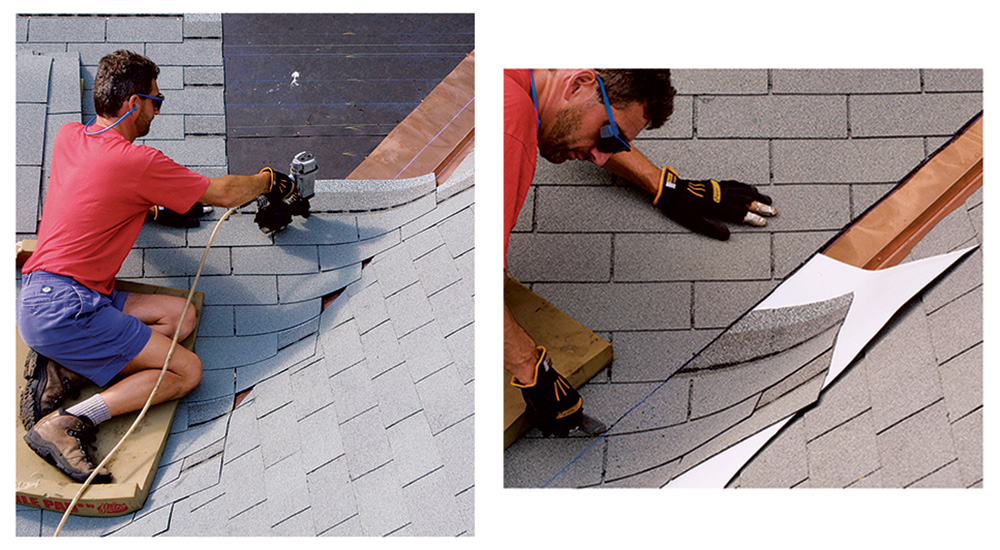
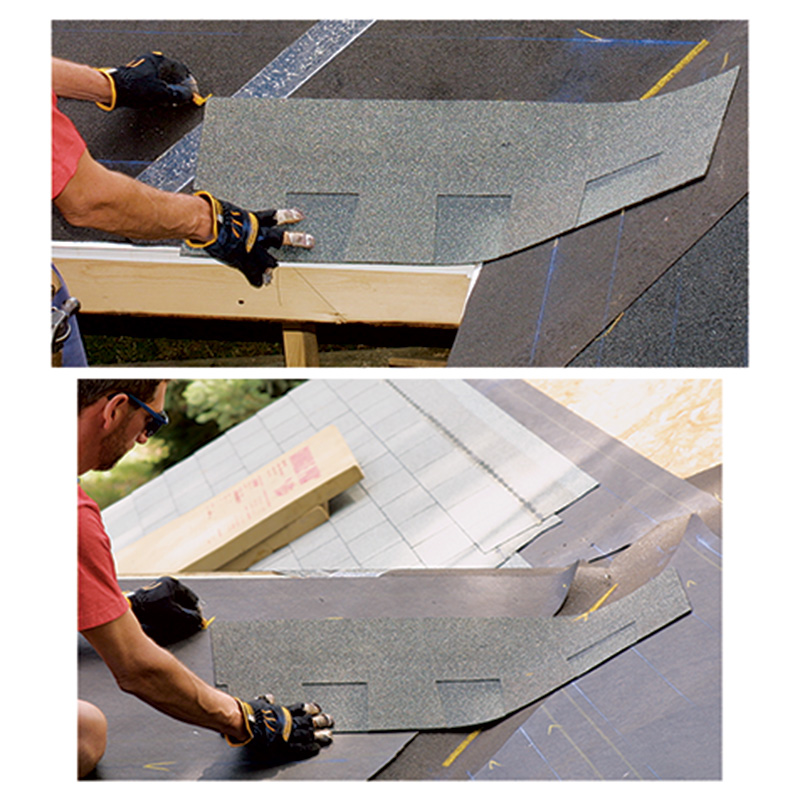
For the valley itself, I snap a chalkline parallel to the valley at a distance half the width of the WSU. I cut a sheet of WSU about 3 ft. longer than the overall length of the valley and roll it into the valley with the release sheet still on. I line up one edge of the WSU with my snapped line and staple down that edge of the sheet every couple of feet. Next, I fold back the loose edge, remove the release sheet from that half of the WSU (photo top right) and then roll the sticky side down to the roof sheathing. In colder weather, it may be necessary to nail down the sheet if it doesn’t stick immediately.
Woven valley
Woven valleys seem to have fallen out of favor in most regions of the country, mainly because they are the slowest to install. But woven valleys are the most weather-resistant, and unlike other valleys, they don’t require sealing with messy roofing cement.
You can weave a valley working either into or out of it. However, working out of the valley requires laminated shingles, the multiple layers of which can make a woven valley look very bulky. On the other hand, working three-tab shingles out of the valley would make aligning their slots almost impossible. For the purposes of this article, I’ll describe the weaving process working into the valley with three-tab shingles.
|
|
|
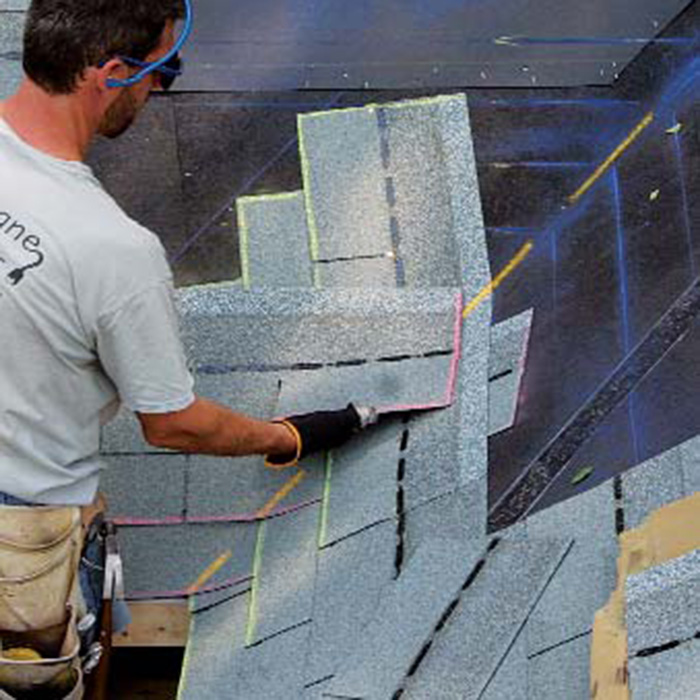
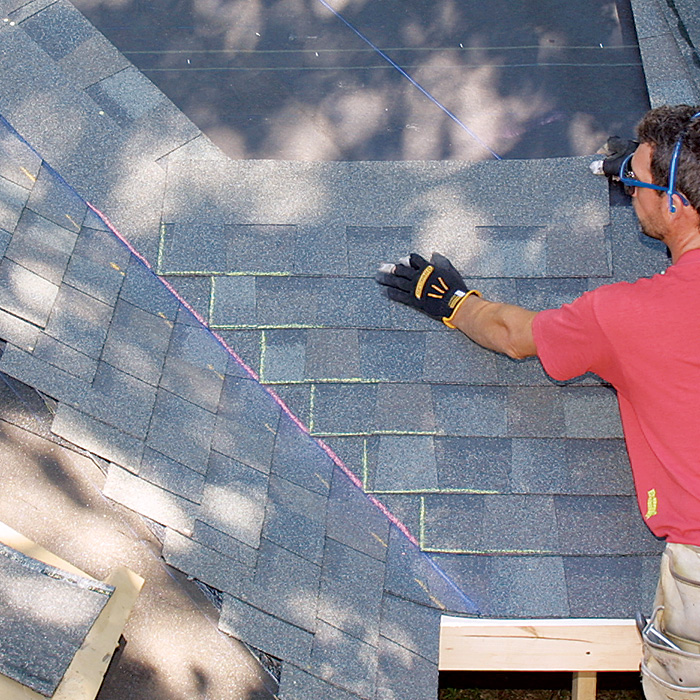
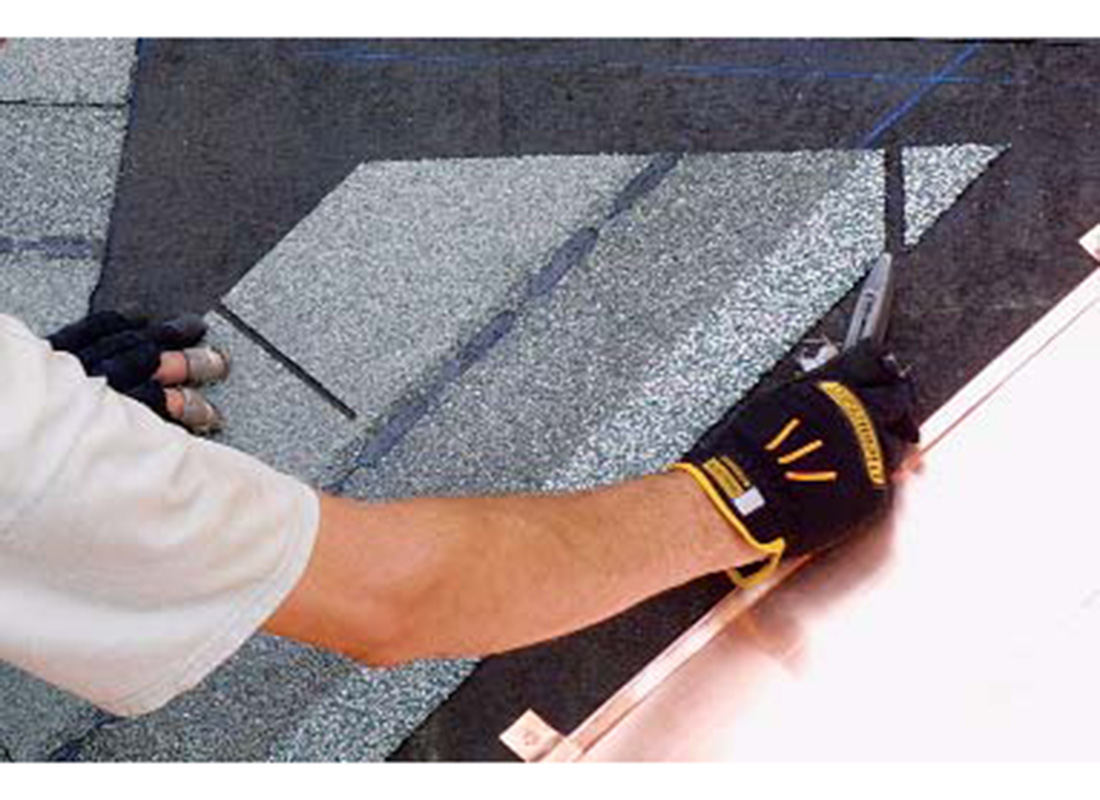
I start by shingling both roof planes to within about a half shingle of the valley center, leaving the ends staggered. Then the starter shingles and the first course are nailed in, with the shingle from the larger roof plane lapping over the shingle from the smaller plane on each course. (Every valley method, except the open metal valley, begins with a woven course).
I keep all nails at least 6 in. away from the valley center. A quick way to gauge this distance is the span between my thumb and index finger. I continue up the valley, overlapping shingles on each course and pressing each shingle into the valley center to halt bridging.
As the shingle courses march up the valley, it’s necessary to insert either single- or doubletab shingles to make sure the valley shingle wraps through far enough (photo bottom left). The minimum distance I let a shingle lap across the valley is 8 in. from the valley center to the outer edge of the shingle’s nailing strip (or the distance from my thumb to the end of my middle finger).
As I press each shingle into the valley, I usually put an extra nail in the shingle corner farthest from the valley center to help hold the shingle flat. I also run full shingles through the valley to keep end joints between shingles as far away from the valley as possible.
Open metal valley
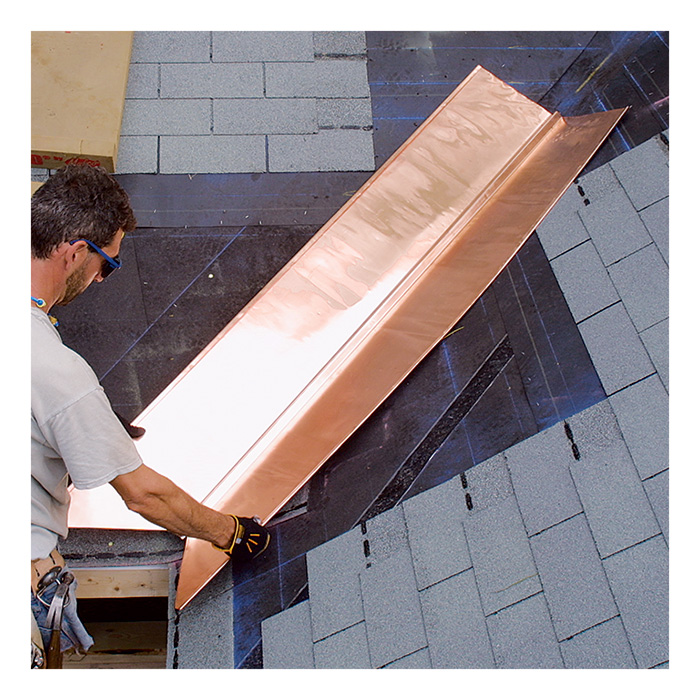
I consider open metal valleys to be the most decorative of the bunch. They’re used traditionally with wood shingles, tile or slate roofing, but they also work well with asphalt shingles, especially today’s heavy laminated shingles, which can be difficult to bend tightly into the valley. Open valleys are most durable when lined with copper; lead-coated copper; or enameled, galvanized or stainless steel. Aluminum also can be used, but the uncoated mill-finish aluminum commonly sold won’t last as long as heavy-gauge color-coated aluminum.
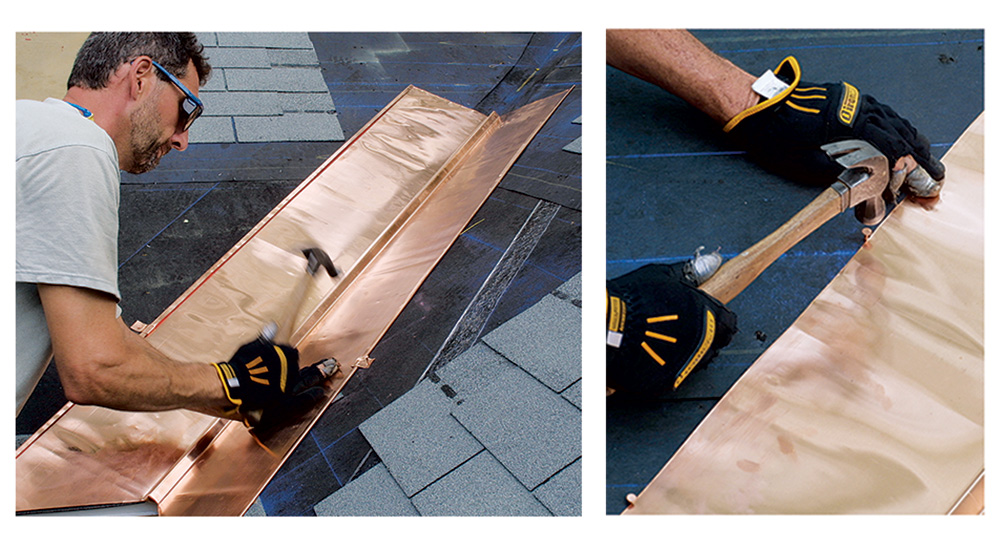
With a metal valley, the first hurdle is having the metal liner fabricated. My HVAC duct fabricator custom-bends all the pieces for my projects. The liner should be 2 ft. to 3 ft. wide, which leaves 12 in. to 18 in. on each side of the valley. Also, each liner panel should be no more than 8 ft. long to allow for lengthwise expansion. I like to have a bent, inverted V, about 1 in. high, down the middle of each panel. The V helps to resist the flow of water across the valley by channeling it down the center. The crimp also stiffens the liner lengthwise and adds a flex point for widthwise expansion, which helps to keep the liner from wrinkling on hot days.
The metal liner panels must be fastened to allow for expansion and contraction. The simplest method is to trap the edges of the liner with the heads of nails driven every 12 in. to 16 in. I butt the nail shank to the edge of the metal and drive the head until it just touches the metal without dimpling it. An even better metho uses clips that interlock a hem along both edges of the liner panel. Just make sure the clips or nails that are snug against the panels are made of the same metal to avoid a galvanic reaction Also, upper liner panels should overlap lower ones by 6 in. to 8 in. as they progress up the valley.
Shingles should overlap the edge of the liner panels by at least 6 in., and at least 3 in. of metal should be exposed on each side of the valley center for appearance and water flow. Shingles can be trimmed and dubbed before they’re nailed in, or run long across the valley and trimmed and dubbed after.
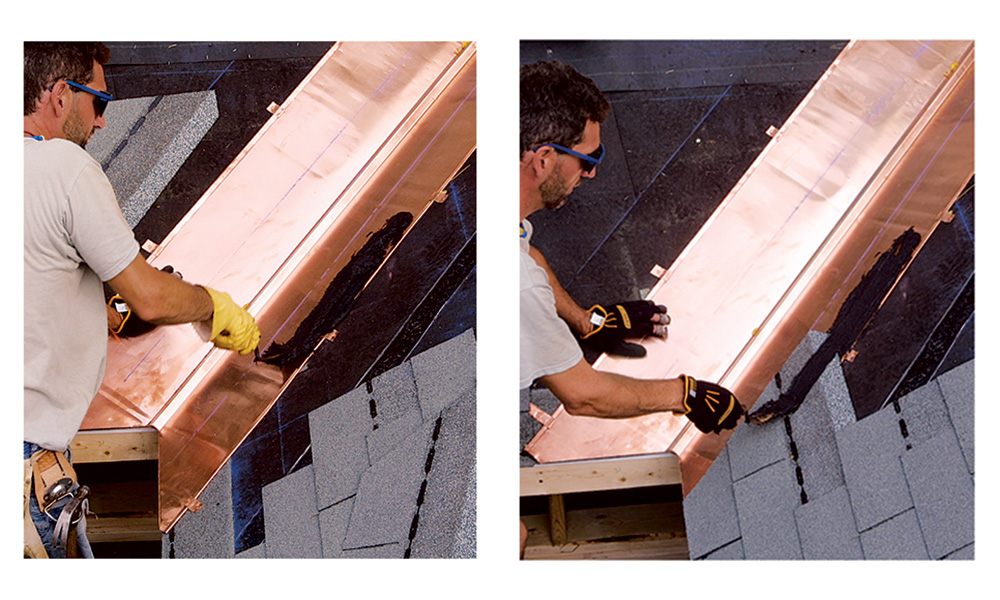
For the first method, I begin by snapping chalklines on the liner 3 in. from the center to guide shingle placement. Working toward the valley as I did here, I measure, cut and dub the shingles for a halfdozen or so courses. I then spread a 2-in. to 3-in. band of roof cement up the valley. As I nail in each course, I run the band of roof cement on top of the shingle down to the adhesion strip. For an open metal valley, keep all shingle nails at least 1 ⁄ 2 in. outside the edge of the liner.
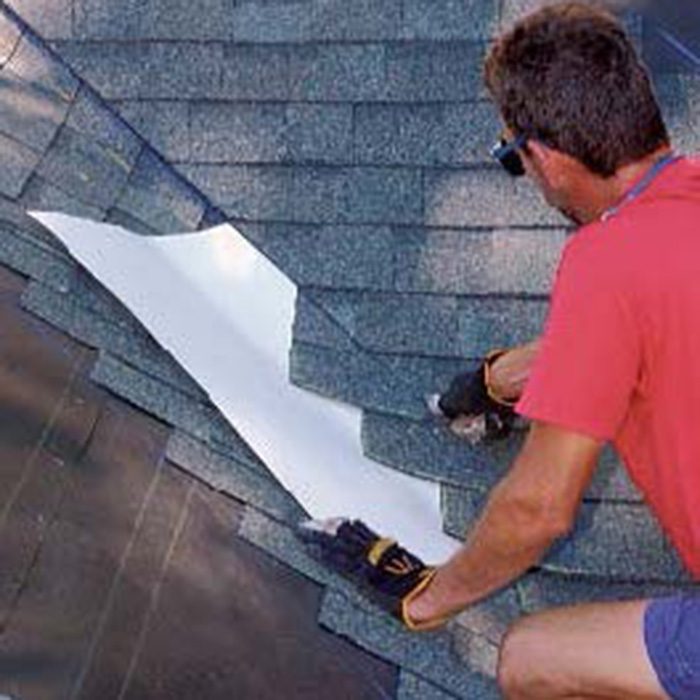
For the second method, I overlap the valley with each course of shingles. Next, I snap a chalkline on my desired cutline. With a shield of sheet metal or a shingle slipped in between the shingles and metal liner, I start at the top and cut the shingles with a hook-blade knife. The trick to cutting a smooth, straight line is to cut through one shingle at a time. I then go back and dub the top corner of each shingle.
The cut edges of shingles need to be bedded in a double ribbon of asphalt roof cement to resist water and to bond them to the valley liner. The quickest method is to use a caulking gun, running one bead with the nozzle all the way under the shingles and a second bead with my finger on the end of the gun as a spacer. Finally, double beads have to be continued down onto the top laps of each shingle.
Dubbing shingle corners
When water rushes down a valley, it has to be channeled downhill as it passes every shingle course. If the upper corners of the shingles are left straight in an open metal valley or a cut valley, water can be diverted away from the valley, causing leaks to appear several feet from the valley. To help prevent these leaks from occurring, the upper corner of each valley shingle should be clipped or dubbed.
To dub a shingle, measure approximately 2 in. down the cut edge of the shingle (photos below) and make a square cut back to the top edge of the shingle. This removes a small triangle of shingle. Any water that hits the dubbed corner of the shingle should now be diverted safely down the valley and away from the main part of the roof.
 |
Dubbing corners can prevent leaks.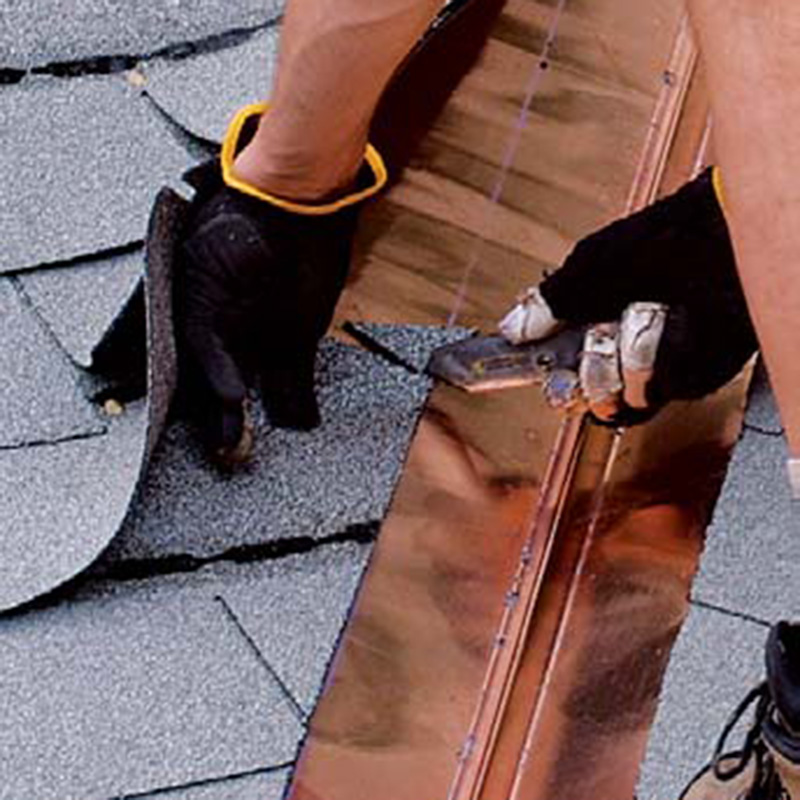
Dubbing or clipping the corners of shingles along the valley keeps water flowing downhill along a cut edge. Corners can be clipped either before the shingles are installed or in place before the edge is cemented. |
Closed-cut and Long Island valleys begin the same
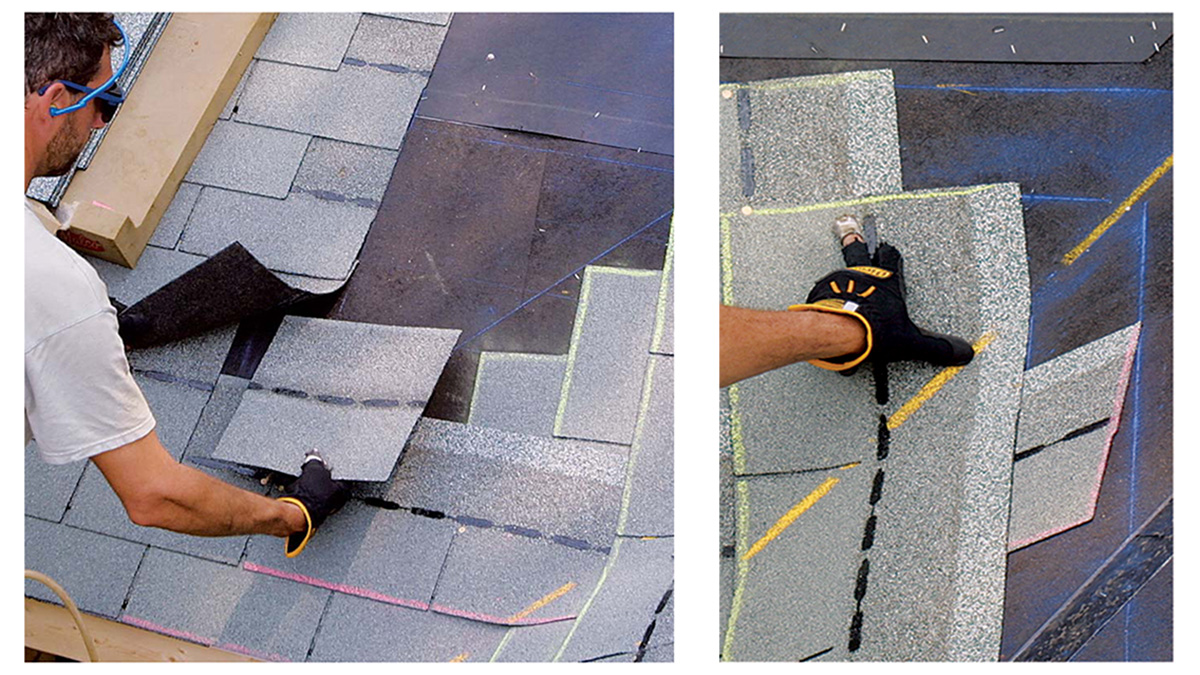
For the next two shingling methods, closed-cut and Long Island valleys, I work out of the valley using laminated shingles instead of working toward the valley with three-tab shingles. Shingling both a closed-cut valley and a Long Island valley is the same for the first half of the process. Working on the smaller roof plane, I set a shingle on the first course line. I place the shingle so that one edge is 2 ft. away from the valley center at the nail line. I mark the shingle where the valley center crosses the top edge, and I mark the roof at the top outside corner of the shingle (bottom photo).

Closed-cut valley
Even if I work toward the valley with three-tab shingles, cut valleys are faster than woven valleys hands down. With a closedcut valley, there’s no need to shingle the two roof planes at the same time. Plus, cutting the closedcut valley shingles can happen after the rest of the roof is shingled.
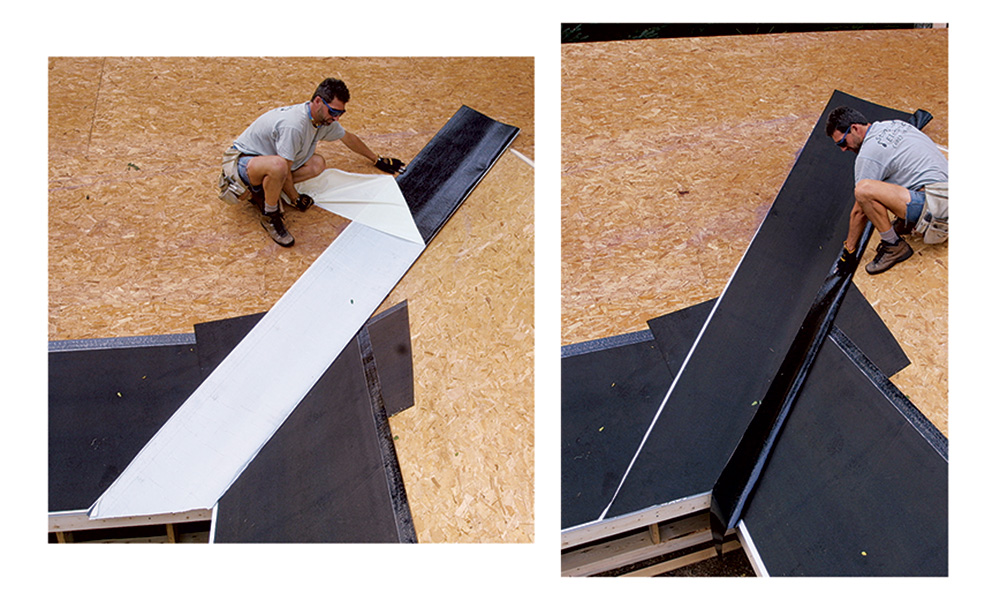
I begin the second side (the side that will be cut) by snapping a cutline 2 in. to 3 in. from the valley center (photos facing page). Keeping the cutline away from the center of the valley creates a better watercourse for runoff and tends to hide discrepancies in the line after the shingles are cut.
Here’s one of the big advantages of working out of the valley with laminated shingles. To establish a line to guide the placement of the shingles on the second roof plane, I place the lowest shingle on the course line so that the cutline meets the shingle 2 in. down from the top edge. In this position, there is no need to dub the corners of the shingles. As I did on the other side, I mark the location of the outside corner of the shingle on the felt, repeat the process at the top of the valley and snap a chalkline. I then install the shingles, lining the top edge with the course line and the outside corner with the guide line, letting the other edges run through the valley.
When the shingles are all in, I resnap my cutline. For protection, I insert a metal sheet between the shingles from both roof planes, and I trim the shingles one at a time with a hook blade in my utility knife. I finish the cut edge with a double bead of roof cement, the same as for the open metal valley.
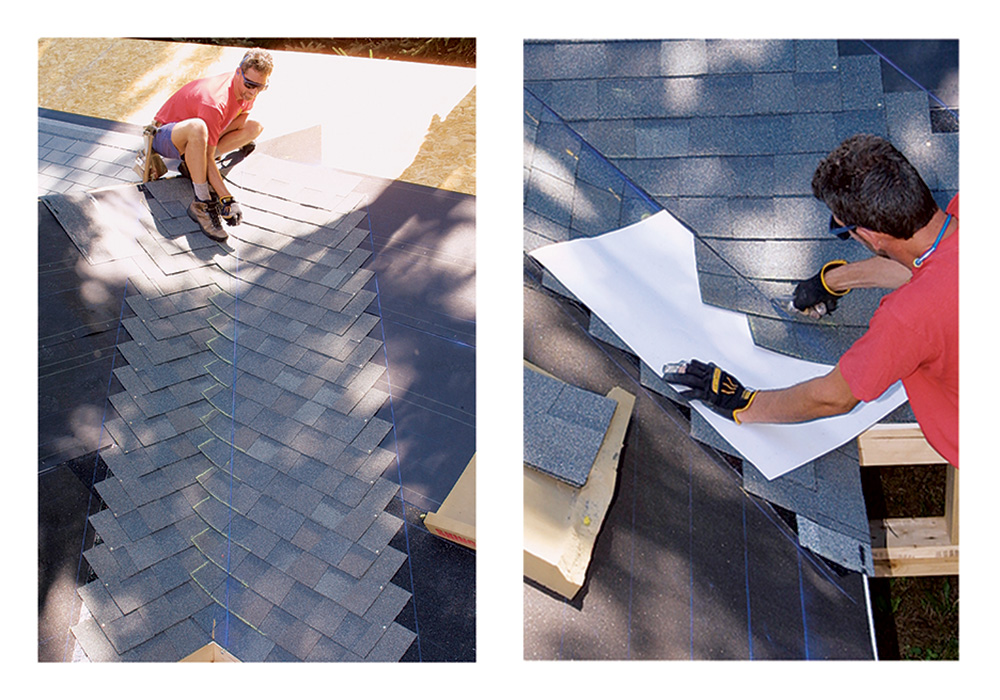
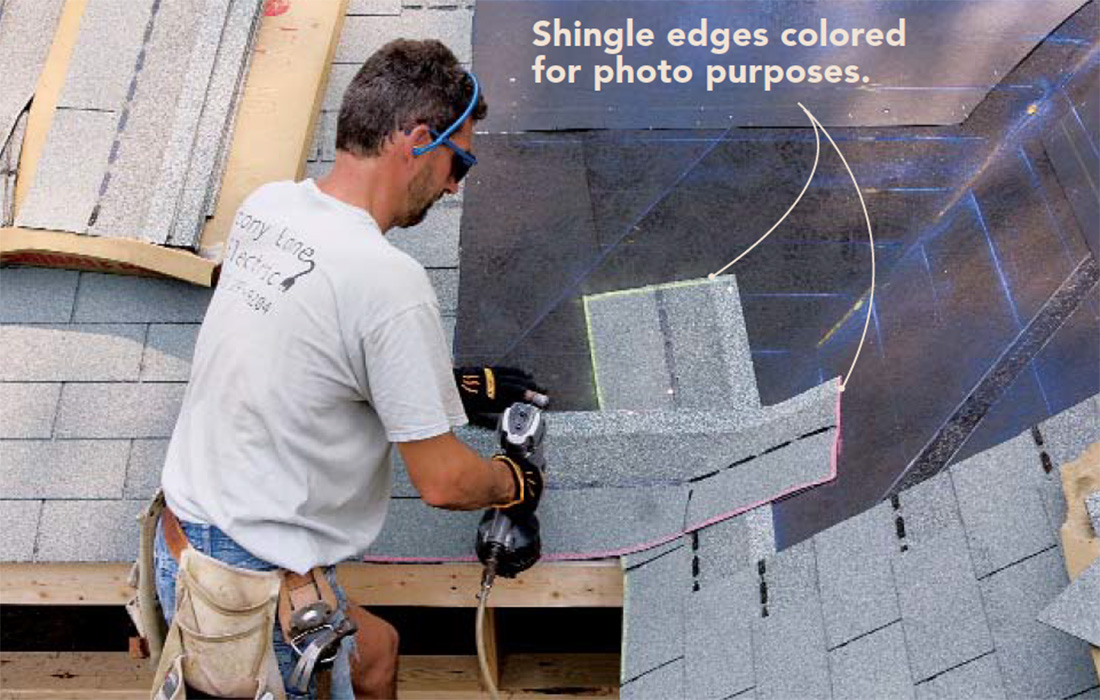
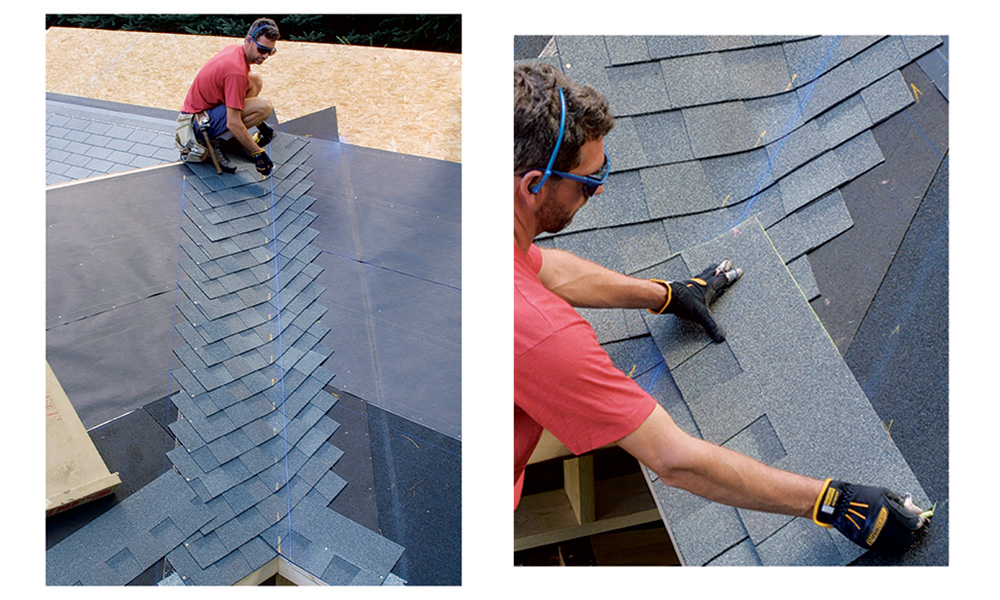
Long Island valley
A young roofer from Long Island first showed me what I now call a Long Island valley. This valley looks the same as a cut valley, only it’s faster to install. Although this valley system isn’t entirely new, you won’t find it described on shingle wrappers. However, it does seem to be a viable weather-resistant method. The only drawback is that Long Island valleys work only with laminated, random-pattern shingles. This method cannot be used with three-tab shingles.
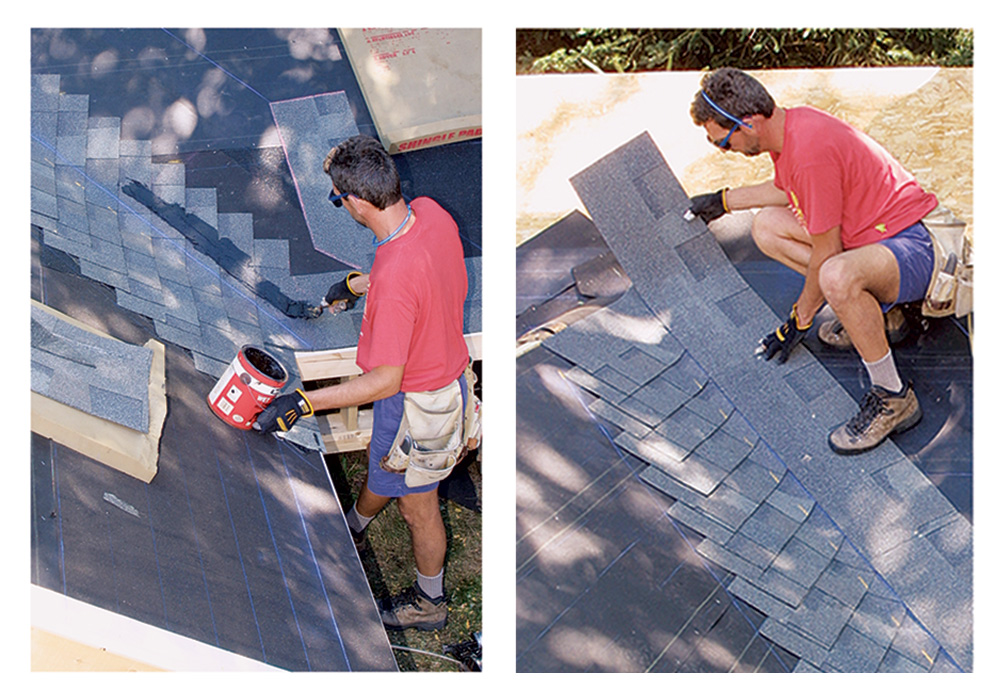
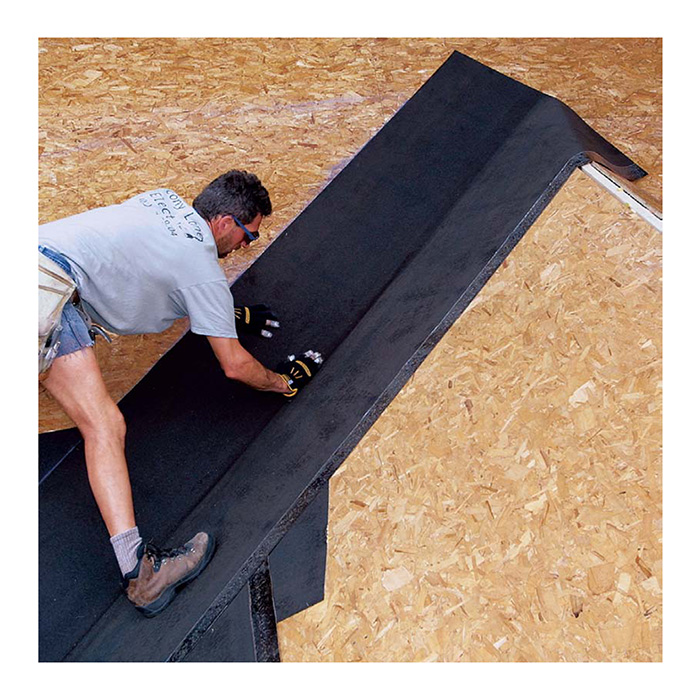
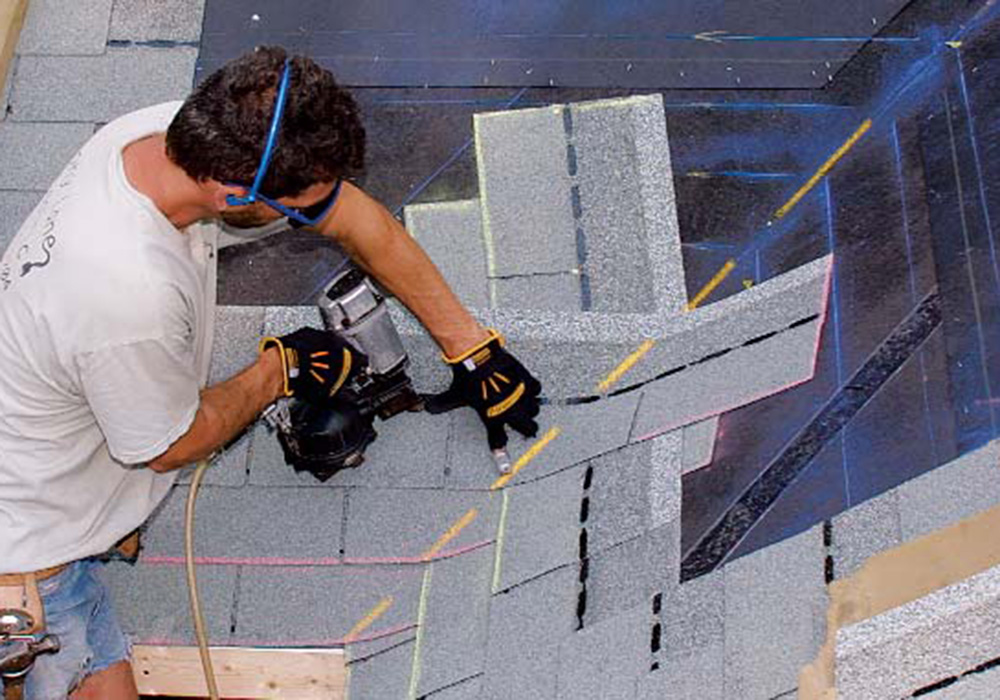
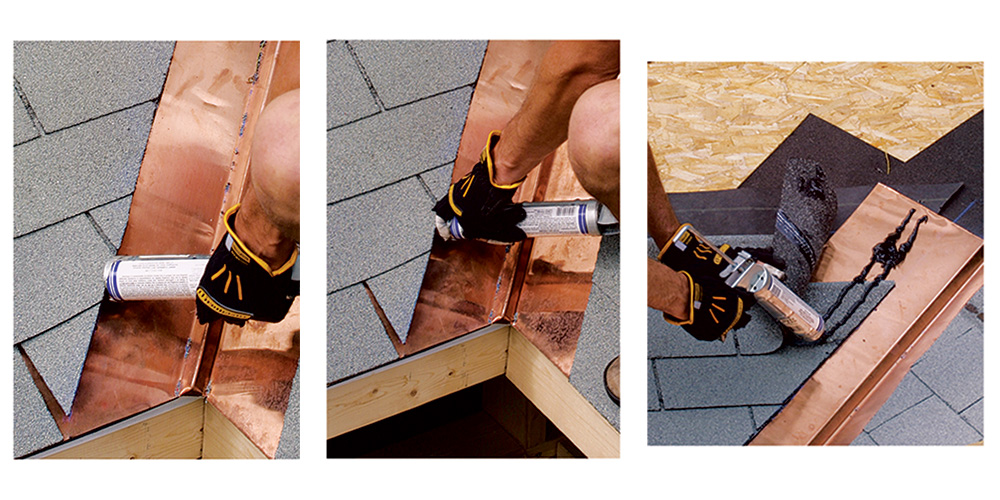
When I’ve finished shingling the first roof plane, I snap a chalkline 2 in to 3 in. away from the valley center, just as I did with the closed-cut valley. Next, I smear roof cement a couple of inches away from my snapped line (photo facing page). Then I install a line of shingles up the valley with the top edge aligned with my snapped line. The lowest of these valley shingles is cut back at an angle in line with the lowest course line.
I install the shingles for each course with the lower corner lined up with the edge of the valley shingles. The result of this layout leaves a small triangle of the valley shingle that is exposed on each course. From the ground, the Long Island valley is indistinguishable from a cut valley. The sealing is easier, too: Just a half-dollar-size dab of roof cement under each corner where it laps over the valley shingle is all that is required.
Mike Guertin, author of Roofing with Asphalt Shingles (The Taunton Press, 2002), is a builder, construction consultant and contributing editor to Fine Homebuilding.
Photos by Roe A. Osborn.
Editor’s Note:
We used the term “Long Island Valley” to identify one type of valley. There are other names for the valley style: No-Cut Valley, Tamko Valley (Tamko brand shingle instructions show this as a preferred method), California Valley.
Check with the shingle manufacturer to see if they approve of the method if you are concerned about warranty coverage. Several companies approve of the method though they don’t include it in their instructions.
For more photos and details on the different ways to shingle a valley, click the View PDF button below.
Fine Homebuilding Recommended Products
Fine Homebuilding receives a commission for items purchased through links on this site, including Amazon Associates and other affiliate advertising programs.

Peel & Stick Underlayment
Shingle Ripper

Hook Blade Roofing Knife
