
Check the Roof for Square
Here's how to check for square—and how to compensate for a roof that's out of square.
During the initial evaluation of a roofing job, you checked the roof at a few points to determine how many shingles to order, but you may not have checked whether the roof is square. Roofs that are out of square can make the slots between shingle tabs look cockeyed.
To determine if a roof is square, measure from the eaves to the ridge at several points along the roof to see how parallel they run. Do the same from one gable end to the other to determine parallel and also measure the roof diagonally.

Use your eye or a taut string to check how straight the roof edges are—some adjustments can be made with the shingles to overcome crooked edges so the roof looks even.
If the roof isn’t square, you can give the illusion that it is by tweaking how you position the shingles. Make a sketch of the roof and note your findings. This will help you decide how to correct the errors when you lay out for the roof shingles.
Straightening a crooked edge
On old houses and on some poorly built new homes, the eaves edge may not be straight. If the eaves edge is no more than 3/4 in. out of whack, you can make it appear straight by keeping the top nailing flange straight and bending the fascia leg to accommodate the error. The following steps outline this process.
1. Snap a reference line. The idea here is to find the drip-edge position that averages the ins and outs of the fascia. Start by making a mark on each end of the roof, 1 in. up from the eaves edge, and snap a chalkline between these two marks.
2. Determine the average variation. Measure distance between the eaves edge and the reference chalkline at several points until you find the greatest distance and the shortest distance, then average the two distances and subtract 1 in. For example, if the greatest distance is 1-7/8 in. and the shortest is 1-1/4 in., your average variation is 5/8 in.
3. Snap the guideline. Add half the average variation to the normal drip-edge overlap measurement. For example, if the drip edge is designed to overlap the roof 3 in., mark each end of the roof 3-5/16 in. from the eaves edge. Snap the guide chalkline between these points.
4. Bend the fascia legs. Place each drip-edge section against the fascia, and press gently until the top edge meets the guide chalkline. Look underneath for gaps between the drip edge and the fascia, and mark those areas on the drip edge. It’s helpful to have two people conduct this procedure, one to hold the drip edge in place and one to check and mark. Remove the drip edge and bend the leg inward at the marked areas, being careful not to kink the drip lip. Use a 3/4-in. by 4-in. block of wood to press against the leg equally if you think pressing with your fingers will cause a kink.
5. Install the drip edge. Put the drip edge back in place on the roof and check the bends. Adjust as necessary. You may not always be able to get out all the gaps, but as long as you can close most of them it won’t be evident from the ground, especially if gutters are installed.
Hiding misaligned rakes
Rakes that are crooked or out of parallel by more than 11/2 in. can’t be adjusted by using the shingle overhang to conceal the error. The problem is highlighted by the straight, uniform pattern of vertical cutout slots in three-tab shingles (see the photo below) . The best solution is to shingle the roof with random-pattern shingles such as laminated or multi-cutout. Trim the shingles to roughly match the curve in a badly misaligned rake, and use the shingle overhang to soften the error. Where there’s a bulge out, let the shingles overhang the edge by only % in.; where there’s a curve inward, let the shingles overhang an inch or so. Without cutout slots, the variation will only be evident along the rake.
Hiding crooked eaves
Crooked eaves are a problem no matter what style of shingle you use because the shingle butts will be out of alignment. However, the problem will be a bit less obvious with some laminated shingles that have tabs of different lengths to mimic shakes. As with rakes, if the variation is more than 1-1/2 in., you can’t correct it solely by adjusting the shingle overhang. Ordinarily you’d start the horizontal control-line layout by marking and snapping straight chalklines for the starter and first full course of shingles. To veil a significantly uneven edge, you can break the control line into short segments that approximate the curve of the eaves edge, then mark the successive control lines with diminishing “curves” until you can snap a straight control line and continue up the roof.
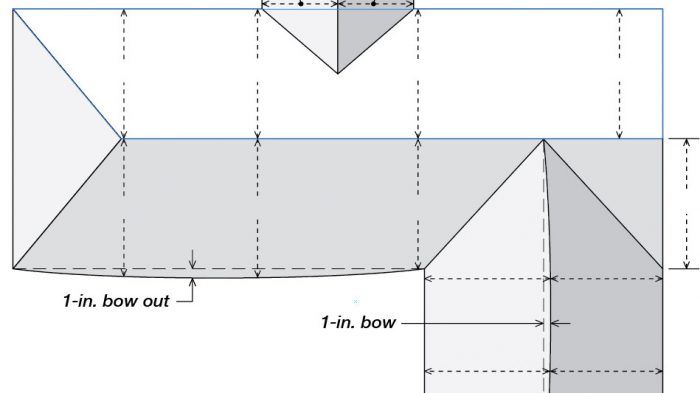
1. Snap a straight reference line. Start by snapping a chalkline about an inch up from the ends of the drip edge as a reference for where the eaves curves up and down. Measure between this line and the eaves, and mark where the difference is greatest and where it is smallest.
2. Lay out and install the starter course and first course. Measure and mark for the starter and first course of shingles (7 in. and 12 in.) at points about every 10 ft. along the eaves edge. Let the tape measure overhang the drip edge by 1 in. where the edge curves upward the most and 1/4 in. where it curves down the most; this will vary the shingle overhang to take up some of the error. Connect the marks with chalklines and install the starter and first course of shingles (see the illustration below).
3. Adjust additional courses in 1/4-in. increments. Strike a chalkline along the top of the shingle course to highlight the remaining error. Hold the string flush with the top of the course at the lowest points so the rest of the chalkline will strike across the shingles themselves and not the underlayment. Mark 4% in. up from the points along the shingle edge where the chalkline is the closest to the top of the shingles, and mark 5 in. up where the chalkline is the lowest on the shingles. Snap lines between the points and install the next course of shingles. Continue snapping a straight chalkline across the top of the shingles and making %-in. corrections until you can snap a straight 5-in. line for a course of shingles. From there, lay out the rest of the shingle courses in straight 5-in. increments.
Hiding crooked ridges
Masking crooked ridges is done in the exact opposite fashion as correcting the eavesedge error. Mark out and install shingle courses with straight 5-in. exposures until you get within 3 ft. of the ridge. Measure down off the ridge to the top of the last shingle course to see how crooked the ridge is, then mark and snap the control lines in segments to create progressively greater curves in the shingle courses. Increase the curve by % in. with each course until the control line roughly matches the ridge. Although you don’t have to make this ridge correction, without it the cap shingles will follow the curve of the ridge and be highlighted by the straight lines of the shingle courses.
Significantly out-of-square roof planes (3 in. or greater) are best covered with random-pattern shingles. Provided that the opposite edges of the roof are fairly parallel and that the predominant error is the square, random-pattern shingles will hide the problem. Avoid tabbed shingles; the cutout slots will look askew as you sight up a vertical column. If you must use tabbed shingles, then follow a 5-in. shingle-offset pattern so the vertical cues that highlight the cockeyed slots will be too far apart to notice.
Fine Homebuilding Recommended Products
Fine Homebuilding receives a commission for items purchased through links on this site, including Amazon Associates and other affiliate advertising programs.
Flashing Boot Repair

Ladder Stand Off
Flashing Boot
