FHB Logo Facebook LinkedIn Email Pinterest Twitter X Instagram Tiktok YouTube Plus Icon Close Icon Navigation Search Icon Navigation Search Icon Arrow Down Icon Video Guide Icon Article Guide Icon Modal Close Icon Guide Search Icon Skip to content
Subscribe
Log In
  • How-To
  • Design
  • Tools & Materials
  • Restoration
  • Videos
  • Blogs
  • Forum
  • Magazine
  • Members
  • FHB House
  • Podcast
Log In

Fine Homebuilding Project Guides

Roofing

Guide Home
  • Tools and Materials
  • Roof Replacement and Reroofing
  • Roof Ventilation
  • Waterproofing
  • Installing Asphalt Shingles
  • Installing Other Types of Roofs
  • Roof Maintenance and Repair

Setting Up Roof Jacks

Working from roof brackets and staging planks is the safest and most efficient way to shingle a pitched roof.

By Mike Guertin
Install the roof bracket by driving 10d to 16d nails through the holes in the bottom strap of the bracket, through the top lap of the shingle, and into the solid roof framing beneath the sheathing.

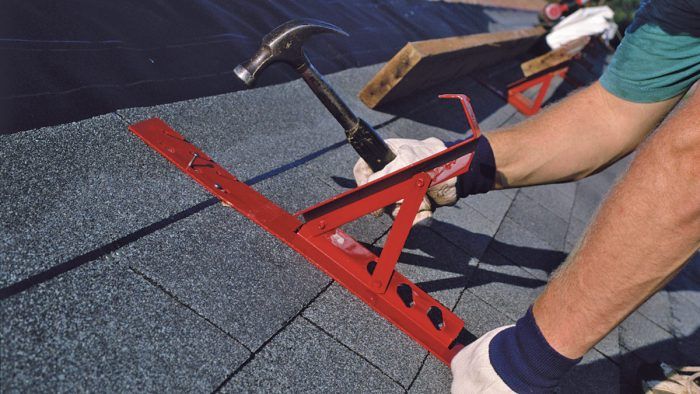
Roof jacks provide safe platforms on sloped roofs. They attach to the roof with nails, but don’t use roofing nails; although the heads are broad, roofing nails are short, their shank diameters are small, and their heads pop off easily. Use 10d to 16d common nails and drive them through the roof sheathing and into the framing (see the photo). Don’t rely on nails driven just into the roof sheathing because they’re likely to pull out. 

Space the jacks about 6 ft. to 8 ft. apart horizontally. Plan the jack positions so that one falls within 1 ft. of the ends of your staging planks. Also think ahead to avoid placing jacks where the joints between shingles and cutout slots will occur in the course immediately above.

Roof jacks have a long attachment strap with three or four teardrop-shaped holes or diagonal slots to drive nails into. The shape of the holes or slots permits you to remove the jacks later without removing the nails: Just tap the jack upward and the nail heads will be released. To permit the jacks to slide upward during removal, be sure to let them hang low enough when you install them; otherwise the plank support leg will bruise the butt edge of the shingle.

The backs of the triangular-shaped jacks will rest on the exposure portion of the shingle course beneath. With all the motion the jacks will absorb as you walk on the planks set on them, the backs can dig into or scuff the granules on the shingle surface, or worse they can cut through the shingles. For protection, place a piece of scrap shingle between the back of each roof jack and the roof shingle. You can also use pieces of wood-siding shingles as a cushion.

shingles above the roof brackets
Apply two courses of shingles above the roof brackets before laying staging planks across them.

Protect the shingle surface
Protect the shingle surface beneath the roof bracket by slipping a scrap piece of shingle between the bracket and the roof.

Once you have a row of roof jacks in place and two courses of shingles applied above them, carefully lay staging planks, not dimensional lumber, across the roof jacks. Full-cut 2×8 or 2×10 planks fit roof-jack support arms pretty well. As you lay the planks, be sure you don’t slam them in place because you may pull the nails out of the jacks. Overlap the ends of the planks by 1 ft. to 2 ft., making sure the lap occurs over a roof jack. To hold the planks fast, drive nails through the holes in the turned-up ends of the support arms and into the edges of the staging planks.

THINKING AHEAD: As you feel yourself getting close to your vertical reach limit when shingling, install a row of roof jacks and apply two more courses of shingles above the jacks. This way you won’t have to bend into an awkward position when you start working on the next level above. You’ll start working 1 ft. above the plank.


Setting Up Jacks around Shingles

Sometimes you’ll realize that you forgot to install a row of roof jacks and you’ve exceeded your reach limit. You can still install the jacks below shingles that are already installed. Do this by lifting the exposure portion of the shingle where you want a jack, sliding the leg beneath, and carefully driving nails through the holes. It may take an extra set of hands to hold the shingle up while you hold the jack and drive the nails. Be careful not to hit the upturned shingle butt when swinging the hammer.

In cold weather, shingles won’t bend up without cracking. In this case, you may be forced to drive nails through the face of shingles to attach roof jacks. Before doing this, place shingle scrap below the jack-nailing holes to protect the shingle beneath. When you remove the roof jacks, pull the nails and slide a piece of metal flashing coated with roof cement beneath the shingle under the holes. Apply small dabs of cement to each hole on the shingle exposure, then scrape off color granules from a scrap shingle and press them into the cement. This will seal and hide the damage the roof-jack nails caused.

WORK SMART: Be aware that your toes, tools, and materials stacked on the staging planks can easily bruise the surface of the shingles directly behind the planks. As you walk along the planks, they will flex. Anything touching the shingle surface can abrade it as the planks move up and down. The problem is worse in warm weather when shingles soften.


Fine Homebuilding Recommended Products

Fine Homebuilding receives a commission for items purchased through links on this site, including Amazon Associates and other affiliate advertising programs.

Affordable IR Camera

This camera is super useful for tracking down air leaks in buildings. The one-hand pistol grip arrangement frees your other hand for steadying yourself while maneuvering tricky job sites.
Buy at Amazon

8067 All-Weather Flashing Tape

Available in 2- to 12-in. widths, this is a good general-purpose flashing tape that sticks well to most things. It features a two-piece release paper, water-shedding layers, and good UV resistance.
Buy at Amazon

Handy Heat Gun

This heat gun is great for drying joint compound, primer and paint when patching drywall and plaster walls. Plus it can soften adhesive, get a very cold small engine to start, and shrink heat-shrink tubing.
Buy at Amazon

Sign up for eletters today and get the latest how-to from Fine Homebuilding, plus special offers.

Signing you up...

This site is protected by reCAPTCHA and the Google Privacy Policy and Terms of Service apply.
See all newsletters
See all newsletters
Previous: How to Get a Good-Looking Layout with Laminated Shingles Next: How To Install Shingles and Step Flashing

Guide

Roofing

Chapter

Installing Asphalt Shingles

Log in or create an account to post a comment.

Sign up Log in

Become a member and get full access to FineHomebuilding.com

Roofing

Roofing

A complete resource that includes the best materials and the right techniques to build a sturdy, leak-free, attractive roof on any house

View Project Guide

View All Project Guides »

Become a member and get unlimited site access, including the Roofing Project Guide.

Start Free Trial

Tools and Materials
  • Roof Coverings
  • Roofing Materials
  • Power Tools
  • Handy Helpers
  • Staging and Ladders
  • Safety Equipment
Roof Replacement and Reroofing
  • Preparing the Old Roof
  • Sheathing
  • Installing the New Roof
Roof Ventilation
  • Venting Basics
  • Installation
Waterproofing
  • Underlayment
  • Drip Edge
  • Flashing Adjoining Walls
  • Dormer and Skylight Flashing
  • Chimney Flashing
  • Vent Flashing
  • Gutters
Installing Asphalt Shingles
  • Calculating Shingles
  • Layout
  • Installation
  • Valleys
Installing Other Types of Roofs
  • Cedar Shingles
  • Metal
  • Low-Slope Roofs
  • Slate and Tile
Roof Maintenance and Repair
  • Assessing the Problem
  • Repairing Asphalt-Shingle Roofs
  • Other Roofing Repairs

Fine Home Building

Newsletter Sign-up

  • Fine Homebuilding

    Home building tips, offers, and expert advice in your inbox.

  • Green Building Advisor

    Building science and energy efficiency advice, plus special offers, in your inbox.

  • Old House Journal

    Repair, renovation, and restoration tips, plus special offers, in your inbox.

Signing you up...

This site is protected by reCAPTCHA and the Google Privacy Policy and Terms of Service apply.
See all newsletters

Follow

  • Fine Homebuilding

    Dig into cutting-edge approaches and decades of proven solutions with total access to our experts and tradespeople.

    Start Free Trial Now
    • Facebook
    • Instagram
    • X
    • LinkedIn
  • GBA Prime

    Get instant access to the latest developments in green building, research, and reports from the field.

    Start Free Trial Now
    • Facebook
    • YouTube
  • Old House Journal

    Learn how to restore, repair, update, and decorate your home.

    Subscribe Now
    • Facebook
    • Instagram
    • X

Membership & Magazine

  • Online Archive
  • Start Free Trial
  • Magazine Subscription
  • Magazine Renewal
  • Gift a Subscription
  • Customer Support
  • Privacy Preferences
  • About
  • Contact
  • Advertise
  • Careers
  • Terms of Use
  • Site Map
  • Do not sell or share my information
  • Privacy Policy
  • Accessibility
  • California Privacy Rights

© 2025 Active Interest Media. All rights reserved.

Fine Homebuilding receives a commission for items purchased through links on this site, including Amazon Associates and other affiliate advertising programs.

X
X
This is a dialog window which overlays the main content of the page. The modal window is a 'site map' of the most critical areas of the site. Pressing the Escape (ESC) button will close the modal and bring you back to where you were on the page.

Main Menu

  • How-To
  • Design
  • Tools & Materials
  • Video
  • Blogs
  • Forum
  • Project Guides
  • Reader Projects
  • Magazine
  • Members
  • FHB House

Podcasts

  • FHB Podcast
  • ProTalk

Webinars

  • Upcoming and On-Demand

Podcasts

  • FHB Podcast
  • ProTalk

Webinars

  • Upcoming and On-Demand

Popular Topics

  • Kitchens
  • Business
  • Bedrooms
  • Roofs
  • Architecture and Design
  • Green Building
  • Decks
  • Framing
  • Safety
  • Remodeling
  • Bathrooms
  • Windows
  • Tilework
  • Ceilings
  • HVAC

Magazine

  • Current Issue
  • Past Issues
  • Magazine Index
  • Subscribe
  • Online Archive
  • Author Guidelines

All Access

  • Member Home
  • Start Free Trial
  • Gift Membership

Online Learning

  • Courses
  • Project Guides
  • Reader Projects
  • Podcast

More

  • FHB Ambassadors
  • FHB House
  • Customer Support

Account

  • Log In
  • Join

Newsletter

Get home building tips, offers, and expert advice in your inbox

Signing you up...

This site is protected by reCAPTCHA and the Google Privacy Policy and Terms of Service apply.
See all newsletters
See all newsletters

Follow

  • X
  • YouTube
  • instagram
  • facebook
  • pinterest
  • Tiktok

Join All Access

Become a member and get instant access to thousands of videos, how-tos, tool reviews, and design features.

Start Your Free Trial

Subscribe

FHB Magazine

Start your subscription today and save up to 70%

Subscribe

We hope you’ve enjoyed your free articles. To keep reading, become a member today.

Get complete site access to expert advice, how-to videos, Code Check, and more, plus the print magazine.

Start your FREE trial

Already a member? Log in