FHB Logo Facebook LinkedIn Email Pinterest Twitter X Instagram Tiktok YouTube Plus Icon Close Icon Navigation Search Icon Navigation Search Icon Arrow Down Icon Video Guide Icon Article Guide Icon Modal Close Icon Guide Search Icon Skip to content
Subscribe
Log In
  • How-To
  • Design
  • Tools & Materials
  • Restoration
  • Videos
  • Blogs
  • Forum
  • Magazine
  • Members
  • FHB House
  • Podcast
Log In

Fine Homebuilding Project Guides

Roofing

Guide Home
  • Tools and Materials
  • Roof Replacement and Reroofing
  • Roof Ventilation
  • Waterproofing
  • Installing Asphalt Shingles
  • Installing Other Types of Roofs
  • Roof Maintenance and Repair
How-To

How To Install Shingles and Step Flashing

Watch as these roofers lay out materials, set a starter course, and cut and nail down flashing and shingles.

VIDEO TRANSCRIPT

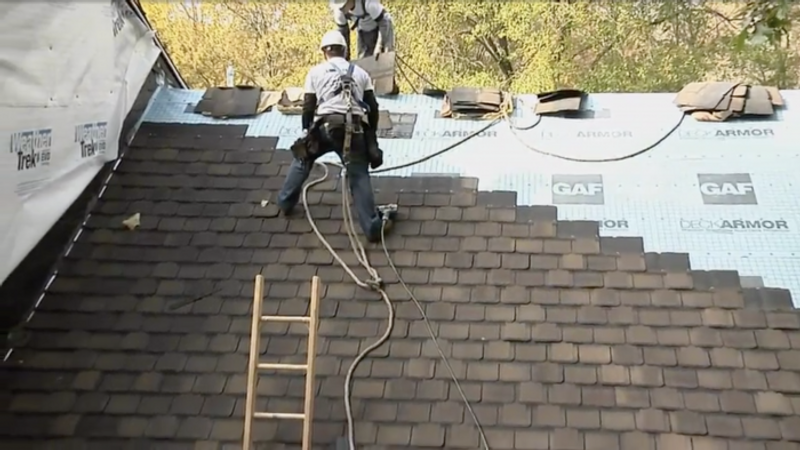
Narrator: The first step in shingling is loading the roof. Despite what you commonly see, it’s bad practice to bend the bundles severely by draping them over the ridge. Instead, the roofers arrange them so they lay relatively flat.

Once the material is up on the roof, they can move on to the starter course. Shingle installation begins with starter shingles that are installed along the eave and rake edges.

Tom Melillo, residential project manager, Roof Services:  The main reason for a starter course is to fill the gaps between the keys on the shingles. Without the starter course, water would run through the gaps in the shingles, eventually causing damage to the underlayment and sheathing.

Narrator: First they measure so the starter course will overhang the drip edge by 3/8-in. and snap a line. They line up the course using a complete starter shingle (not split), so it goes up the roof twice as far as normal.

Tom Melillo: We’re using a full starter in this case because of the exposure of the shingle that we’re using. It requires a full starter because the keys are so deep. On standard architectural shingle we would use a half of a starter. Starter shingles come with a perforation on the back that allows you to snap it in half.

When you’re looking at a finished roof you’ll notice a pattern. Well that pattern isn’t accidental. Shingles need to have a proper offset from each other to create that pattern.

Narrator: Because the garage roof butts into the exterior wall, we’ll need step flashing at the transition. Conventional step flashing would allow water to run down the siding and cause damage, so we’re using this kick-out flashing at the edge of the roof to direct water away from the house. Then the roofers install the first shingle on top of the starter course and kick-out flashing. Once the shingle is inlace, they will continue with traditional 4×6 aluminum step flashing that they bend by hand nailing only through the vertical leg as high up as possible.

To maintain the proper offset, they lay the next shingle upside down and use the notch on the previous shingle to locate the cut.

Working from left to right, they continue with the starter course and full shingles until they have enough coverage to continue up the roof with full shingles. The shingles in this project have yellow marks to show correct nail placement. Not all shingles have these markings, but you can find instructions for nailing on the shingle wrapper.

Again, they lay the shingles upside down to mark the next cut, and they use a knife with a hooked blade to prevent damage to underlying shingles. They are careful not to nail through the step flashing as they nail the shingles. Architectural shingles have two or three layers, so it may take several passes to cut through them.

They repeat the process over and up as they continue shingling the entire roof. Nails should be driven flush with the shingle. Over-driven nails can lead to shingle blow off in high winds. Under-driven nails can wear through  the shingles on top of them leading to leaks.

Once shingling is complete, only two steps remain. They will have to cut the overhanging rake shingles and install the ridge vent.

Sign up for eletters today and get the latest how-to from Fine Homebuilding, plus special offers.

Signing you up...

This site is protected by reCAPTCHA and the Google Privacy Policy and Terms of Service apply.
See all newsletters
See all newsletters

Videos in the Series

  • Introduction: How to Replace a Roof

    Get an overview of the entire process before watching our how-to series on re-roofing an existing building.

  • Replacing a Roof: How to Strip Old Shingles and Patch Sheathing

    A pro roofing contractor demonstrates how to keep a job site clean, remove worn-out roofing, and replace damaged board sheathing before installing a new roof.

  • How to Install Drip Edge When Replacing a Roof

    A pro roofing contractor shows how to install these crucial water-management details before the shingles go on.

  • How To Install Shingles and Step Flashing

    Watch as these roofers lay out materials, set a starter course, and cut and nail down flashing and shingles.

  • Step-by-Step Ridge Vent Installation Instructions

    The last phase of this project includes cutting through the sheathing at the ridge, fastening down vent material, and nailing down roof-cap shingles.

Previous: Setting Up Roof Jacks Next: Fastener Placement

Guide

Roofing

Chapter

Installing Asphalt Shingles

View Comments

  1. mike_guertin | Sep 08, 2022 07:35pm | #1

    A few of the practices shown in the video may not meet the building code, shingle manufacturers' instructions nor the National Roofing Contractors Association manual for steep slope roofing. The starter course serves two important functions. As the installer noted the starters fill in the open shingle tab slots. The starter must also create a bond to the overlying shingle tabs to keep the leading eave edge from lifting up. The installer is shown driving nails along the top edge of the starter shingles. These nails alone will not resist wind uplift. Nails must be driven about an inch up from the bottom edge of the roof and located beneath the overlying shingle tabs so the heads aren't exposed to the weather.
    The minimum step flashing size by code must have a 4 in. roof leg, a 4 in. wall leg and must be at least 2 in. taller than the exposure portion of the roof shingles. Most shingles today require a 7 5/8 in. or 8 in. tall flashing. The 6 in. height noted in the description is much too short.
    And the standard roofing practice is to nail the top outside corner of the step flashing to the roof sheathing rather than the siding. I often broke this installation requirement earlier in my career. Now I understand the benefit of nailing the flashing to the roof rather than the wall. Future roofers can remove and replace step flashing much easier if it is not nailed to the wall.

Log in or create an account to post a comment.

Sign up Log in

Become a member and get full access to FineHomebuilding.com

Roofing

Roofing

A complete resource that includes the best materials and the right techniques to build a sturdy, leak-free, attractive roof on any house

View Project Guide

View All Project Guides »

Become a member and get unlimited site access, including the Roofing Project Guide.

Start Free Trial

Tools and Materials
  • Roof Coverings
  • Roofing Materials
  • Power Tools
  • Handy Helpers
  • Staging and Ladders
  • Safety Equipment
Roof Replacement and Reroofing
  • Preparing the Old Roof
  • Sheathing
  • Installing the New Roof
Roof Ventilation
  • Venting Basics
  • Installation
Waterproofing
  • Underlayment
  • Drip Edge
  • Flashing Adjoining Walls
  • Dormer and Skylight Flashing
  • Chimney Flashing
  • Vent Flashing
  • Gutters
Installing Asphalt Shingles
  • Calculating Shingles
  • Layout
  • Installation
  • Valleys
Installing Other Types of Roofs
  • Cedar Shingles
  • Metal
  • Low-Slope Roofs
  • Slate and Tile
Roof Maintenance and Repair
  • Assessing the Problem
  • Repairing Asphalt-Shingle Roofs
  • Other Roofing Repairs

Fine Home Building

Newsletter Sign-up

  • Fine Homebuilding

    Home building tips, offers, and expert advice in your inbox.

  • Green Building Advisor

    Building science and energy efficiency advice, plus special offers, in your inbox.

  • Old House Journal

    Repair, renovation, and restoration tips, plus special offers, in your inbox.

Signing you up...

This site is protected by reCAPTCHA and the Google Privacy Policy and Terms of Service apply.
See all newsletters

Follow

  • Fine Homebuilding

    Dig into cutting-edge approaches and decades of proven solutions with total access to our experts and tradespeople.

    Start Free Trial Now
    • Facebook
    • Instagram
    • X
    • LinkedIn
  • GBA Prime

    Get instant access to the latest developments in green building, research, and reports from the field.

    Start Free Trial Now
    • Facebook
    • YouTube
  • Old House Journal

    Learn how to restore, repair, update, and decorate your home.

    Subscribe Now
    • Facebook
    • Instagram
    • X

Membership & Magazine

  • Online Archive
  • Start Free Trial
  • Magazine Subscription
  • Magazine Renewal
  • Gift a Subscription
  • Customer Support
  • Privacy Preferences
  • About
  • Contact
  • Advertise
  • Careers
  • Terms of Use
  • Site Map
  • Do not sell or share my information
  • Privacy Policy
  • Accessibility
  • California Privacy Rights

© 2025 Active Interest Media. All rights reserved.

Fine Homebuilding receives a commission for items purchased through links on this site, including Amazon Associates and other affiliate advertising programs.

X
X
This is a dialog window which overlays the main content of the page. The modal window is a 'site map' of the most critical areas of the site. Pressing the Escape (ESC) button will close the modal and bring you back to where you were on the page.

Main Menu

  • How-To
  • Design
  • Tools & Materials
  • Video
  • Blogs
  • Forum
  • Project Guides
  • Reader Projects
  • Magazine
  • Members
  • FHB House

Podcasts

  • FHB Podcast
  • ProTalk

Webinars

  • Upcoming and On-Demand

Podcasts

  • FHB Podcast
  • ProTalk

Webinars

  • Upcoming and On-Demand

Popular Topics

  • Kitchens
  • Business
  • Bedrooms
  • Roofs
  • Architecture and Design
  • Green Building
  • Decks
  • Framing
  • Safety
  • Remodeling
  • Bathrooms
  • Windows
  • Tilework
  • Ceilings
  • HVAC

Magazine

  • Current Issue
  • Past Issues
  • Magazine Index
  • Subscribe
  • Online Archive
  • Author Guidelines

All Access

  • Member Home
  • Start Free Trial
  • Gift Membership

Online Learning

  • Courses
  • Project Guides
  • Reader Projects
  • Podcast

More

  • FHB Ambassadors
  • FHB House
  • Customer Support

Account

  • Log In
  • Join

Newsletter

Get home building tips, offers, and expert advice in your inbox

Signing you up...

This site is protected by reCAPTCHA and the Google Privacy Policy and Terms of Service apply.
See all newsletters
See all newsletters

Follow

  • X
  • YouTube
  • instagram
  • facebook
  • pinterest
  • Tiktok

Join All Access

Become a member and get instant access to thousands of videos, how-tos, tool reviews, and design features.

Start Your Free Trial

Subscribe

FHB Magazine

Start your subscription today and save up to 70%

Subscribe

We hope you’ve enjoyed your free articles. To keep reading, become a member today.

Get complete site access to expert advice, how-to videos, Code Check, and more, plus the print magazine.

Start your FREE trial

Already a member? Log in