
Installing Cedar Shakes
Use these modern methods and materials to create a timeless and durable wood roof.

Synopsis: Cedar roofs, once relatively common, have been on the decline due to the rising cost of cedar and the growing popularity of metal. But the rustic look is unmatched, which is why the homeowners in this article wanted their replacement roof to look exactly like their old one. Remodeler Andrew Grace gives background information on types of cedar shakes and the standards and installation details outlined by the Cedar Shake and Shingle Bureau before walking through the steps to replacing a cedar roof, from laying courses of self-adhered membrane, felt, and ventilation matrix, to setting up the first row of starter shingles, to fitting valleys and capping hips and ridges.
Cedar roofs have become pretty rare in my neck of the woods. The rising cost of cedar and the increased popularity of metal have turned what was once a relatively common roof type in the early 20th century into a boutique option. It doesn’t help that I’m a few thousand miles from the nearest western red cedar tree. But when my customers’ 30-year-old cedar roof started leaking, they were resolute about using cedar again. It was not surprising, since it was the shake roof that drew them to the house in the first place.
Shakes or shingles?
When most people think of roofs, they think of shingles, but that’s not the case when it comes to cedar roofs. Cedar shingles are regularly used on walls, but cedar shakes are more common on roofs. So, what’s the difference? Shingles are sawn on both sides and thinner than shakes. Shakes are thicker, and split on one or both sides. There are two types of wood used for shakes: western red cedar and Alaskan yellow cedar. Alaskan yellow cedar is actually a kind of cypress and is harder than red cedar. Alaskan yellow cedar, although popular on the West Coast, is relatively unheard of in the eastern United States.
The responsibility of deciding the grading standards and installation details for red- and yellow-cedar roofs falls to the Cedar Shake and Shingle Bureau (CSSB). Their manuals for sidewall and roof installations are invaluable resources, and almost everything you need to know about a bundle of shakes or shingles is clearly printed on its label.
Making a wood roof watertight
Cedar shakes count on multiple watershedding layers working together to keep out rain. Both shakes and felt absorb water that must be allowed to dry. A continuous ventilation matrix allows the shakes to dry evenly front and back to prevent cupping.

| Peel-and-stick first. In areas with a history of ice dams, code requires an ice barrier to prevent ice dams from causing water damage inside. Our steep roof and wide overhangs meant we needed two courses that we fastened with cap nails. On top of the selfadhered membrane is a roll of continuous ventilation matrix fastened with the same staples that we use to secure the shakes. | Then full-width felt. Over the ventilation matrix we install 36-in.-wide #30 asphalt felt. The felt must comply with ASTM D4869 Type IV or ASTM D226 Type II. This thicker, high-quality felt is specified in the CSSB manual. We fasten it with just enough cap nails to keep it in place while we put on the shakes. |
| Starters before shakes. Under the first course of shakes is a starter course of underlayment shingles that overhang the fascia 1-1 ⁄ 2 in. (rake ends overhang 1 in.). These are sawn, 18-in.-long., 1 ⁄ 2-in.-thick (at the butt) cedar shingles. Their thinner butt end keeps the first row of shakes from flaring up. |
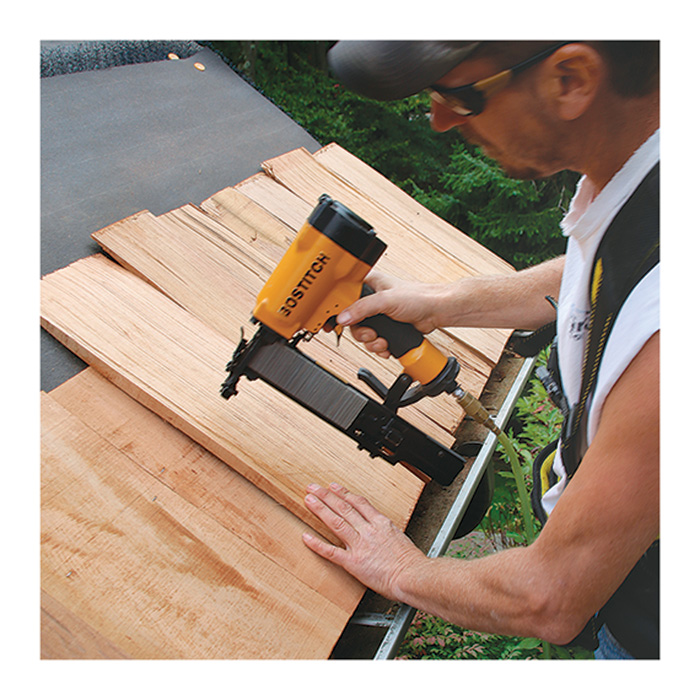 |
| Finally, the first course. The first row of shakes lines up with the starter course below. Each shake is fastened with two stainless-steel staples 3 ⁄ 4 in. from the edges and 1-1 ⁄ 2 in. above the exposure line. Shakes should be spaced 3 ⁄ 8 in. to 5 ⁄ 8 in. apart with joints offset by at least 1-1 ⁄ 2 in. |
Next course, much like the first
Once the first course is complete, subsequent courses are largely repetitive. Each starts with snapped lines that indicate the location of the felt interlayer and the butt end of the next course. Use only two fasteners, even on the widest shakes.
 |
 |
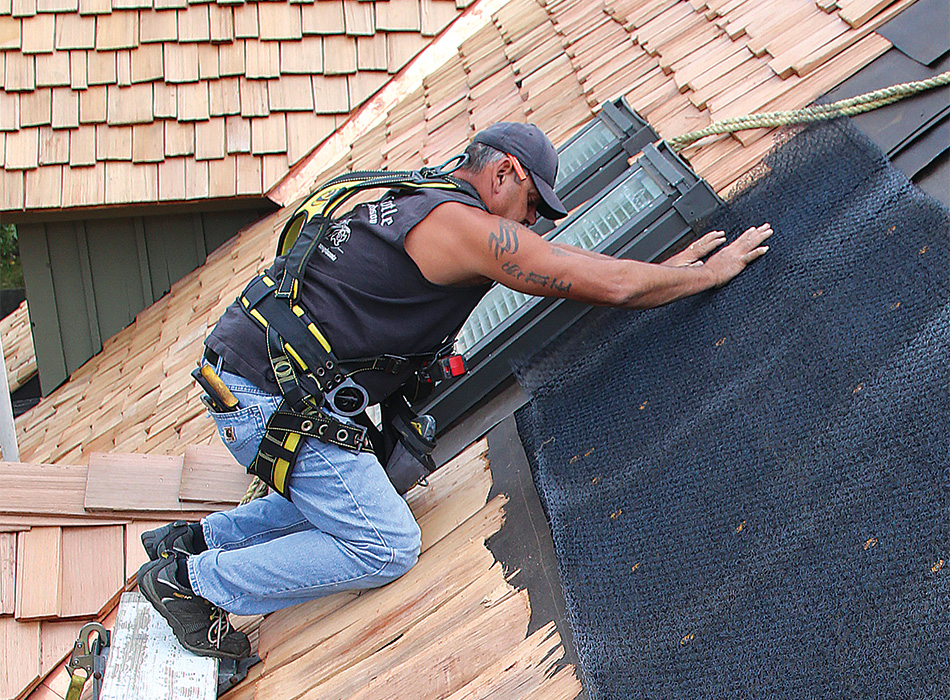 |
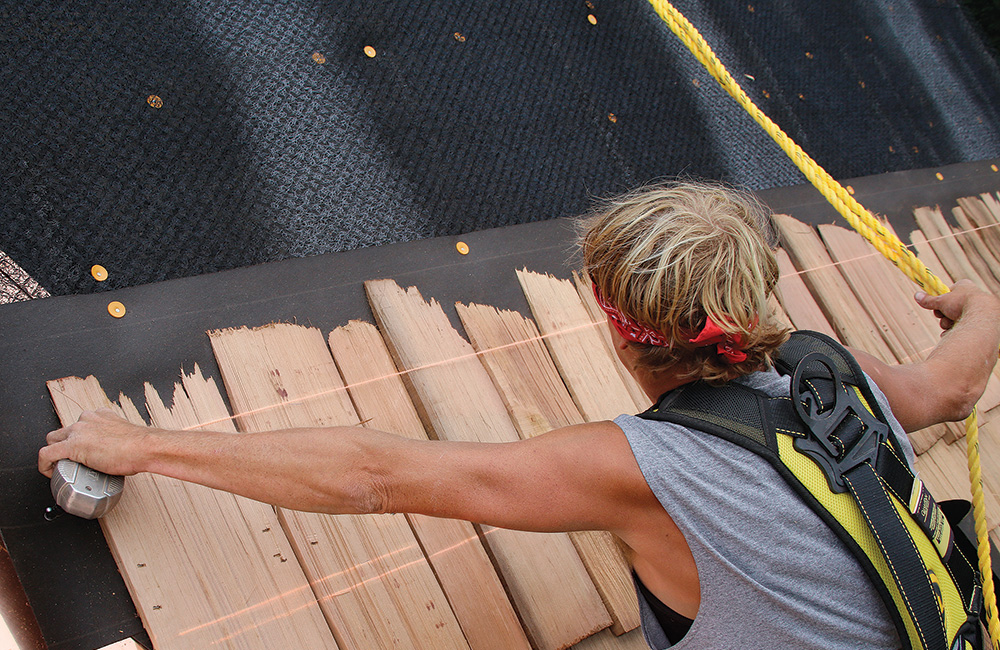
| Snap some lines. The courses of felt and shakes are indicated by three snapped lines. The top one is for the felt interlacing; the bottom two indicate the exposure, which for this roof’s saw-tooth design alternates between 9 in. and 10 in. | Roll out the interlacing. Strips of 18-in.-wide felt are stapled on top of the shakes at a distance from the butt that’s twice the width of the exposure, which works out to 20 in. on this roof. Like the wider felt used under the first course, it should comply with ASTM D4869 or ASTM D226. | More matrix. Once the shingle courses have reached the top of the ventilation matrix, another row of matrix is butted to the previous course and fastened with stainless staples. Tuck the matrix under step flashing, lap it onto valley flashing, then cut with a utility knife. |
| Whole lotta shakin’ goin’ on. Roofers work from both ends of the course and meet in the middle. Keeping a mix of shake widths close by helps ensure correct overlaps and an aesthetically pleasing layout. |
Secure footing
Roof jacks designed for slate roofing are best for cedar shakes. They cost about $75 a pair at supply houses. The sheet-metal construction is thinner than cheaper jacks, so they’re easier to remove. They also hold a 12-in.-wide staging plank, which is more comfortable and has more room for shakes and felt.
|
Not all shakes are equal
My customers wanted their new roof to look exactly like their old one. We chose Premium Grade Certi-Split handsplit cedar shakes, and specified 100% vertical grain. These “heavy resaws” are made from a block of cedar roughly 1-5⁄8 in. thick handsplit from a 24-in. log round. The block is then resawn corner to corner to create two tapered shakes between 3⁄4 in. and 5/4 in. thick at the butt. “Premium” refers to the percentage of edge grain to flat grain in the shake—Premium is 100% edge grain. There are two types of edge grain that meet the standard: slash grain and vertical grain. Vertical grain is perpendicular to the width of the shake. Slash grain can be at up to a 45° angle at the butt. Vertical grain is more stable, so I specified 100% vertical grain to minimize curling.
Number 1, the next grade down from Premium, is supposed to have a minimum of 80% edge grain and 20% flat grain. Flatgrain shakes are prone to curling, so they’re best avoided. More than one cedar-industry insider told me that there’s some fudge factor involved in the 80:20 ratio, meaning the ratio of flat grain is often higher because it’s hard to inspect. All-vertical grain is harder to fudge, because any flat grain fails the standard. 100% is not subjective. The shakes I specified were also cut from all old-growth trees, which have tighter growth rings and are more stable than newer trees. The upcharge for the best of the best shakes was about $75 per square (100 sq. ft.), which is cheap insurance against later problems.
Flashing penetrations
Flashing pipes and penetrations on a cedar-shake roof is similar to flashing asphalt and slate roofs—layers are lapped from the bottom up. Sidewalls get step flashing at every row; wider shakes are used at the wall-to-roof intersection. Headwall details get standard aprons.
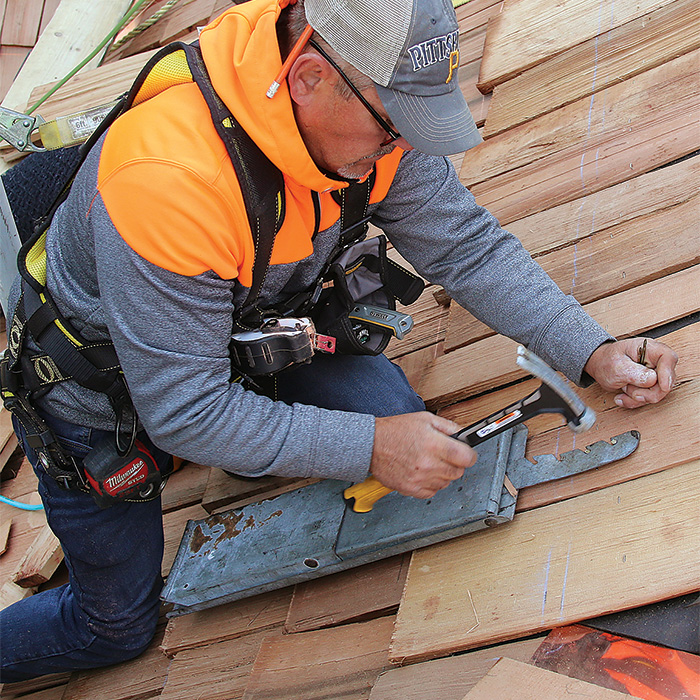
| Step flashing. On this roof we reused the copper step flashing along chimneys and dormer cheek walls, so we were careful when stripping the old shakes to prevent damage. When reusing existing flashing, it’s good practice to use shakes at least 1 in. wider than the step flashing. If this were a new roof, I’d bend my own step flashing from 10-in. by 12-in. pieces of 16-oz. copper sheet. |
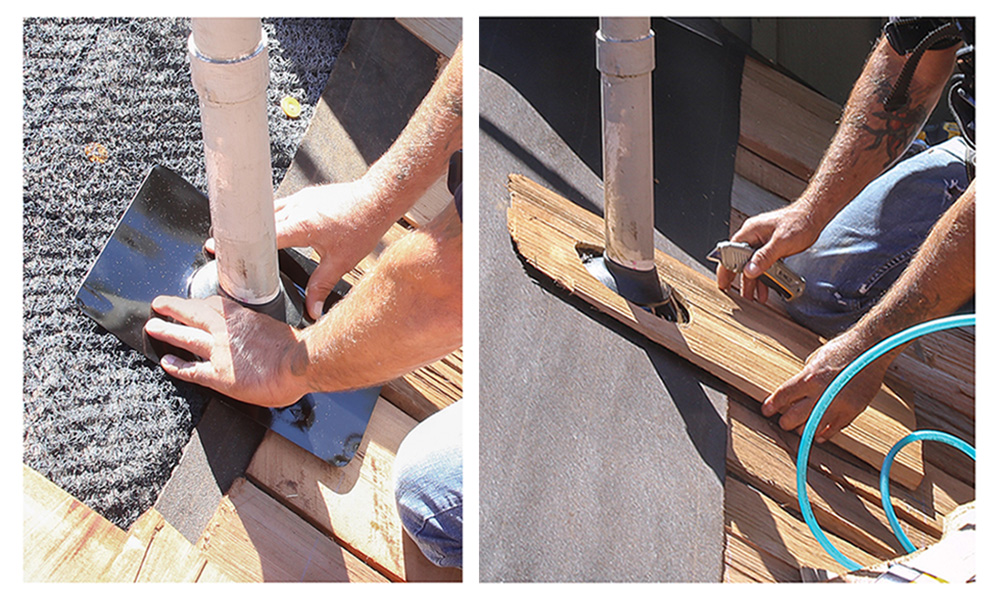 |
| Flashing pipes. For the vent stack, place the boot on the ventilation matrix with the downslope edge lapped over the felt and shingle course below. A single shake with a round cutout is then fastened on top. A cordless jigsaw is the perfect tool for cutting the hole. |
| Rough character. On tight spaces like between this dormer and a neighboring valley, it often takes more than one try to get an arrangement of shakes that provides the minimum offset, maintains the saw-tooth pattern, and has a pleasing look. |
Old vs. new
A lot has changed in the few years since I last bought shakes. A major cedar supplier told me that modern production equipment has made the process more accurate, so manufacturers make thinner shakes to stretch raw material. As is common in small markets, all my local lumberyards get their shakes from the same master distributor, making it impossible for me to find the 5/4-in.-thick shakes I wanted locally. After some exhaustive searching, I found a Tennessee company that’s been a national red-cedar wholesaler for more than 45 years. With a brick-andmortar store and knowledgeable staff, I felt comfortable doing $30,000 worth of business with them over the phone. They helped me find a mill in Washington State that still produces the “old style” heavy split shakes that my customers wanted. The mill sent me over 20 photos of the 250 bundles of shakes I was ordering and a few sample shakes via UPS for my customers’ approval. I paid with a wire transfer and my order was headed east. One important thing to keep in mind when buying direct is that you have to be able to unload a tractor trailer on-site. I used my skid steer with forks, but if you hand-unload, they charge a premium for lost truck time. And I bought the underlayment and felt paper from my local lumberyard, but I had to buy full pallets of these non-stock items. I found the best price and fastest delivery of stainless staples on amazon.com.
Fitting valleys
Valleys have layering similar to the rest of the roof. Under the copper valley is a layer of self-adhered waterproof underlayment for extra protection from water infiltration.
 |
||
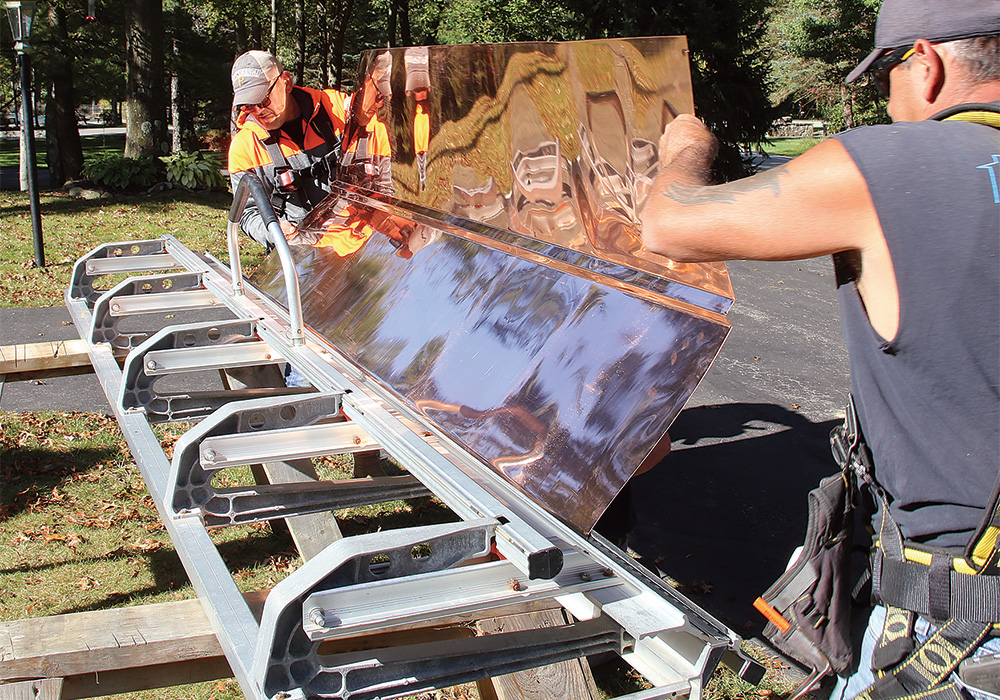
| Worth a splurge. This is an expensive, highly visible roof, so we used copper for the valleys, but stainless steel and aluminum are also acceptable. We bend our own W-shaped valley flashing from 16-oz. copper sheet and nail it to the roof deck over self-adhered underlayment with copper slater’s nails. | Scribe to fit. Use a scrap of shingle ripped to 2-1 ⁄ 2 in. as a guide for the angled cuts adjacent to the valley. This ensures that the cuts are straight and the sides of the valley are parallel from top to bottom. | Cut on the roof. A cordless circular saw is the fastest way to make straight and angled cuts. For best results, rest the end of the shake on the roof to steady the piece while it’s being cut. |
More layers than an onion
Years ago, in the days before plywood and OSB, cedar shakes were nailed to skip sheathing, a substrate of narrow 1x boards nailed perpendicular to the rafters and spaced 4 in. to 8 in. apart. The spacing allowed both sides of the wet shakes to dry. This is an important detail. If a shake can’t dry from the bottom, the top (weather-facing) side will dry faster than the underside, causing the shake to cup. Because skip sheathing is so labor-intensive to install, modern shake installations use a plastic matrix that allows drainage and promotes drying. The product we used, CedAir-Mat from Advanced Building Products, comes in 2-square rolls and costs about $0.90 per sq. ft.
Although I use synthetic underlayments on asphalt-shingle and metal roofs, traditional asphalt felt is a must with cedar. Felt’s permeability increases when it gets wet, allowing more drying when you need it most. Cedar shakes require 18-in.-wide layers of #30 roof felt over every row. You can cut standard rolls of felt in half, but you can also find 18-in. rolls, known as “split rolls.” They cost 50% more per square foot, which is a negligible cost for their convenience.
Depending on roof pitch and local code, the CSSB recommends felt that meets either ASTM D226 Type II or ASTM D4869 Type IV, which are heavier, higher-quality felts. Although the CSSB details show the felt interlaced with rows of shakes and not applied to the roof sheathing, we put felt in both places. The layer over the roof sheathing protects the house from the elements while we’re working on the roof, and it won’t affect the shakes’ ability to dry.
The first step when installing a shake roof is to strip the existing wood shakes, which creates a lot of debris. This 5000-sq.-ft. roof produced 90 yd. of waste, compared to about 20 yd. if we’d been stripping asphalt. When it comes time to start laying shakes, teams of two—with one roofer picking and staging shakes, and another placing and nailing— works best. Even when we were completely up to speed and in rhythm, we only averaged about 6 squares a day with four installers.
Capping Hips and Ridges
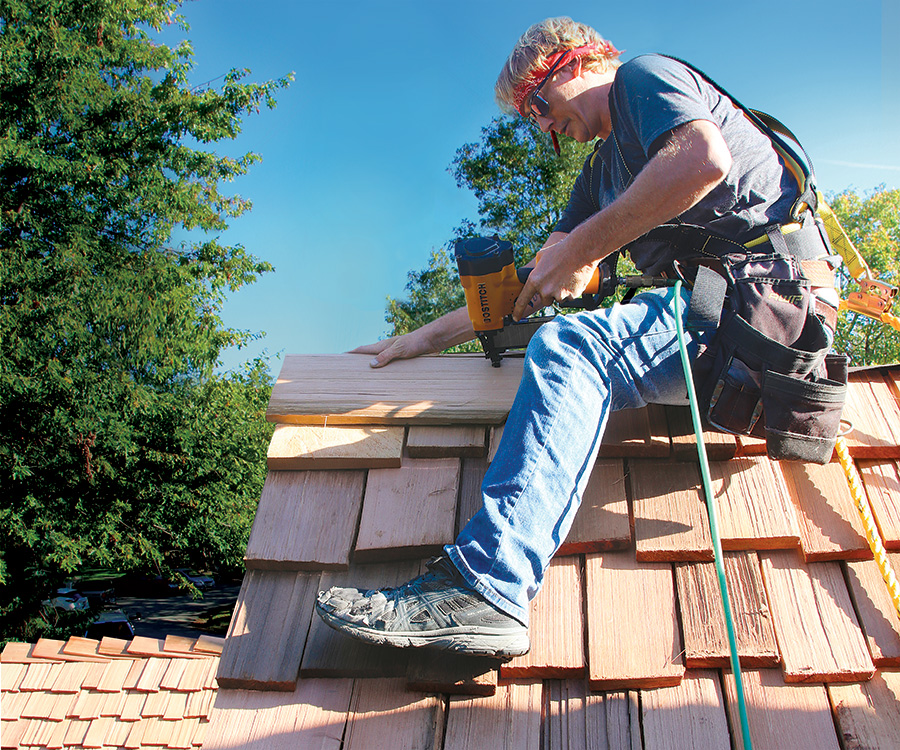
Hips and ridges are capped with pairs of shakes stapled together with the joints alternating from one pair to the next. The exposure on hips and ridges should not exceed the field exposure.
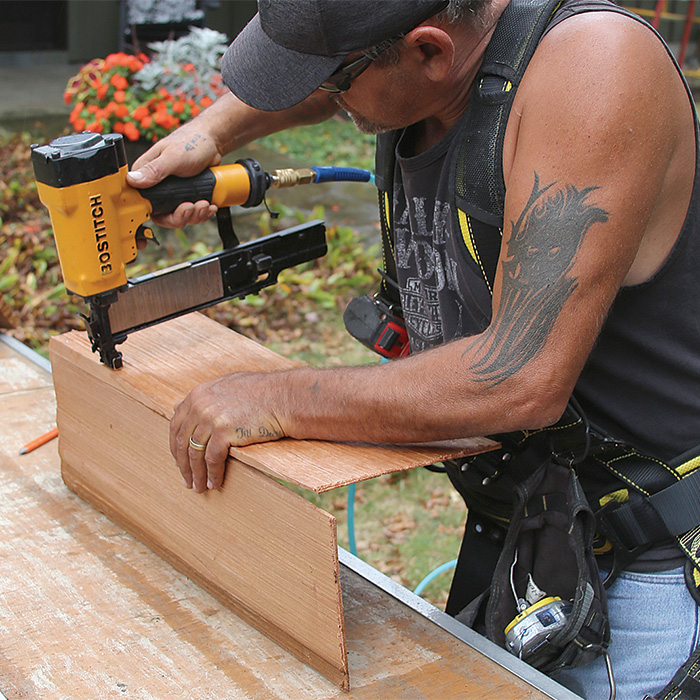 |
| Peak performance. Preassemble pairs of shakes on the ground, angling the staples slightly to prevent splitting. Often the shake edges are beveled before nailing to match the roof pitch, but we left them square to continue this roof’s rustic look. |
Tooling up
The only specialty tools I need for cedar roofing are medium-crown staplers and some slater-style roof jacks. Purists will insist that wood shakes be hand-nailed—that’s easy to say when you don’t have to pay my bills. The CSSB allows pneumatic fastening, but the nail head or staple must be driven flush without being overdriven, which would crush the wood fibers. Remote manifolds are helpful because you can tune the pressure while you’re on the roof.
Although technical, this was a really rewarding job. There is something about installing a wood roof that really makes you feel like a carpenter. There’s also a sense of pride that comes with the opportunity to work with such a beautiful, natural product. This roof looks amazing, and with a little routine maintenance, should last 30 to 40 years or more.
Andrew Grace is a remodeler in Ligonier, Pa.
Photos by Patrick McCombe.
From Fine Homebuilding #290
To view the entire article, please click the View PDF button below
RELATED LINKS
