FHB Logo Facebook LinkedIn Email Pinterest Twitter X Instagram Tiktok YouTube Plus Icon Close Icon Navigation Search Icon Navigation Search Icon Arrow Down Icon Video Guide Icon Article Guide Icon Modal Close Icon Guide Search Icon Skip to content
Subscribe
Log In
  • How-To
  • Design
  • Tools & Materials
  • Restoration
  • Videos
  • Blogs
  • Forum
  • Magazine
  • Members
  • FHB House
  • Podcast
Log In

Fine Homebuilding Project Guides

Roofing

Guide Home
  • Tools and Materials
  • Roof Replacement and Reroofing
  • Roof Ventilation
  • Waterproofing
  • Installing Asphalt Shingles
  • Installing Other Types of Roofs
  • Roof Maintenance and Repair

Shingle-Installation Patterns

You have two basic layout choices: a racking pattern or a pyramid pattern.

By Mike Guertin
It's crucial to carefully organize and plan shingle installation. There's more than one way to approach layout, and different methods work better than others depending on the job. When using the racking pattern shown here, alternating shingles are registered against parallel vertical control lines.

When I discuss shingle-installation patterns, I’m not talking about creating patterns with roof shingles. Rather, shingle-installation patterns are methods of orienting and interlacing roof-shingle courses to maintain the offset of joints between shingles in successive courses and to speed production by establishing a regular and predictable installation process.

The two most common patterns are the racking pattern and the pyramid pattern. Each pattern has advantages and disadvantages for installation speed and the resulting appearance of the roof. You’ll probably find one pattern or the other will work better on certain styles and pitches of roofs or with different types of shingles.

Racking-Pattern Layout

The racking pattern is controlled by two or more chalklines running up the roof plane perpendicular to the eaves and ridge. The joints between shingles in successive horizontal courses are offset from one another from one another by one half a tab width, but other offsets can also be used that appear to randomize the shingle joints. The shingle joints in the racking pattern alternate back and forth as the shingles go up the roof. Because some roofers work from the eaves up to the ridge installing shingles straight up in columns rather than running out courses horizontally, this pattern is sometimes called “straight up” or “column.”


WORK SMART: Always check the shingle manufacturer’s instructions. Specialty shingles sometimes require unique installation patterns to create the intended visual effect on the roof or to avoid undesirable effects. In those cases, follow the manufacturer’s instructions rather than those described here.


Racking advantages

The layout process is fairly easy for the racking pattern. A major advantage is that the racking pattern does a better job of keeping cutout slots in three-tab shingles aligned than the pyramid pattern does. When you install three-tab shingles, you need to keep the cutout slots between the tabs in vertical alignment between successive courses because when the slots drift out of alignment, the roof looks unprofessional.

Roofers often snap vertical control chalklines for the racking pattern in the middle of a roof section. Then after running the first column of shingles up the control lines, workers can install shingles to the left and to the right from the starter column. This enables more workers to coordinate their efforts.

Establishing Control Lines

Establishing Control Lines

Racking disadvantages

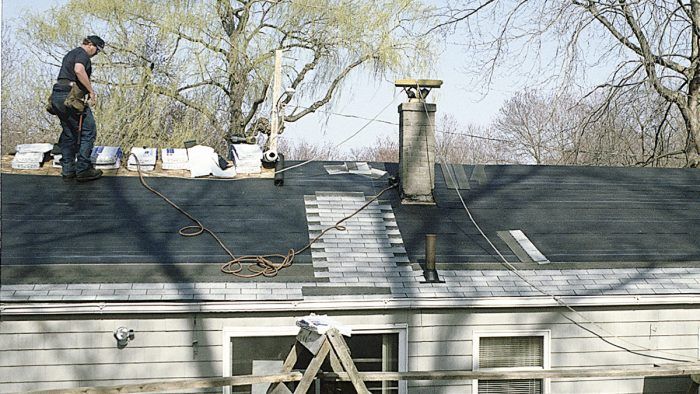
On the downside, the racking pattern has some annoying installation quirks. Installing shingles vertically from eaves to ridge requires that you skip the last fastener at the end of every other shingle in order to slip the shingles from the next column beneath. As you work your way up each additional column of shingles, you have to lift the loose end of every other shingle in the previous column, slip the end of the new shingle beneath it, and drive a nail (see the photo below). It’s hard to hold up the loose end and keep the new shingle from slipping out of position while driving a nail.

disadvantages of the racking
One of the disadvantages of the racking pattern comes during installation. The end of every other shingle in a column must be left unnailed and lifted in order to slide the shingle in below it when installing the adjacent column.

Once the loose end is flopped down, you have to drive that skipped fastener at the end of the shingle on the previous column. The whole process slows production a bit, and lazy installers often neglect the fastener under the loose shingle end. The bad habit of skipping one fastener on every other shingle is called “cheat nailing,” which can lead to shingle drooping (where one end of the shingle slips downward) and blowoffs.

Another disadvantage of racking a roof is the zipper appearance that the pattern can display in the finished roof. The shading of the surface granules on many color-blended shingles is supposed to create a random shading effect across the roof. When individual shingles are offset in a regular pattern from eaves to ridge, the shading randomness can be lost and can actually highlight the back and forth, zigzag look of the pattern (see the photo). This frequently happens when shingles from different lot numbers are installed on the same roof plane.

unattractive zipper
The regular back-and-forth offset of racked shingles can leave an unattractive “zipper” up a roof.

The racking pattern can also be revealed when the cutout slots at the joints between shingles appear wider or narrower than the ones stamped out in the middle of the shingles. As shingles age, they can shrink and the edges curl, especially organic felt shingles. The shrinking makes the slots where the ends of shingles meet appear wider, and the ends may be more likely to curl.

When joints are staggered at regular intervals up the roof, the undesirable zipperlike effect is highlighted. This can also happen when manufacturers miscut shingles or the installer doesn’t butt the shingles tightly together. In any case, the installation pattern is exposed and detracts from the overall appearance of the roof. Some shingle manufacturers advise against using the racking pattern for these reasons.

Laminated shingles and other random shingle styles shouldn’t be racked. There is no slot control required, so there is no advantage. And racking will betray a pattern in a style of shingle where you don’t want one.

Pyramid-Pattern Layout

The pyramid pattern is also known as the 45-degree or diagonal pattern. This is because it works up the roof as a diagonal instead of going straight up the roof like the racking pattern. The angle is rarely a true 45 degrees, but it does appear that way from a distance no matter what the offset. The roof shingles are typically started along one rake edge with ends of shingles in successive courses staggered diagonally to form the appearance of one side of a stepped pyramid.

Shingle Installation Patterns

Shingle Installation Patterns

Pyramid advantages

There are several advantages to using the pyramid pattern. Once you get the pyramid started, shingling goes quickly. You can work up a roof at a diagonal or left and right horizontally. Since there are no back-and-forth offsets between courses as with the racking pattern, you don’t have to struggle with lifting the ends of shingles and driving fasteners. This speeds production considerably.

The eaves-to-ridge zipper effect is eliminated too. Sometimes a diagonal zipper can develop, but it isn’t as obvious as a straight one. The pyramid pattern is the preferred installation pattern for laminated and other random-appearance shingles. Many manufacturers recommend a modified pyramid pattern where the offsets between shingles aren’t equal measurements but random themselves. Rather than equal 6-in. offsets, they may recommend an offset of 7 in. for the first course, 9 in. for the next, and then 5 in. This increases the randomness of the roof shingles and reduces the chance a diagonal zipper will show up.

diagonal pyramid pattern
Shingles are installed in a diagonal up the roof in the pyramid pattern. Progressively shorter shingles make up a starter kit and are aligned to several vertical control lines or a rake edge to establish the offset between horizontal shingle courses.

Pyramid disadvantage

The drawback to the pyramid approach is that it’s more difficult to control the vertical orientation of cutout slots in three-tab shingles because you need more vertical control lines. The pyramid-shingle pattern is typically begun along a rake edge and continued across, but it can be started in the middle of the roof too. The diagonal progresses up the roof and moves horizontally with the addition of each horizontal course. If the slots of the initial shingle in a course aren’t set precisely, the whole course will be off. To control tab slots on a pyramid pattern accurately, you need to snap six or seven vertical control lines rather than the two needed for the racking method.

There is a way to use the pyramid pattern without vertical control lines. To do this, use a 5-in. offset with three-tab shingles. With a 5-in. offset, slots in successive courses only repeat vertically at every twelfth course. That’s 5 ft. up the roof, so any deviation in the slots won’t be noticeable (see the photo below).

cutout offset
A 5-in. cutout offset, shown here, eliminates the need for vertical control lines because the pattern repeats only every 12th course, so any deviation in the slots won’t be noticeable.


Fine Homebuilding Recommended Products

Fine Homebuilding receives a commission for items purchased through links on this site, including Amazon Associates and other affiliate advertising programs.

Roofing Gun

This lightweight, pneumatic roofing nailer is capable of driving ¾-in to 1¾-in coil roofing nails and has a depth adjustment wheel to dial in nailing depth on the various shingle types you're likely to encounter.
Buy at Amazon

Flashing Boot

Adequately seal vulnerable vent penetrations through the roof with this galvanized flashing and flexible rubber collar.
Buy at Amazon

Hook Blade Roofing Knife

Cutting asphalt shingles is made faster, easier, and safer when using a hook-blade. Suitable for any standard utility knife, these are a must-have on any roofing project.
Buy at Amazon

Sign up for eletters today and get the latest how-to from Fine Homebuilding, plus special offers.

Signing you up...

This site is protected by reCAPTCHA and the Google Privacy Policy and Terms of Service apply.
See all newsletters
See all newsletters
Previous: Avoiding Shingle-Color Variations Next: Control-Line Layout

Guide

Roofing

Chapter

Installing Asphalt Shingles

Log in or create an account to post a comment.

Sign up Log in

Become a member and get full access to FineHomebuilding.com

Roofing

Roofing

A complete resource that includes the best materials and the right techniques to build a sturdy, leak-free, attractive roof on any house

View Project Guide

View All Project Guides »

Become a member and get unlimited site access, including the Roofing Project Guide.

Start Free Trial

Tools and Materials
  • Roof Coverings
  • Roofing Materials
  • Power Tools
  • Handy Helpers
  • Staging and Ladders
  • Safety Equipment
Roof Replacement and Reroofing
  • Preparing the Old Roof
  • Sheathing
  • Installing the New Roof
Roof Ventilation
  • Venting Basics
  • Installation
Waterproofing
  • Underlayment
  • Drip Edge
  • Flashing Adjoining Walls
  • Dormer and Skylight Flashing
  • Chimney Flashing
  • Vent Flashing
  • Gutters
Installing Asphalt Shingles
  • Calculating Shingles
  • Layout
  • Installation
  • Valleys
Installing Other Types of Roofs
  • Cedar Shingles
  • Metal
  • Low-Slope Roofs
  • Slate and Tile
Roof Maintenance and Repair
  • Assessing the Problem
  • Repairing Asphalt-Shingle Roofs
  • Other Roofing Repairs

Fine Home Building

Newsletter Sign-up

  • Fine Homebuilding

    Home building tips, offers, and expert advice in your inbox.

  • Green Building Advisor

    Building science and energy efficiency advice, plus special offers, in your inbox.

  • Old House Journal

    Repair, renovation, and restoration tips, plus special offers, in your inbox.

Signing you up...

This site is protected by reCAPTCHA and the Google Privacy Policy and Terms of Service apply.
See all newsletters

Follow

  • Fine Homebuilding

    Dig into cutting-edge approaches and decades of proven solutions with total access to our experts and tradespeople.

    Start Free Trial Now
    • Facebook
    • Instagram
    • X
    • LinkedIn
  • GBA Prime

    Get instant access to the latest developments in green building, research, and reports from the field.

    Start Free Trial Now
    • Facebook
    • YouTube
  • Old House Journal

    Learn how to restore, repair, update, and decorate your home.

    Subscribe Now
    • Facebook
    • Instagram
    • X

Membership & Magazine

  • Online Archive
  • Start Free Trial
  • Magazine Subscription
  • Magazine Renewal
  • Gift a Subscription
  • Customer Support
  • Privacy Preferences
  • About
  • Contact
  • Advertise
  • Careers
  • Terms of Use
  • Site Map
  • Do not sell or share my information
  • Privacy Policy
  • Accessibility
  • California Privacy Rights

© 2025 Active Interest Media. All rights reserved.

Fine Homebuilding receives a commission for items purchased through links on this site, including Amazon Associates and other affiliate advertising programs.

X
X
This is a dialog window which overlays the main content of the page. The modal window is a 'site map' of the most critical areas of the site. Pressing the Escape (ESC) button will close the modal and bring you back to where you were on the page.

Main Menu

  • How-To
  • Design
  • Tools & Materials
  • Video
  • Blogs
  • Forum
  • Project Guides
  • Reader Projects
  • Magazine
  • Members
  • FHB House

Podcasts

  • FHB Podcast
  • ProTalk

Webinars

  • Upcoming and On-Demand

Podcasts

  • FHB Podcast
  • ProTalk

Webinars

  • Upcoming and On-Demand

Popular Topics

  • Kitchens
  • Business
  • Bedrooms
  • Roofs
  • Architecture and Design
  • Green Building
  • Decks
  • Framing
  • Safety
  • Remodeling
  • Bathrooms
  • Windows
  • Tilework
  • Ceilings
  • HVAC

Magazine

  • Current Issue
  • Past Issues
  • Magazine Index
  • Subscribe
  • Online Archive
  • Author Guidelines

All Access

  • Member Home
  • Start Free Trial
  • Gift Membership

Online Learning

  • Courses
  • Project Guides
  • Reader Projects
  • Podcast

More

  • FHB Ambassadors
  • FHB House
  • Customer Support

Account

  • Log In
  • Join

Newsletter

Get home building tips, offers, and expert advice in your inbox

Signing you up...

This site is protected by reCAPTCHA and the Google Privacy Policy and Terms of Service apply.
See all newsletters
See all newsletters

Follow

  • X
  • YouTube
  • instagram
  • facebook
  • pinterest
  • Tiktok

Join All Access

Become a member and get instant access to thousands of videos, how-tos, tool reviews, and design features.

Start Your Free Trial

Subscribe

FHB Magazine

Start your subscription today and save up to 70%

Subscribe

We hope you’ve enjoyed your free articles. To keep reading, become a member today.

Get complete site access to expert advice, how-to videos, Code Check, and more, plus the print magazine.

Start your FREE trial

Already a member? Log in