FHB Logo Facebook LinkedIn Email Pinterest Twitter X Instagram Tiktok YouTube Plus Icon Close Icon Navigation Search Icon Navigation Search Icon Arrow Down Icon Video Guide Icon Article Guide Icon Modal Close Icon Guide Search Icon Skip to content
Subscribe
Log In
  • How-To
  • Design
  • Tools & Materials
  • Restoration
  • Videos
  • Blogs
  • Forum
  • Magazine
  • Members
  • FHB House
  • Podcast
Log In

Fine Homebuilding Project Guides

Roofing

Guide Home
  • Tools and Materials
  • Roof Replacement and Reroofing
  • Roof Ventilation
  • Waterproofing
  • Installing Asphalt Shingles
  • Installing Other Types of Roofs
  • Roof Maintenance and Repair
How-To

Vent Flashing Done Right

Back up roof vent boots with flashing, counterflashing, and proper shingling to prevent leaks.

By Mike Guertin Issue 276 - July 2018

Synopsis: Mike Guertin describes his method for flashing roof vent boots, a main source of roof leaks. Because the vent flashing boot’s rubber collar is typically thin and seals only to the vent pipe, Guertin adds an additional seal with EPDM flashing tape with a butyl adhesive backing. In a series of step-by-step photographs, he shows how to flash the pipe, how to flash over and under the pan, and how to finishing by shaping the shingles.   


Roofs generally don’t leak in the field of shingles unless there is some kind of damage. Other than ice dams, leaks usually occur at flashings around chimneys, roof-to-wall connections, and penetrations like exhaust vents. Of all the calls to investigate roof leaks I’ve received in the last few years, there’s been one main culprit: plumbing vent flashing boots. Often I find the rubber collar on the boot has split or been damaged by a falling branch or a critter chewing at the rubber. In some cases, the collar is fine, but the leak is due to how the shingles were detailed around the flashing pan.

Whatever the cause, the leak can lead to damage. When the roof has a vented attic below, the leak usually evidences itself as a stain in the ceiling beneath the attic, with little damage other than to the drywall and paint. Where the leak can be more devastating is on roofs where the rafters or trusses have been insulated with spray foam applied directly to the roof sheathing. There, the leak can persist for years before it’s noticed, all the while rotting the surrounding sheathing and framing.

vent flashing pipe

Rubber collar: the weak link

Today’s roof shingles are much longer lasting than earlier generations. Many vent flashing boots, on the other hand, haven’t improved to match. Most boots have a thin rubber collar that seals to the vent pipe. There’s often no additional seal beneath the collar, so if—or when—the collar is damaged or splits, water can find a path into the house. Whether using a standard vent flashing boot, as I did here, or one of the premium products, back it up by sealing the vent pipe to the roofing with flashing tape. I do this with 6-in.-wide strips of uncured EPDM flashing tape with a butyl adhesive backing. My preferred tape for this is Protecto Wrap’s Form Flash 2 EPDM. It’s durable, rated for UV exposure, and very flexible; it adheres and seals aggressively; and it works at low and high temperatures. You’ll need two strips of tape to flash the pipe to the roof, each at least 6 in. longer than the pipe opening so that they’re long enough to get a good overlap.
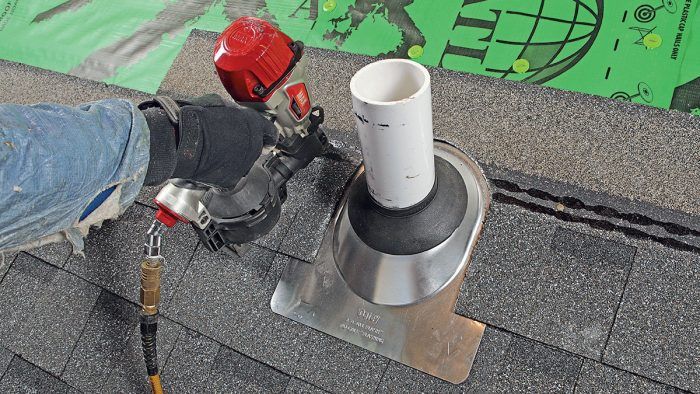
Flash the pipe

Shingle up to and around the pipe Shingle up to and around the pipe
Shingle up to and around the pipe. The top edge of the last course of shingles to go on before the flashing tape should extend at least to the middle of the pipe, but no further up than the self-seal strip on the shingle. Hold the shingle in place below the pipe and mark the cutout with chalk.


Tape the downslope Tape the downslope
Tape the downslope. First, mark a line on the pipe representing the top of the vent boot’s collar. Fold the tape in half lengthwise, with the adhesive side out, and, starting from the middle and 1 ⁄ 2 in. below the mark, wrap the tape around the pipe, working one side at a time.


Tape the upslope
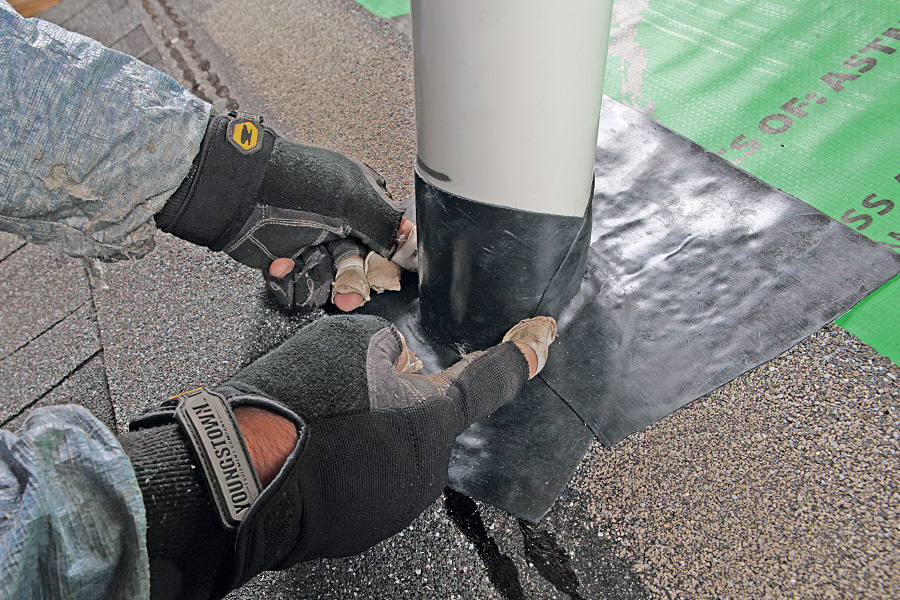
Tape the upslope. Using the same method as the downslope side, apply the second piece of tape so it overlaps the first around the pipe, again staying 1 ⁄ 2 in. below the collar mark.

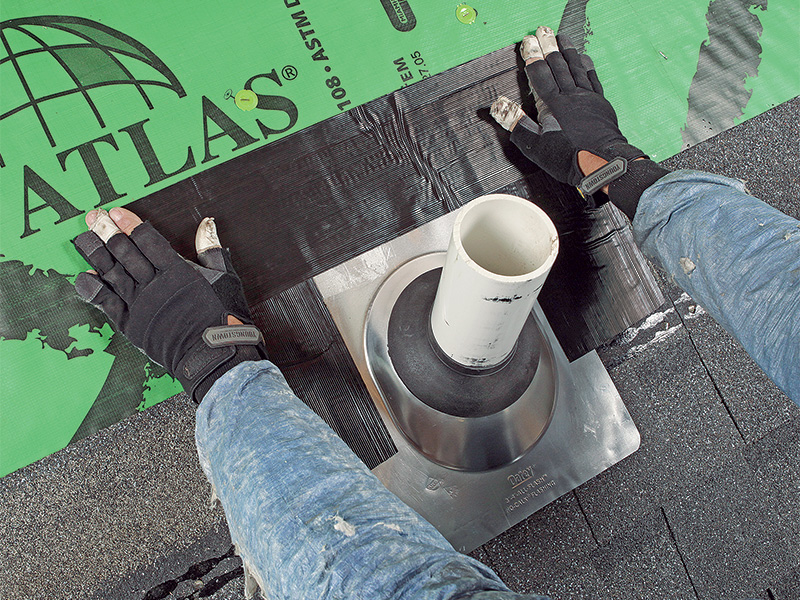
Flash the pan like a window

Pans for flashing boots don’t have a wide flange to overlap with the surrounding shingles. Most installers seal the shingles to the pan with roof cement, which may dry and crack (and leak) before it’s time to reshingle the roof. Instead of cement, I use flashing tape to extend the pan’s perimeter and seal it to the shingles and underlayment to make it more storm-resistant. I also add a rain dam strip along the underside of the bottom of the pan to bond the bottom edge to the shingle and resist wind-driven rain. After flashing the boot, I tuck an extra piece of underlayment beneath the next underlayment joint above, and lap it over the top of the boot’s metal flashing to serve as counterflashing, so the system doesn’t just rely on adhesive bonds to keep water out.

Flash under the pan

Score the backing Dam the rain
Score the backing. Cut a piece of asphalt flashing tape about 1 in. narrower than the width of the flashing pan, and use a utility knife to score the release sheet down the middle so it can be removed in two steps. Dam the rain. Remove the backing on one half of the tape, then center and bond it to the underside of the bottom portion of the flashing pan. Then fold the flashing tape back on itself and remove the second strip of release sheet.


Boot it
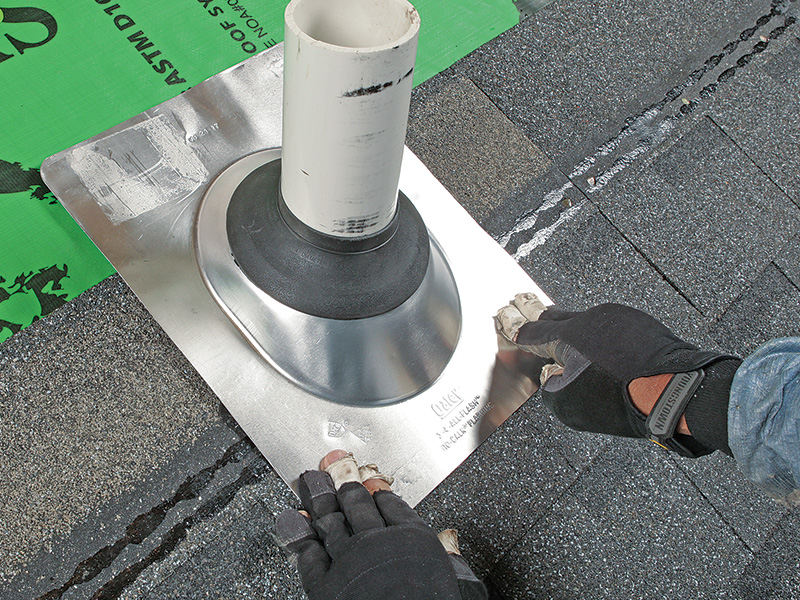
Boot it. With one hand under the pan holding the tape flap so the sticky side stays down, slide the flashing boot over the pipe, align the flashing pan square with the roof shingles, and press the bottom edge down to seal the tape.

Flash over the pan

tape the sides
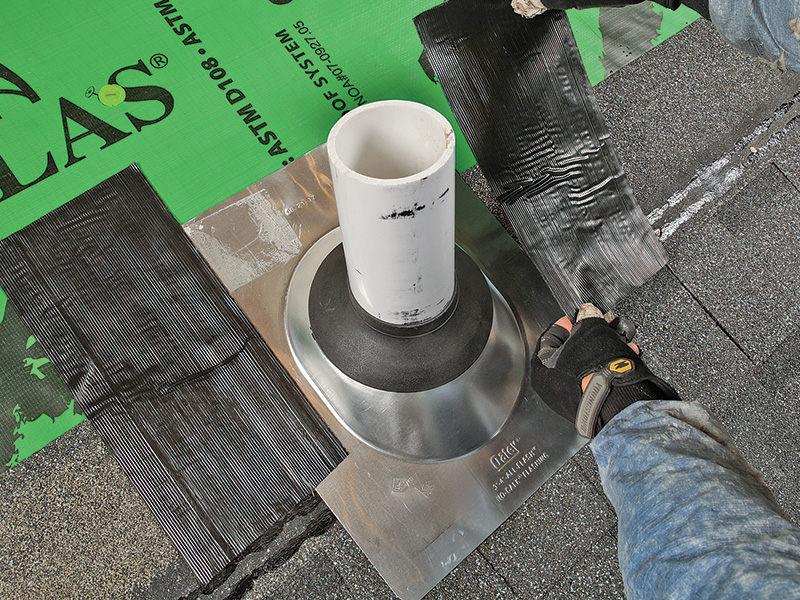
Tape the sides. Cut two strips of 4-in.- to 6-in.-wide asphalt flashing tape and apply it over the sides of the flashing pan and onto the shingle and underlayment. Keep the tape above the shingle’s self-seal strip, and let it extend 1 in. to 2 in. above the pan. Keep the edge of the tape about 1 ⁄ 2 in. away from the pan’s bell.


tape the head
Tape the head. Cut a strip of 4-in. to 6-in. flashing tape long enough to cover across the tops of the side strips of flashing tape. Overlap the top of the pan flashing, keeping the bottom edge of the tape about 1 ⁄ 2 in. to 1 in. above the bell of the flashing pan.

Cut and install a piece of underlayment
Extra protection. Cut and install a piece of underlayment that laps 6 in. beneath the next underlayment joint above, and down onto the top of the flashing boot’s pan.

Shape the shingles

Trim shingles to fit
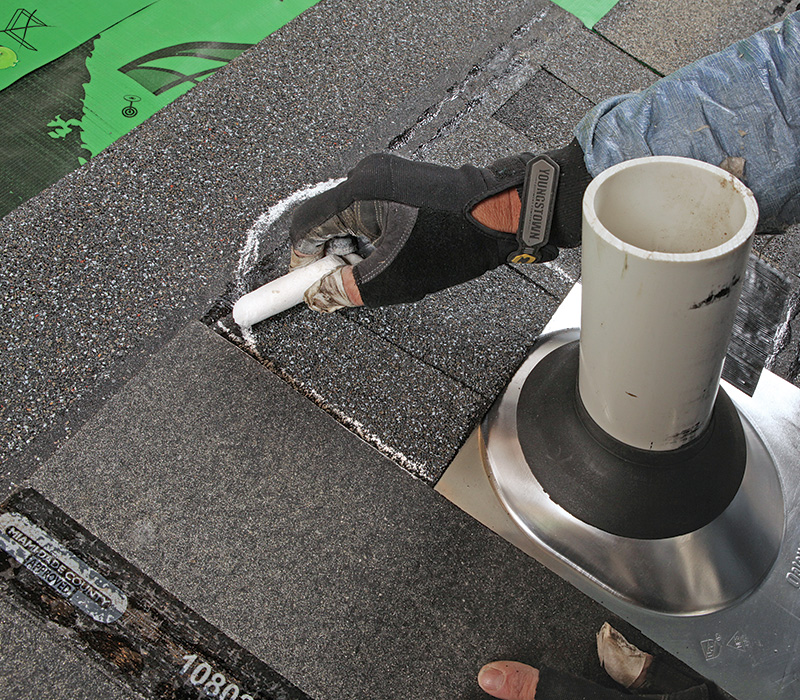
Trim shingles to fit. Continue shingling. When you get to the vent pipe, mark the cutout for the vent pipe on the shingle, using another shingle as a straightedge. I eyeball the curve around the flashing boot’s bell.


put the shingle in place
Shingle on. With the cutout made, put the shingle in place.


nail it in and mark a cutout
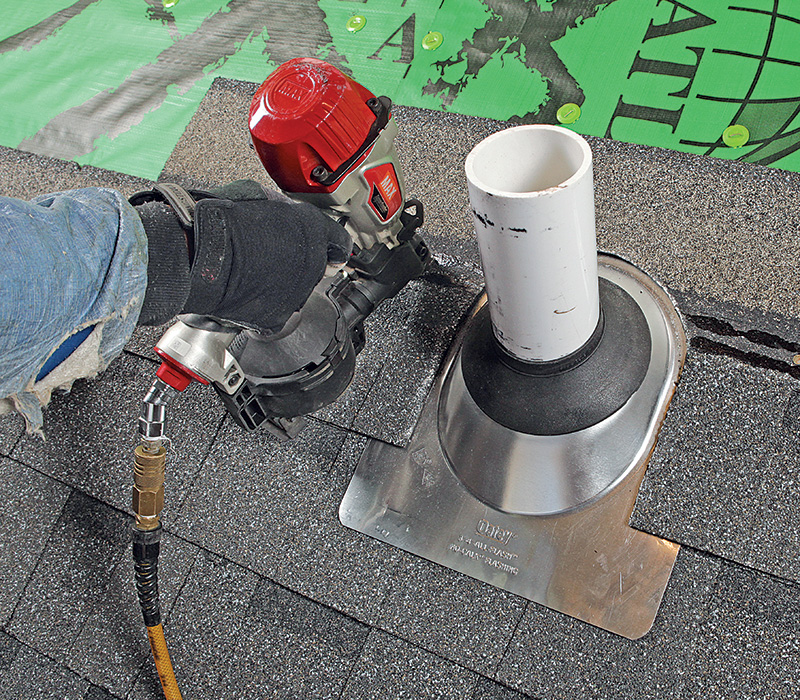
Nail it. Depending on your shingle’s exposure, you’ll have to mark a cutout on the next course as well.

Mike Guertin is Fine Homebuilding’s editorial advisor. Follow him on Instagram @mike_guertin.

Photos by Matthew Millham.

From Fine Homebuilding #276


For other articles related to this topic, please check out these links:

  • Vent Flashing Done Right
  • A Guide to Better Boot Flashings
  • Back Up Your Vent Pipe Flashing
  • Better Boot Flashings Last Longer, Seal Better
  • Plumbing Vent Boot Flashing Repair: Method 1
  • Plumbing Vent Boot Flashing Repair: Method 2

For details and many more photos in this article, please click the View PDF button below.

Fine Homebuilding Recommended Products

Fine Homebuilding receives a commission for items purchased through links on this site, including Amazon Associates and other affiliate advertising programs.

Roof Jacks

All-steel construction makes these roof brackets durable and long lasting, and their adjustability allows you to create a flat, safe standing surface on most any pitched roof.
Buy at Amazon

Peel & Stick Underlayment

Often required by code, this durable, slip resistant, self-sealing, and self-adhered roofing underlayment is easy to install and ensures maximum protection along roof eaves, rakes, and valleys.
Buy at Amazon

Ladder Stand Off

Stability is key when working off a ladder or accessing the roof, and this lightweight aluminum stand-off makes any extension ladder safer and more comfortable to use.
Buy at Amazon

Sign up for eletters today and get the latest how-to from Fine Homebuilding, plus special offers.

Signing you up...

This site is protected by reCAPTCHA and the Google Privacy Policy and Terms of Service apply.
See all newsletters
See all newsletters
View PDF
Previous: How to Bend Copper Chimney Flashing Next: Back Up Your Vent Pipe Flashing

Guide

Roofing

Chapter

Waterproofing

View Comments

  1. user-6962131 | Jul 02, 2018 12:55pm | #1

    I prefer lead flashing, though squirrels can chew on it.

Log in or create an account to post a comment.

Sign up Log in

Become a member and get full access to FineHomebuilding.com

Roofing

Roofing

A complete resource that includes the best materials and the right techniques to build a sturdy, leak-free, attractive roof on any house

View Project Guide

View All Project Guides »

Become a member and get unlimited site access, including the Roofing Project Guide.

Start Free Trial

Tools and Materials
  • Roof Coverings
  • Roofing Materials
  • Power Tools
  • Handy Helpers
  • Staging and Ladders
  • Safety Equipment
Roof Replacement and Reroofing
  • Preparing the Old Roof
  • Sheathing
  • Installing the New Roof
Roof Ventilation
  • Venting Basics
  • Installation
Waterproofing
  • Underlayment
  • Drip Edge
  • Flashing Adjoining Walls
  • Dormer and Skylight Flashing
  • Chimney Flashing
  • Vent Flashing
  • Gutters
Installing Asphalt Shingles
  • Calculating Shingles
  • Layout
  • Installation
  • Valleys
Installing Other Types of Roofs
  • Cedar Shingles
  • Metal
  • Low-Slope Roofs
  • Slate and Tile
Roof Maintenance and Repair
  • Assessing the Problem
  • Repairing Asphalt-Shingle Roofs
  • Other Roofing Repairs

Fine Home Building

Newsletter Sign-up

  • Fine Homebuilding

    Home building tips, offers, and expert advice in your inbox.

  • Green Building Advisor

    Building science and energy efficiency advice, plus special offers, in your inbox.

  • Old House Journal

    Repair, renovation, and restoration tips, plus special offers, in your inbox.

Signing you up...

This site is protected by reCAPTCHA and the Google Privacy Policy and Terms of Service apply.
See all newsletters

Follow

  • Fine Homebuilding

    Dig into cutting-edge approaches and decades of proven solutions with total access to our experts and tradespeople.

    Start Free Trial Now
    • Facebook
    • Instagram
    • X
    • LinkedIn
  • GBA Prime

    Get instant access to the latest developments in green building, research, and reports from the field.

    Start Free Trial Now
    • Facebook
    • YouTube
  • Old House Journal

    Learn how to restore, repair, update, and decorate your home.

    Subscribe Now
    • Facebook
    • Instagram
    • X

Membership & Magazine

  • Online Archive
  • Start Free Trial
  • Magazine Subscription
  • Magazine Renewal
  • Gift a Subscription
  • Customer Support
  • Privacy Preferences
  • About
  • Contact
  • Advertise
  • Careers
  • Terms of Use
  • Site Map
  • Do not sell or share my information
  • Privacy Policy
  • Accessibility
  • California Privacy Rights

© 2025 Active Interest Media. All rights reserved.

Fine Homebuilding receives a commission for items purchased through links on this site, including Amazon Associates and other affiliate advertising programs.

X
X
This is a dialog window which overlays the main content of the page. The modal window is a 'site map' of the most critical areas of the site. Pressing the Escape (ESC) button will close the modal and bring you back to where you were on the page.

Main Menu

  • How-To
  • Design
  • Tools & Materials
  • Video
  • Blogs
  • Forum
  • Project Guides
  • Reader Projects
  • Magazine
  • Members
  • FHB House

Podcasts

  • FHB Podcast
  • ProTalk

Webinars

  • Upcoming and On-Demand

Podcasts

  • FHB Podcast
  • ProTalk

Webinars

  • Upcoming and On-Demand

Popular Topics

  • Kitchens
  • Business
  • Bedrooms
  • Roofs
  • Architecture and Design
  • Green Building
  • Decks
  • Framing
  • Safety
  • Remodeling
  • Bathrooms
  • Windows
  • Tilework
  • Ceilings
  • HVAC

Magazine

  • Current Issue
  • Past Issues
  • Magazine Index
  • Subscribe
  • Online Archive
  • Author Guidelines

All Access

  • Member Home
  • Start Free Trial
  • Gift Membership

Online Learning

  • Courses
  • Project Guides
  • Reader Projects
  • Podcast

More

  • FHB Ambassadors
  • FHB House
  • Customer Support

Account

  • Log In
  • Join

Newsletter

Get home building tips, offers, and expert advice in your inbox

Signing you up...

This site is protected by reCAPTCHA and the Google Privacy Policy and Terms of Service apply.
See all newsletters
See all newsletters

Follow

  • X
  • YouTube
  • instagram
  • facebook
  • pinterest
  • Tiktok

Join All Access

Become a member and get instant access to thousands of videos, how-tos, tool reviews, and design features.

Start Your Free Trial

Subscribe

FHB Magazine

Start your subscription today and save up to 70%

Subscribe

We hope you’ve enjoyed your free articles. To keep reading, become a member today.

Get complete site access to expert advice, how-to videos, Code Check, and more, plus the print magazine.

Start your FREE trial

Already a member? Log in