8 Building Science Mistakes to Avoid
From missing flashing details to incomplete roof venting, understanding how things go wrong is the first step to getting them right.
There’s a very simple reason why all builders should understand building science—or, in other words, know how buildings work: because buildings, or at least parts of buildings, regularly fail. If you’ve worked as a remodeler, or even if you tackle projects in your own home, you know this story well. You start stripping roof shingles first thing in the morning intending to install flashing and underlayment after lunch. But instead of taking a lunch break, you spend an hour running to the lumberyard for a few sheets of plywood to repair the rotted sheathing below the improperly flashed plumbing vent. Heck, even if you’ve never worked on a home, if you’ve lived in one, you may know the experience of a damp basement, a hood fan that never quite seems to clear the kitchen air, or finish that’s peeling clean off the siding way too soon. Every one of these examples relates to building science mistakes that could have been avoided.
For this reason, I reached out to some regular FHB contributors from around the country and asked them not only what building science mistakes they’ve made or often see, but how things could have been done better. Their replies could easily have been turned into a manuscript for a book, but there were a bunch of common themes, and that’s what you’ll find here—along with a few concerns of my own.
1. Not controlling condensation with exterior insulation
Continuous exterior insulation on walls has several benefits. It’s often a good way to add R-value to existing walls when re-siding an old house. More than just adding insulation, it specifically minimizes thermal bridging, which is why it is also a smart way to insulate the walls of a new house too. For this purpose alone, however, even a small amount of insulation would be helpful, and there are other options, like double-stud walls. The beauty of continuous exterior insulation is that with the right R-value for your climate, it will also add durability to your walls. Let’s imagine that your gutters are draining all the roof water far away from the house, your flashing is impeccable, and your drainable water-resistive barrier (WRB) is doing its job. Great! But if your sheathing is cold in the winter, there’s still the risk of condensation, wet framing, and all the problems that come with it. That is, unless you have enough exterior insulation that your sheathing isn’t cold at all.
Get it Right: There are two places in the 2021 IRC where you can find R-values for exterior continuous insulation on walls. In chapter 11 (Energy Efficiency), you’ll find a table that gives minimum R-values for walls in each climate zone (N1102.1.2). It includes options for meeting the requirements with some or all continuous exterior insulation. In chapter 7 (Wall Coverings), there’s a table for class III interior vapor retarders. Here, you’ll find the minimum R-value of continuous exterior insulation needed on 2×4 and 2×6 walls if you use a class III interior vapor retarder.
What’s the difference between the two? The latter assumes that the ratio of exterior to interior insulation is sufficient to keep the sheathing above the dew point temperature in the winter. So, you don’t need as robust vapor control on the warm-in-winter side of the assembly as you would in a house without exterior insulation. In fact, with some of the insulation products that you might use on the exterior—specifically low-perm rigid foams—you will want the wall to be able to dry to the interior. Note that what the IRC prescribes in chapter 7 is a ratio. In climate zone 5, it requires at least R-5 exterior insulation on a 2×4 wall, and R-7.5 on a 2×6 wall for condensation control. If you built and fully insulated a 2×8 wall, you’d need to increase the R-value of the exterior insulation accordingly. —Brian Pontolilo, senior editor
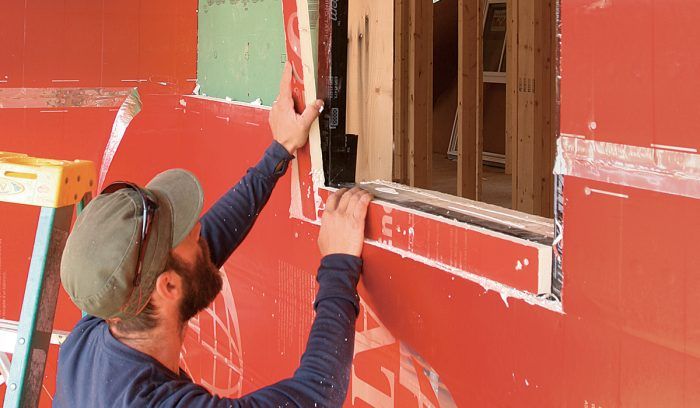
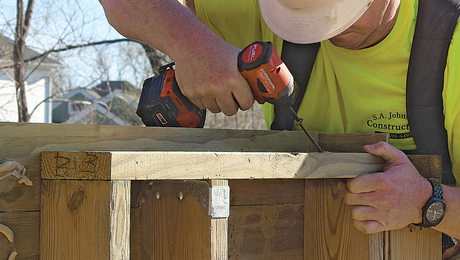
2. Skipping necessary flashing details
Water is the enemy of buildings. It rots the structure, promotes mold growth, and damages interior and exterior finishes. Flashing—typically some type of material that redirects water around a joint or juncture in a structure—is used to prevent water from entering the building through vulnerable locations. But when common flashing details are omitted or installed incorrectly, water leaks in through those places and reduces the life spans of a building’s components, costing money and causing repair headaches. The most common places where flashing is omitted or incorrectly installed are around windows, at the edge of roof-to-wall junctures, and wherever water needs to be directed away from the building. It’s also common to see materials that have been improperly lapped, like the water-resistive barrier (WRB) found on all home exteriors.
Get it Right: If we think about how a drop of water moves, we can picture the path it takes to travel into or through our buildings. To prevent damage, we need to direct the water toward drainage or a place where it can dry. Imagine, for example, the roof overhang pushing rainwater away from the walls below, or the head flashing above a window pushing the water away from the window and trim, or properly installed housewrap that laps over the layer below and not behind it. So, anywhere there is a change in material or plane (like a bump, jog, or extension) in a building’s exterior, consider how you can move the water around that detail to promote draining or drying in the most efficient way. For example, you need to tape the top and sides of a flanged window but should leave the bottom open to allow drainage and drying. It may seem counterintuitive, but if you tape the bottom and water gets in, it won’t be able to get out. —Emily Mottram, Mottram Architecture, Thomaston, Maine
3. Not installing a radon mitigation system
Radon is a radioactive gas found to varying degrees in soil throughout the United States. When radon infiltrates a house in high concentrations it presents a potential health risk for the occupants. The EPA publishes a map of radon zones that you can use to determine the risk of exposure in your area, but it’s not possible to be sure if a house will have high levels of radon until it is built. Because radon has no color or odor, and because homes with unhealthy levels of radon have been found in all risk zones recognized by the EPA, all homes should be tested. While the EPA advises that homes with radon levels of 4 picoCuries per liter of air (pCi/L) be retrofit with a radon mitigation system, the CDC says that we should always shoot for the lowest possible levels of radon in our homes. That makes installing at least a passive radon mitigation system in new homes a smart idea.
Get it Right: Because radon is typically pulled into a house via the stack effect, air-sealing is one way to limit infiltration. Air-sealing the entire building envelope helps, but a particular focus on the foundation is critical to keep radon out and allow a radon mitigation system to work. Most homes have a concrete slab, and slabs should have a vapor retarder beneath them. You can detail the subslab vapor retarder as an air barrier by taping all seams, taping penetrations, and sealing the perimeter. You can also seal all cracks and penetrations through the concrete from above with caulk. If a basement slab has a sump, make sure it has an airtight lid. With proper air-sealing, you can then effectively vent radon from the soil below with a simple system of PVC pipe.
Many slabs will already have a crushed stone layer beneath them. Installing a PVC tee in the gravel with a riser that penetrates the slab and a pipe that extends through the conditioned area of the house and exhausts above the roof is effective and affordable. There are some important details to be aware of, so talk to your local building official or an engineer before getting started. And even if your local codes don’t require it, consider wiring an outlet near the vent pipe in a closet or an attic. This way, if a house tests for particularly high radon levels, a fan can be added to boost exhaust. Similar systems can be retrofit into existing houses, though you may have to get creative when running the pipe. —B.P.
4. Mismanaging rainwater
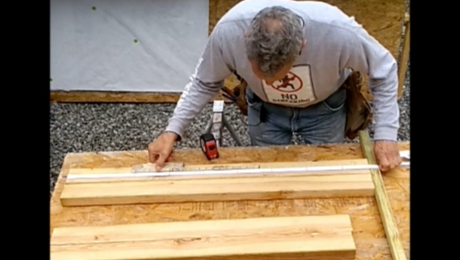
In a building science article like this, it can’t be said enough: Water kills buildings. Rainwater management may seem to be common sense, yet I’ve seen many problems that counter the idea. The primary force that acts on rain is gravity. (A secondary force is wind.) When rainwater hits a surface, friction slows it down. One way to limit the effect of friction is with a slope. The steeper the slope, the less friction there is, and the velocity of the water’s movement is increased. Conversely, the lower the slope, the harder it is for water to move across a surface. Even if you direct water to shed off a building, it can collect around the perimeter of the house and potentially infiltrate the soil and enter the foundation system. Eventually, there can be water intrusion into the building itself.

Get it Right: To play it safe, build with roof pitches of 5:12 as a baseline. If you build flatter, consider using a roofing material that will involve less friction, such as metal. Note that the amount of rainwater shedding off a roof is cumulative. During a rainstorm, there may be a little water at the ridge, but there will be a lot of water at the eave. Similarly, valleys contain more water at the bottom than they do at the top. For these reasons, ensure that gutters are sized to collect the full roof load and that the roofing doesn’t impede too deep into the gutter trough, or the rain may shoot past the gutter. Use downspouts to direct the water to an underground piping system that conveys the water to another location. Ideally, there is stormwater infrastructure to tie the piping into. There may also be an infiltration pit, dispersion, or other means of handling the rainwater. At the area around the building, ensure the grade slopes away. I try to follow the IRC requirement of at least 6 in. of fall in the first 10 ft. of horizontal distance from the house. This can allow water around the house to drain away at the surface, and it can collect the water coming toward the house and keep the foundation dry. —Bryan Uhler, Pioneer Builders, Port Orchard, Wash.
5. Incomplete roof venting
While ventilated attics make for some of the most durable roofs in our built environment, adding a ridge vent alone doesn’t make a properly ventilated roof. Including a path for air to escape at the top of the roof assembly is an ideal way to get hot or moisture-laden air out of the structure. Venting it at the highest point in the assembly allows for the maximum potential pressure differential from a lower intake point, which takes full advantage of the stack effect to cool and dry the back of the sheathing. This time-tested method has proven incredibly effective and is unsurpassed in its simplicity, as long as the builder remembers to feed that ridge-vent air from a lower point of the roof system. Ideally this means cutting in continuous vents at the soffit for intake air.

Get it Right: It’s common for roofers in my area to add a continuous ridge vent to an attic rather than relying on existing gable vents when reroofing. As attic air heats up, it expands, and ridge vents offer a place for the hot air to escape. Installing a ridge vent typically just involves cutting away a few inches of the sheathing at either side of the ridge. Then the roof underlayment and the roofing material are installed all the way up to the ridge-vent opening. Instead of installing the ridge-cap directly over the roofing material, the roofer installs a continuous roll of monofilament matrix material (imagine a Brillo pad) that allows air to flow out of the attic while supporting the ridge shingle and not letting bugs and pests in. Rolled-out ridge venting is common in our areas, but there are other options. In any case, their purpose is the same. Installing a continuous ridge vent is an excellent durability upgrade on new roofs or on existing roofs that were undervented and don’t meet the current building code.
Unfortunately, exhaust only happens when you bring in air to replace what will be exhausted, and this means the roofer needs a carpenter to get involved to complete the circuit. Most of the houses in our area have at least small overhangs, where a carpenter can cut an intake vent into the soffit, but there are top-of-roof intake vents that slip under shinges, as well. The code specifies that a ratio of 1 sq. ft. of venting for every 300 sq. ft. of enclosed attic space is required to make these roofs work. The total venting is typically split between the upper portion of the roof (the ridge, commonly) and the lower (the soffits, typically). But our clients have always preferred things to look consistent, so we simply integrate continuous soffit intake with the design of the eave. This allows our vented roofs to remain cool(er) and dry(er), which maximizes their durability and reduces the accelerated loss of indoor conditioned air through leakage to the attic. —Travis Brungardt, Catalyst Construction, Prairie Village, Kan.
6. Expecting too much from spray foam
Spray-applied polyurethane foam (SPF) can provide tremendous thermal resistance in both open-cell and closed-cell applications. The R-values vary between manufacturers and foam types, but typically you can get R-6 per in. from closed-cell spray foam and R-3.5 per in. from open-cell spray foam. While open-cell foam has an R-value comparable to other types of insulation, closed-cell foam has one of the highest R-values available, which can be helpful and even necessary in some situations.
Both open- and closed-cell foam are produced by mixing two chemical components at the tip of a sprayer as the materials are applied to the surfaces to be insulated. When the two parts meet at the correct pressure and temperature, the chemical reaction results in an expanding foam that adheres to and integrates with building assemblies. When done properly, this foam application can provide tremendous air-sealing benefits too. The trouble begins when you don’t have a proper mix or acceptable application conditions, or when you mistakenly assume the foam will provide a continuous air barrier despite a discontinuous application.

Get it Right: An ideal spray-foam installation begins with ideal site conditions. The ambient temperature of both the air and the substrate should be above 40°F. The cavities should be clean and free from dust and debris that might limit the adhesion of the foam, and while some moisture can accelerate curing, there should not be frost or water on the substrates. Finally, you must heat the two tanks containing the A and B parts to their proper temperature ranges (120°F to 140°F). Because the two parts mix at the sprayer tip, those temperatures must be maintained through the line set as well. If the chemistry temperature, mixing ratio, or substrate conditions are off, you may encounter voids, cracking, incomplete curing, or a delamination of the foam from the substrate. These conditions all rob you of performance.
The danger of spray-foam failures is often in the potential for water vapor to condense in cavities created where the foam has pulled away from the sheathing. Though relatively rare, this can cause catastrophic wood rot and even structural failure in hot-roof assemblies where vapor condenses on the back of the roof sheathing and is then held there by the foam. Since roof membranes are vapor-closed, the only drying opportunity is toward the interior, and once water vapor accumulates in the foam it is slow to dry. A proper mix and application can alleviate this risk, but still, the foam can only insulate and air-seal where it’s been installed.
The most critical element of an air barrier is continuity. Filling individual wall cavities and rafter bays with foam might air-seal those cells, but does not provide continuity because the framing interrupts. We cannot expect continuous performance from discontinuous application. So, when using spray foam, it’s still a good idea to make the sheathing, a membrane, or even the drywall your primary air barrier, and to do everything possible to ensure continuity at transitions like the mudsill and top plates. —T.B.
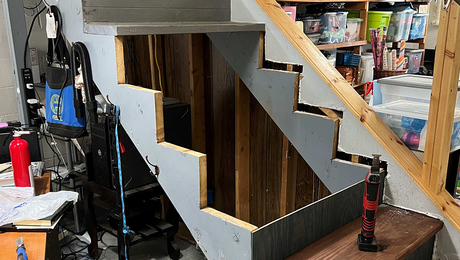
7. Running ductwork in unconditioned spaces
The building envelope of a home is designed to be a separator, keeping the outside out and the inside in. We want the heating and/or cooling we pay for to remain inside for as long as possible and not have losses when it moves from the place where it is produced to the area where it’s supplying comfort. When we place ductwork outside the building envelope, either in an unconditioned crawlspace, attic, or other exterior space, there is the possibility of creating inefficiencies with these systems.
This can happen in a few different ways. If there is an air leak in the supply-air ductwork (located outside the building envelope), the air that is leaking originated from inside the home. The lost air will be replaced by air leaking into the building somewhere. Not only did you lose the air that was just conditioned, but unconditioned air has leaked back in, further increasing the heating or cooling load in the house. If air leaks into the return duct, the home becomes pressurized, and conditioned air will be forced out of the home. Plus, the origins of the air that leaks into a return duct may be of poor quality that can affect occupant health or a building’s durability. Ducts outside the thermal envelope also need to be well-insulated. Not only will heat loss or gain contribute to cost and comfort issues, but condensation can form on either the inside or outside of the duct. This can create issues with a build’s durability and indoor-air quality.
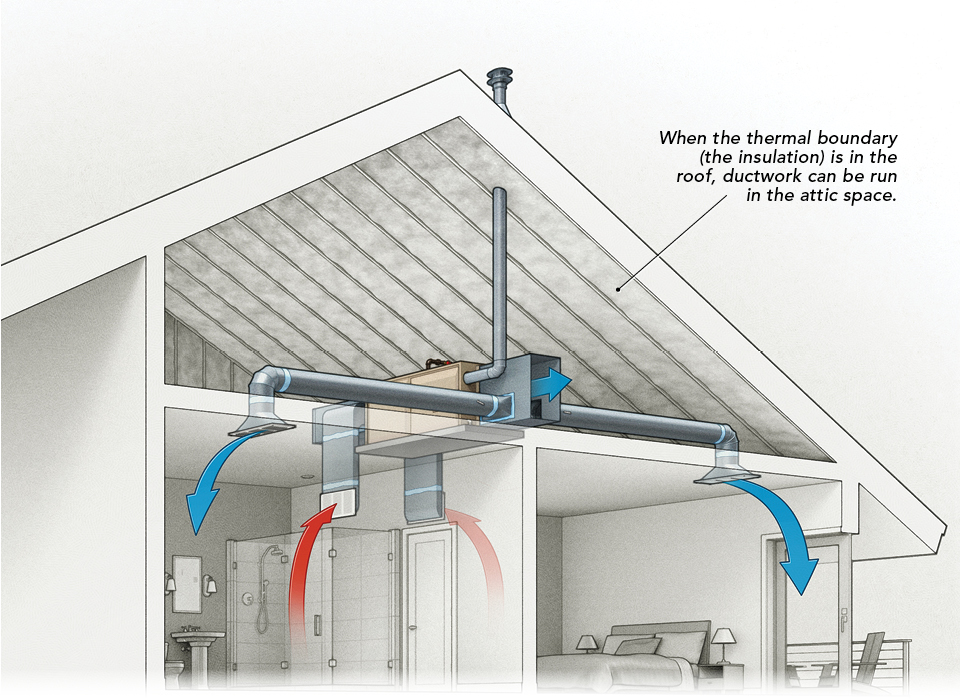
Get it Right: When ducts are located outside the building envelope, codes specify insulation and airtightness levels. These codes are found in chapter 11 section N1103 (R403). The codes are very specific and provide acceptable levels of both insulation and the airtightness of the ducts. Duct-tightness testing is required when ducts are outside the building envelope. Bringing the ducts into the conditioned space greatly simplifies these requirements. In crawlspace applications, simply changing the crawlspace from a vented to a conditioned space may be the best option. In attics, you can choose to condition the space by insulating and air-sealing the roof deck instead of the attic floor.
Other options are to use plenum trusses (these have a notch in the bottom chord of the truss where ducts and other mechanical systems can be installed), or you can create soffits inside the home where ductwork can be hidden.
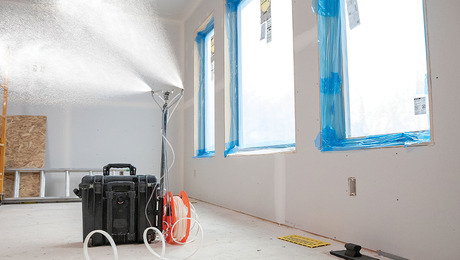
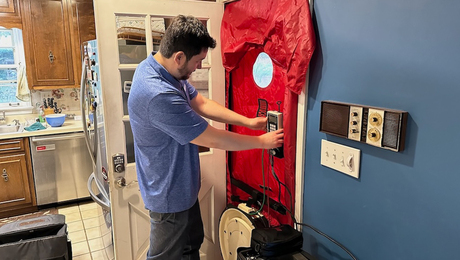
Duct-tightness testing has been around for several code cycles, but new to the 2021 energy code is the requirement that all ducts, whether inside or outside, be tested. The requirements are less stringent when the ductwork is inside the building envelope—a test result of 8 cfm per 100 sq. ft. of conditioned floor area is needed. Testing when ductwork is outside the thermal envelope requires a test of less than either 3 cfm or 4 cfm per 100 sq. ft. of conditioned floor area depending on whether the air handler is installed before testing is conducted. —Randy Williams, builder and energy auditor, Grand Rapids, Minn.
8. Still believing that “houses need to breathe”
A common trope that is still fairly prevalent in the residential building industry is “houses need to breathe.” The premise is that if a house has too robust of an air barrier (i.e., the house is too tight), you’ll trap moisture in the assemblies, creating the potential for condensation, mildew, mold, and rot. The historical basis for this was the introduction of insulation and vapor retarders in the mid-20th century. All of a sudden, assemblies that previously could very easily dry out stayed wet longer since much less heat flowed through them. There were some problems.
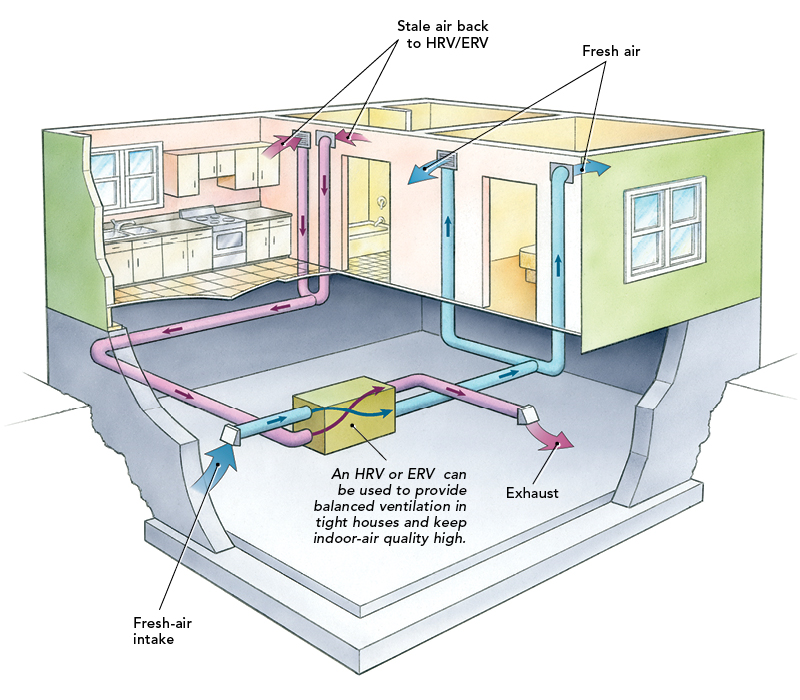
We’ve since learned, however, that most moisture flow travels via air currents, not vapor diffusion through the materials themselves. So, if you cut off the airflow through an assembly, you stop almost all the moisture movement. The evolution of the building code demonstrates this understanding; the requirements for vapor retarders have become less stringent while the requirements for airtightness and air barriers have grown stricter. With a good air-barrier system, balanced mechanical ventilation becomes necessary to maintain healthy indoor-air quality. Balanced mechanical ventilation has many advantages over letting houses “breathe.” With balanced ventilation, you can control where the air enters and how much comes in and out. You can filter the air. You can recover energy during the process. And you can control where the air is delivered to and extracted from.
Get it Right: Now, this isn’t to say that all airtight assemblies are guaranteed to be moisture-problem-proof. A poorly located vapor retarder can still create a condensation risk, which in turn can lead to the risk of mildew, mold, and rot. Intelligent design still needs to be a part of the process and for new-construction projects, the air barrier needs to be an integral part of the overall design.
My ideal air barrier (AB) is located mid-assembly, against the sheathing, underneath continuous insulation. This mid-assembly location has a number of benefits. It protects the AB from the occupants over the life of the house (compared to an interior AB) and from thermal and weather stresses (compared to an exterior AB). It allows for much easier AB continuity when the house geometry gets more complex (compared to an interior AB). It is located at a point in the assembly that should stay warm enough year-round to ensure that condensation won’t occur. And it is easy to execute and visually verify. I do not like nor recommend relying on spray foam or caulked joints as part of an air barrier since they are much more difficult to properly execute and visually verify.
A well-designed, continuous air barrier will make a house more energy efficient, thermally comfortable, and durable. The mechanical ventilation system (preferably with energy recovery) will maintain excellent indoor-air quality for the homeowners. —Jordan Goldman, Zero Energy Design, Boston, Mass.
RELATED STORIES
- Building Science for the Rest of Us
- The Fine Homebuilding Interview: Christine Williamson
- Six Proven Ways to Build Energy-Smart Wall
From Fine Homebuilding #321
Fine Homebuilding Recommended Products
Fine Homebuilding receives a commission for items purchased through links on this site, including Amazon Associates and other affiliate advertising programs.

All New Kitchen Ideas that Work

Not So Big House

The New Carbon Architecture: Building to Cool the Climate


View Comments
I am scratching my head on the first item in this article. Exterior insulation. Why would the exterior insulation have to get thicker for a 2x6 wall than a 2x4 wall? Seems counterintuitive?
I agree, it does seem a little counterintuitive, but the reason is because a 2x4 wall gets more warmth from the inside which keeps the back side of the sheathing warmer. This helps prevent condensation on the interior side of the sheathing during the heating season. It works in reverse during the cooling season.