
Six Proven Ways to Build Energy-Smart Walls
Whether you're building new or remodeling, use these alternative framing and insulating techniques to make your home more comfortable, energy efficient, and durable than a code-built house.
If we look even a mere 20 years into the future, we’ll see a very different world. For one thing, fossil-fuel-based energy will be much less abundant and much more expensive as we become independent of foreign oil. Eventually, we will be living in a world without oil. But the places we live in last a lot longer than 20 years, so we should start thinking now about how to construct energy-efficient houses that will function in a post-petroleum economy.
To that end, a good deal of money and brainpower is being put to work to come up with efficient solutions. The German Passive House Institute and its U.S. affiliate (Passive House Institute US; passivehouse.us) have designed building-enclosure standards based on energy use that’s 15% to 20% of today’s typical residential design load. Their model suggests that an envelope R-value ratio of 5:10:20:40:60 should be considered a minimum in the northern tier of the United States. In other words, windows at R-5, subslab insulation at R-10, or slab perimeter or basement wall insulation at R-20, wall insulation at R-40, and ceiling or roof insulation at R-60. For more on this, see “What are Passive Houses“.
Fortunately, you can achieve this goal now with one of six high-performing wall systems, each capable of achieving or exceeding R-40 (not including the added values of the siding, the drywall, or the surface-bound air layers). Each can be interpreted or varied in many ways. Although there are still other approaches to consider, I’m focusing on systems currently in use (or in development) in the northern United States, where the climate demands more efficiency from a structure.
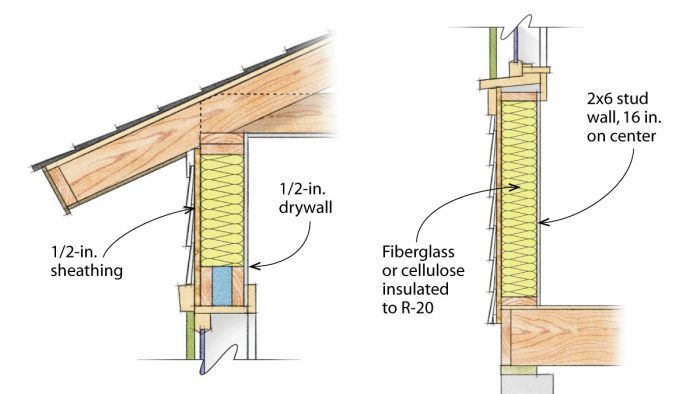
Would you rather have the standard R-20 wall?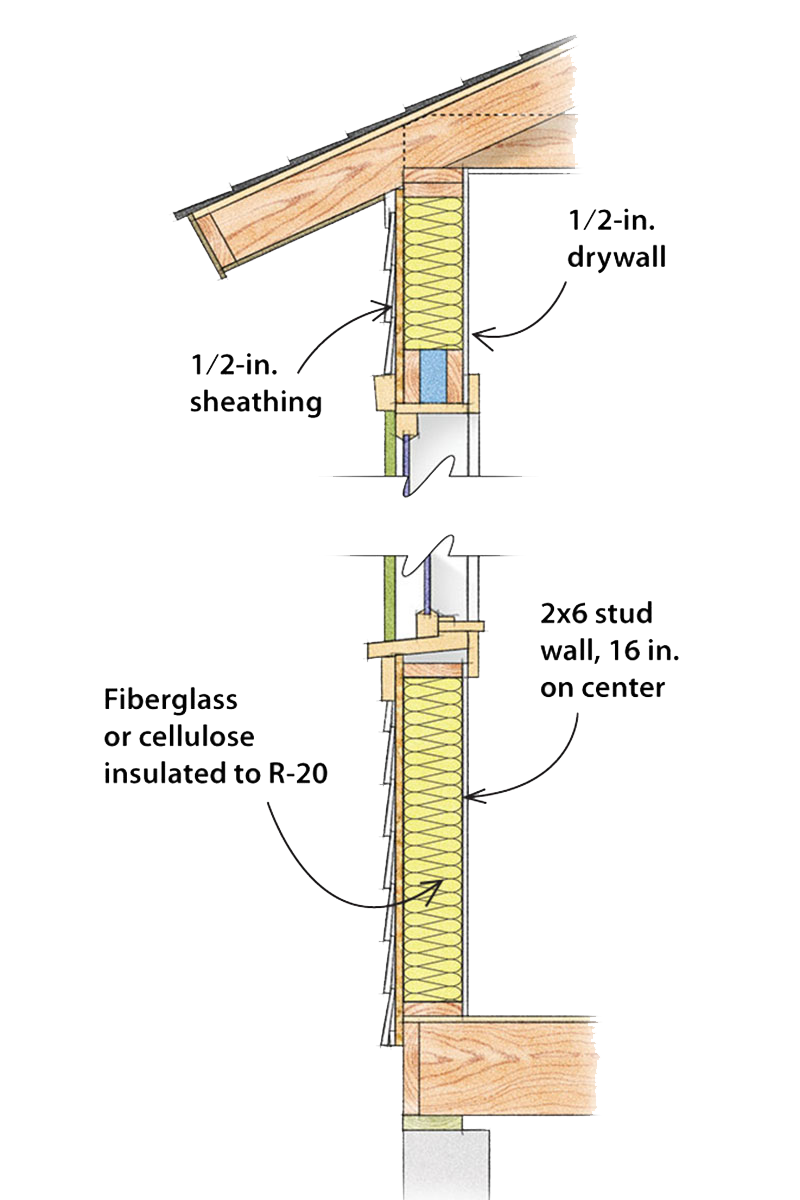 Code-minimum walls are framed and insulated conventionally, and are prone to air leaks and thermal bridging. The 2009 IRC requires that a residential structure in a heating climate (zone 5) must have the following R-values: Windows: R-2.8 Slab: R-10 Basement walls: R-10 Wood-frame walls: R-20 Roof: R-38 You can save energy with R-40Progressive builders and designers have redefined what it means to build an efficient envelope: Windows: R-5 Slab: R-10 Basement walls: R-20 Wood-frame walls: R-40 Roof: R-60 |
Efficient wall assemblies depend on airtightness, moisture storage, and drying potential
Air leaks are a wall’s worst enemy. In cold-climate, high-R buildings, the exterior sheathing spends a significant portion of the year below the dew point of the interior air because of heavily insulated walls. If warm interior air leaks out through the wall cavity, the moisture it carries will condense on the sheathing and can result in rot and mold growth. Great care must be given when air sealing to achieve less than 1 air change per hour at 50 pascals (1 ACH50), or less than 0.1 cfm of air leakage per square foot of shell area. This is five times tighter than the Energy Star airtightness standard and creates the need for mechanical ventilation.
In each of the following wall-system examples, the air barrier must extend unbroken up and across the roof or ceiling, and down to the basement wall or floor slab.
There also can be no water leaks in high-efficiency walls. Windows should be installed on full sill flashing and have wrapped jambs. If the wall does get wet, it should be able to store moisture, then gradually dry either to the interior or exterior and endure for decades. A wall must lose rather than gain water over the course of a year. Of course, it’s best that the wall not get wet in the first place. But think of such recuperative capability as a form of insurance that is designed and built-in rather than purchased afterward.
Cost is relative
An energy-efficient wall system should contribute to lower heating and cooling costs. It also should reduce energy loads on mechanical systems so that smaller, less expensive heating and/or cooling units can be integrated into a house. In some cases, a central-heating system can be eliminated, and the house can rely on point-source space heaters. Beyond cutting down on energy consumption, a well-built wall system reduces drafts and maintains interior relative-humidity levels, which increases overall comfort.
Of course, all this comes at a cost, which is substantially higher than if the walls are built to code minimums. Finding this balance is what makes the cost equation difficult. Even among the six wall systems shown here, useful cost comparisons are hard to make because they depend on contractor familiarity and on regional markets. I think one thing is ultimately true: In smaller, open-plan houses where these high-performance walls will permit eliminating a central-heating system, the cost premium will be retrieved, even without staggering fuel-price escalations.
*To see full details of all of the illustrations, click View PDF at the bottom of this page*
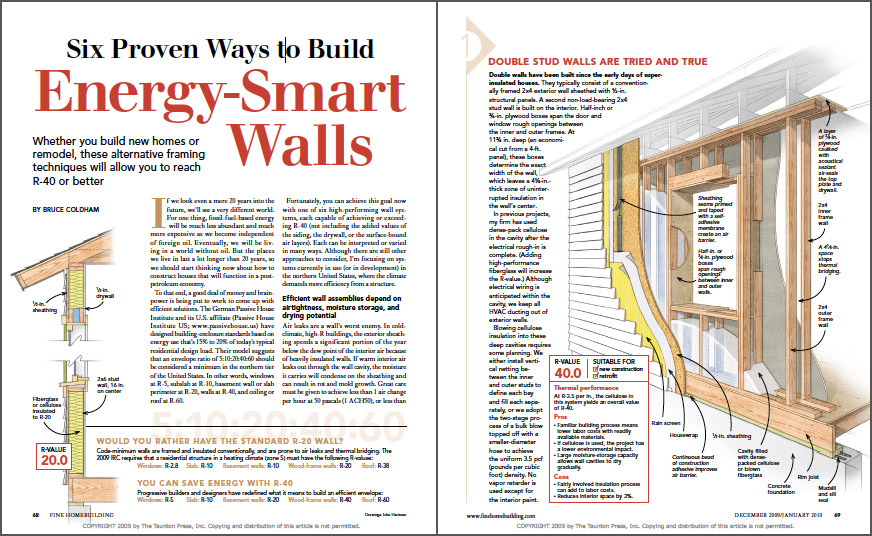
1. Double stud wall are tried and true
R-Value 40Suitable For: New construction and RetrofitThermal performance At R-3.5 per in., the cellulose in this system yields an overall value of R-40. Pros • Familiar building process means lower labor costs with readily available materials. • If cellulose is used, the project has a lower environmental impact. • Large moisture-storage capacity allows wall cavities to dry gradually. Cons • Fairly involved insulation process can add to labor costs. • Reduces interior space by 3%. |
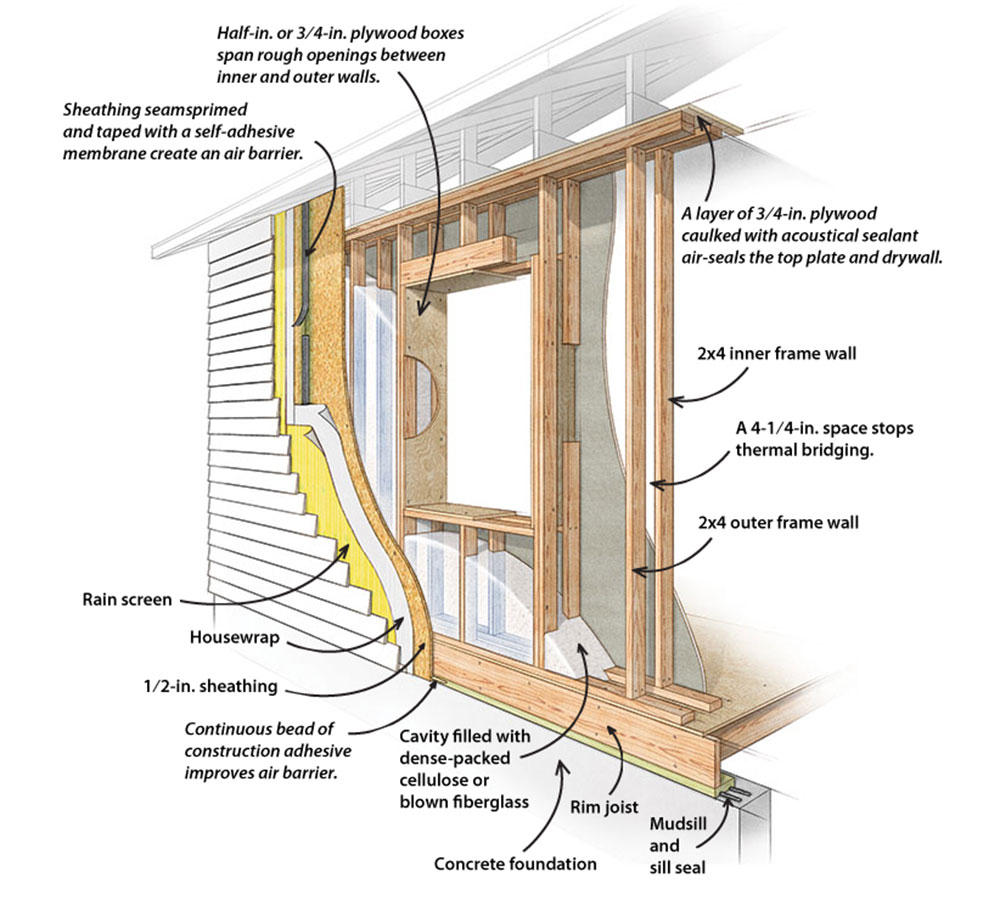
Double-stud walls have been built since the early days of super-insulated houses. They typically consist of a conventionally framed 2×4 exterior wall sheathed with 1/2-in. structural panels. A second non-load-bearing 2×4 stud wall is built on the interior. Half-inch or 3/4-in. plywood boxes span the door and window rough openings between the inner and outer frames. At 11-3/4 in. deep (an economical cut from a 4-ft. panel), these boxes determine the exact width of the wall, which leaves a 4-1/4-in.-thick zone of uninterrupted insulation in the wall’s center.
In previous projects, my firm has used dense-pack cellulose in the cavity after the electrical rough-in is complete. (Adding high-performance fiberglass will increase the R-value.) Although electrical wiring is anticipated within the cavity, we keep all HVAC ducting out of exterior walls.
Blowing cellulose insulation into these deep cavities requires some planning. We either install vertical netting between the inner and outer studs to define each bay and fill each separately, or we adopt the two-stage process of a bulk blow topped off with a smaller-diameter hose to achieve the uniform 3.5 pcf (pounds per cubic foot) density. No vapor retarder is used except for the interior paint.
2. Larson trusses create an exoskeleton
R-Value 39.5Suitable For: New construction and Retrofit Thermal performance Used in this system, cellulose (at R-3.5 per in.) yields an overall value of R-39.5. Pros • Continuously protected air barrier keeps wall cavity dry. • Large moisture-storage capacity allows wall to dry gradually. • During retrofits, interior walls can remain intact. Cons • Unconventional framing can increase production time and labor costs. • Increases the gross building area by 3%. |
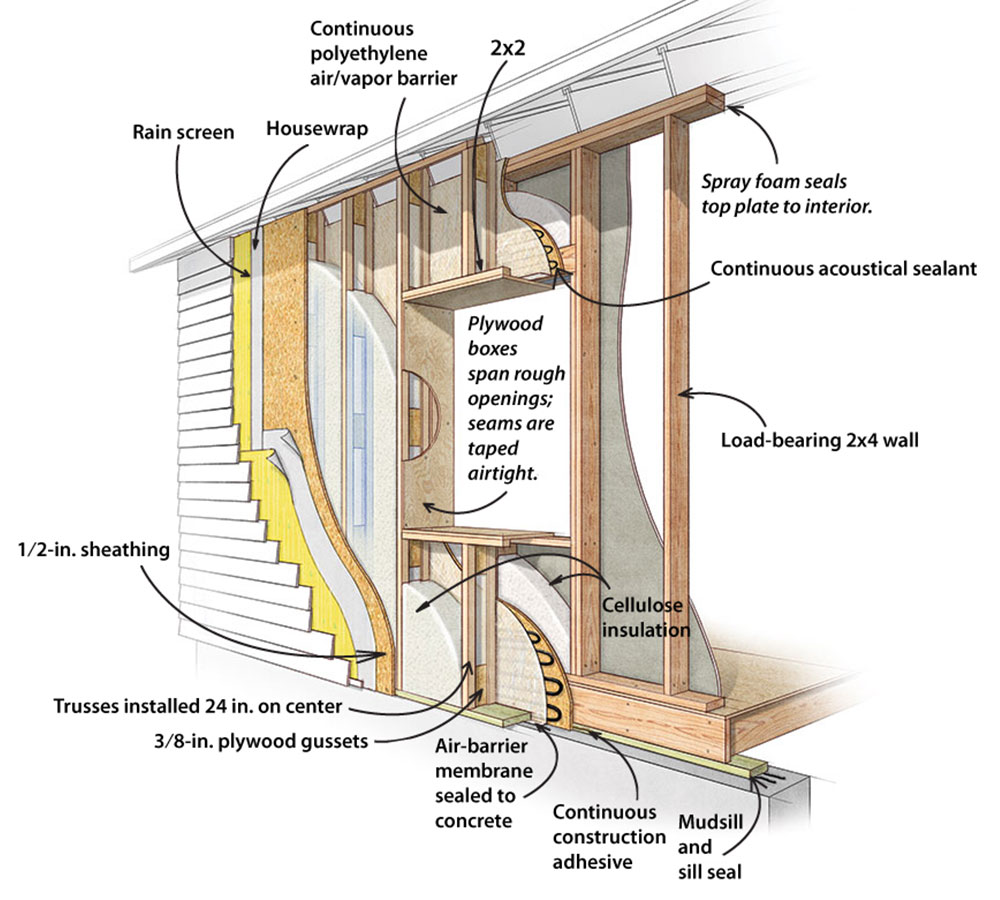
Like the double stud wall, a Larsen truss wall creates a thick outer wall cavity, which gets filled with blown-in insulation (typically cellulose, fiberglass, or mineral wool). A load-bearing 2×4 frame wall is sheathed with 1/2-in. plywood or OSB. An 8-in.-deep exoskeleton frame is attached to the load-bearing wall and is supported on a wide foundation wall. The floor deck and bearing wall are held to the inner half of the foundation wall. Both are insulated in retrofits. The truss exterior is not supported by the foundation and is sealed with a plywood bottom plate. A plastic air barrier and a vapor-retarding membrane are wrapped around the entire outside of the sheathed 2×4 frame and are sealed to the sill plate or directly to the concrete foundation wall. The assembly is made to dry both to the outside and the inside. The outer Larsen truss wall is typically made on site and creates an uninterrupted cavity filled with dense-pack cellulose. The insulation is blown through holes in a second exterior layer of sheathing.
Because the double-wall system is easier to air-seal, we primarily use the Larsen truss as a retrofit option. As with the double-wall system, 1/2-in.- or 3/4-in.-deep plywood boxes are fabricated to span the rough openings, and here, they also provide an additional measure of rigidity to the exoskeletal framing. The 2×4 wall inside the air barrier can be penetrated with utilities without compromising the airtightness of the house.
3. Inspired by the passive house, walls made of engineered lumber
R-Value 44Suitable For: New construction Thermal performance Insulated with cellulose: R-36.0. Insulated with high-performance fiberglass (R-4.5 per in.): R-44.0 Pros • Optional 2×3 insulated wall and high-efficency fiberglass give potential for even higher R-values. • Large capacity for moisture storage allows the wall cavity to dry gradually. Cons • Panels are often manufactured off site, trucked to site, and craned into place, which all add to cost. • Design may be subject to joist manufacturers’ approval. |
This system of framing thick walls with I-joists was used by Katrin Klingenberg to introduce the German Passive House program to the United States. Klingenberg’s walls are built with 12-in.-wide I-joists as studs. The interior sides of the I-joists are sheathed with OSB that serves as the primary air barrier. The exterior of the I-joists is sheathed with structural fiberboard, which is vapor permeable and allows the wall cavity to dry to the exterior. These sheathings also give the I-joist wall a boxbeam-like structural integrity. It pays to specify the window placement and widths so that rough openings fall between the regular stud spacing. The wall is supported on a concrete slab.
Walls can be site-constructed as panels and tipped up with the help of a crane. However, Klingenberg prefers to prefabricate double-story panels of about 8 ft. in width and to fill the wall cavities with high-efficiency blown fiberglass (R-4.5 per in.). (Cellulose also can be used.) The panel junctions are designed with an overlap that is glued and then taped to ensure that the enclosure stays airtight as it is assembled.
If you’re pursuing the Passive House standard, a 2×3 wall built on the interior of the wall panels and insulated with damp-spray cellulose can support the second-floor joists and position the electrical and plumbing inside the air barrier. Having the vapor-retarding OSB sheathing slightly insulated from the interior-wall surface helps to eliminate moisture issues during the cooling season.
4. A spray-foam shell encases the house

R-Value 41.5Suitable For: Retrofit Thermal performance A combination of 4.5 in. of exterior spray foam at R-5.6 per in. over a 2×6 interior frame, 24 in. on center and filled with cellulose at R-3.5 per in., yields a value of R-41.5. Pros • Easily applied to retrofits of many building types. • Cured foam forms an air and vapor barrier and rain-screen wall. Cons • Spraying conditions are weather dependent and could affect scheduling. • Unusual technique can create higher labor costs. |
This approach, which involves framing a new wall outside of an existing wall and filling the outer wall with spray foam insulation, is particularly well suited to a deep-energy retrofit. Developed by John Straube, a building scientist and construction consultant based in Waterloo, Ontario, the system consists of vertical 2×3 furring spaced off existing exterior walls, then set in place with closed-cell spray foam. According to Straube, the furring needs only a minimum of attachment strength and stiffness.
The key to this system’s strength is the closed-cell polyurethane foam sprayed around the furring. The density of the cured foam is sufficient to stabilize the furring and carry the load of the cladding. Indeed, beyond stabilizing the furring, the foam provides a continuous insulation blanket and an air barrier around the building.
The sprayed foam is installed to spill up over the existing wall’s top plate to seal against the top side of the ceiling drywall, which forms the air barrier. Straube does not advocate any exterior rain-screen or drainage planes. The lap siding is attached directly to furring substantially embedded in the foam. In turn, the foam is applied so that its cured surface is recessed 1/2 in. to 3/4 in. below the face of the furring, leaving an airspace behind the siding, which is vented top and bottom.
5. A double layer of rigid-foam panels blankets the exterior
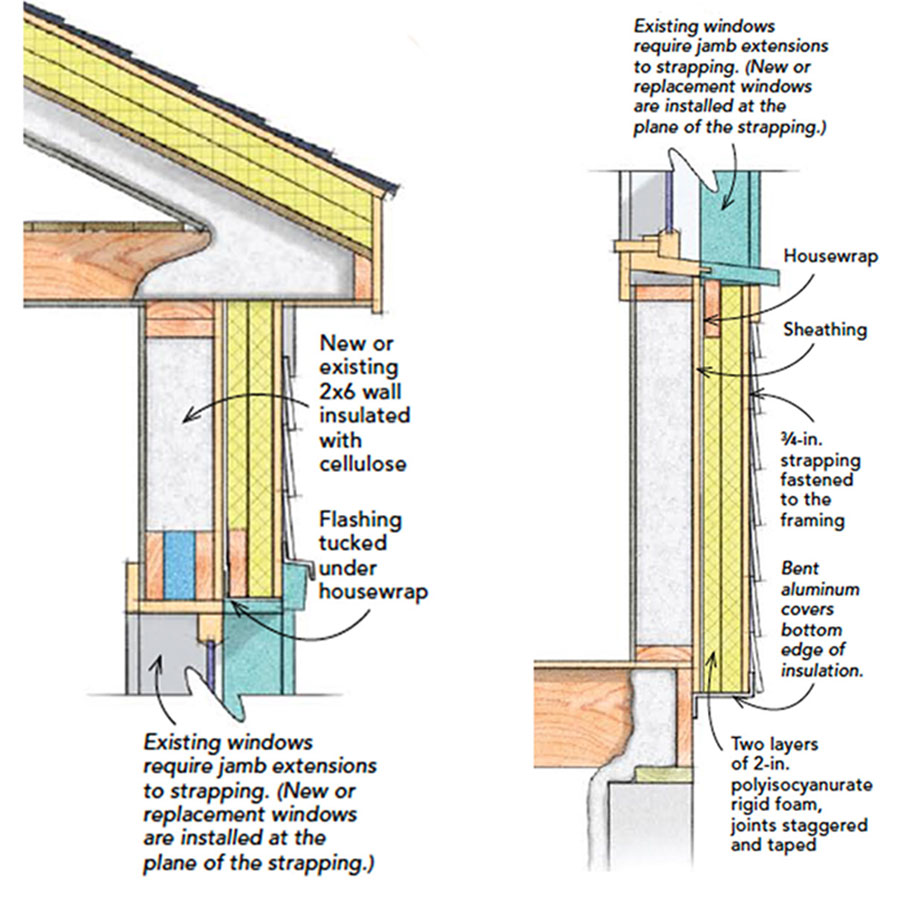
R-Value 40Suitable For: New construction and Retrofit Thermal performance Rigid foam: R-6 per in., 4 in. over 2×6 stud frame filled with cellulose; R-3.5 per in., R-40.0. Pros • Readily available materials. • Placement of air barrier and drainage plane is adaptable to the situation. • Relatively low-tech system can reduce labor costs. Cons • Modest moisture-storage capacity. |
Conceptually, the most simple of the six systems, this technique of wrapping a house with rigid foam insulation is particularly well-suited to retrofits or for enhancing conventionally framed new construction. In an approach developed by architect Betsy Pettit of Building Science Corporation, a double layer of 2-in. polyisocyanurate insulation is applied directly to the studs and is held in place with vertical 1x4s screwed to the framing.
With this system, the drainage plane and the air barrier can be either in front of or behind the rigid insulation. The decision largely depends on the windows and, specifically in a retrofit, whether they are kept or replaced. If the existing windows are kept, the drainage plane (and therefore the air-barrier membrane) should be installed on the exterior of the existing sheathing before the insulation is applied. This detail eliminates the need to tape the joints of the insulation panels.
For new construction (or for a retrofit that involves window replacement), the windows are best located in the plane of the applied 1×4 furring. The drainage plane is created by taping the insulation-panel joints. The air barrier can be established at the exterior, or it can remain behind the insulation, either as a sealed membrane or as taped joints of the wall sheathing.
6. Structural insulated panels (SIPs)
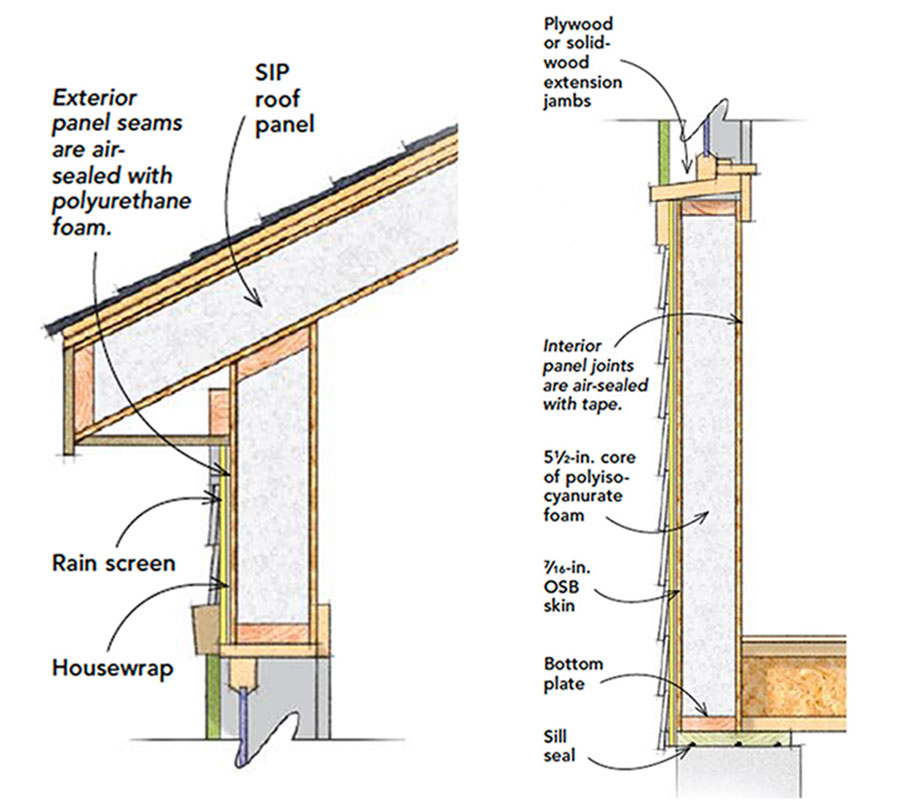
R-Value 40Suitable For: New construction Thermal performance A core of 73⁄8-in.-thick XPS (R-5 per in.) yields R-38. A core of 5-1 ⁄ 2-in.- thick polyiso-cyanurate (R-5.8 per in.) yields R-40. Pros • Once on site, panels assemble very quickly. • Typically thinner wall profiles. Cons • Polystyrene’s by-products include toxins such as HBCD, benzene, and toluene. • Vulnerable to moisture degradation. • Electrical installation can be tricky. |
Structural Insulated Panels (SIPs) are manufactured panels consisting rigid-foam insulation sandwiched between two skins of 7/16-in.-thick OSB. The best-performing foam core is polyisocyanurate. Chemical additives—in particular the brominated fire retardant HBCD—in polystyrene (EPS and XPS) make polyiso a better choice from a human- and environmental-health standpoint. Polyiso foam is also a more resourceful choice. The panels are typically constructed on a custom basis with rough openings blocked out, which reduces the waste that accrues from blank XPS core panels cut on site.
The OSB facings are particularly susceptible to degradation if they get wet. Therefore, SIPs require special attention during construction to keep them dry. It’s also extremely important to air-seal the panel joints with face-applied SIP tape to prevent moisture-laden interior air from reaching the exterior skin.
Joe Lstiburek says, “The best way to deal with the limited (almost nonexistent) moisture-storage capacity of SIPs is to ventilate exterior claddings and to add a vented ‘overroof.’ With those two additions, SIPs becomes pretty indestructible.”
Bruce Coldham is a principal of Coldham & Hartman Architects (www.coldhamandhartman.com) in Amherst, Mass.
Drawings: John Hartman.
From Fine Homebuilding #208
To view the entire article, please click the View PDF button below.
Fine Homebuilding Recommended Products
Fine Homebuilding receives a commission for items purchased through links on this site, including Amazon Associates and other affiliate advertising programs.

Portable Wall Jack

Stabila Classic Level Set

Bluetooth Earmuffs

View Comments
Did #5 in Northern Ontario with reclaimed roofing foam, 4" walls 6" roof, 1/2" ply, 2x6 studs and 2" closed cell foam. Simple, tight. Haven't moved in yet but love how stable the interior is.
I think #4 have an error because 4.5 inch of exterior closed-cell foam and 2x6 filled will yield way over R40 if you count R 6.5 per inch for closed cell foam, R50 assembly.
In Number 5 -- exterior rigid foam applied to exterior -- How can the drainage plane be behind the foam? If the insulation is tight against the sheathing any moisture that gets in there is hardly going to go anywhere. It won't be able to run down the face of the housewrap with closed cell foam pressed tight against it. When we nail clapboards or shingles to the wrap-on-top-of-sheathing, moisture may also have a hard time running down the wall face, but there is some drying potential thru the siding itself. With foam water is never going anywhere. Is that OK?