FHB Logo Facebook LinkedIn Email Pinterest Twitter X Instagram Tiktok YouTube Plus Icon Close Icon Navigation Search Icon Navigation Search Icon Arrow Down Icon Video Guide Icon Article Guide Icon Modal Close Icon Guide Search Icon Skip to content
Subscribe
Log In
  • How-To
  • Design
  • Tools & Materials
  • Restoration
  • Videos
  • Blogs
  • Forum
  • Magazine
  • Members
  • FHB House
  • Podcast
Log In
How-To

That Modern Look

Veneered wall paneling is popular for its clean style, but it's a surprisingly complex trim carpentry job to do well.

By Casey Knips Issue 329 - Feb/Mar 2025
Photo by Chelsie Lopez.

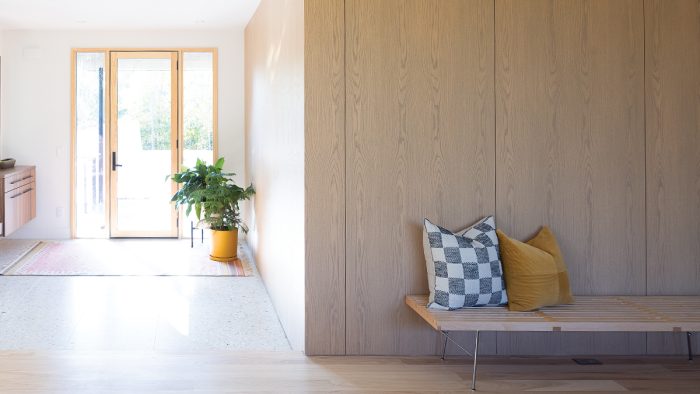
Modern wood wall paneling and flush doors bring a clean, seamless aesthetic, but achieving this look requires precision and planning. Casey Knips shares his approach to crafting veneered white oak paneling, starting with ensuring plumb, flat walls using engineered studs and plywood substrates.

He details the grain-matching, edge-banding, and specialized fastening techniques that make modern trim carpentry both challenging and rewarding. Pivot door hardware, custom jambs, and careful alignment contribute to the polished result. Knips emphasizes the importance of preparation, from planning to execution, showcasing the tools and methods that ensure success in complex modern trim projects.

Modern Trim Makes a Statement

From the look of the pocket doors in my first Fine Homebuilding article (FHB #325) and the style of this wall paneling, you might think that I specialize in modern trim. I don’t. I’m happy to tackle all styles of custom trim and cabinetry. But I’m grateful to have had the experience of tackling some projects with modern details like this red oak–veneered wall paneling that was designed by Sustainable 9 Design + Build, for whom I do a lot of work.

Big Doors Have Big Challenges: This project included two tall, flush, hidden doors that also received a veneered plywood panel to disappear into the walls. Building big, flush doors that won’t warp, will operate well for a long time, and are light enough that you don’t need a crane to install them is a challenging project on its own. Before cutting the doors to their final dimensions, installing the pivot-door hardware, and hanging them, all of which you’ll learn about here, I built the doors in my shop. That’s a story all its own, which I’ll share in the next issue of FHB. Photo by Chelsie Lopez.

These modern details are actually quite challenging and require their own planning process, material selection, an occasional new tool, and even some specialty fasteners. As with the pocket-door trim in my first article, I used clips to install these panels. Those clips were easy to work with because they are part of a self-indexing system, which means no measuring to locate the mating pieces, thereby reducing the likelihood of error.

Prep and Planning

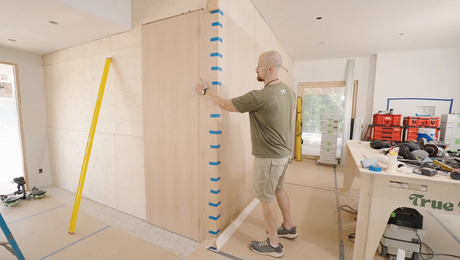
Even though I knew the finished look the builder was after, it took some time to work out all the installation details on paper. I also worked with the framers to get the two walls as plumb and square as possible. I asked them to use engineered studs, and I still shimmed the walls flat before installing a plywood substrate. Not only did I not want to do all this work just to have wavy walls of paneling, but a flat substrate is essential for the clips to mate and catch.

The panels are from a company called Navy Island. When I placed my order, I submitted a design board showing the dimensions and where I wanted to match the grain. The panels arrived numbered with a layout. I wrote the numbers on the plywood substrate to avoid mistakes. I did spend some time to make sure the grain lined up from the bottom panels to the top panels, but generally Navy Island did a great job with the veneer.

I edge-banded the panels and routed the edges to accept a solid red-oak spline. I made spacers to ensure even reveals, used a laser to align the panels horizontally, and scribed the panels that met the floor, walls, and ceiling. A lot of work was done before any panels were clipped into place, but it paid off—everything fit nearly perfectly and needed no adjustment, except maybe at the mitered outside corner, which I expected to be fussy.


Start With a Great Substrate

In any house, plumb walls and square corners are a goal. When another goal is a seamless modern look like this, a flat surface is also a must. The walls were framed with engineered studs because those are more stable than common lumber, and the framing was done with extra care. Because the crisp reveals and the fastener system used to install the panels rely on the walls being perfectly flat, I checked everything with a long level and then used a laser to shim the walls before installing the 1/2-in. plywood substrate.

Check for Plumb and Flat: To determine if shimming is necessary, I first check each stud for plumb and then turn my level horizontally to see how flat the wall is.

Use a Laser: I set up a line laser to find the high spot on the wall (the biggest belly) and use a gauge block to determine where to shim the wall out.

Card Tricks of the Trade: Plastic, shims, playing cards, and a two-sided tape dispenser make easy work of small adjustments.

Glue and Screw: After applying a healthy bead of construction adhesive along each stud, I fasten the substrate with countersunk screws.

Install Doors Before Paneling

The panels interact with the door jambs; where they meet on the hinge side, the panels are given a rabbet that overlaps the jamb’s edge. So the door jambs needed to be installed first. And because of my installation sequence for the doors, they needed to be hung before jambs were fastened off. I used pivot-door hardware from Rixson for the doors. After a little work on my bench, I installed the jambs with just a couple screws and then installed the door. Once the door was hung and operating properly, I shimmed the jamb for a perfect gap around the door and fastened it with screws.

Mill the Parts: The jamb legs and head are milled from solid red oak in my shop and cut to size on-site. I ease all the edges with a slight roundover.

Mortise for Hardware: The pivot-door hardware needs to be mortised into the head jamb, so I do this on my worktable before assembling the jamb.

Assemble and Install: With glue and screws, I assemble the jamb on my bench and install it into the opening as a unit.

Pivot Point: After taking careful mea-sure­ments and drilling pilot holes in the terrazzo floor, I fasten the bottom mount of the pivot-door hardware to the floor.
Easier Than Math: Instead of measuring the length of the door opening and subtracting the undercut, I put my tape on a gauge block that equals the undercut. Then I can run with the measurement I read. I cut the door length with a track saw.
Set and Seal: I install the final pieces of pivot-door hardware in mortises in the top and bottom of the door and seal the top and bottom edges with spray-can shellac before installing the door.

Dial ‘Em In: Once the door is installed, I adjust the hardware to make sure it is operating properly. Then I shim the jamb to set the gap around the door and secure it with screws driven on an angle through the plywood substrate.

The Panels Need Some Prep

Even though, given my shop drawings, I had a good idea of the final panel dimensions, I ordered the veneered MDF panels a bit oversized. I wanted the ability to cut everything to final dimensions on-site and change any panel sizes if needed. Because none of the panels were used at full width, I was able to cut a straight edge on each panel and then a perfectly parallel edge. The more perfect the panels are, the more perfect the reveals will be. I edge-banded the panels, and most of them were grooved for a spline. When I needed a rabbet to meet the door jambs, I added a solid red-oak strip before routing the rabbet. I also added a solid wood strip to the bottom of the panels so that they would bear on the floor and not be completely reliant on the clips to hold them up.

Straight and Parallel: I first cut a straight line along one edge of the panel and then use my TSO parallel cut guides to align the track and trim the other edge.

Too Many Edges to Iron: I’ve ironed on a lot of edge banding, but projects like this make investing in the Festool Conturo a no-brainer. I trim the edge banding with a router and ease the edge with a light sanding.

Groovy Move: All the edges of panels that align with other panels get a groove on the long edges and the top edge to accept a spline during installation.

Solid Rabbets: The panel edges that meet the door jambs are rabbeted. The easiest way to do this without having exposed MDF is to add a solid red-oak strip before routing the edge.

Block the Bottom: The last thing I do before installing the panels is add a strip of solid wood to the bottom, set back from the front edge, so that the panel will bear on the floor but the blocking will not be visible.

Clips Instead of Measuring

The obvious reason to use clips to install the panels is to conceal the fasteners. But there’s a lot to like about this system from Fastmount. It includes both mating clip pieces, self-indexing pins, and the tools to drill for and install the clips.

The self-indexing pins mean that once I have the female side of the clips installed on the wall with the pins inserted, I can lift the panel into place, press it firmly against the pins, and know exactly where the mating male pieces should be installed on the back of the panel. There’s no measuring, and as long as I have the panel where I want it before pressing it into the pins, there are no errors. To align the panels, I scribed them to the ceiling, walls, and floor first, and used gauge blocks to ensure the reveal.

Scribe First: Before the panels can be marked for fasteners, they need to be perfectly aligned. That means scribing the blocking to the floor and the edges that meet the ceiling and walls. I use a strip of painter’s tape, draw the scribe with a marking knife, cut the bulk of the scribe with a track saw, and then work to the tape line with an angle grinder.

1. Drill holes approximately 16 in. on center.

2. Install female half of clips.

3. Inset indexing pins.

4. Align panels carefully.

5. Tap on panels to make sure pins make indentations.

6. Install male half of clips at indexed location.

Install the Panel: I glue the spline into the groove in the mating panel before slipping the next panel into place and pressing firmly all around the panel until each clip is engaged.

Finishing Touches

The last two challenges I had to complete to get this project wrapped up were mitering and installing the outside corner pieces and attaching panels to the doors.

Miter Madness: I prepped each side of the miter and then made the cuts with my track saw set a bit beyond 45°. After a test fit, I glued both edges of the miter joint, installed the two panels, and used blue painter’s tape to clamp it until the glue set up.

Final Door Details: I needed the panels to be fastened to the doors a bit more securely, so I used a combination of Festool Domino tenons for alignment and Lamello Tenso clamping connectors (see “Beefed-up biscuit joints,” Tools & Gear, FHB #321) for their holding power. The door panel also has a rabbeted edge that lands on the jamb on the strike side, and the hinge side of the door has a deep roundover, a necessary detail for a pivot door.

— Casey Knips is owner and operator of True Fit Carpentry, a custom trim and cabinetry company in the Twin Cities. Photos by Brian Pontolilo, except where noted.

From Fine Homebuilding #329

RELATED STORIES

  • A Simple Approach to a Paneled Passageway
  • 7 Trim Carpentry Tips and Secrets
  • How to Lay Out a Paneled Fireplace Wall

Sign up for eletters today and get the latest how-to from Fine Homebuilding, plus special offers.

Signing you up...

This site is protected by reCAPTCHA and the Google Privacy Policy and Terms of Service apply.
See all newsletters
See all newsletters
×

Get home building tips, offers, and expert advice in your inbox

Signing you up...

This site is protected by reCAPTCHA and the Google Privacy Policy and Terms of Service apply.
See all newsletters
See all newsletters

New Feature

Fine Homebuilding Forums

Ask questions, offer advice, and share your work

Log in or create an account to post a comment.

Sign up Log in

Become a member and get full access to FineHomebuilding.com

Up Next

Video Shorts

Featured Story

FHB Podcast Segment: Gutter Covers 101

Gutter covers may be riskier than you think.

Featured Video

How to Install Exterior Window Trim

Learn how to measure, cut, and build window casing made of cellular PVC, solid wood, poly-ash boards, or any common molding material. Plus, get tips for a clean and solid installation.

Related Stories

  • Window Glazing with Traditional Putty
  • Making and Installing Wood Wall Paneling
  • Sand Smooth Contours
  • FHB Podcast Segment: Drywall-Free Half Wall Finish

Discussion Forum

Recent Posts and Replies

  • |
  • |
  • |
  • |
  • |
  • |
View More Create Post

Highlights

Fine Homebuilding All Access
Fine Homebuilding Podcast
Tool Tech
Plus, get an extra 20% off with code GIFT20

"I have learned so much thanks to the searchable articles on the FHB website. I can confidently say that I expect to be a life-long subscriber." - M.K.

Get home building tips, offers, and expert advice in your inbox

Signing you up...

This site is protected by reCAPTCHA and the Google Privacy Policy and Terms of Service apply.
See all newsletters
See all newsletters

Video

View All Videos
  • Window Glazing with Traditional Putty
  • Making and Installing Wood Wall Paneling
  • Building a Flush Interior Door With Carpenter Casey Knips
  • How to Repair Shrinking Crown Molding
View All

Walls

View All Walls Articles
  • FHB Podcast Segment: Drywall-Free Half Wall Finish
  • FHB Podcast Segment: Plaster Peeling Predicament
  • That Modern Look
View All Walls Articles

Fine Homebuilding Magazine

  • Issue 330 - April/May
    • Deck Details for Durability
    • FAQs on HPWHs
    • 10 Tips for a Long-Lasting Paint Job
  • Issue 329 - Feb/Mar 2025
    • Smart Foundation for a Small Addition
    • A Kominka Comes West
    • Making Small Kitchens Work
  • Issue 328 - Dec/Jan 2024
    • How a Pro Replaces Columns
    • Passive House 3.0
    • Tool Test: Compact Line Lasers
  • Issue 327 - November 2024
    • Repairing Damaged Walls and Ceilings
    • Plumbing Protection
    • Talking Shop
  • Issue 326 - October 2024
    • Paint Behind Strike Plates
    • Conceal Cut Ends
    • Ladder Slip Solution

Fine Home Building

Newsletter Sign-up

  • Fine Homebuilding

    Home building tips, offers, and expert advice in your inbox.

  • Green Building Advisor

    Building science and energy efficiency advice, plus special offers, in your inbox.

  • Old House Journal

    Repair, renovation, and restoration tips, plus special offers, in your inbox.

Signing you up...

This site is protected by reCAPTCHA and the Google Privacy Policy and Terms of Service apply.
See all newsletters

Follow

  • Fine Homebuilding

    Dig into cutting-edge approaches and decades of proven solutions with total access to our experts and tradespeople.

    Start Free Trial Now
    • Facebook
    • Instagram
    • X
    • LinkedIn
  • GBA Prime

    Get instant access to the latest developments in green building, research, and reports from the field.

    Start Free Trial Now
    • Facebook
    • YouTube
  • Old House Journal

    Learn how to restore, repair, update, and decorate your home.

    Subscribe Now
    • Facebook
    • Instagram
    • X

Membership & Magazine

  • Online Archive
  • Start Free Trial
  • Magazine Subscription
  • Magazine Renewal
  • Gift a Subscription
  • Customer Support
  • Privacy Preferences
  • About
  • Contact
  • Advertise
  • Careers
  • Terms of Use
  • Site Map
  • Do not sell or share my information
  • Privacy Policy
  • Accessibility
  • California Privacy Rights

© 2025 Active Interest Media. All rights reserved.

Fine Homebuilding receives a commission for items purchased through links on this site, including Amazon Associates and other affiliate advertising programs.

X
X
This is a dialog window which overlays the main content of the page. The modal window is a 'site map' of the most critical areas of the site. Pressing the Escape (ESC) button will close the modal and bring you back to where you were on the page.

Main Menu

  • How-To
  • Design
  • Tools & Materials
  • Video
  • Blogs
  • Forum
  • Project Guides
  • Reader Projects
  • Magazine
  • Members
  • FHB House

Podcasts

  • FHB Podcast
  • ProTalk

Webinars

  • Upcoming and On-Demand

Podcasts

  • FHB Podcast
  • ProTalk

Webinars

  • Upcoming and On-Demand

Popular Topics

  • Kitchens
  • Business
  • Bedrooms
  • Roofs
  • Architecture and Design
  • Green Building
  • Decks
  • Framing
  • Safety
  • Remodeling
  • Bathrooms
  • Windows
  • Tilework
  • Ceilings
  • HVAC

Magazine

  • Current Issue
  • Past Issues
  • Magazine Index
  • Subscribe
  • Online Archive
  • Author Guidelines

All Access

  • Member Home
  • Start Free Trial
  • Gift Membership

Online Learning

  • Courses
  • Project Guides
  • Reader Projects
  • Podcast

More

  • FHB Ambassadors
  • FHB House
  • Customer Support

Account

  • Log In
  • Join

Newsletter

Get home building tips, offers, and expert advice in your inbox

Signing you up...

This site is protected by reCAPTCHA and the Google Privacy Policy and Terms of Service apply.
See all newsletters
See all newsletters

Follow

  • X
  • YouTube
  • instagram
  • facebook
  • pinterest
  • Tiktok

Join All Access

Become a member and get instant access to thousands of videos, how-tos, tool reviews, and design features.

Start Your Free Trial

Subscribe

FHB Magazine

Start your subscription today and save up to 70%

Subscribe

We hope you’ve enjoyed your free articles. To keep reading, become a member today.

Get complete site access to expert advice, how-to videos, Code Check, and more, plus the print magazine.

Start your FREE trial

Already a member? Log in