Practical System for a Seismic Retrofit
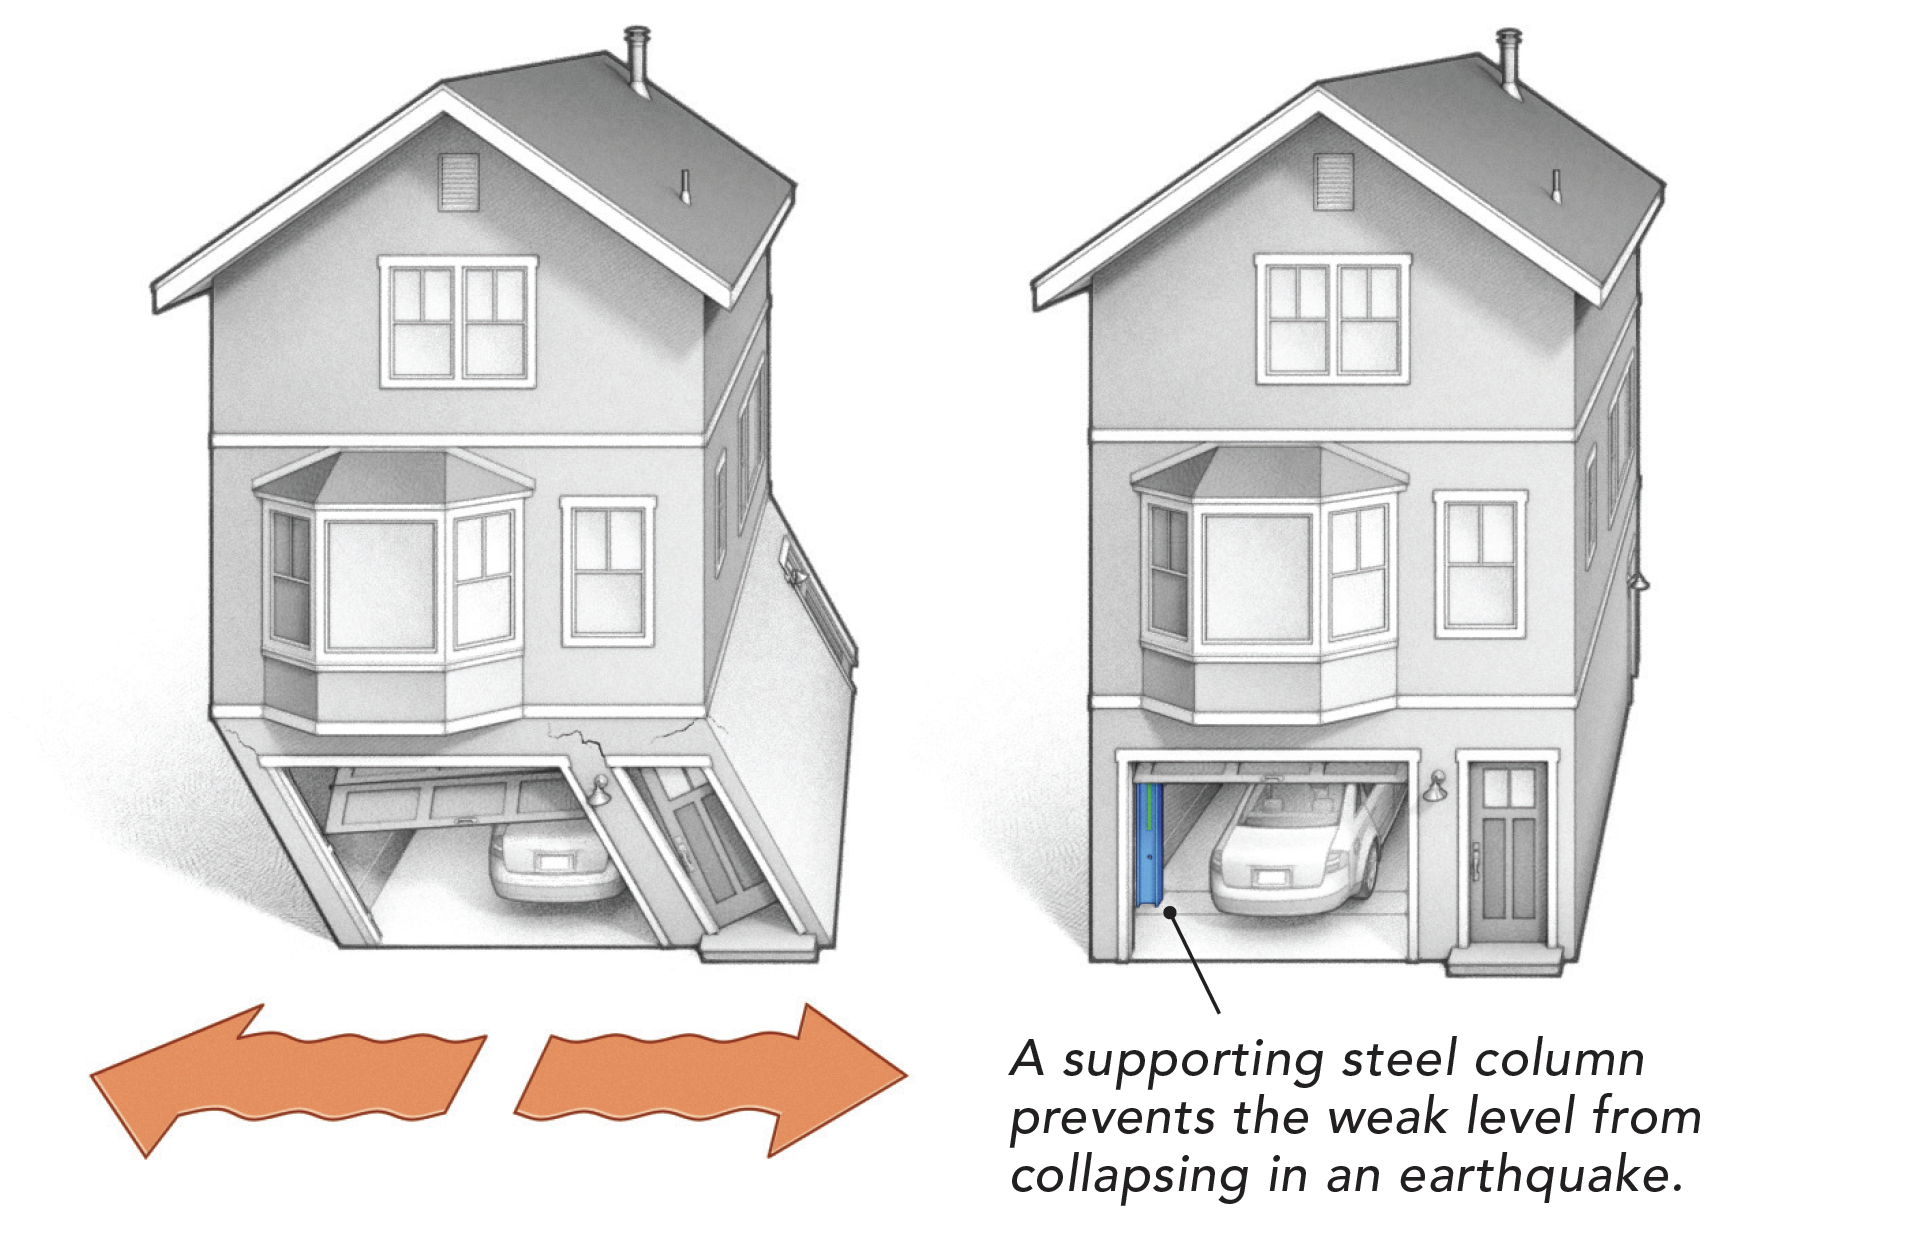
A single steel column on a reinforced footing keeps homes standing during an earthquake.
Synopsis: Julio Nieto of Nieto Valle Construction walks through the process of bracing an open-front building in California with a steel column on one side of the garage-door opening to strengthen the structure against earthquakes. The team installs a SkinnyBrace column from Quake Brace Mfg., first digging a massive footing to secure the column base and then mounting brackets between the joists to attach the column at the top. This article walks through the entire process, from lifting and bolting the column into place to connecting the column to the rebar cage, and discusses the cost of the project in comparison to other steel bracing systems.
My company specializes in retrofits that strengthen older buildings to resist earthquakes. We’ve done about 1000 over the years, with some designed by engineers and others that follow plans developed by local governments and FEMA. This retrofit project includes bracing a “soft story,” or “SWOF”—soft, weak, or open front—building, which is a type of building that’s very common in the Bay Area (see “What is a soft story?”). Currently there are no standard plans for such a retrofit, so the owners hired Chris Pioli of Clearheart Structural Engineering to design the new structural system. We have worked with Chris on about 20 projects over the years. Chris has experience in construction and we find his designs more practical to install than those from some other engineering firms without this background.
The traditional method for bracing a SWOF building is to install a steel moment frame in the weak wall. The frame includes two (sometimes more) steel columns, one on each side of the garage-door opening. A steel beam connects to the tops of the column and the pieces are usually welded together on-site. However, many SWOF buildings have something blocking the location where the frame would go—such as gas meters, electrical panels, water supply lines, sewer stacks, garage door and opener tracks, ducts, appliance flues, or fire-sprinkler pipes. In this case, there was not enough room above the garage door for a steel frame’s crosspiece.
When we encounter obstacles or low-headroom situations, we use the SkinnyBrace system from Quake Brace Mfg. The SkinnyBrace steel column fits into very narrow spaces from 8-1⁄4 in. to 13 in. wide. Another advantage of this product is that usually only one of them is needed. Finding space for a single vertical element in an existing garage is much easier than finding space for two or more steel columns and the beam to connect them.
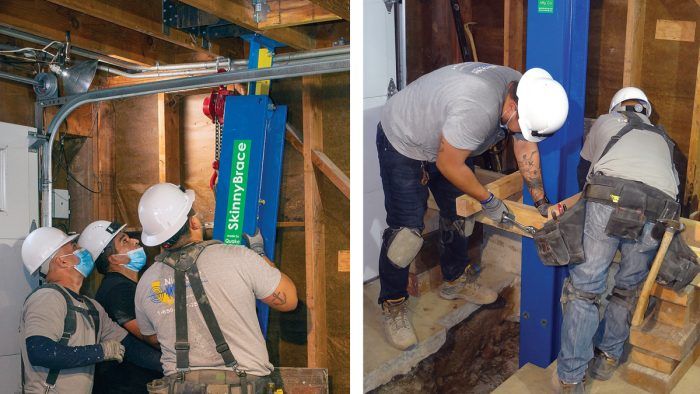
Handling the heavy column
Two options are available for connecting the column to the structural framing above the garage. One method uses a steel connection plate that fastens to the underside of a wood beam. The second method, used in this project, connects between a pair of floor joists. Usually we have to tear off some ceiling to expose the joists. This garage had exposed framing, which we later covered with 5⁄8-in. type-X (fire-resistant) drywall.
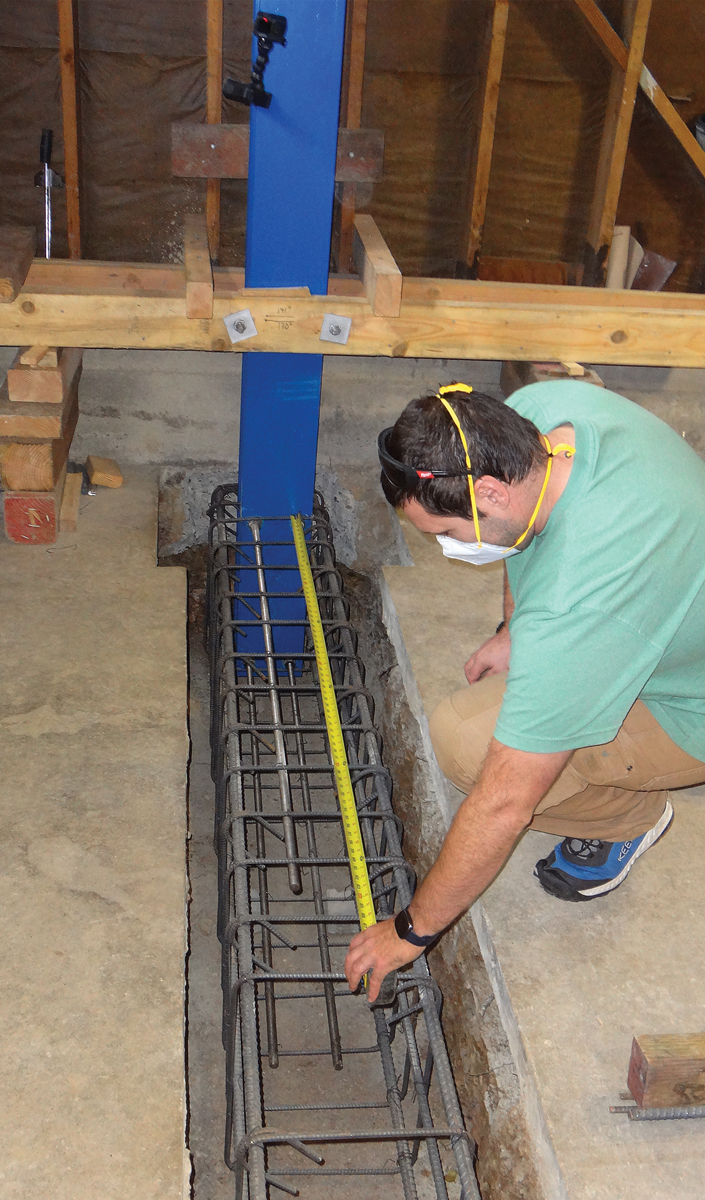
Once we picked a clear spot to locate the column, we dropped a plumb line from the center of the joist bay to the floor to mark the centerline of the footing and measured from the top of the slab to the bottom of the floor framing above. We provided this measurement to the manufacturer so they could fabricate the column to the necessary height.
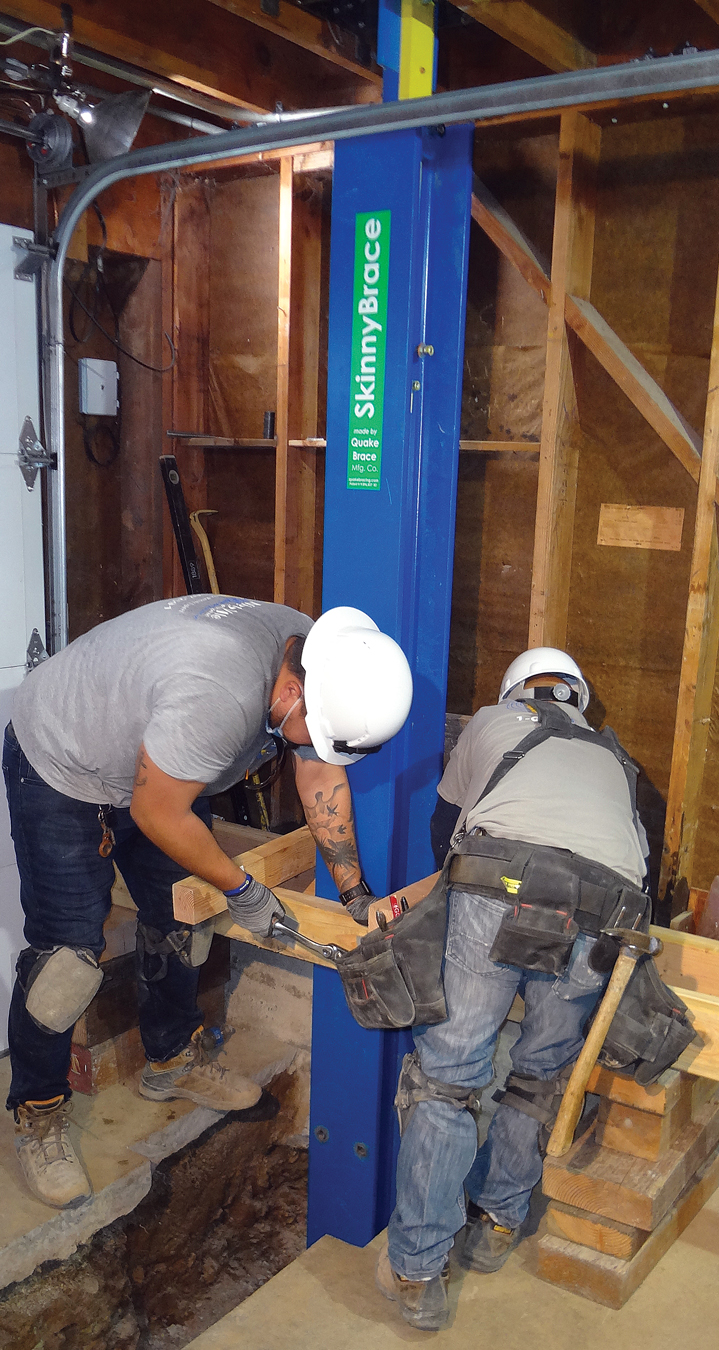
The lightest available SkinnyBrace weighs about 350 lb.; the one we used here weighs about 675 lb., and some are 1400 lb. or more. With a building overhead, using a crane to lift the column is impossible. Fortunately, there are support loops in the connection brackets that align with the centerline of the column. The manufacturer warns against slinging a chain over the connector brackets to use for hoisting. Doing so puts a twisting force on the joists, potentially splitting them and dropping a very heavy piece of steel on top of you. Lifting hoists should be left in place to support the column until its connection bolts are tightened. Depending on how much space we have to install the rebar cage around the base of the column, we may not want to fully tighten the bolts until later. This allows us to wiggle the base of the column slightly to make room for installing the rebar.
Prep for the column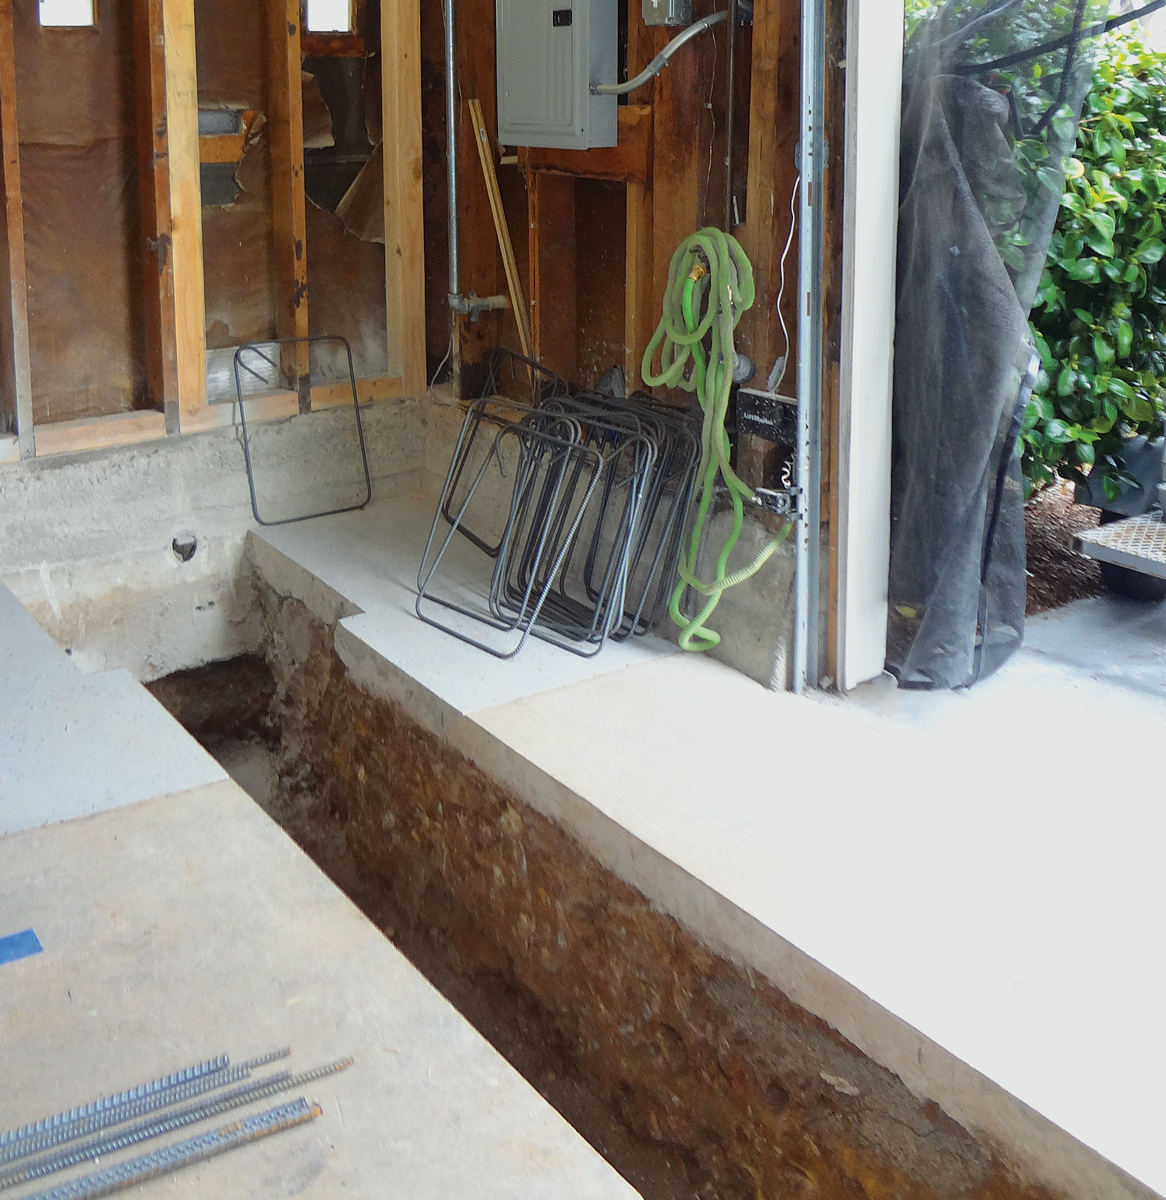 |

Making a massive footing
The column must be anchored to a footing that is strong and heavy enough that it won’t move during an earthquake. For this project, the engineer designed a dumbbell-shaped footing, which is the most efficient shape that meets the soil-bearing and overturning-resistance requirements with the least concrete. This shape also means less digging. Disposing of soil in the Bay Area—San Francisco especially—is expensive, easily costing $2000 or more. Cutting concrete to dig the footing is messy and requires special equipment. We use a hydraulic-powered wet saw with a diamond blade.
On this project we did not find any pipes or other buried treasure when digging the new footing. Sewer and water pipes are usually not too much trouble to deal with—we just wrap them with a few layers of foam and place the concrete around them. Gas pipes are another matter. Many older houses in the Bay Area have gas risers that come up inside a crawlspace or garage, which is no longer allowed and the riser should be moved outside the building before the footing is poured.
As the earthquake forces try to rock the column back and forth, it wants to break out of the end of the footing. The anchorage and footing reinforcement prevents this breakout in two ways. First, the base of the column is anchored into the footing with four horizontal high-strength threaded rods. For this project, the all-thread is 3⁄4 in. diameter, 6 ft. long, with matching high-strength nuts. The threaded rod is ASTM F1554 Grade 105, which is about three times stronger than standard all-thread. The second way the column is secured in the footing is with the rebar cage, which includes lengthwise top and bottom “U”-shaped bars that wrap around the column base.
Tying rebar in a trench with pliers is no fun; we use twisters with prelooped wire ties to speed up the process. We wire-tie the all-thread rod at every point that it crosses the rebar cage—this is important because it helps to electrically bond all the steel together. (For more on this, see Code Check Electrical by The Taunton Press.)
Sometimes a sewer line blocks us from using full-length reinforcing bars. We really don’t like to touch existing plumbing, so instead of cutting and patching the pipe after we install the rebar, we use specified Bar Lock rebar splices. These are heavy steel sleeves with pointed bolts threaded into the side of the sleeve. The bolts tighten against the rebar and force it against teeth on the opposite side of the sleeve. The bolts are tightened until their heads break off, showing the inspector they are fully tightened. Bar Locks are expensive and slow to install, but lap splices may be several feet and nearly as difficult to arrange around pipes as full-length rebar.
With all the rebar tied and the bolts at the top of the column fully tightened, it’s time for a special inspection. In our case, Chris performed the inspection, but sometimes the project engineer designates a third-party agency. Once everything is approved by the special inspector and the city, we can place and finish the concrete.
Raise the column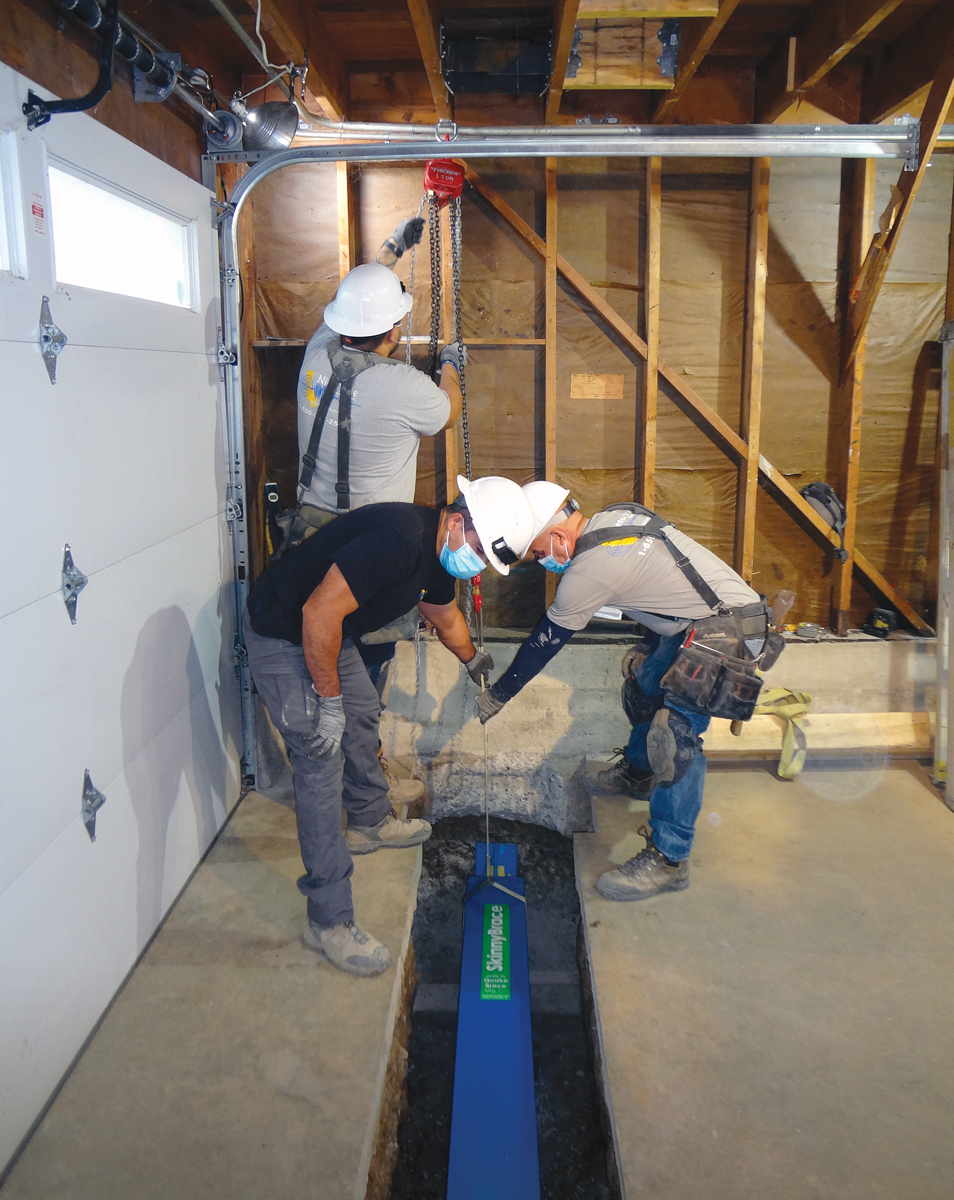 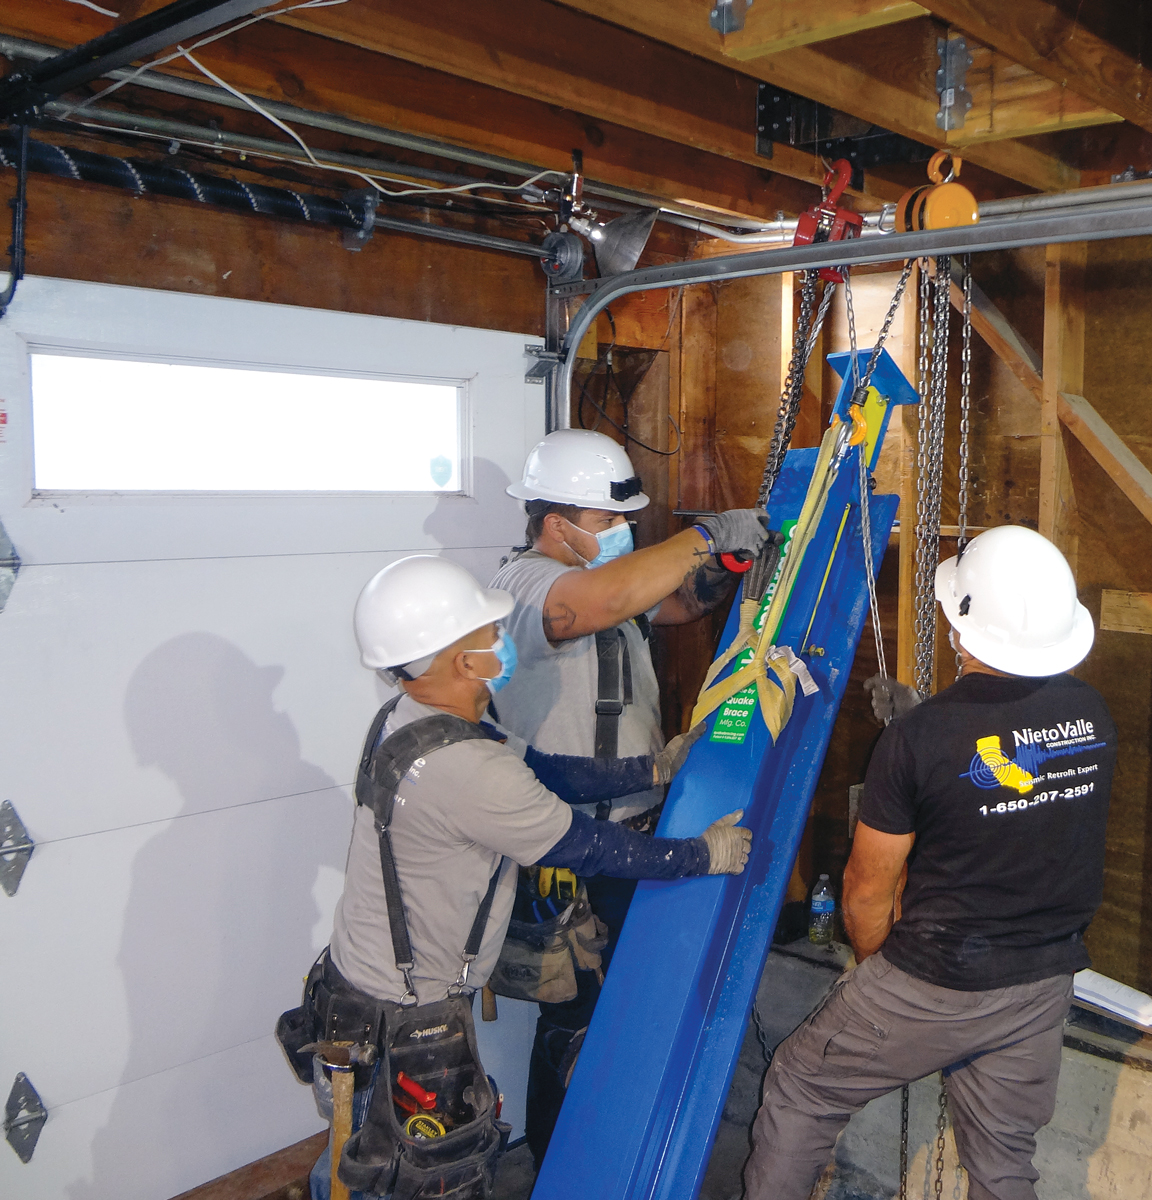 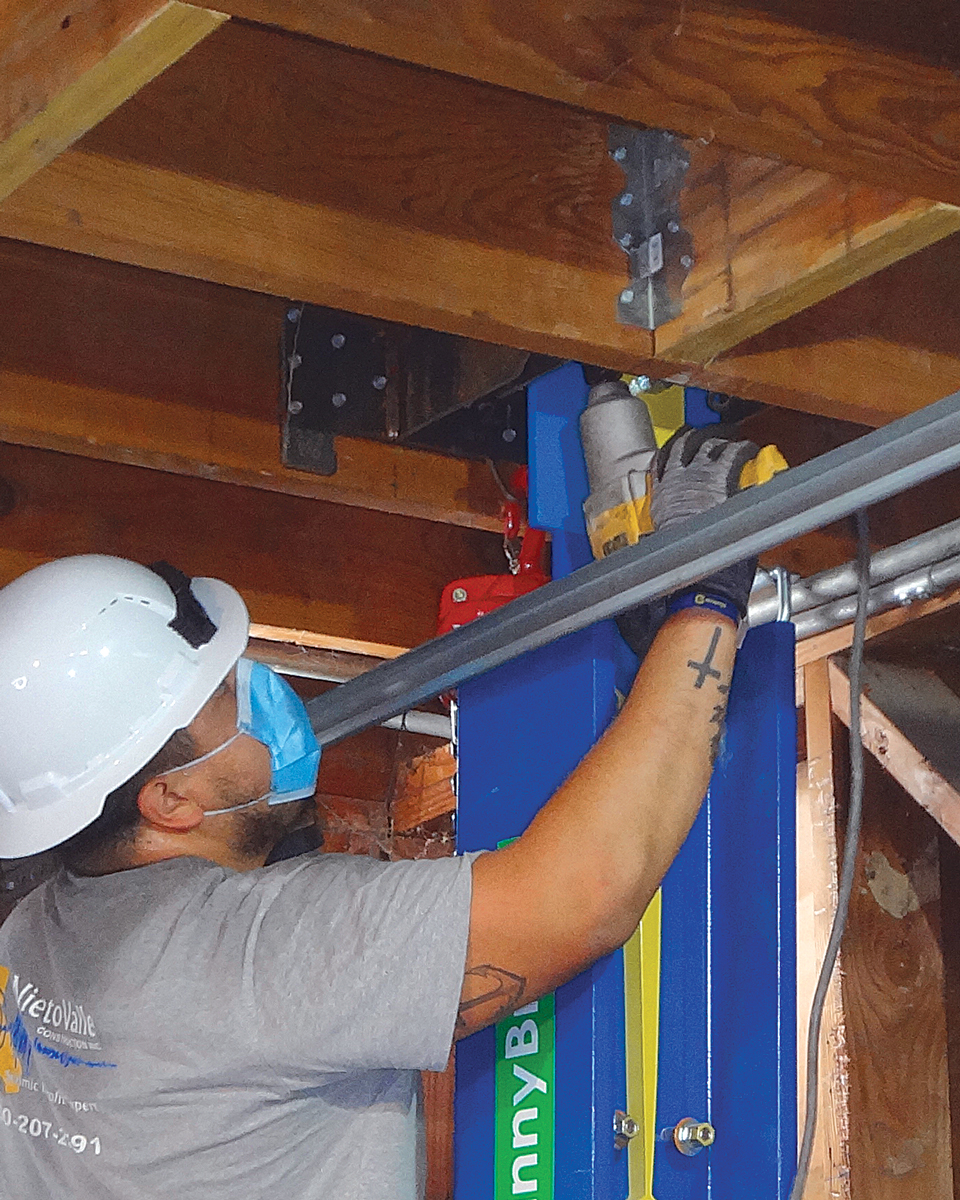 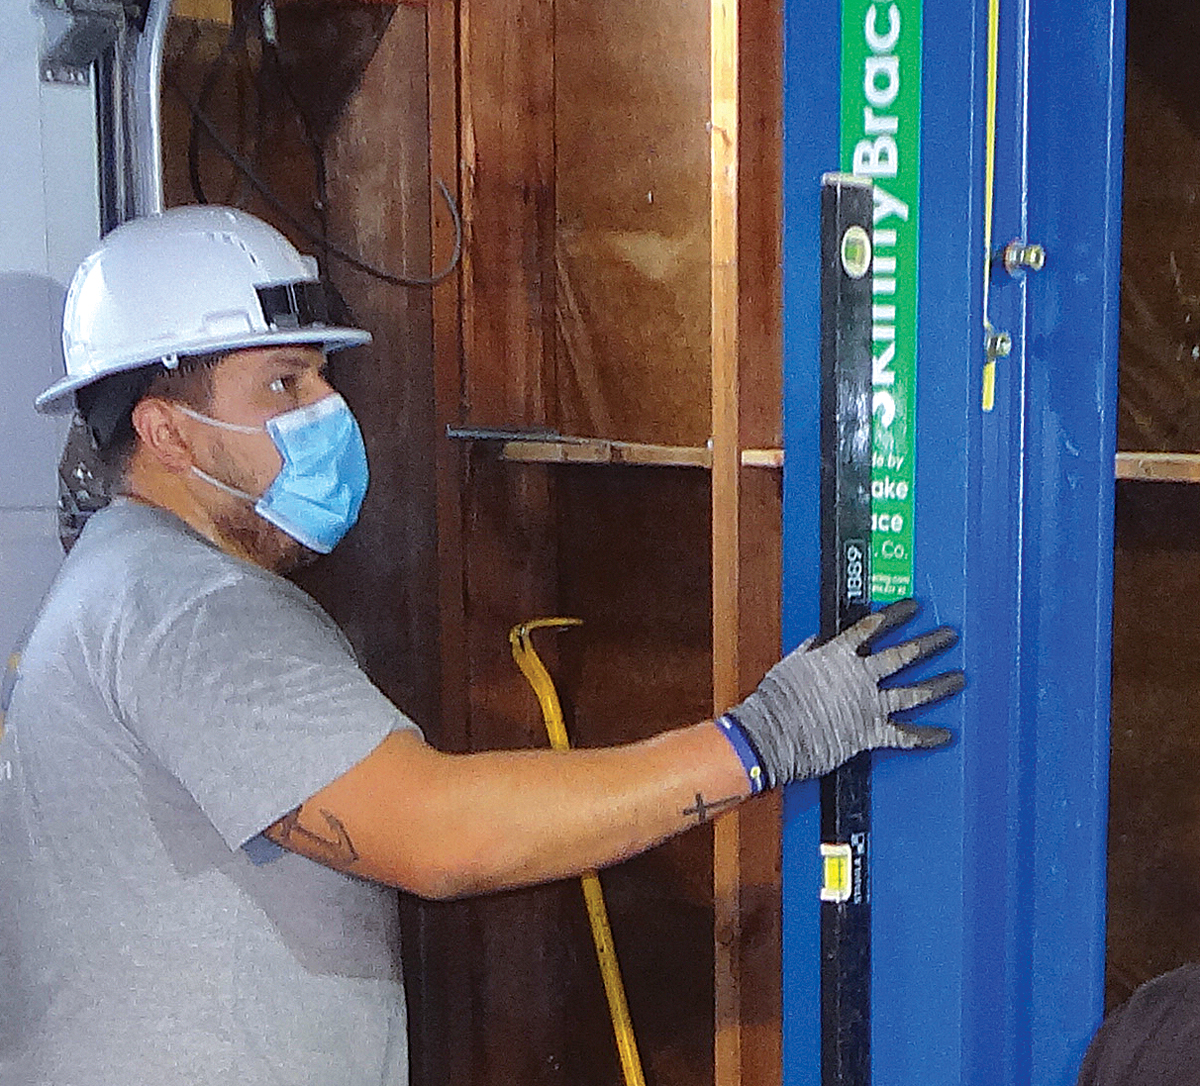 |
Why this method?
The cost of the SkinnyBrace for this project, including the brackets for connecting to the joists, was $7885 including tax, with an additional $368 for labor to drill the holes in the base of the column for the all-thread connections. We paid for the drilling because the column flanges were almost 1 in. thick and we needed eight holes. This price is similar to the cost of other steel bracing systems, but in most situations the single column is easier and so less expensive to install. The manufacturer stocks commonly used sizes, so it only took us a few days to receive the column, which is much quicker than the lead time for other manufactured retrofit systems.
I also like SkinnyBrace’s “structural fuses,” which absorb an earthquake’s energy so nothing else fails in the system. The fuses can be replaced by removing three bolts, while other bracing systems may need to be replaced entirely, including the footing—and finding a contractor to do this work after a big quake could take months or years.
Connect the column to the cage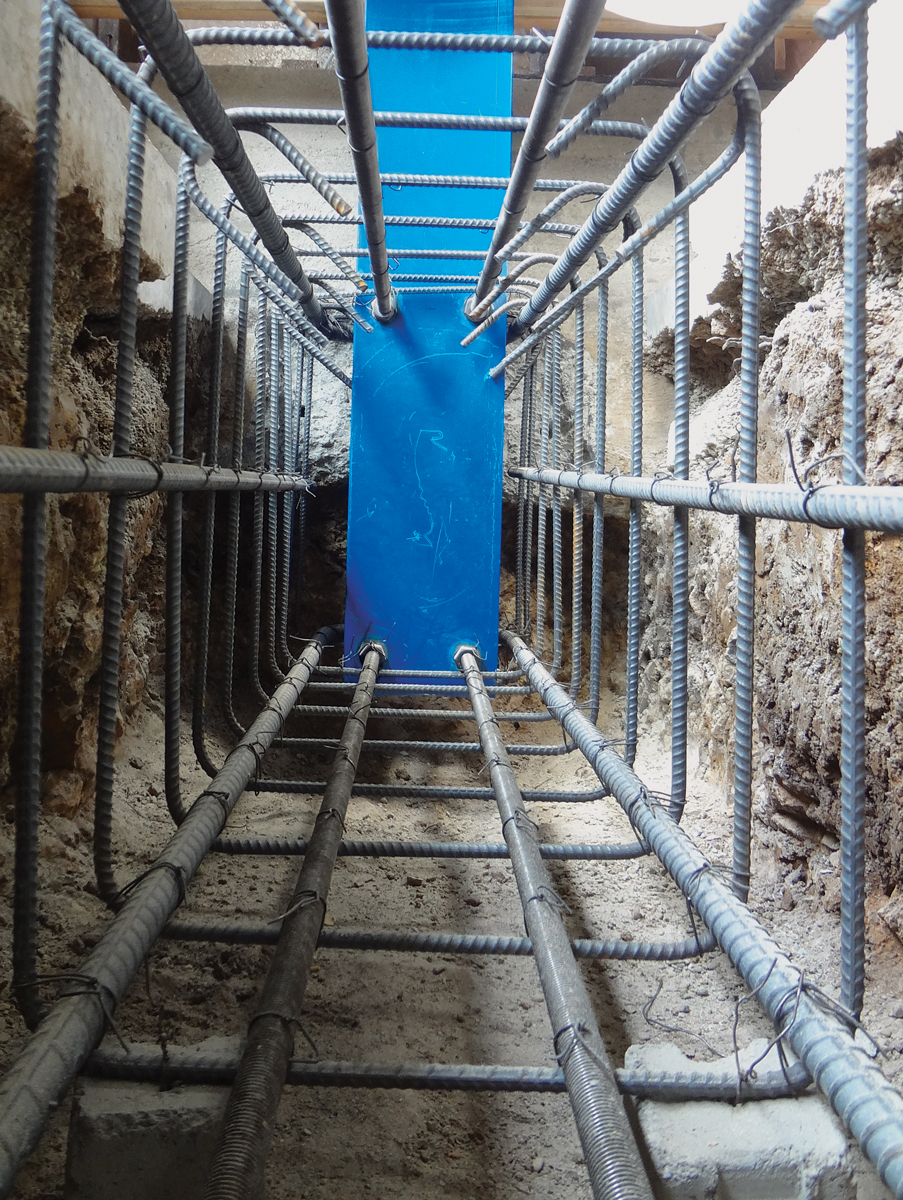 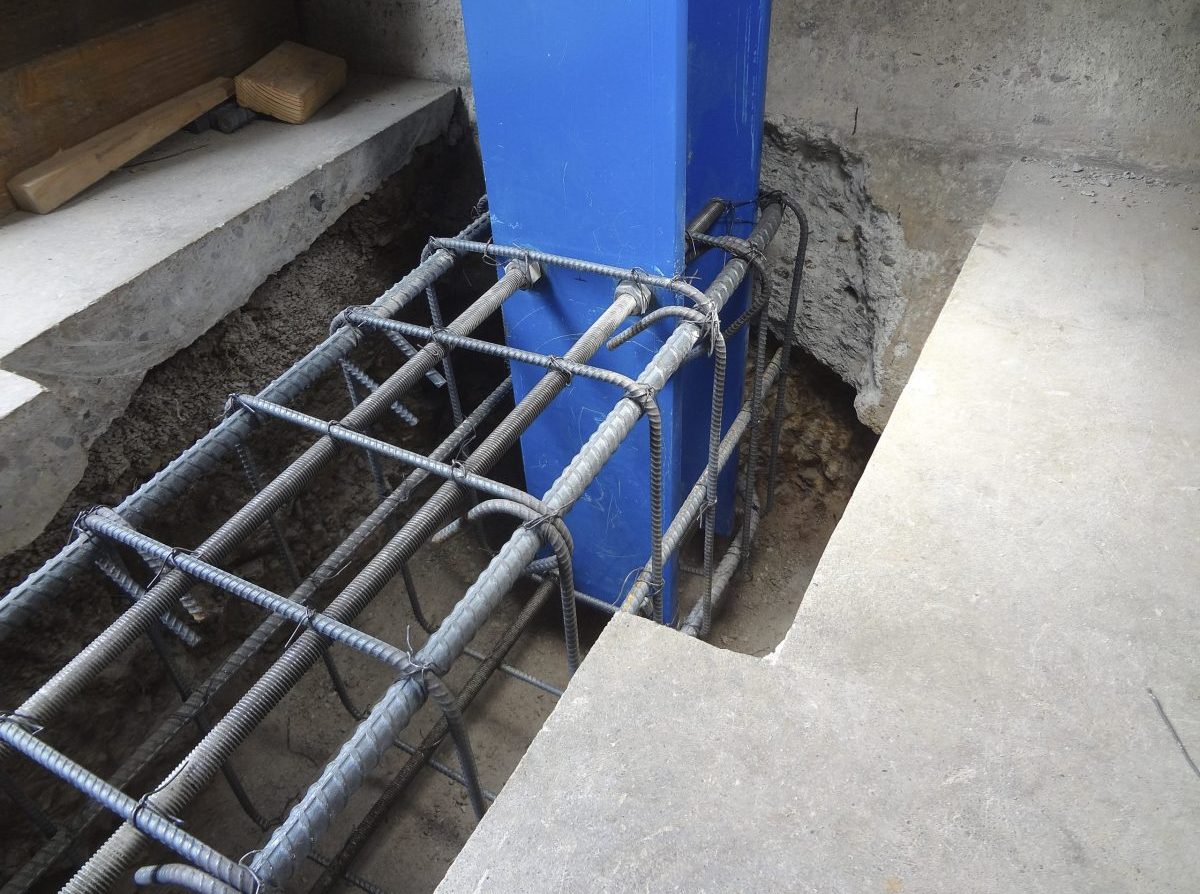 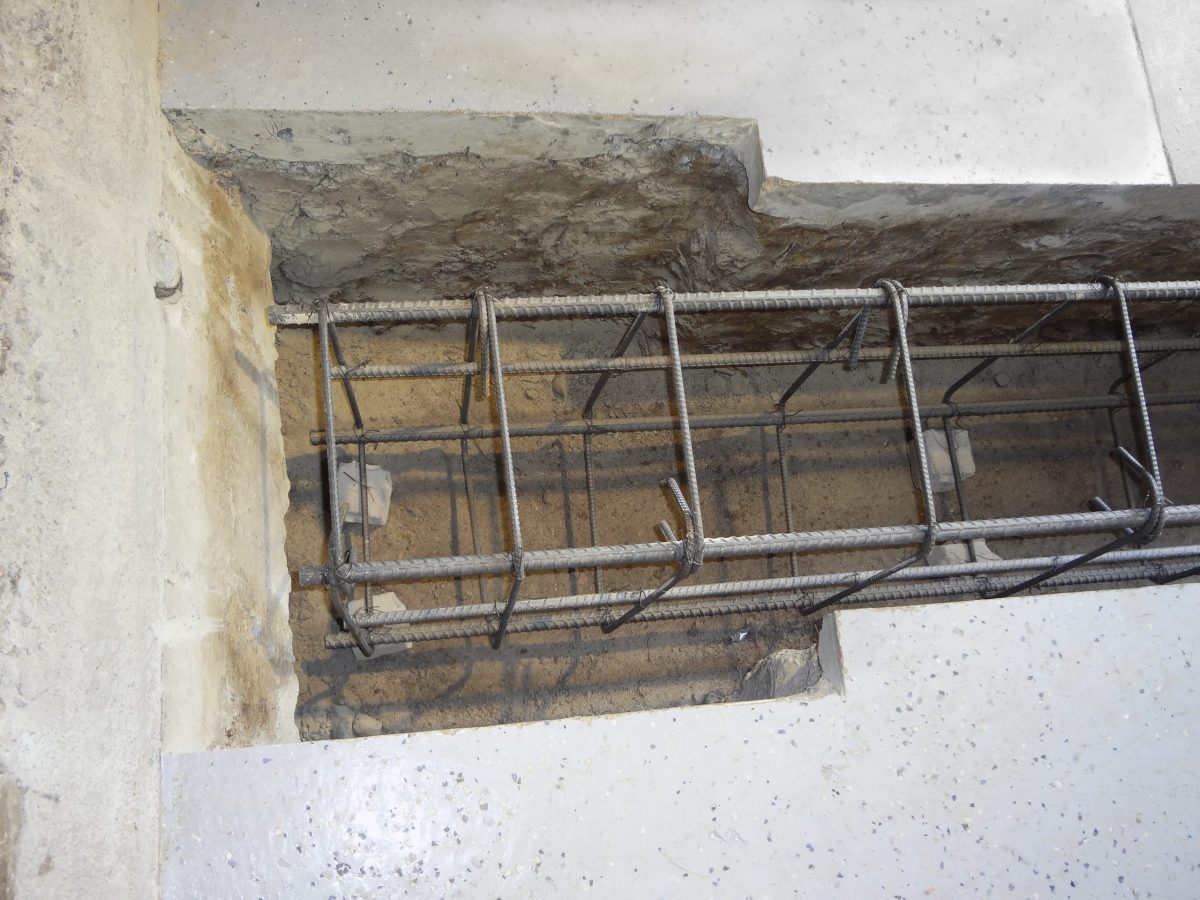 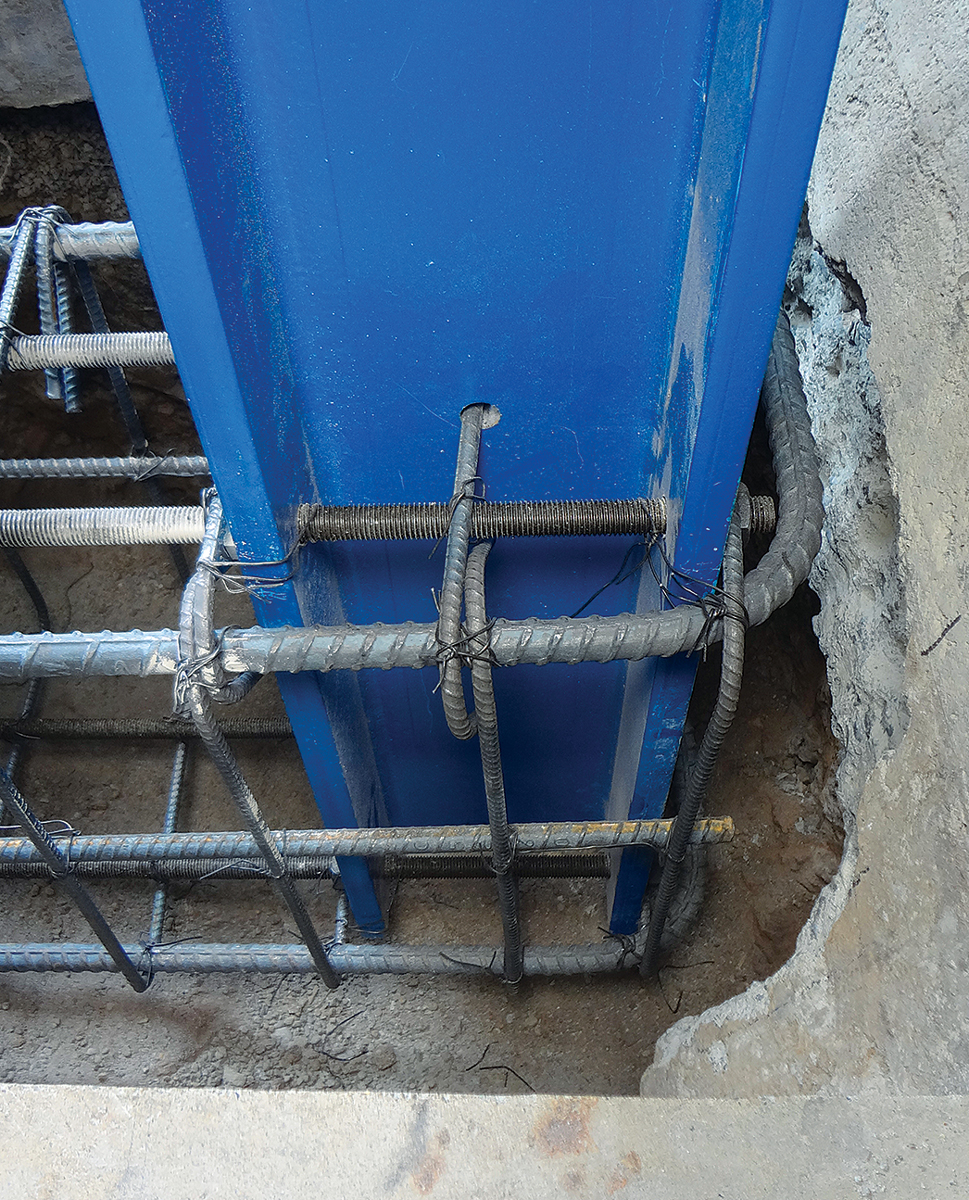 |
What is a soft story?
A good way to visualize a soft-story building is to imagine taking an open shoebox and placing it upside down on a table. The shoebox can resist side-to-side forces very well. But if you cut out most of one side of the box it becomes much less stable. If you place another shoebox or two on top of the weakened one, you have modeled a typical soft-story building. Large openings (such as a garage doors) cause the soft-story weakness by punching huge holes through an otherwise solid wall. With open, “tuck-under” parking, the entire wall is missing on one or more sides.
The term “soft story” encompasses buildings that may have a weakened level for a number of reasons. A more specific term to describe the type of building in this article is “SWOF,” which stands for “soft, weak, or open front.” This type of hazard is very common. The front of most residential buildings has a garage door, entry doors (or stairs leading to an entry porch at the floor above the garage), and sometimes a service-entrance door. Together, all these openings leave very little solid wall length. Very narrow walls cannot resist earthquakes at all. Many SWOF buildings collapsed during the most recent Bay Area earthquake in 1989, which was centered about 60 miles away. Seismologists expect the shaking from an earthquake centered closer to San Francisco would be 20 times more violent than the 1989 quake.
Julio Nieto is owner of Nieto Valle Construction in Hayward, Calif. Photos courtesy of Quake Brace Mfg. Co.
Drawing: Christopher Mills
From Fine Homebuilding #313
RELATED STORIES
Protect Your Home With a Basic Seismic Retrofit
Houses That Roll With the Punches
Fine Homebuilding Recommended Products
Fine Homebuilding receives a commission for items purchased through links on this site, including Amazon Associates and other affiliate advertising programs.

A House Needs to Breathe...Or Does It?: An Introduction to Building Science

All New Bathroom Ideas that Work
Get Your House Right: Architectural Elements to Use & Avoid