FHB Logo Facebook LinkedIn Email Pinterest Twitter X Instagram Tiktok YouTube Plus Icon Close Icon Navigation Search Icon Navigation Search Icon Arrow Down Icon Video Guide Icon Article Guide Icon Modal Close Icon Guide Search Icon Skip to content
Subscribe
Log In
  • How-To
  • Design
  • Tools & Materials
  • Restoration
  • Videos
  • Blogs
  • Forum
  • Magazine
  • Members
  • FHB House
  • Podcast
Log In
How-To

Mid-Wall Install

This time-tested installation method for flangeless windows ensures smooth operation and provides air, water, and vapor control.

By Josh Edmonds Issue 328 - Dec/Jan 2024

Josh Edmonds walks through the process of selecting and installing flangeless European-style windows and doors in high-performance wall assemblies. The thick, triple-pane glazing enhances comfort and reduces condensation risks, making these windows ideal for energy-efficient homes.

Detailed in step-by-step photos, the build team uses specialty tapes and shims to create a tight air- and water-seal around the window and door frames. This installation method not only improves the building’s durability but also elevates indoor comfort.

Way Back When

Before we started using European flangeless windows about 10 years ago, we installed windows with a nailing flange like almost every other builder in North America. I remember struggling over unfamiliar details as we adjusted to flange-free installations, but now everything has become second nature, from ordering and unloading to making final adjustments.

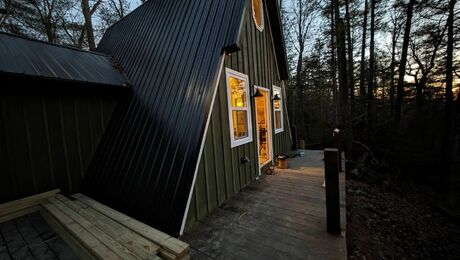
This article shows how we install flangeless European-style windows and doors in our typical high-performance wall assembly—a sheathed 2×6 wall with exterior I-joist insulation cavities dense-packed with cellulose. In this wall the I-joist acts as a Larsen truss that creates the insulation cavity on the exterior and provides attachment for the water-resistive barrier and siding. (You can see this exact assembly in “Larsen Trusses Live On” by Brian Pontolilo in FHB #321.)

So why do we use European windows? It’s certainly not for lack of patriotism or shorter lead times. Performance is the biggest factor. Our standard window, shown in the photos, has a whole-window U-factor of 0.13, which is roughly R-7. For comparison, the Department of Energy recommends windows with a U-factor of 0.30 to 0.35 (roughly R-3) in most of the country, and windows with a U-factor of 0.60 (R-1.6) in the hottest places. Given those DOE recommendations, some might ask if we really need R-7 windows. How much energy does that save?

Good Windows Make a More Comfortable, More Durable Structure

The answer is that we do need windows with excellent performance, but not because it saves money on heating and cooling—at least not a significant amount. More importantly, we need a high-performance window for the comfort of the occupants and the durability of the structure.

The 13/4-in.-thick triple-pane glazing common to European windows keeps the glass closer to the temperature inside the room. When this is combined with insulated frames that are easier to air-seal, you end up with a house that’s noticeably more comfortable than one built with ordinary windows, especially large ones.

This thick glazing also helps control condensation, which is a big deal for building durability. In our airtight and superinsulated houses we worry about creating condensing surfaces around windows and doors, which are often the coldest things in the room. When the thermostat is set to 70°F and the relative humidity is 40%, the dew point is 45°F; to avoid condensation, everything in the house should be above that temperature. In winter, keeping everything above 45°F is difficult with typical double-pane windows.

In our builds we prefer to install the windows in the middle of the wall, which allows us to insulate around the opening. This reduces thermal bridging through the window frame and the framing surrounding the rough opening. Our middle-wall location provides an interior sill, unlike fully inset windows.

Differences From Domestic Windows and Doors

We commonly install both tilt-turn windows and fixed windows. Tilt-turn windows have a sash that’s hinged on one side and swings into the space like a door. The sash also tilts toward the interior at the top, which can provide fresh air even when it is raining.

I like the tilt-turn operation more than double-hung and slider styles because it offers better airtightness. I think these windows are also more functional than casements, which have their sashes exposed to the weather when they’re open. Fixed windows are less expensive and a little more airtight, and we use them often in hard-to-reach locations.

The pricing of these European windows compares favorably to high-end or triple-pane domestic windows. There are fewer design options than top-of-the-line domestic windows, but there are several material options that can work with most budgets. Our favorite window is made by Yaro out of uPVC and has exterior aluminum cladding, which can be almost any color.

The standard uPVC’s white interior looks right at home in the modern style we commonly build, but if the client wants an upgrade, we can add a foil cladding of almost any color or wood grain of nearly any species to the sashes and frame. On multifamily projects, we’ve also used the least-expensive plain uPVC windows, which have a white interior and exterior, without any trade-offs in performance or durability.

More About Doors

The entry and patio doors we commonly use are also by Yaro. The doors have thermally broken aluminum frames and triple-pane glass, giving them far better energy performance than typical entry or patio doors. Euro-style doors install similar to the windows, with a few notable differences (see “Doors are a little different,” below).

Euro-style windows and doors have 31/2-in.-wide frames, which means the glass is smaller in dimension than with domestic windows, and you may need to upsize for an equivalent glass size. If you are looking for a 3-ft.-wide door opening, order a 42-in. door, which allows for the thicker frame and the thickness of the door when open.

Delivery takes about 10 to 12 weeks once we place an order. The windows and doors are manufactured on a per-order basis, securely packed in wooden crates, and sent to the U.S. in shipping containers. We used to unload them by hand when they were delivered, but now we use a forklift to get the crates onto the ground with less effort.

As a builder, I appreciate the precision hardware and rigid construction that makes these windows and doors a pleasure to use. Their advantages are obvious when I show them to clients, and I still smile when I open and close them in my own high-performance house.


Prep the Opening

Before installing the windows and doors, we created an air barrier around the rough opening using 5⁄8-in.-thick Zip System sheathing to connect the interior (bearing) wall to the insulated Larsen truss on the exterior. We used Zip System Liquid Flash, a fluid-applied flashing membrane, to seal the corners.
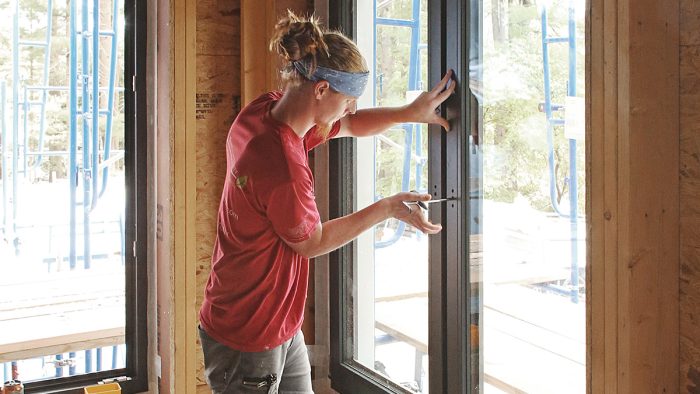
Make a Back Dam: We stack two pieces of 1⁄2-in. sheathing for a back dam. They’re cut slightly less than half the width of the rough sill, which puts the window in the middle of the opening. The 1-in. thickness puts the window stool at the right height for the frame.

Add a Sloped Subsill: An 8-in.-wide piece of bevel siding directs any water that leaks past the window toward the exterior. We hold the siding in place with a few 2-in. galvanized siding nails.

Integrate the WRB: We use Siga’s Fentrim 230 tape to seal the WRB to the sloped subsill. Like all the flashing and air-sealing tapes used in this installation, we roll it to ensure that the pressure-sensitive adhesive is fully bonded to the substrate.
Seal Corners: After taping all four sides of the opening with the Fentrim 230, we cut and fit small pieces of Fentrim in the corners of the opening as a second line of defense against air and water intrusion.

Install the Sill Pan: We create a sill pan on top of the sloped subsill using pieces of 6-in.-wide Zip System Flashing Tape. The back edge of the tape goes over the back dam, and the front laps over the Fentrim. We use a square to push the tape tight to the back dam before rolling it.

Install the Window Frame

The impressive weight of Euro-style windows and doors requires twice as many crew members to move them. If a domestic unit can be carried by a single carpenter, plan on two for a similar-sized Euro-style window and four for a standard-size patio door or big twin. High-quality suction cups are a must-have, as they provide a far better grip than the smooth frame.
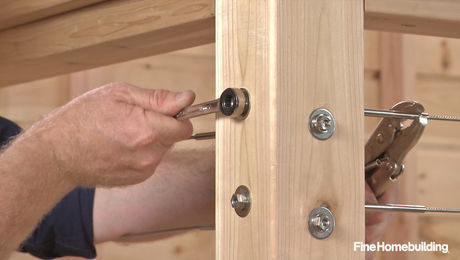
Level the Opening: The windows are installed on nontapered plastic shims. The shim locations are indicated on shop drawings that come with the window order. We use a plate level and the shims, which come in multiple thicknesses, to level the subsill.

Secure the Shims: To keep the window shims in the proper location while installing the frame, we tape them to the sill pan with Fentrim 230. The tape’s textured surface allows the movement of water even when other materials (like windows) sit directly on top.

Pull the Pins: Fixed windows and patio doors are left fully assembled, but we remove the sash of operable windows during installation. Using the tool that comes with the windows, we rotate the lock mechanism to tilt mode. With the sash closed, we pull the upper hinge pin with the tool’s other end.

Remove the Sash: With the pin removed and safely stored, we tilt out the top of the sash and then lift the sash off the lower hinge. A big window requires two people to safely manage its sash. We lean the sash against a wall until the end of the window installation.

Install the Clips: Flangeless windows and doors come with metal clips that can face toward the interior or the exterior. We turn them to the interior for our mid-wall window installation. They lock into the frame with a quarter turn, and we install them where the shop drawings specify.

Set the Frame: Once the clips are installed, we lift the frame into the opening, making sure the bottom is pushed tight to the back dam and roughly centered in the opening. We then plumb the frame on both sides of the window and mark the location of the frame.

Fasten the Frame

Each window is first fastened through the clips that help hold it in position. When combined with shims, the clips can act as the final fastening. We prefer fastening operable windows with turbo screws because they’re faster than shimming at every clip, and we have the manufacturer drill holes for the screws at the proper locations. We fasten fixed windows and doors with the clips because we don’t remove the sash, which is required with turbo screws.

Center the Frame: With a carpenter on each end using the same setup, we center the window in the opening for consistent interior and exterior trim reveals. Air shims make precise adjustments quickly.

Fasten with Clips: Holding the frame plumb and against the back dam, we run 1-1⁄2-in. pan-head construction screws through the slotted hole in each clip into the sides and top of the opening. We regularly check for plumb and make adjustments by loosening the screw, correcting, and retightening. When installing doors and fixed windows, we shim at every clip location and the corners.
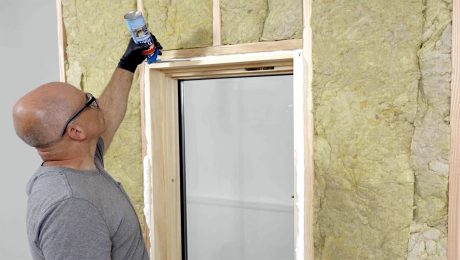
Fasten with Turbo Screws: For operable windows, clips temporarily hold the window in place before final fastening with turbo screws, which fasten and shim the window in the same step. The first drive of the screw may jack or shift the frame, so we fully back off each screw and then redrive into the threaded hole.

Shim the Corners: With the turbo screws in place, we check the jambs with a laser to confirm they’re straight and measure diagonals to confirm the frame is square, making adjustments as needed. Then we shim the corners.

Seal the Inside, Then the Outside

Once the window is fully fastened to the opening, sealing the interior comes next. The taped interior acts as an air barrier and prevents the spray foam that will seal around the frame from getting on any visible areas on the interior. The exterior trim will hide any foam that oozes out of the opening. When the inside is fully taped, we move outside. We use spray foam in the gap around the frame and then tape the frame to the WRB. With the air-seal on the interior, the tape used on the exterior is primarily for water management.
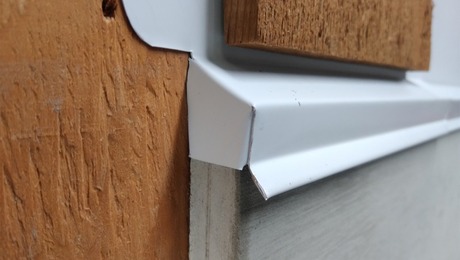
Pull the Protection: The windows and doors we use have a protective tape on the frames that we leave on until we air-seal the interior. This tape prevents fingerprints and scratches during shipping, handling, and installation.

Tape the Window: Low-perm Siga Fentrim IS 20 provides air and vapor control around the window. It has a two-part release paper to make installation easier. The window side of the tape has 1⁄2-in.-wide release paper, which is too wide to be hidden by the extension jamb, so we lap it 1⁄4 in. to 3⁄8 in. onto the window frame.

Tape the Opening: The larger side of the two-part Fentrim IS 20 is adhered to the sheathing panels and back dam that surround the opening. We seal all four sides on the interior of the window with this tape.

Cover Corners and Clips: Once a window’s four interior sides are taped and the tape is rolled, we fold small pieces of Fentrim IS 20 to seal the corners. We also tape over the metal installation clips for air and vapor control.

Foam the Gap: Once the inside is air-sealed, we move to the exterior. Using low-expansion canned foam, we run a bead of foam in the gap between the window frame and the rough opening. We’re careful not to put too much in or it will ooze out and make a mess.

Flash the Exterior: We tape the window top and sides with Siga Fentrim 230 and leave the bottom untaped for drainage. When taping the exterior, we adhere the full 1⁄2-in.-wide window side of the tape onto the window frame, and the other part of the tape is bonded to the opening.

Add Final Details

Rigid-foam insulation around the window frame and window-matched extension sills provide a more durable installation. The foam keeps occupants comfortable and reduces condensation potential. The sill mounts to the window frame and directs rain and snow away from the opening.
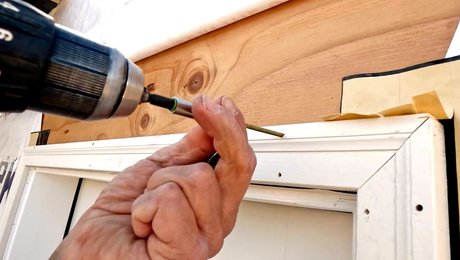
Warm the Frame: The window frame and the gap around it is the coldest part of the window assembly. Adding 1 in. of XPS on the sides and top of the exterior boosts the window’s installed U-factor and its condensation resistance. The foam will be covered by PVC extension jambs.

Trim the Sill Extension: These windows can be ordered with aluminum sill extensions that match the window finish. They’re available in custom widths that we cut to length on-site. The back lip tucks into a channel in the window bottom, making for a reliable, weathertight connection.

Install the Sill: We slip on the sill’s included aluminum end caps before fastening the sill to the frame with color-matched screws provided by the window manufacturer. The sills extend past the drainage space and future siding and trim, and the end caps have a vertical leg to direct water outward.

Reinstall the Sash: Once the foam and sill extension are in place, we reinstall the sash. Installing a large window like the one shown here takes two carpenters about an hour. The first one of the project often takes longer to install, and small windows go faster.

Doors Are a Little Different

Doors share many installation steps with windows, but there are differences too. Unlike the windows, these doors are installed flush with the interior walls so they’re able to open fully. This door installation started when we cast a 1-1⁄2-in.-deep recess into the floor when placing the concrete. The recess creates a drainage space and lowers the door sill to match the polished slab inside. We leave the glass panels in place when setting doors because they help keep the units square.

Level the Sill: We tape blocks of 3⁄4-in.-thick PVC trim to the bottom of the slab recess at the manufacturer-specified locations to raise the door’s sill. We level their tops with plastic shims using an extendable plate level.

Install the Clips: We install doors flush with the interior so that they can open all the way. Clips would interfere with casing if installed on the interior, so we install them in the manufacturer-specified locations facing toward the exterior.

Bend the Clips: We bend the installation clips so that they won’t get caught on the opening when setting the door. This also creates an offset in the clip when it’s bent again for installation. The offset helps to center the door in the opening and helps to keep it centered during fastening.

Set the Door: With suction cups providing a good grip, pairs of carpenters on the inside and outside lift the door into position. We drop it into the recess and then tip the top toward the outside. Because of the weight, we plan on a minimum of two carpenters per glass panel when setting high-performance doors. Air shims make it easy to move the heavy door a small amount.

Plumb and Fasten: We plumb the door from front to back with a level and then fasten through a few clips to hold the door in position. Then we check the door jambs for straight with a laser set up inside and shim the frame with composite shims. We shim at every clip before final fastening.

Seal the Inside: Once the exterior is taped, we foam the gap. Because the doors are installed flush with the inside of the opening, it’s easier to foam the gap from the inside. Then we tape the door with Fentrim IS 20 tape. The two-part tape’s shorter leg laps the frame by 1⁄4 in. to 3⁄8 in., and the longer leg goes on the rough opening.

Seal and Warm the Frame: Once the door is fully fastened and sealed on the interior, we apply Fentrim 230 tape with the 1⁄2-in. side on the door frame and the wider part on the door opening. The final step is to install foam panels around the opening to minimize thermal bridging through the frame and for condensation control.

— Josh Edmonds is managing partner of Simple Integrity in Cooperstown, N.Y. Photos by Patrick McCombe.

From Fine Homebuilding 328

RELATED STORIES

  • Flangeless Windows Done Right
  • Windows in Thick Walls
  • Flashing for Old Windows

Originally published November, 2024.

Sign up for eletters today and get the latest how-to from Fine Homebuilding, plus special offers.

Signing you up...

This site is protected by reCAPTCHA and the Google Privacy Policy and Terms of Service apply.
See all newsletters
See all newsletters
×

Get home building tips, offers, and expert advice in your inbox

Signing you up...

This site is protected by reCAPTCHA and the Google Privacy Policy and Terms of Service apply.
See all newsletters
See all newsletters

New Feature

Fine Homebuilding Forums

Ask questions, offer advice, and share your work

Log in or create an account to post a comment.

Sign up Log in

Become a member and get full access to FineHomebuilding.com

Up Next

Video Shorts

Featured Story

Eight Common Electrical Myths and Mistakes

Dangerous electrical work and widespread misconceptions cause fires, deaths, and $1.5 billion in property damage annually.

Featured Video

How to Install Cable Rail Around Wood-Post Corners

Use these tips to keep cables tight and straight for a professional-looking deck-railing job.

Related Stories

  • Mortising a Hinge without a Router
  • Window Glazing with Traditional Putty
  • Fastening an Exterior Door With Brick Mold
  • Tom Gensmer, Remodeler and Window-Repair Expert

Discussion Forum

Recent Posts and Replies

  • |
  • |
  • |
  • |
  • |
  • |
View More Create Post

Highlights

Fine Homebuilding All Access
Fine Homebuilding Podcast
Tool Tech
Plus, get an extra 20% off with code GIFT20

"I have learned so much thanks to the searchable articles on the FHB website. I can confidently say that I expect to be a life-long subscriber." - M.K.

Get home building tips, offers, and expert advice in your inbox

Signing you up...

This site is protected by reCAPTCHA and the Google Privacy Policy and Terms of Service apply.
See all newsletters
See all newsletters

Video

View All Videos
  • Fastening an Exterior Door With Brick Mold
  • Podcast Episode 627: Leaky Doors, Flashing, and Kneewalls
  • Insulating Foam for High-Performance Windows
  • How to Bend Custom Cap Flashing
View All

Energy Efficiency

View All Energy Efficiency Articles
  • Strategies for Making an Old House Airtight
  • The Best Way to Protect Heat Pumps from Rain and Snow
  • High-Demand Heat-Pump Water Heater
View All Energy Efficiency Articles

Fine Homebuilding Magazine

  • Issue 330 - April/May
    • Deck Details for Durability
    • FAQs on HPWHs
    • 10 Tips for a Long-Lasting Paint Job
  • Issue 329 - Feb/Mar 2025
    • Smart Foundation for a Small Addition
    • A Kominka Comes West
    • Making Small Kitchens Work
  • Issue 328 - Dec/Jan 2024
    • How a Pro Replaces Columns
    • Passive House 3.0
    • Tool Test: Compact Line Lasers
  • Issue 327 - November 2024
    • Repairing Damaged Walls and Ceilings
    • Plumbing Protection
    • Talking Shop
  • Issue 326 - October 2024
    • Paint Behind Strike Plates
    • Conceal Cut Ends
    • Ladder Slip Solution

Fine Home Building

Newsletter Sign-up

  • Fine Homebuilding

    Home building tips, offers, and expert advice in your inbox.

  • Green Building Advisor

    Building science and energy efficiency advice, plus special offers, in your inbox.

  • Old House Journal

    Repair, renovation, and restoration tips, plus special offers, in your inbox.

Signing you up...

This site is protected by reCAPTCHA and the Google Privacy Policy and Terms of Service apply.
See all newsletters

Follow

  • Fine Homebuilding

    Dig into cutting-edge approaches and decades of proven solutions with total access to our experts and tradespeople.

    Start Free Trial Now
    • Facebook
    • Instagram
    • X
    • LinkedIn
  • GBA Prime

    Get instant access to the latest developments in green building, research, and reports from the field.

    Start Free Trial Now
    • Facebook
    • YouTube
  • Old House Journal

    Learn how to restore, repair, update, and decorate your home.

    Subscribe Now
    • Facebook
    • Instagram
    • X

Membership & Magazine

  • Online Archive
  • Start Free Trial
  • Magazine Subscription
  • Magazine Renewal
  • Gift a Subscription
  • Customer Support
  • Privacy Preferences
  • About
  • Contact
  • Advertise
  • Careers
  • Terms of Use
  • Site Map
  • Do not sell or share my information
  • Privacy Policy
  • Accessibility
  • California Privacy Rights

© 2025 Active Interest Media. All rights reserved.

Fine Homebuilding receives a commission for items purchased through links on this site, including Amazon Associates and other affiliate advertising programs.

X
X
This is a dialog window which overlays the main content of the page. The modal window is a 'site map' of the most critical areas of the site. Pressing the Escape (ESC) button will close the modal and bring you back to where you were on the page.

Main Menu

  • How-To
  • Design
  • Tools & Materials
  • Video
  • Blogs
  • Forum
  • Project Guides
  • Reader Projects
  • Magazine
  • Members
  • FHB House

Podcasts

  • FHB Podcast
  • ProTalk

Webinars

  • Upcoming and On-Demand

Podcasts

  • FHB Podcast
  • ProTalk

Webinars

  • Upcoming and On-Demand

Popular Topics

  • Kitchens
  • Business
  • Bedrooms
  • Roofs
  • Architecture and Design
  • Green Building
  • Decks
  • Framing
  • Safety
  • Remodeling
  • Bathrooms
  • Windows
  • Tilework
  • Ceilings
  • HVAC

Magazine

  • Current Issue
  • Past Issues
  • Magazine Index
  • Subscribe
  • Online Archive
  • Author Guidelines

All Access

  • Member Home
  • Start Free Trial
  • Gift Membership

Online Learning

  • Courses
  • Project Guides
  • Reader Projects
  • Podcast

More

  • FHB Ambassadors
  • FHB House
  • Customer Support

Account

  • Log In
  • Join

Newsletter

Get home building tips, offers, and expert advice in your inbox

Signing you up...

This site is protected by reCAPTCHA and the Google Privacy Policy and Terms of Service apply.
See all newsletters
See all newsletters

Follow

  • X
  • YouTube
  • instagram
  • facebook
  • pinterest
  • Tiktok

Join All Access

Become a member and get instant access to thousands of videos, how-tos, tool reviews, and design features.

Start Your Free Trial

Subscribe

FHB Magazine

Start your subscription today and save up to 70%

Subscribe

We hope you’ve enjoyed your free articles. To keep reading, become a member today.

Get complete site access to expert advice, how-to videos, Code Check, and more, plus the print magazine.

Start your FREE trial

Already a member? Log in