Understanding Larsen Trusses
Hanging a truss outside a stick-framed wall is an old idea that hangs in with modern materials, building science, and energy-efficiency goals.

In November of 1983, Popular Science published a short article called “Superinsulated House Trusses” that briefly described John Larsen’s alternative to double-stud walls. John’s approach, which we know today as the Larsen truss, was to build a house with conventional 2×4 walls, install airtight polyethylene sheeting around the building, and then attach to the wall shop-made trusses of long 2x2s joined with plywood gussets. When filled with fiberglass batts inside and out, John’s walls would hit R-35 with little thermal bridging.
“I came up with this idea while framing a double-wall house,” John wrote in an email. “Normally, experienced framers do the framing much more efficiently than ordinary carpenters like myself. They are, however, not so good at vapor retarder installation, which has to happen at the same time. By using the external truss system, they can frame the structural part of the house and I or a subtrade can come in and wrap the house externally with large sheets of poly, and then install the trusses. In the ’80s there was no internet, so we spread the idea by printing ads in building publications and sold manuals with blueprints for $15. We sold hundreds.”
In a 2011 interview with Martin Holladay, John said, “I was making the trusses until the late ’80s. After that, there wasn’t a big demand anymore.”
The Larsen truss may not have taken off as a product, but variations on the idea are still widely in use today. In fact, they’re a favored superinsulated wall assembly by some cold-climate builders, and for good reasons. They don’t necessarily have to be custom-built. Common manufactured products including I-joists and floor trusses can be used. They are a fairly straightforward way to add deep exterior insulation to a wall assembly, which has several benefits. And they offer an exterior insulation option that doesn’t rely on plastic-foam products. Like any alternative wall assembly, though, there’s a learning curve for first-time builders. And at least one high-performance builder who says there’s a lot to like about Larsen trusses has concerns about their durability over the long term.
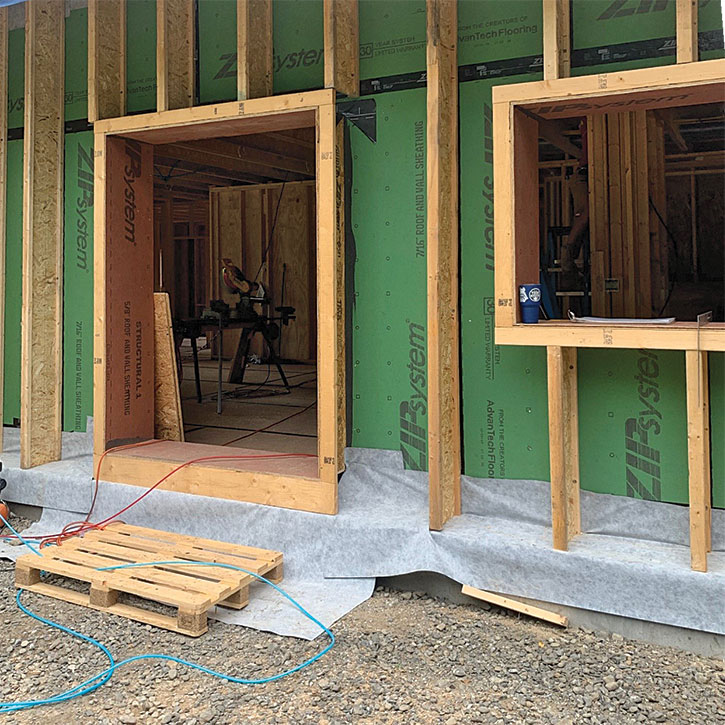
Photo: Josh Edmonds
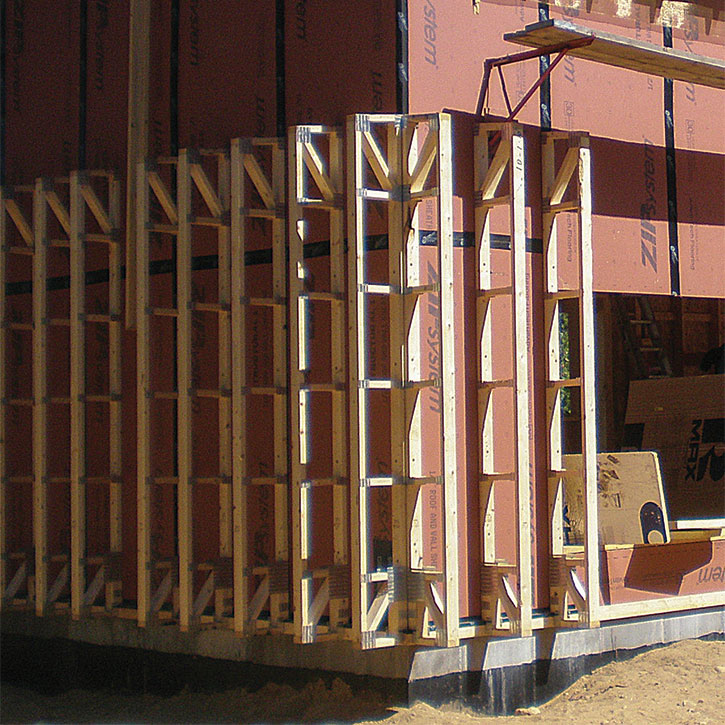
Photo: Steve Baczek
A pretty perfect wall
A Larsen-truss wall has some similarities with a double-stud wall. The structural aspect of the framing is common—both start with 2×4 or 2×6 walls that will be familiar to builders. In the case of a double-stud wall, it is common for the outer wall to be structural, and load-bearing where necessary. The interior wall is essentially a partition that creates an uninterrupted space for continuous insulation, deepens the cavity for greater R-value, and carries the drywall, trim, cabinetry, and toilet-paper holders. Larsen trusses are attached outside of the structural walls, creating an additional cavity for insulation to the exterior of the sheathing. This is one of the advantages of the system, says New York builder Josh Edmonds.
Josh builds Passive Houses, and even when not pursuing certification tends to use the Passive House Institute (Phius) modeling strategies for his new homes and remodels. Josh says that Phius frowns on double-stud walls, particularly where the outer wall is structural. This is because hygrothermal modeling reveals the possibility of cold sheathing issues, specifically the potential for condensation that can lead to rot and structural failure. (For an alternative perspective, see “A Case for Double-Stud Walls,” FHB #291). In this way, a Larsen-truss wall is also akin to a house wrapped with continuous exterior insulation. If the trusses are deep enough to achieve the necessary R-value for the climate zone in which the house is built, having most of the insulation outside the wall means that the sheathing will never get cold enough to be a condensing surface.

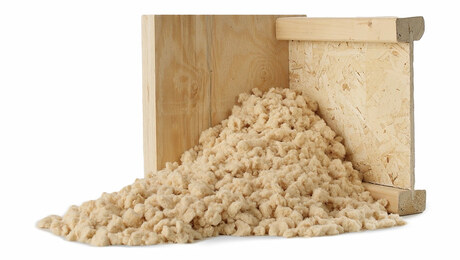
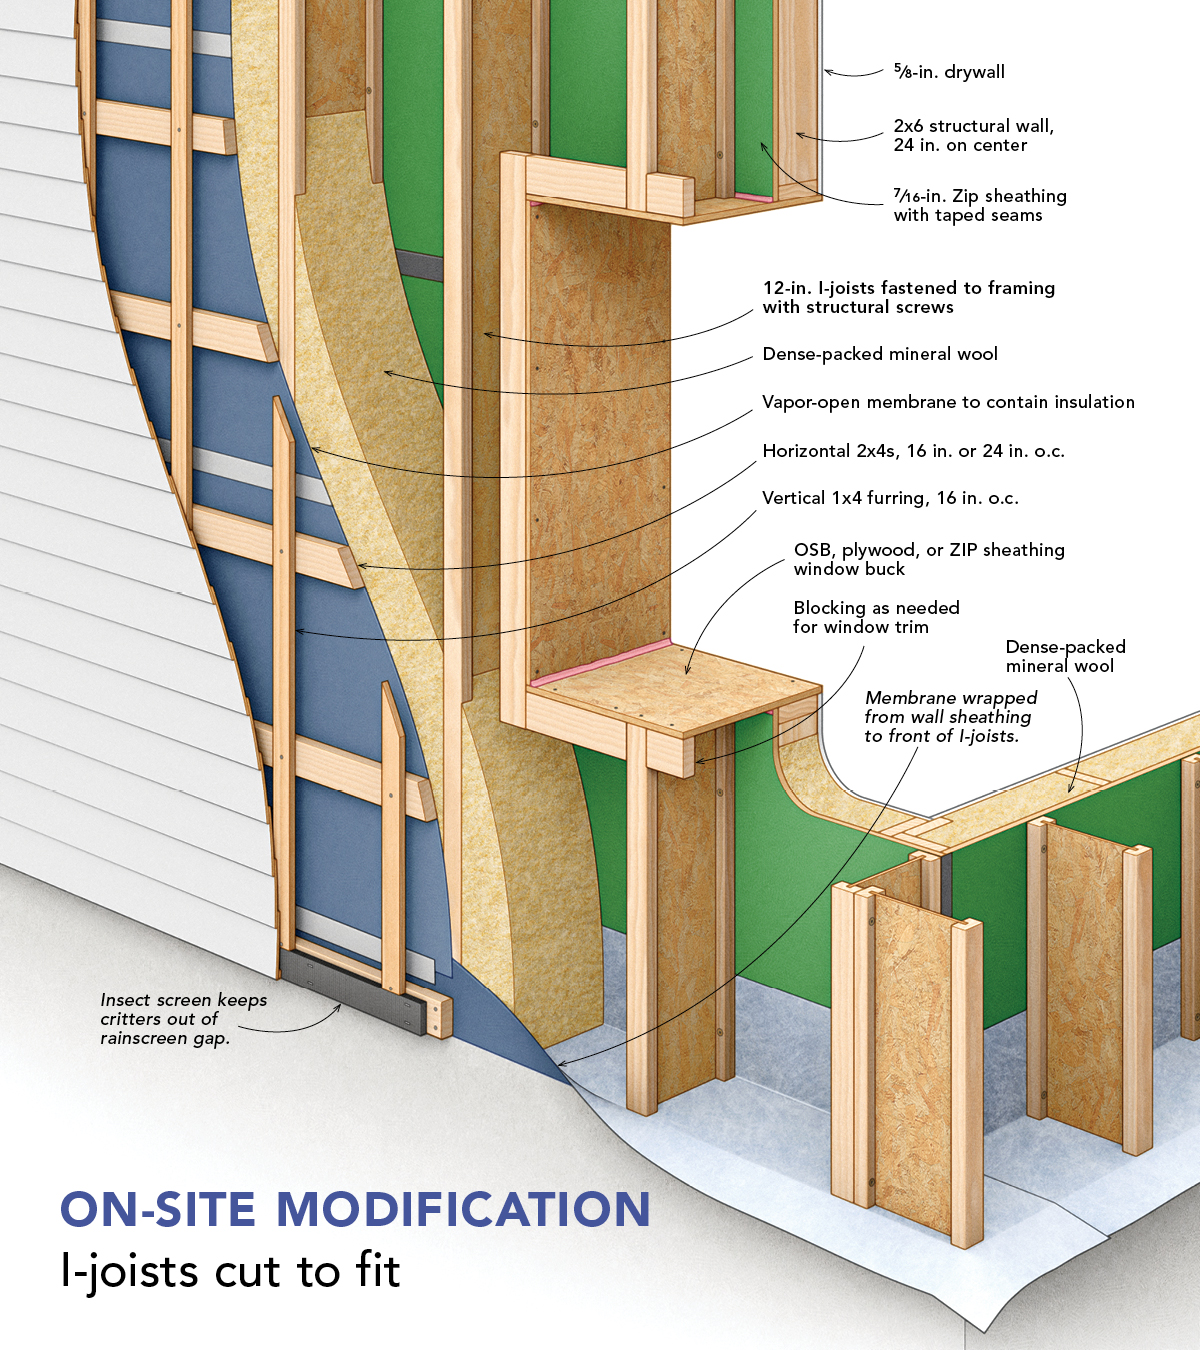
Josh’s rule of thumb is to have about two-thirds of the insulation to the exterior, which means he can build a 2×6 wall and use 12-in. I-joists for the Larsen trusses. For condensation control, the International Residential Code (IRC) calls for a minimum R-11.5 of exterior insulation over 2×6 walls in climate zone 6 where Josh builds. With dense-pack cellulose or mineral-wool insulation, the R-value outside of the sheathing in his Larsen-truss assembly will be in the mid-R-40s. Josh also likes the drying potential of these walls, which can dry readily in both directions. The only vapor retarder in his walls is the sheathing.
“With either cellulose or mineral-wool insulation,” he says, “you could have a flashing issue and dump water into this wall system and not have a catastrophic building failure.” Moreover, the water, air, and vapor control layers are at the sheathing, so the Larsen-truss system achieves the beneficial characteristics of Joe Lstiburek’s “Perfect Wall.” All four control layers are to the exterior of the framing, and the water, air, and vapor control layers, along with the structure of the building, are all inside the thermal boundary (or most of it, anyway). They’re protected from the elements and the effects of temperature changes.
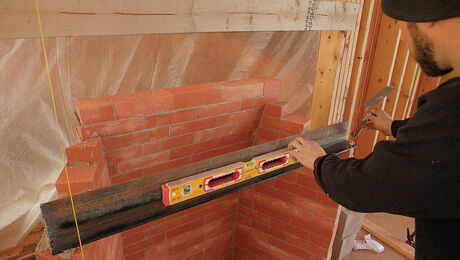
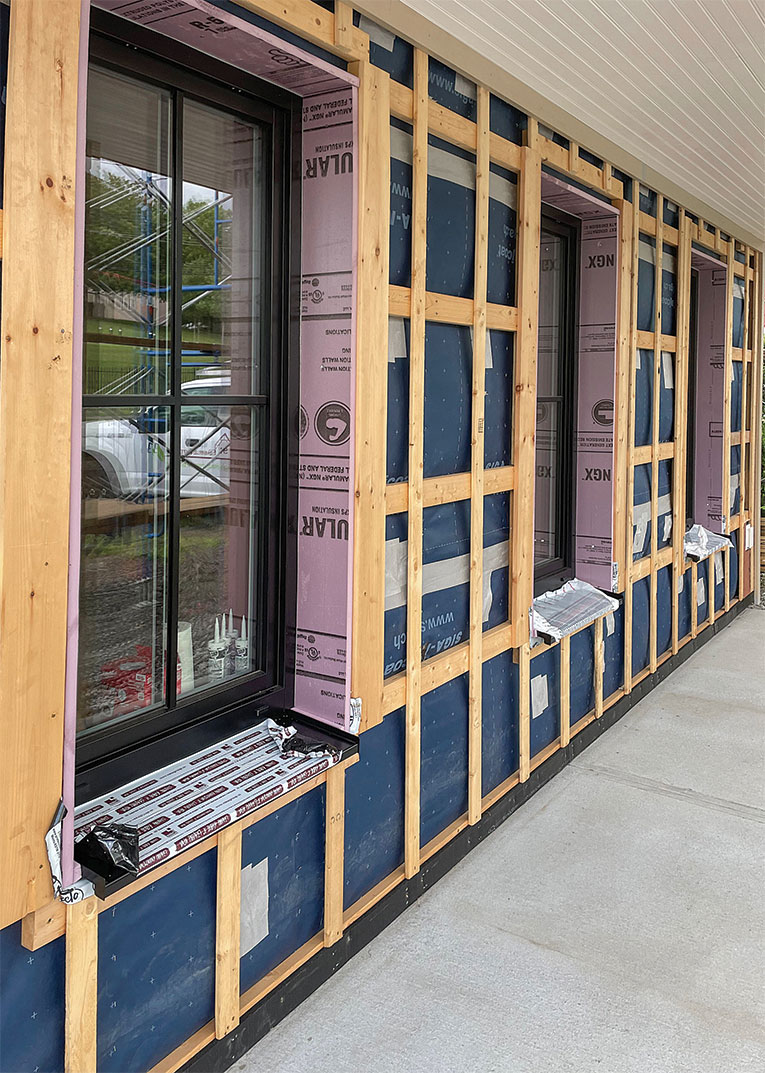
If you’ve ever tried to find framing with structural screws through a few inches of exterior insulation, you can imagine how tough it would be to find a stud with a 12-in. screw through 10 in. of rigid insulation. This is another benefit of the Larsen truss. The cavities are commonly filled with dense-packed fibrous insulation, meaning the outer truss flange is available for fastening. To hold the insulation in place, another membrane is installed over the trusses. On a recent project, Josh used Siga’s Majcoat, a roofing underlayment, for this detail, but any vapor-open membrane rated for dense-packed insulation could work. The membrane provides an additional water-resistive barrier (WRB).
Furring strips, often installed in a lattice pattern, help to hold the membrane in place and create a ventilated rainscreen gap for the siding. In other words, if you are installing horizontal lap siding, you can run the first layer of strapping horizontally, and the second layer vertically. If you are installing vertical siding, you can switch the strapping layers. In either case, the rainscreen is then detailed as any other.
You can use floor joists
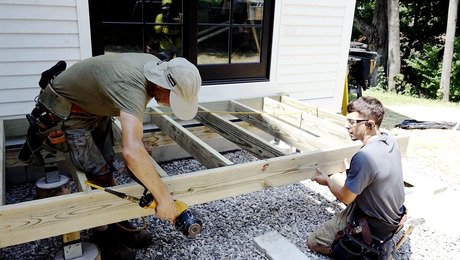
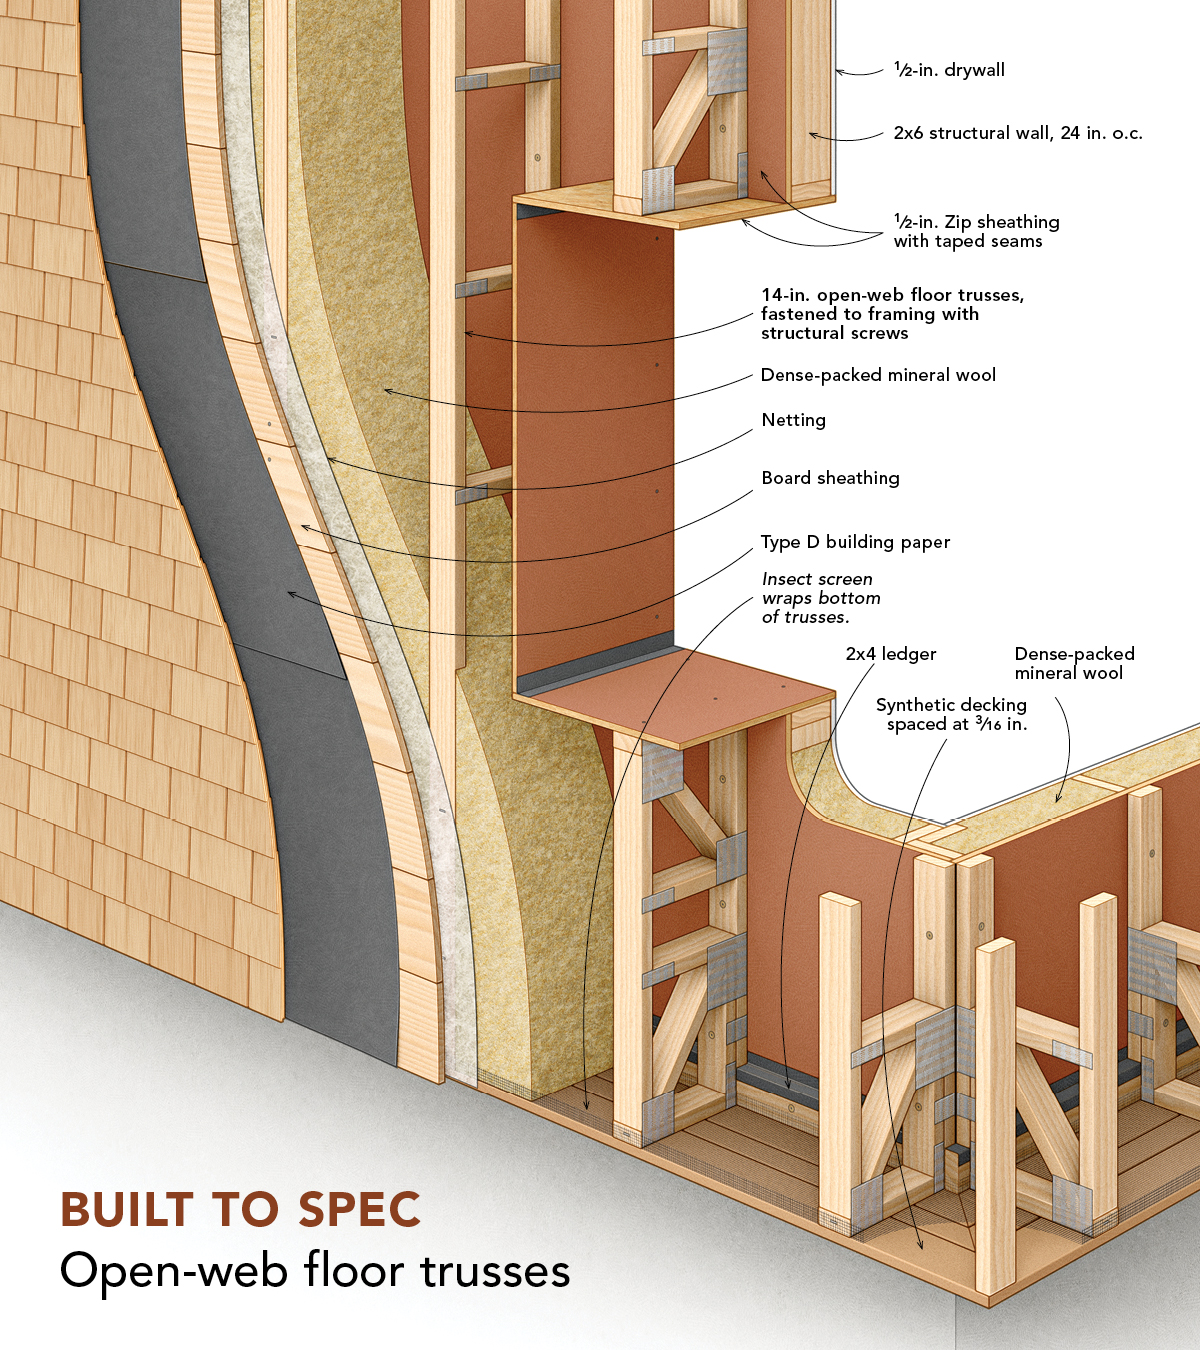
A few years ago, Massachusetts architect Steve Baczek was designing a high-performance home for a property where strict zoning regulations were limiting the possible size of the building. Steve asked the town officials how they measured the footprint of a home. It turns out they weren’t sure. Steve suggested that they measure from the perimeter of the foundation. The officials agreed. Steve needed thick walls to achieve the project’s performance goals, so he decided to design a Larsen-truss wall system because it wouldn’t creep into the already tight interior living space the way double-stud walls would. It also wouldn’t be counted as square footage. Steve ordered floor trusses to hang on the exterior wall and says they are advantageous for a few reasons, mostly having to do with the open webs.
“People will argue that there’s not a lot of cross-sectional area to a 3⁄8-in. OSB web and it’s not going to make a difference in terms of thermal bridging in an R-60 or R-70 wall. And I agree. Loosing 2% of that with an I-joist is not a concern for me,” Steve said when comparing the thermal-bridging potential of an open-web floor truss to an I-joist. “But there are still some things I like a lot about the open-web floor trusses in this application. You can screw them directly at 90° into the studs with a palm nailer or 90° driver. And they’re light. On the project we did with them, one guy was able to install them by himself.”
But the things Steve likes most about open-web floor trusses as Larsen trusses are that you can easily set them on a ledger and that you don’t have to make any modifications on-site if you order just what you need. Floor trusses are manufactured with a knockout on one corner where a 2×4 band is attached to tie the trusses together. When using them as a Larsen truss, Steve says that you can attach a ledger to the building to set the trusses on, fitting the ledger into the notch. Also, because truss plants will make whatever you design, Steve says that you can even order them with an angle on one end, which could make it easier to match the roof pitch or to sheath for a water-shedding cap on the trusses.
Josh’s I-joists are also a manufactured solution. The joist depth is chosen to meet performance goals. Josh fastens the I-joists to the framing every 2 ft. with structural screws, alternating sides of the OSB web. Though the application and fastening schedule has been approved by an engineer, Josh uses a raft-slab foundation for his homes, so the I-joists are also resting on high-psi rigid-foam insulation. One more thing Josh likes about using I-joists is that they can be cut on-site. For example, when the I-joists run up to the roof eave, the crew can cut them at an angle that matches the roof pitch.
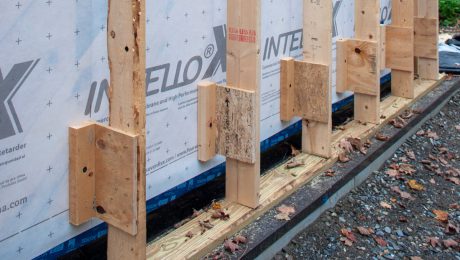
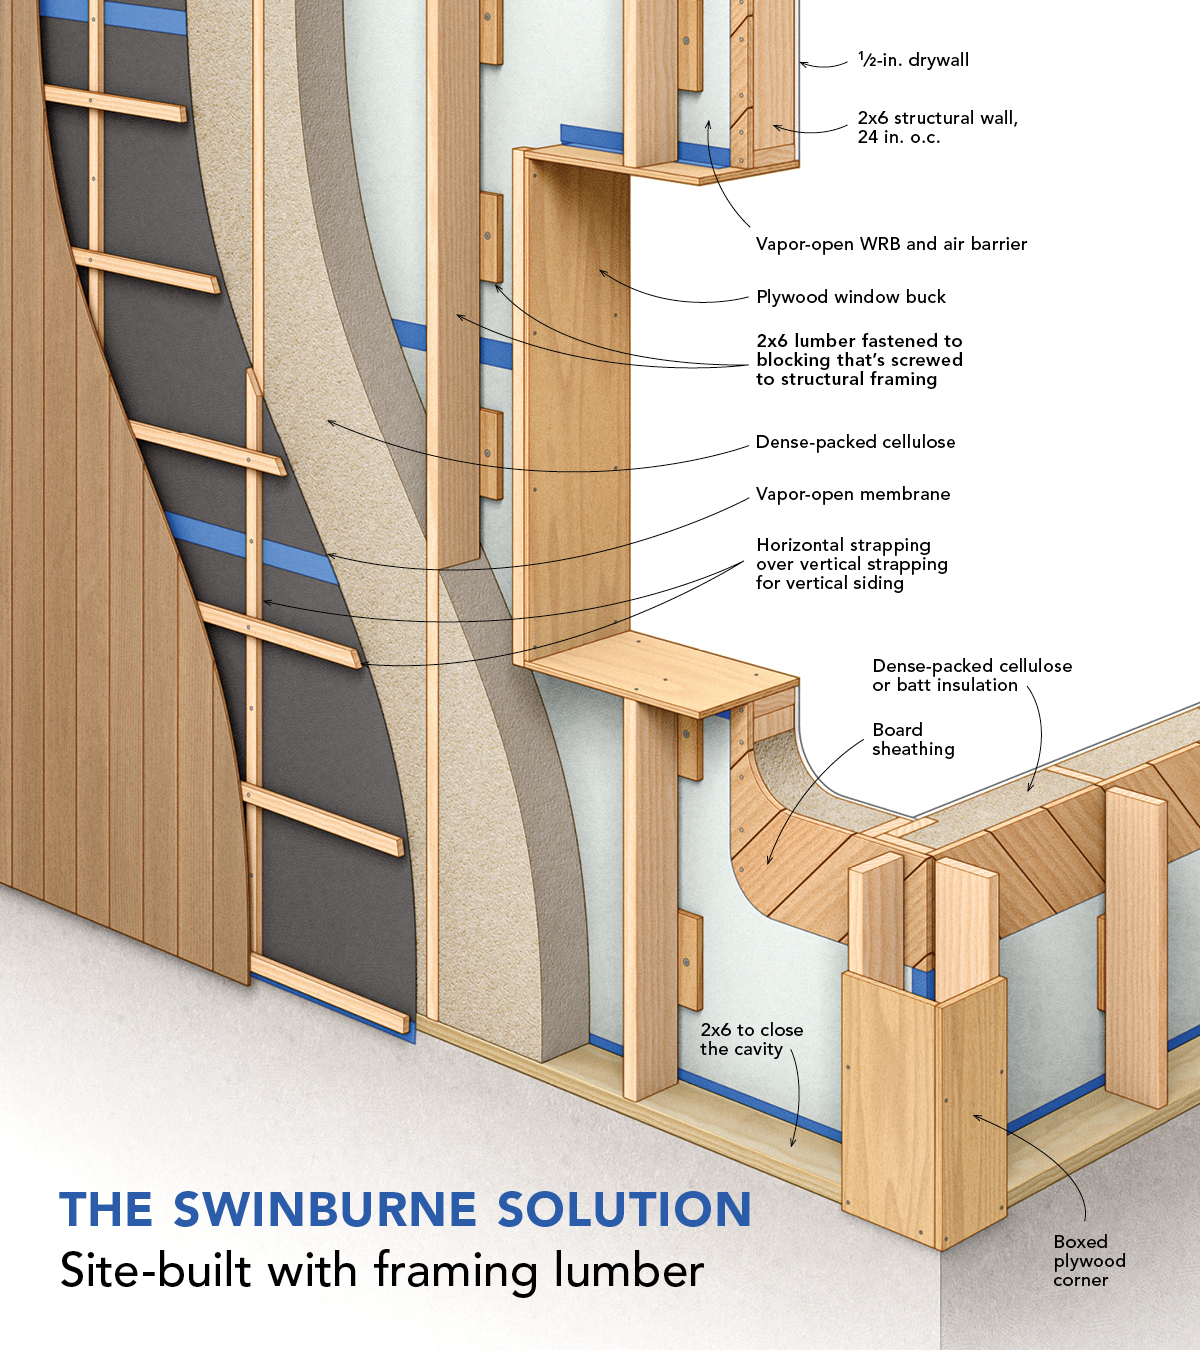
Though manufactured alternatives to John Larsen’s original wall truss have gained popularity, Vermont architect Robert (Bob) Swinburne has adopted a site-built solution of his own. Bob has tried a few variations on what his friends call the “Swinburne truss.” His first idea was to create a standoff with a block of wood fastened to the framing and a plywood gusset holding a length of 2×4 or 2×6 parallel to the wall. But he’s simplified that further to just having the lumber attached to the block of wood fastened to the wall and offset with the framing inside the sheathing. His builder has also switched from framing lumber to local green lumber.
Whether to use a Larsen truss or a double-stud wall, Bob says the choice is partially the builders’. He wants them to be comfortable with the assemblies they are hired to build. Other factors include the complexity and height of the building. Larsen trusses make a lot of sense on wide, single-story houses, he says. The time of year is also a factor. In the winter, he’d rather the crew be working inside. In nicer weather, installing Larsen trusses outside is more viable. And finally, the foundation type matters.
“A standard concrete foundation with insulation to the inside is a good situation for a double-stud wall,” Bob says. “If you’re using insulated concrete forms or a floating slab where there’s a lot of exterior insulation, then a Larsen-truss system starts to make sense.”

Details, details, details
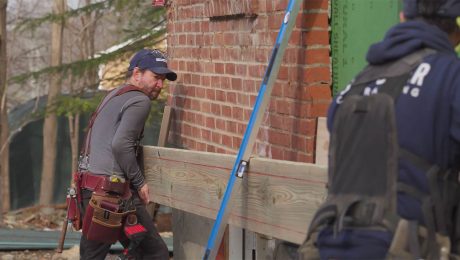
Connecticut builder Ben Bogie has used I-joists as Larsen trusses on both new homes and remodels. One of the things Ben likes about this system for remodels is that he can straighten walls as he installs the I-joists. He’ll set the joists plumb on either end of a wall, pull stringlines between them, and shim the I-joists to the line wherever the wall is wonky. Ben also likes the fact that he can cover a lot of area fast with this system. After installing a ledger at the bottom of the wall and notching the I-joists to bear on it, Ben only screws the I-joists to the framing at the rim joist and the top plate, because that is all his engineer called for. He also said that you’ll probably find yourself scratching your head on a few details when building with Larsen trusses for the first time. If you’ve never built a house with thick walls, windows and doors are one of the first tricky details you’ll encounter with a Larsen-truss assembly.
The most common approach to framing window openings is to build a window buck from sheet material. A flangeless window can be installed inside the buck with common details like a sloped sill pan, flashing tape on the exterior, spray foam in the shim space, and air-sealing tape to the interior. Josh prefers a one-piece aluminum sill pan under his windows. One of the key joints to seal is where the wall sheathing and WRB meet the window buck, because this is the main water and air control layer. This can be done with a fluid-applied membrane, tape, or both. Doors can be installed the same way. In both cases it is important to think about what you’ll need for fastening trim around the window or door. Also, it’s important to consider the placement of trusses next to window and door bucks. Josh says that he occasionally omits trusses when they are too close to windows and doors and will create a space that is too tight to insulate well.
The gable end is another area where you’ll need to plan your details well. Josh sometimes sets the gable truss out to the plane of the I-joists. In this case, the portion of the roof load that hangs over the edge of the structural wall is bearing on the I-joist, a detail approved by Josh’s engineer. However, if the roof pitch is low, which means the gable isn’t very tall, he sometimes will build a deep rake overhang and run the I-joists to the roof. Josh says there is some insurance to be found in running the I-joists above the thermal boundary on both gable ends and eave walls with raised-heel roof trusses. By packing the insulation above the top plate, a bit of settling will not be an issue.
You’ll also need to determine how to handle the bottom of the trusses, install ledgers, and detail outside corners. If the trusses don’t land on the foundation, you’ll need to detail the bottom in a way that keeps the insulation in the cavity and keeps critters out of it. Some builders wrap a membrane around the bottom of the trusses, but a rigid barrier will be necessary to keep rodents from getting in. Solid lumber and sheet goods will work. You may consider something pressure treated, being so close to the ground.
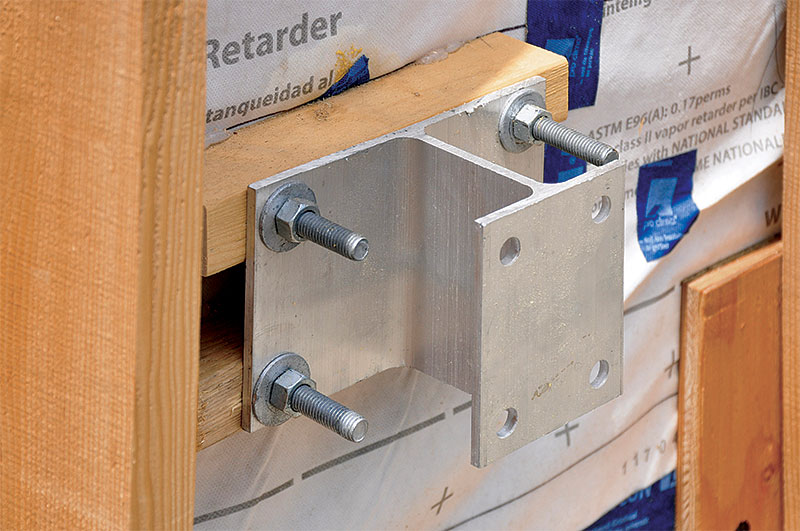
Your engineer may approve fastening framing lumber to the trusses for ledgers. This is how Josh commonly handles the ledger for a porch roof, for example. Bob has mounted Maine Deck Brackets on blocks fastened directly to the wall sheathing to hold a porch-floor ledger outside of the truss system. In any case, this is not a detail you’ll want to leave for the day you need to do the work, nor are outside corners.
Here, too, the solution may be simpler than it seems. When using I-joists for Larsen trusses, Josh completes outside corners with an additional joist, fastened perpendicular to the flange of one of the corner joists. If this sounds like it would be flimsy, keep in mind that all the I-joists will be tied together with horizontal 2x4s, which add a lot of rigidity to the assembly. Bob details the corners by connecting the end trusses on the adjacent walls with corners built from rips of plywood or OSB, leaving gaps where insulation can be blown into the hollow.
A healthy dose of skepticism
As you can see, there’s a lot to like about Larsen-truss wall assemblies. With good planning and a bit of experience, they’re a very buildable system too. Some builders make them work from a cost perspective, at least when compared to other high-performance wall assemblies. But at least one builder shared some skepticism about their durability.
“From a building science perspective, this system makes a lot of sense. It’s very vapor open to the exterior. With a good, ventilated cladding system, the assembly is going to dry really well. So hygrothermally, Larsen trusses are excellent. They have continuous insulation, and very little thermal bridging,” says Ben. “But I do have concerns about them. You are going to be relying on a membrane on the outside of the truss to contain the insulation, and that gives me durability concerns over a long time frame. For 10 or 20 years, I’m sure it’s fine. At 50 years, I’m not so sure. And I’m of the school of thought that we should be building homes that will last at least 100 years, if not 200.”
Point taken, but let’s agree: High-performance homes are high-stakes homes. To minimize risk in a Larsen-truss wall or any other assembly, it’s up to all of us to make sure we not only understand the important details, but execute them with precision and care.
RELATED STORIES
- Framing for Superinsulation
- Don’t Forget the Blocks
- Walls That Work: An Introduction to the Four Control Layers
From Fine Homebuilding #321
To view the entire article, please click the View PDF button below.
Fine Homebuilding Recommended Products
Fine Homebuilding receives a commission for items purchased through links on this site, including Amazon Associates and other affiliate advertising programs.
Portable Wall Jack

Speed Square

Magoog Tall Stair Gauges