FHB Logo Facebook LinkedIn Email Pinterest Twitter X Instagram Tiktok YouTube Plus Icon Close Icon Navigation Search Icon Navigation Search Icon Arrow Down Icon Video Guide Icon Article Guide Icon Modal Close Icon Guide Search Icon Skip to content
Subscribe
Log In
  • How-To
  • Design
  • Tools & Materials
  • Restoration
  • Videos
  • Blogs
  • Forum
  • Magazine
  • Members
  • FHB House
  • Podcast
Log In
How-To

A Fine Finish for Wood Exteriors

Maintain the beauty of stain-grade siding with proper prep and a protective oil finish.

By Noah Kanter Issue 322 - Apr/May 2024

Synopsis: The process of properly applying a penetrating oil finish to a wood-sided home involves stripping the old finish and cleaning the house with a chemical stripper and brightener, soft-washing with water, and then applying the stain. Professional painter Noah Kanter describes the different choices when it comes to transparent stains, the benefits of penetrating stains over film-forming finishes, and how to complete the process of staining a home from start to finish.


Though a properly applied stain on exterior wood looks incredible, stained exteriors are rare, for good reasons. For starters, a stained-wood exterior requires more-­expensive grades of natural-wood siding. The installation takes skilled carpenters working to tight tolerances, because there’s no putty or caulk to fill gaps and cracks. Perhaps most important of all, maintaining the beauty of a stained exterior takes a homeowner committed to regular upkeep. But contrary to popular belief, this type of finish doesn’t have to be a maintenance headache. If the surface is prepped correctly and the finish is reapplied every few years, a penetrating stain can be a cost-effective way to protect natural-wood siding, trim, and outdoor structures like decks and pergolas. It will, however, require a thorough understanding of the cleaning and coating products. And because there’s an exacting prep process, the first application of penetrating stain will likely be more expensive than painting

Given the challenges, it’s no wonder that many painting contractors stick with opaque coatings, which are more predictable and provide greater color consistency. But the trade-off is a more costly maintenance plan of washing, scraping, sanding, priming, and recoating every seven to 10 years. Unlike paint or solid stain, the transparent penetrating finish I use can be renewed almost indefinitely with a soft wash and recoat, a process that costs thousands less than a full paint job.

Film finishes vs. penetrating finishes

Exterior finishes that show off the wood grain can be arranged on a spectrum, from penetrating on one side to film-forming on the other. Both have pros, cons, and maintenance considerations. Penetrating finishes saturate the wood fibers with oil to protect them without forming a surface film. Film-forming coatings build up into a shell over the wood, usually over multiple coats, forming a protective barrier. There are also options in between penetrating and film-forming with characteristics of both, like semi-transparent coatings.

Spar, sometimes called yacht varnish, is a well-known example of a film-forming coating. Film finishes are often untinted, which produces a gorgeous, natural amber tone, but there are also tinted options available. When the surface is sanded extrasmooth, film finishes, paired with attractive wood, look luxurious, and it’s easy for the uninitiated to see a durable shell protecting the underlying wood.

While a sturdy film finish can offer good weather protection, the issue is maintenance, which can be as often as an annual recoat depending on the sun exposure. Without regular recoats the film can crack and peel. When the is film breached, moisture will enter and be trapped, discoloring and eventually damaging the wood and further degrading the film. While films can be repaired with sanding and recoating, it’s labor-intensive and rarely results in a uniform look.

Part of the appeal of penetrating finishes is that they don’t experience this type of costly failure, because the protective oil is absorbed by the wood fibers instead of remaining on the surface. The absorption also prevents the siding and trim from taking on water, which increases its resistance to cupping and improves dimensional stability. Unlike film finishes, neglecting a penetrating coating for a few years results in dry, weathered siding, instead of an unsightly peeling finish.

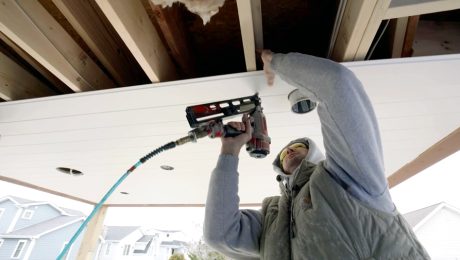
Of course it isn’t ideal to neglect outdoor wood products as described in this scenario, but it’s not as bad as moisture being trapped behind a film. Part of what makes a penetrating finish more affordable long-term is that the surfaces never need scraping or sanding; rather, they’re washed and recoated. I use penetrating finishes for most exterior situations. I save film-forming finishes for special areas like porch ceilings, doors, and outdoor living spaces.

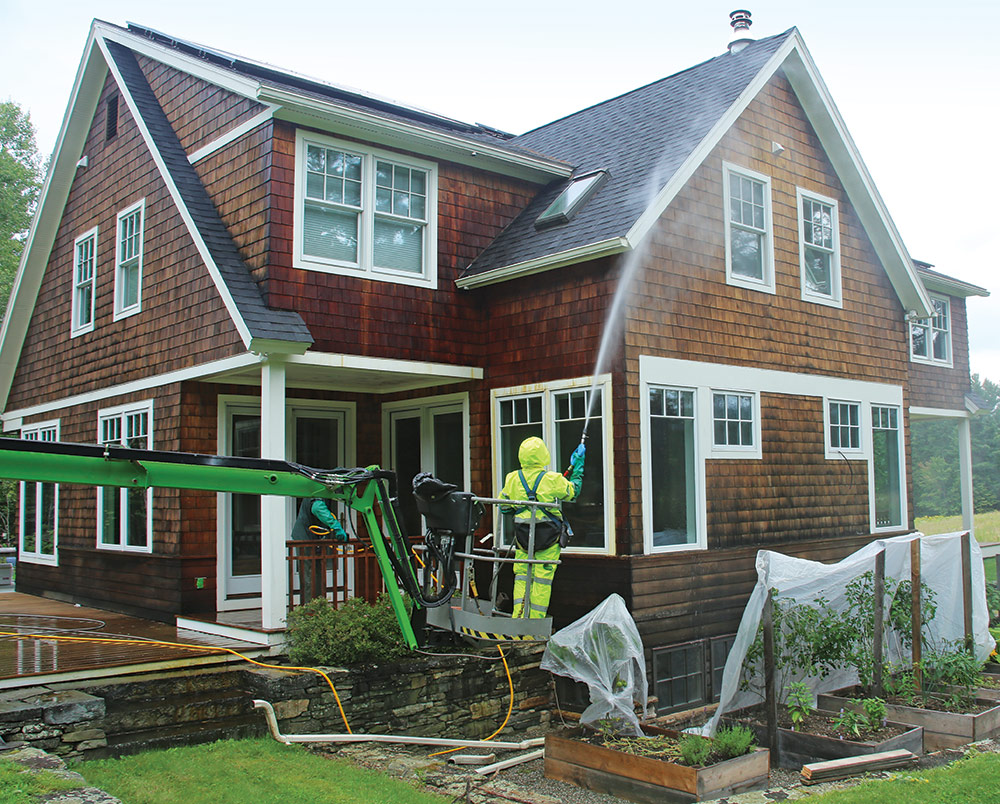
Start by cleaning and brightening

The whole idea with a penetrating finish is to highlight and preserve the wood, so the goal with the cleaning process is to remove the old finish while minimizing wood damage in order to produce a uniform substrate. This is where the soft wash comes into play. Soft-washing with large volumes of low-pressure water rinses away dirt, old finish, and residue from the cleaning and neutralizing chemicals without damaging the wood, and prepares the wood for finish application.

The cleaning and prep starts with a thorough wash using a chemical stripper that cleans the surface and removes the old finish. The stripper, which is a strong base, is later neutralized with a citrus-based acid that also acts as a wood brightener. Both steps require trial mixes of chemicals on small sections of siding. The type of wood, its porosity, and the type and condition of the existing finish are all variables that affect how the cleaning chemicals do their work. We adjust their strength and dwell times (how long we leave them on the siding before washing them off) to match the situation.

Cleaning and brightening will make some boards “furred” to some degree, which is the unscientific way to describe loose wood fibers that are raised from the surface, giving the wood a furry appearance in some spots. You can minimize furring to some degree by using lower-strength chemical treatments and the shortest effective dwell times, but some raised grain is inevitable. I make clients aware of this when we’re discussing how we’ll wash and finish their house.

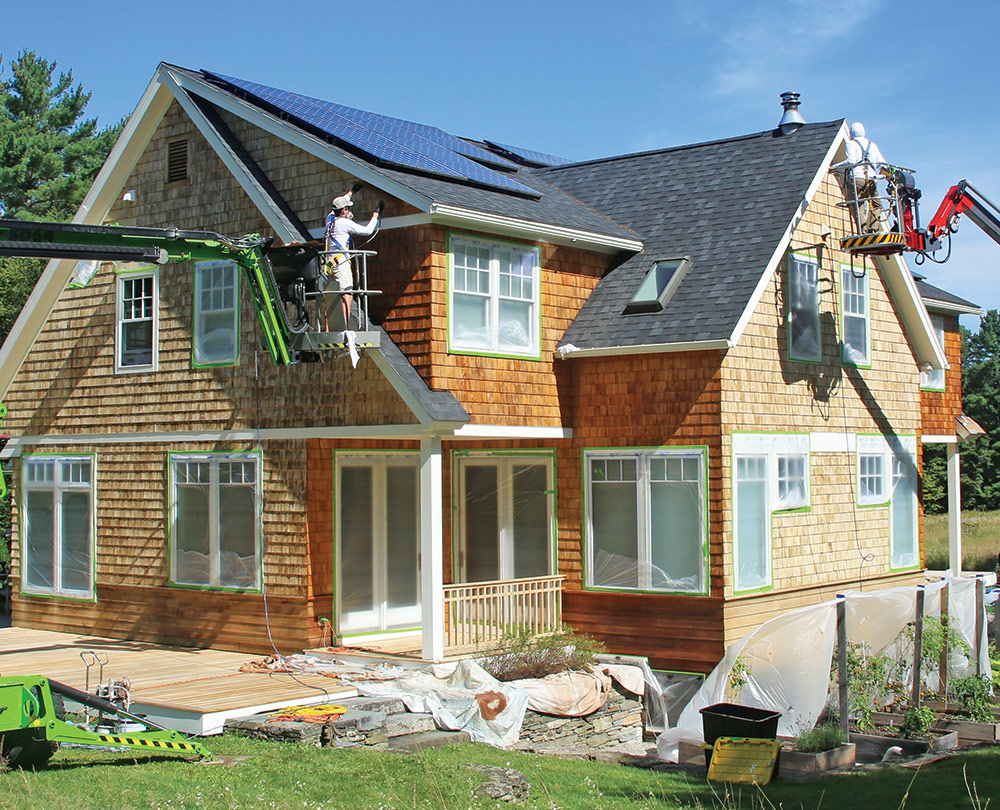
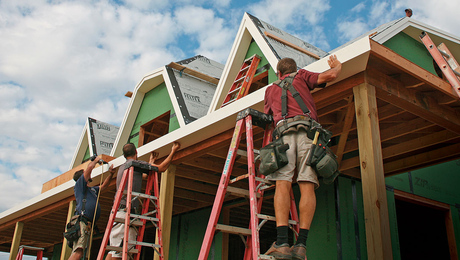
You need an effective setup for soft-washing. On this project, I came in as a local subject-­matter specialist to help Green Mountain Painters, the lead contractor. They have dedicated wash trailer built specifically for large jobs like this, with on-board water, a pair of high-capacity pumps, and hundreds of feet of hose. This equipment is fantastic, as are their rotating bucket lifts. The lifts, besides the obvious safety benefits, allow for better work in a fraction of the time with less strain on the body.

But you don’t need $100,000 or $200,000 in equipment to do this work; you can also use an entry-level chemical pump, which can be built for a few hundred dollars and a few hours of your time. I have a breakdown of my low-tech setup on my YouTube channel, Advice from a Young Tradesman TV. For your first project, I’d suggest ordering a sample chemical starter pack from PressureTek.com for less than $100, getting some used siding from an architectural salvageyard, and experimenting. Keep a notebook and record how certain chemical ratios perform on certain substrates. Your trials will be invaluable when you scale up to decks or houses.
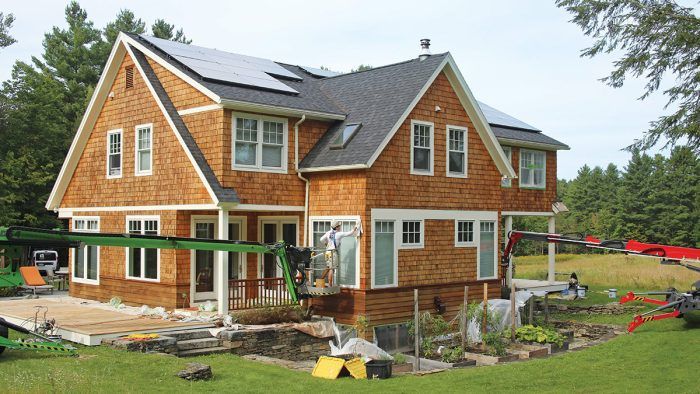

PREP THE JOB SITE

To keep moving equipment to a minimum, prep the house an elevation at a time, working around the house in a clockwise or counterclockwise manner. Start by protecting windows, exterior furnishings, and vulnerable landscaping.

Remove and label screens
Remove and label screens— If you leave screens in place, you run the risk of residue from the old finish or water spots from cleaning chemicals on the glass. Label the screens and keep track of any hardware so the screens are easy to reinstall.


Stow away shiny things
Stow away shiny things— The chemical stripper can damage decorative objects. Carry a drill or impact driver and a collection of bits for removing objects while prepping the house. Bring tape and plastic for labeling and masking.


Take down downspouts
Take down downspouts— Downspouts prevent the cleaning solutions and finish from reaching the siding reliably, so they have to come off. We replace downspouts after every work day so the house’s water-management system is fully intact for storms.


Give plants a good soak
Give plants a good soak— Regular sprays of water help protect gardens and other landscaping by diluting any stripper or brightener overspray. If any plants are especially valuable or edible, and consider covering them or moving them temporarily.


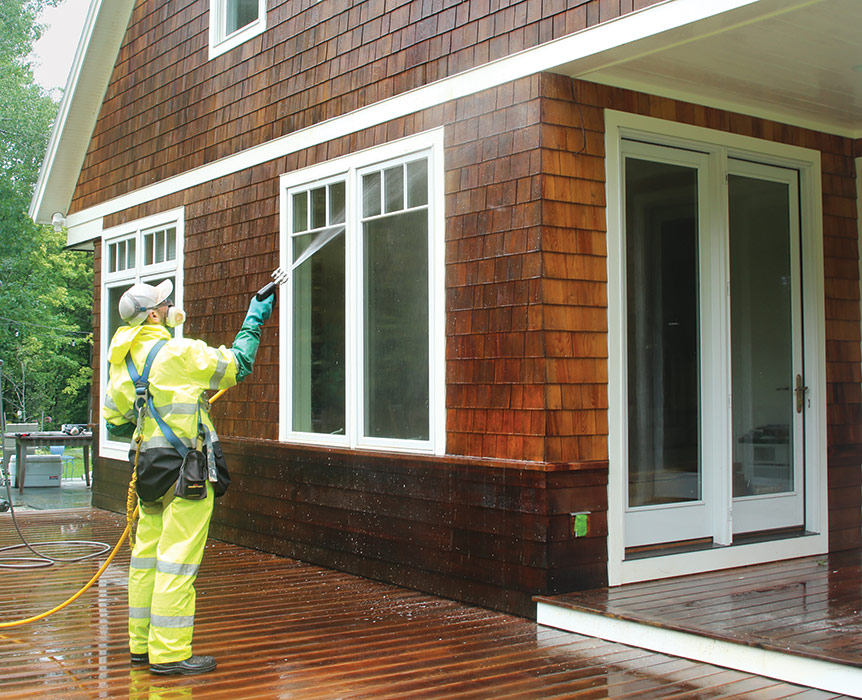
STRIP THE OLD FINISH

We use a sodium-hydroxide-based stripper, Extreme Solutions HD-80, to remove dirt, mold, and old finish. The concentrated stripper is highly alkaline, making a respirator and protective gloves a must.

Mix the stripper
Mix the stripper— The stripper must remove any surface contaminants and all the old finish without damaging the underlying wood. We mix it in batches, adjusting the concentration to match the existing finish. We start with about 1 cup of stripper to 1 gal. of water.


Test effectiveness of the stripper
Test effectiveness— We test the stripper on a small section under a porch or overhang where the siding hasn’t been washed by rain. We repeat this test on every elevation, as each will have different amounts of dirt and old finish. A ratio of 1-1⁄4 cup stripper to 1 gal. of water was effective on most of this house.


Work from the bottom up
Work from the bottom up— Chemical application and washing should start at the bottom of the building and move toward the top, because drips of old finish and stripper should fall on siding already wetted with the stripper solution.


Spray on the stripper
Spray on the stripper— A pump permanently mounted in the trailer transfers the concentrated stripper to the spray nozzle. We thoroughly wet the siding surface with the stripper and then allow it to sit for a few minutes, described as dwell time.


Spray on the stripper
Rinse it off— After letting the stripper dwell for a few minutes, we thoroughly rinse the siding and surrounding surfaces with water delivered by pressure washers tamed down to a very low psi. Washing and rinsing the house uses hundreds of gallons of water, so talk to clients about their well or municipal water supply. You may need an additional water source.


Adjust the recipe as needed
Adjust the recipe as needed— The finish on the south side of this house was more tenacious than on the other sides, so we increased the concentration to 1-1⁄3 cups of stripper per gal. of water, which proved effective. Don’t rush the dwell time, or you may think the stripper isn’t working and be tempted to use an even more concentrated solution, which can discolor or damage the wood.


NEUTRALIZE AND BRIGHTEN

Once the finish is removed, the elevation is treated with an acidic wood brightener that also neutralizes the alkaline stripper. We apply the brightener, allow it to work, and then rinse it from the top down.

Mix the brightener
Mix the brightener— The concentrated, powdered brightener/neutralizer is mixed with water in ratios of about 1 cup of brightener to 1 gal. of water. It is then pumped through the hose to the spray nozzle.


Apply bottom to top
Apply bottom to top— Apply the brightener from bottom to top and allow it to work for a few minutes. Keep the surface wet to prevent the brightener solution from drying on windows, siding, or trim, which can leave persistent water spots.


Rinse the brightener
Rinse the brightener— After about 5 to 10 minutes, we rinse off the brightener with another soft wash of water. Work from the top down to prevent streaks and water spotting. Keep windows wet to avoid those water spots.


Ready for finish
Ready for finish— Stripping and brightening continues by elevation. Once all sides of the house are stripped and brightened, the siding is allowed to dry for two or three days without rain before finishing. Ideally, the siding should be at about 15% moisture content before staining.


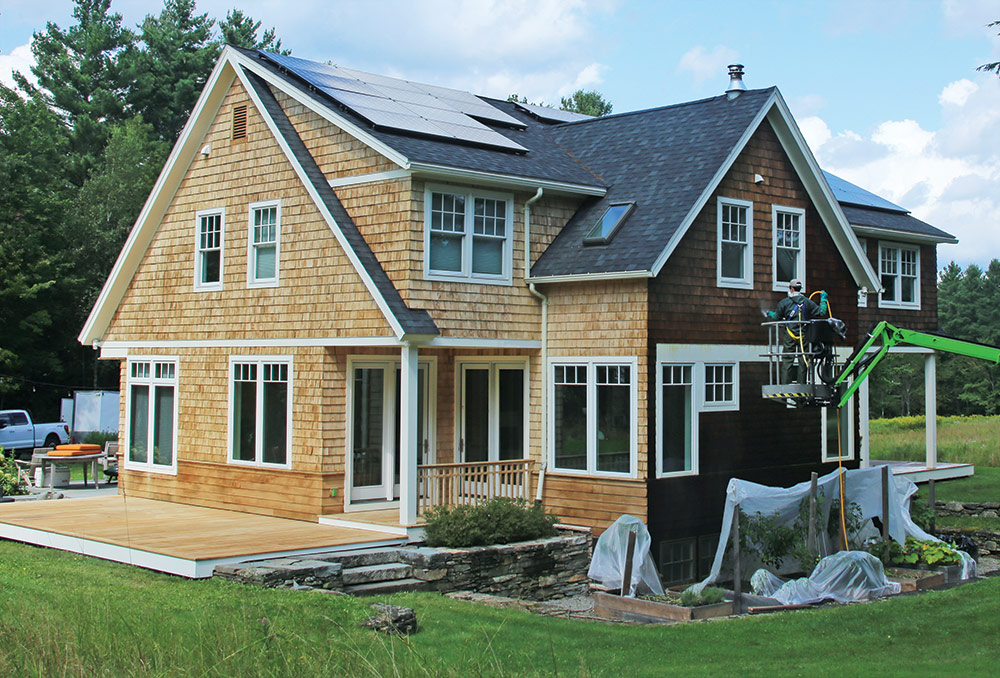
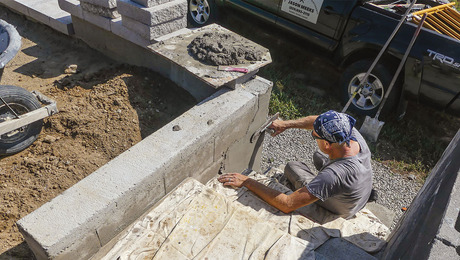
SPRAY LARGE SECTIONS

Staining one side at a time and in a systematic manner minimizes time spent setting up and moving equipment. We use an airless sprayer to apply the finish, which is far faster than constantly dipping a brush into a pail of stain. We use the sprayer to flood the area with finish, and then work it in with a large brush.

Cover windows
Cover windows— Plastic masking film is cut to fit over windows for protection from stain overspray. The plastic is held in place with high-quality painters tape that won’t leave a tape or adhesive residue even in damp or hot conditions.


Start at the top
Start at the top— The oil stain is applied with a small airless sprayer equipped with a 515 spray tip. Compared to working from extension ladders, a bucket lift makes the stripping and finishing process safer and faster.


Protect painted surfaces
Protect painted surfaces— A cardboard spray shield prevents stain from getting on trim and other painted parts of the house. The cardboard becomes quickly saturated with stain, so we use multiple shields and allow them to dry before re-use.


Work in the finish
Work in the finish— Once the finish is sprayed on the surface, we brush it into the siding with a 5-in. Olympian block stainer brush. This ensures the oil is fully worked into the wood and moves excess stain from less to more absorbent wood grain.


Wipe drips and overspray
Wipe drips and overspray— Painted trim like this frieze board doesn’t need to be masked, but the oil finish must be wiped off before the stain dries. If the finish is partially dry and resistant to wiping, it can often be cleaned off with mineral spirits.


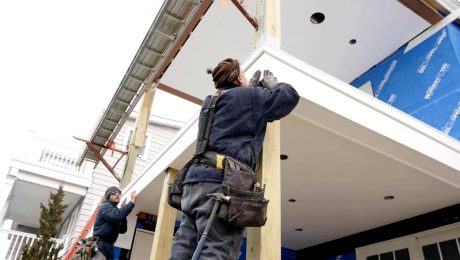
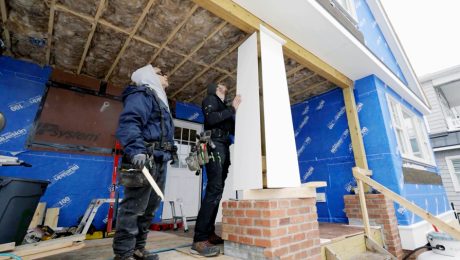
SPRAY AND BRUSH SMALL AREAS 

Bump-outs and covered entries are treated differently than expansive sections of siding. Depending on their size, it may make sense to use a brush to apply the finish instead of spending a disproportionate amount of time masking windows and adjacent areas for spraying.

Spray—don’t dip
Spray—don’t dip— We load the brush with stain using a quick, gentle spray from the spray nozzle. This method is faster, less messy, and more convenient than managing a paint pail or can of stain to wet the brush.


Keep a watchful eye
Keep a watchful eye— As you work on a section, look for drips of stain and wipe them away. Also look for drips from previous coats of finish and scrape these off as you go. Removing them later will damage the new finish and may necessitate recoating.


Cut in around trim
Cut in around trim— Stop spraying a few inches short of trim and painted areas. Once a section has been sprayed, cut in with a stain brush to finish the section. Wipe off any overspray that lands on painted surfaces.


Your mileage may vary
Your mileage may vary— Different wood species and grain will absorb stain differently. The red cedar siding at the base of the exterior walls absorbed more stain than the shakes above it.


FINAL DETAILS 

Finishing touches make or break an exterior refinish. Dirty windows, rough-touch surfaces on railings, and wonky downspouts can spoil an otherwise fresh exterior. Spend some time on the details for a job that looks as good as it can.

Plan work for bad weather
Plan work for bad weather— Covered decks and porches can be worked on in the rain and during dewy mornings. We use a finish that works with a moisture content up to 20%.


Trim before, doors after
Trim before, doors after— I like to paint window casing, corner boards, and other exterior trim with a brush and small roller before staining the siding. The new paint allows stain overspray to wipe off. Exterior doors are painted after the siding is stained and dry to the touch.


Pull the plastic
Pull the plastic— Once a section is stained and has dried for an hour or two, remove the plastic sheeting and masking tape. When practical, do this work while bucket lifts or ladders are in position for staining to save setup time.


Put back what you took off
Put back what you took off— As you remove masking, wash the windows and replace downspouts, screens, and anything else that was removed for cleaning and staining.


Choose the right stain

Choosing a stain that shows off the wood grain can be overwhelming. Transparent, semi-transparent, and semi-solid stains all allow you to see the wood grain behind the finish to varying degrees. In general, as you move toward the semi-solid end of the spectrum, you’re getting more pigment for more even coverage and better protection, but the trade-off is that you can’t see the underlying wood grain as well. I let my clients’ aesthetic goals start the discussion, and then I explain the pros and cons of the various finish types from there.

While water-based paints and finishes have come a long way, the best penetrating finishes are still oil-based. I’ve found that water-based semi-transparent stains, even from reputable manufacturers, don’t carry pigment or penetrate into the wood as well as oil, often resulting in unsightly lap marks. They also don’t have the wood-­conditioning qualities that the best oil-based penetrating stains provide.

In my years of experience, Armstrong-Clark is the best penetrating finish. It has the most effective conditioning oils and solves a number of application problems. It can be applied in direct sunlight on hot days with no lap marks. You can walk on recently stained boards while finishing decks. If there happens to be a freak rainstorm a few hours after application, the product is generally unaffected. Plus, the collection of articles and how-to information on the manufacturer’s website is far superior to the information put out by any other manufacturer.

I regularly hear clients, builders, and homeowners alike tout a siding’s rotproof nature, especially when they’re describing a naturally rot-resistant species like cedar or redwood, or tropical hardwoods. While wood species is important, how the wood is coated and maintained has a bigger impact on its overall appearance and performance. If you opt for a penetrating stain, soft-wash and recoat every few years to protect the house and so that you can enjoy how good it looks. You’ll also have a smaller bill when it comes time to recoat if you do it consistently, compared to waiting until it looks shabby.

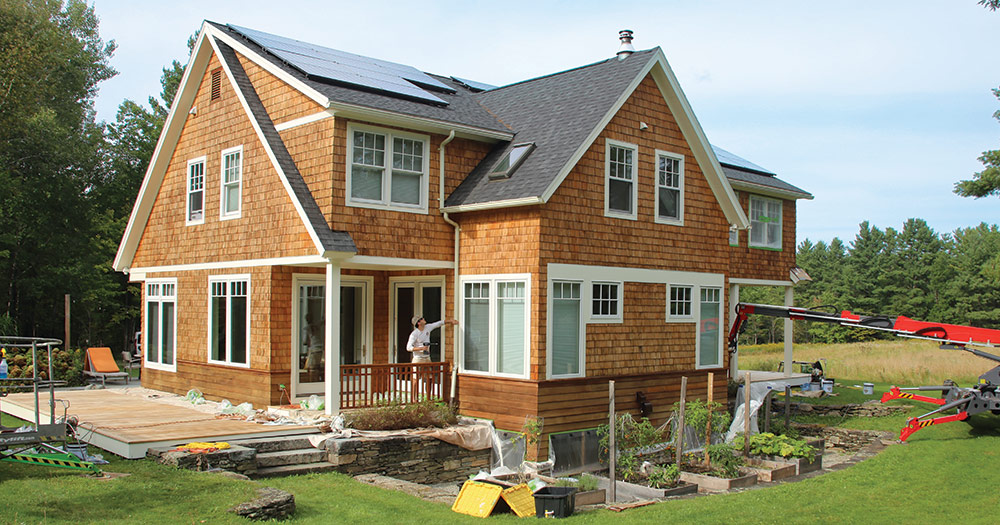
After stripping the old finish and prepping for stain on this house, we applied a transparent penetrating finish. The clients were excellent to work with, and they love their home’s new exterior.


A Fine Finish forWood ExteriorsNoah Kanter is the owner of Nth Degree Painting in Chittenden County, Vt. Special thanks to Green Mountain Painters for coordinating the project. Photos by Patrick McCombe.

RELATED STORIES

  • What’s the Difference: Exterior Paint vs. Solid-Body Stains
  • A Checklist of Exterior Painting
  • 10 Tips to Paint Like a Pro

From Fine Homebuilding #322

To view the entire article, please click the View PDF button below.

Sign up for eletters today and get the latest how-to from Fine Homebuilding, plus special offers.

Signing you up...

This site is protected by reCAPTCHA and the Google Privacy Policy and Terms of Service apply.
See all newsletters
See all newsletters
×

Get home building tips, offers, and expert advice in your inbox

Signing you up...

This site is protected by reCAPTCHA and the Google Privacy Policy and Terms of Service apply.
See all newsletters
See all newsletters
View PDF

New Feature

Fine Homebuilding Forums

Ask questions, offer advice, and share your work

View Comments

  1. mangty | Mar 25, 2024 05:38am | #1

    Congratulations on your new bungalow! Removing the overhanging cabinet to improve light flow is a great idea and usually won't cause major damage beyond needing some patching and painting, but it's best to consult a contractor for a precise assessment. While considering updates, you might also think about improving water quality. For instance, incorporating granular activated carbon cartridges from https://filterway.com/replacement-filter-cartridges/gac-filters/ can enhance your drinking water, complementing your kitchen's aesthetic and functional upgrades. Chalk painting the cabinets and reducing door numbers can significantly freshen up the space without extensive renovations.

Log in or create an account to post a comment.

Sign up Log in

Become a member and get full access to FineHomebuilding.com

Up Next

Video Shorts

Featured Story

Fix Air Leaks in Old Houses

Simple air-sealing measures and spray-applied sealant lower energy bills and increase comfort without the need to tear the house apart.

Featured Video

A Modern California Home Wrapped in Rockwool Insulation for Energy Efficiency and Fire Resistance

The designer and builder of the 2018 Fine Homebuilding House detail why they chose mineral-wool batts and high-density boards for all of their insulation needs.

Related Stories

  • 10 Tips for a Long-Lasting Paint Job
  • Sorting Through Siding: IBS Expert Roundtable
  • Shim Trim With Screws
  • FHB Podcast Segment: When to Use Coil Stock on Fascia and Rake Trim

Discussion Forum

Recent Posts and Replies

  • |
  • |
  • |
  • |
  • |
  • |
View More Create Post

Highlights

Fine Homebuilding All Access
Fine Homebuilding Podcast
Tool Tech
Plus, get an extra 20% off with code GIFT20

"I have learned so much thanks to the searchable articles on the FHB website. I can confidently say that I expect to be a life-long subscriber." - M.K.

Get home building tips, offers, and expert advice in your inbox

Signing you up...

This site is protected by reCAPTCHA and the Google Privacy Policy and Terms of Service apply.
See all newsletters
See all newsletters

Video

View All Videos
  • FHB Podcast Segment: When to Use Coil Stock on Fascia and Rake Trim
  • Wrapping PVC Box Beams
  • Installing a PVC Porch Ceiling
  • Creating and Installing PVC Tapered Columns
View All

Exterior Siding and Trimwork

View All Exterior Siding and Trimwork Articles
  • Cordless Coil Siding Nailer
  • Make Your Own Parging Mix
  • A Deep Dive Into Continuous Exterior Insulation
View All Exterior Siding and Trimwork Articles

Fine Homebuilding Magazine

  • Issue 330 - April/May
    • Deck Details for Durability
    • FAQs on HPWHs
    • 10 Tips for a Long-Lasting Paint Job
  • Issue 329 - Feb/Mar 2025
    • Smart Foundation for a Small Addition
    • A Kominka Comes West
    • Making Small Kitchens Work
  • Issue 328 - Dec/Jan 2024
    • How a Pro Replaces Columns
    • Passive House 3.0
    • Tool Test: Compact Line Lasers
  • Issue 327 - November 2024
    • Repairing Damaged Walls and Ceilings
    • Plumbing Protection
    • Talking Shop
  • Issue 326 - October 2024
    • Paint Behind Strike Plates
    • Conceal Cut Ends
    • Ladder Slip Solution

Fine Home Building

Newsletter Sign-up

  • Fine Homebuilding

    Home building tips, offers, and expert advice in your inbox.

  • Green Building Advisor

    Building science and energy efficiency advice, plus special offers, in your inbox.

  • Old House Journal

    Repair, renovation, and restoration tips, plus special offers, in your inbox.

Signing you up...

This site is protected by reCAPTCHA and the Google Privacy Policy and Terms of Service apply.
See all newsletters

Follow

  • Fine Homebuilding

    Dig into cutting-edge approaches and decades of proven solutions with total access to our experts and tradespeople.

    Start Free Trial Now
    • Facebook
    • Instagram
    • X
    • LinkedIn
  • GBA Prime

    Get instant access to the latest developments in green building, research, and reports from the field.

    Start Free Trial Now
    • Facebook
    • YouTube
  • Old House Journal

    Learn how to restore, repair, update, and decorate your home.

    Subscribe Now
    • Facebook
    • Instagram
    • X

Membership & Magazine

  • Online Archive
  • Start Free Trial
  • Magazine Subscription
  • Magazine Renewal
  • Gift a Subscription
  • Customer Support
  • Privacy Preferences
  • About
  • Contact
  • Advertise
  • Careers
  • Terms of Use
  • Site Map
  • Do not sell or share my information
  • Privacy Policy
  • Accessibility
  • California Privacy Rights

© 2025 Active Interest Media. All rights reserved.

Fine Homebuilding receives a commission for items purchased through links on this site, including Amazon Associates and other affiliate advertising programs.

X
X
This is a dialog window which overlays the main content of the page. The modal window is a 'site map' of the most critical areas of the site. Pressing the Escape (ESC) button will close the modal and bring you back to where you were on the page.

Main Menu

  • How-To
  • Design
  • Tools & Materials
  • Video
  • Blogs
  • Forum
  • Project Guides
  • Reader Projects
  • Magazine
  • Members
  • FHB House

Podcasts

  • FHB Podcast
  • ProTalk

Webinars

  • Upcoming and On-Demand

Podcasts

  • FHB Podcast
  • ProTalk

Webinars

  • Upcoming and On-Demand

Popular Topics

  • Kitchens
  • Business
  • Bedrooms
  • Roofs
  • Architecture and Design
  • Green Building
  • Decks
  • Framing
  • Safety
  • Remodeling
  • Bathrooms
  • Windows
  • Tilework
  • Ceilings
  • HVAC

Magazine

  • Current Issue
  • Past Issues
  • Magazine Index
  • Subscribe
  • Online Archive
  • Author Guidelines

All Access

  • Member Home
  • Start Free Trial
  • Gift Membership

Online Learning

  • Courses
  • Project Guides
  • Reader Projects
  • Podcast

More

  • FHB Ambassadors
  • FHB House
  • Customer Support

Account

  • Log In
  • Join

Newsletter

Get home building tips, offers, and expert advice in your inbox

Signing you up...

This site is protected by reCAPTCHA and the Google Privacy Policy and Terms of Service apply.
See all newsletters
See all newsletters

Follow

  • X
  • YouTube
  • instagram
  • facebook
  • pinterest
  • Tiktok

Join All Access

Become a member and get instant access to thousands of videos, how-tos, tool reviews, and design features.

Start Your Free Trial

Subscribe

FHB Magazine

Start your subscription today and save up to 70%

Subscribe

We hope you’ve enjoyed your free articles. To keep reading, become a member today.

Get complete site access to expert advice, how-to videos, Code Check, and more, plus the print magazine.

Start your FREE trial

Already a member? Log in