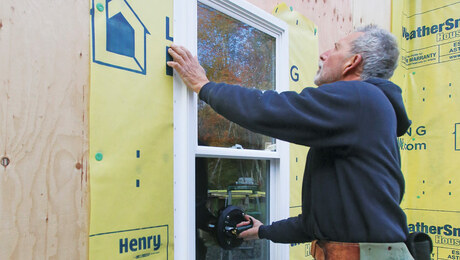
Windows Before Housewrap?
When it makes sense for inspections, extra protection, or sequencing demands, you can install a window before the WRB and still make it weathertight.

Synopsis: There are a number of reasons to install windows before the mechanically fastened WRB (the housewrap)—windy conditions, open-stud construction that has no sheathing panel to prevent the wrap from ripping, project scheduling, inspections, or just because it’s local custom. Editorial advisor Mike Guertin walks through the process, from creating an apron to sloping and flashing the sill, handling the rough opening, installing and taping the window, and finally, installing the housewrap. Watch the step-by-step installation of a window before housewrap.
There are lots of ways to install weathertight windows. You might choose to install a sloped rough sill, a back dam, or both. Your sill pan could be site-made or manufactured from plastic or metal. You can protect the inside perimeter of the rough opening with housewrap or a self-adhering membrane. For flashing, you can choose between tapes and liquid-applied membranes. You even have options for fasteners—there are nails and screws that can do the job. If you’re following good window-flashing principles today, the window manufacturer’s instructions likely inform the process, and you probably improve on them for added reliability.
For many window installers in North America, though, one major step in the window installation and flashing process probably isn’t a decision consciously made: whether the mechanically fastened water-resistive barrier (WRB)—the housewrap—is installed over the walls before the windows are installed (housewrap first), or the housewrap is installed after the windows (windows first).
If you scan through window-installation articles and videos by Fine Homebuilding and other building resources, you’ll notice that most of them profile the housewrap-first approach. This bias is reinforced by window manufacturers’ instructions. Many present the housewrap-first approach to window flashing exclusively; if they do include the windows-first approach, it’s often deeper in the guide or presented as an alternative.
We all fall into building habits based on what we learned early in our careers and how things are done in our areas. Many home-building practices are regional. The windows-first approach isn’t as widespread as the housewrap-first approach, but in some parts of the country, you’ll find it used regularly. You may be skeptical of the idea of installing the windows before the housewrap, but it could be an approach that you find helpful when project conditions warrant.
While sheathing-integrated and liquid-applied WRBs have received a lot of attention among high-performance builders over the past number of years, most new homes are still built using housewrap or tar paper for the WRB, so this topic is an important one for the building industry at large. If you’ve been installing windows first for years, you’ll probably feel like it’s time someone acknowledged that it’s a method on par with the housewrap-first approach. In this article, I’ll review the main advantages, describe the process and details I prefer when installing windows first, and explain a few options along the way.
THE APRON IS JUST A PIECE OF HOUSEWRAP
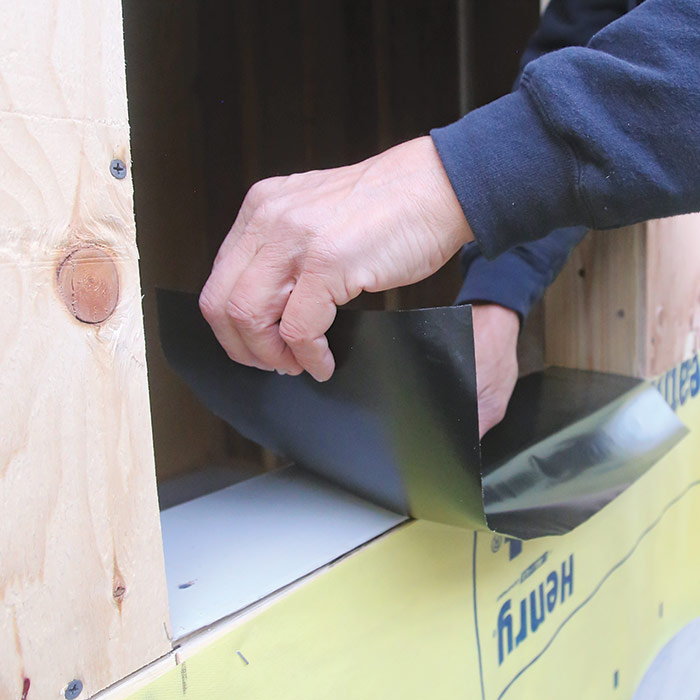
When installing windows before the housewrap, the flashing sequence follows the same principles as when installing housewrap first: Integrate the flashing with the housewrap and install flashing layers shingle-style so water drains to the surface. Sometimes called a “skirt,” the apron is a piece of housewrap installed on the wall beneath the rough sill. Because it is the lowest piece of the flashing system, it’s installed first. Upper layers will lap over it.
Note: Window-installation instructions often call for the apron to be just 1 ft. tall and for it to be pulled though a slit cut in the overlapping piece of housewrap when that piece is installed later. I find this a little awkward and use a taller apron that will either lap over the foundation or be lapped on top of the lower course of housewrap.
Staple up the apron— Cut a piece of housewrap 2 ft. longer than the rough opening is wide. Position the sheet flush with the rough sill and centered so that 1 ft. extends past either side of the rough opening. Fasten along the top edge. Leave the bottom of the sheet loose if an inspection is required or roll the sheet up and tack-fasten at the ends.
SLOPE THE SILL
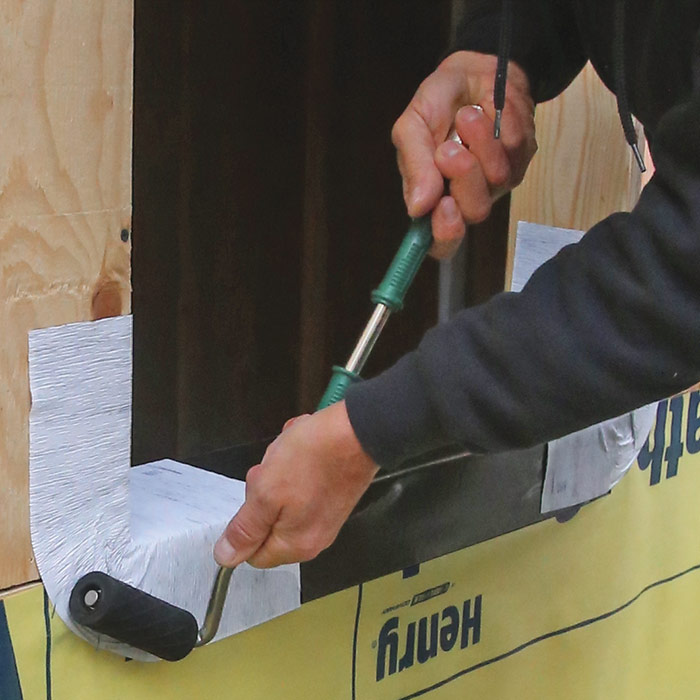
Most window manufacturers and the International Residential Code call for a sloped or sealed sill-pan flashing that directs water to the exterior. I usually apply a piece of bevel siding to the rough sill to create a sloped sill, as shown here. In cases where the rough opening wasn’t made tall enough to account for the thickness of the bevel siding, a back dam can be installed about 1⁄2 in. inboard of the depth of the window jamb. The back dam blocks water from draining toward the inside of the wall. Occasionally I’ll install bevel siding to create a slope and a back dam, because sometimes I like to overdo things.
For rough-opening sides, you have options
Though some manufacturer’s instructions skip this step and show the windows installed directly to the sheathing, I think protecting the sides of the rough opening is a must. I’m comfortable using housewrap for this detail, but strips of a self-adhering flashing material would be an upgrade. This detail protects the framing from any water that gets by the flashing system into the sill pan. The housewrap or flashing should extend out of the opening 6 in. to 12 in. onto the face of the wall and lap over the apron below.
— OR —
4 Reasons to install windows firstThe reason why one construction technique, sequence, or detail dominates in one region while a different method is used widely in another area is sometimes based on practical matters. Other times, it’s just local inertia, which is one reason why builders use the windows-first method. When it’s not, there are at least four good reasons builders and installers may choose to install the windows before the housewrap. They include open-stud construction, windy conditions, project scheduling, and the building-inspection process. Windy conditions— A problem I see on many job sites is mechanically fastened housewrap that’s left exposed for a long period before the cladding is installed. While most housewrap manufacturers have generous exposure limits of 90 to 180 days, the longer the housewrap is exposed, the greater the chance of there being windy conditions. Wind can tear housewrap even when it’s properly installed with cap fasteners at the typical 4-in. to 6-in. spacing along edges and 12 in. to 24 in. in the field. And it’s rare to see proper repairs of tears and fastener pull-throughs being made to damaged housewrap before it’s covered with cladding. All those damaged spots that aren’t repaired properly can lead to leaks. Open-stud construction— This is the process of building walls without structural sheathing and is a regional practice found in many different areas of the country. In this situation, it’s not practical to install the housewrap over the studs until the cladding installation is in process. Even a light breeze can tear housewrap around fasteners when there’s no rigid sheathing panel to block the wind and prevent the wrap from being torn off the studs. Wind can be an issue for housewrap even when wall sheathing is installed over the studs. Project scheduling— In some cases, job-site scheduling may dictate what gets installed first, the windows or the housewrap. Some builders rely on one group of trade specialists to install housewrap and another group of specialists to install windows. When the windows are delivered before the housewrap installers arrive and there’s no place to safely store them, installing the windows first may be a good option. As any builder knows, keeping the job moving along is an important part of staying on time and on budget. Inspections— And finally, inspections sometimes necessitate a windows-first approach. In some areas, code inspection schedules include a wall-sheathing and shear-wall nailing inspection after the mechanical, electrical, and plumbing rough-ins are completed. In this situation, the housewrap installation must wait until after the sheathing is inspected. If the builders want to install windows and doors to secure the buildings and make them weathertight prior to these inspections, they’ll have to take a windows-first approach. |
Install the window as usual
Window manufacturers’ instructions vary on certain details, including the requirement for cap flashing and whether or where to apply sealant between the window flange (or casing) and the wall. It’s important to read manufacturers’ instructions, because warranties are based on the window being installed as specified. There are also accepted best practices by builders, including using sealant between the window flange and the wall. I prefer to put the sealant on the flange before placing the window in the opening. There’s a risk of making a mess by putting your fingers in the sealant, but if you are careful, you end up with the sealant just where you need it. When applying the sealant to the wall, there’s always the chance that it doesn’t end up behind the flange.
Level the sill— Use shims (these can be made from the same material you used to slope the sill) to create a flat surface for the window to sit on. Move the shims in and out until they are level and aligned to establish a base for the window, then tape them in place. Now is a good time to dry-fit the window and check to make sure you can get it level and plumb in the opening.
Tape the flange, but not the bottom
Not all window manufacturers’ instructions call for flashing tape to seal the flanges. Since there will be a gap between the cladding and the perimeter of the window where water can reach the WRB plane, I like to take the extra step and back up the joint with flashing tape. Plus, the head tape laps over the window flange for added protection. Remember: Don’t tape the bottom flange, to allow water to drain away.
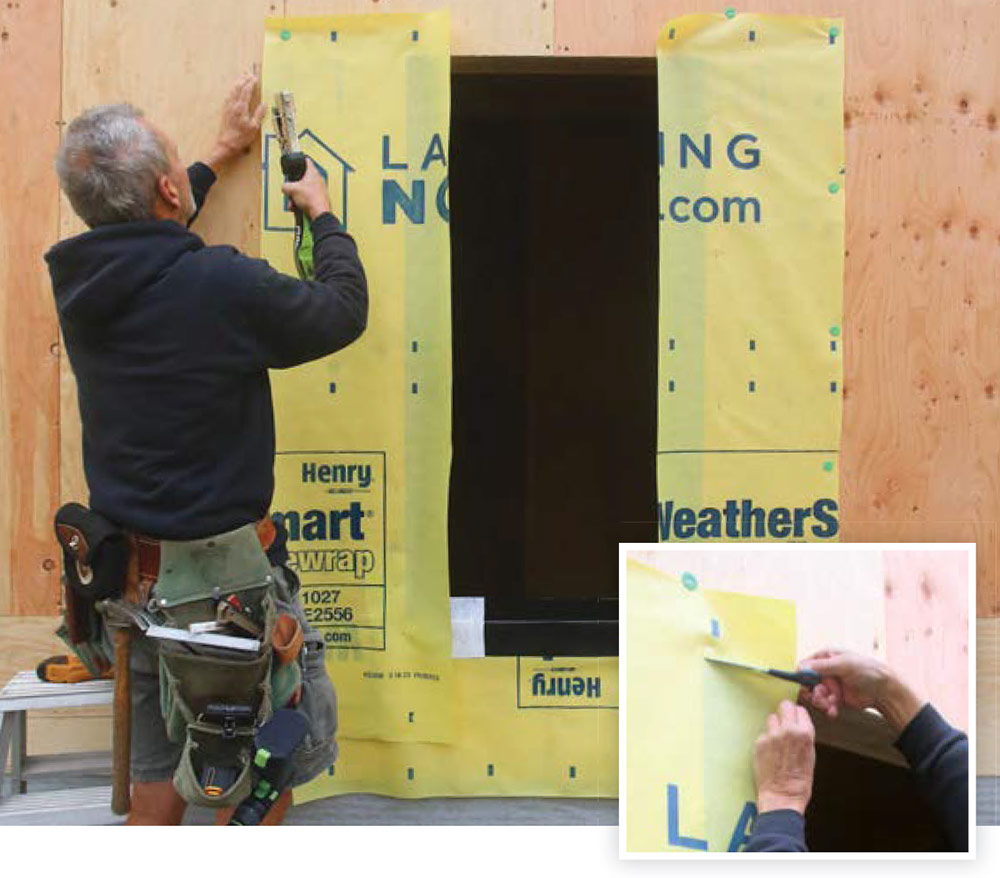
Install the housewrap
When the time comes to install the housewrap, do so as you usually do, or follow the housewrap manufacturers’ instructions. Roll the housewrap right over the windows. When you cut them out, there are a few options for the final details that are acceptable to window and housewrap manufacturers. You can simply fasten the housewrap with cap fasteners, but without any sealant or tape. You can apply a bead of sealant under the edge of the housewrap at the sides and head to seal it to the housewrap or flashing tape below. I’m happy to use housewrap tape for this purpose, though a more robust flashing tape is again an upgrade you may consider.
Consider a wind-driven rain deflectorThough it is not found in the manufacturers’ instructions for many windows, housewraps, or flashing tapes, a rain deflector, also called a high-pressure wind skirt, can be installed to protect the open bottom flange. Since the bottom flange of the window is not sealed when using a sill-pan flashing, it is vulnerable to wind-driven rain that gets past the cladding and is blown up and under the window flange. To reduce the risk of this happening, a strip of housewrap can be taped to the face of the bottom flange to deflect the water. |
—Editorial advisor Mike Guertin lives and works in East Greenwich, R.I. Photos by Brian Pontolilo.
RELATED STORIES
- Video: Installing and Flashing Windows Before Housewrap
- Video: Part 1: Prepare a Rough Opening for a Nail-Fin Window over Housewrap
- A Practical Approach to Installing Windows
From Fine Homebuilding #322
To view the entire article, please click the View PDF button below.