Three Ways to Insulate Basement Walls
For interior insulation, you'll need to use either rigid-foam boards or spray polyurethane foam.
Synopsis: Former editor Martin Holladay outlines three ways to insulate a basement wall from the interior side of the wall to achieve minimum R-values in the space, with section drawings to illustrate each assembly. He notes the R-value requirements by climate zone, the types of rigid-foam insulation that work best on the interior, and considerations for termites and airtightness.
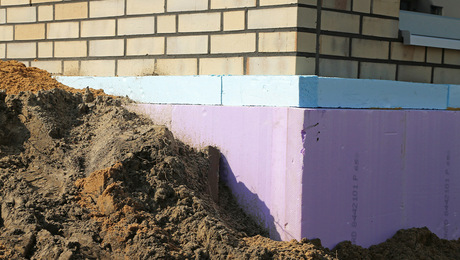
Basement-wall insulation can be placed on the exterior side of the wall, on the interior side of the wall, or on both sides of the wall. When the basement wall is insulated from the interior, there are a few different ways to achieve minimum R-values. This article illustrates the three most common options: continuous rigid insulation, a combination of continuous rigid insulation and insulation batts, or closed-cell spray foam. Regardless of the insulation method you choose, here are some things to keep in mind.
The first step is to make sure your basement is dry. Before installing any interior-wall insulation, verify that your basement doesn’t have a water-entry problem. Next, consider your climate zone and code-minimum R-values. Basement insulation required by the 2012, 2015, and 2018 International Residential Code (IRC) is as follows: at least R-5 in climate zone 3, R-10 in zone 4 (except marine zone 4), and R-15 in zones 5, 6, 7, and 8 and marine zone 4. That said, local codes may differ from these general guidelines, so it’s worth asking your local building department about minimum R-value requirements in your community.
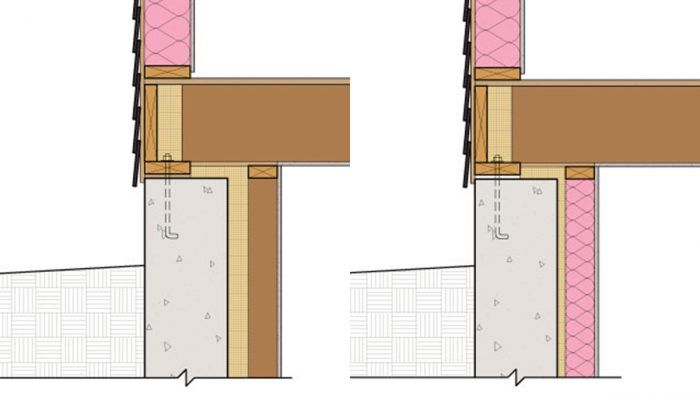
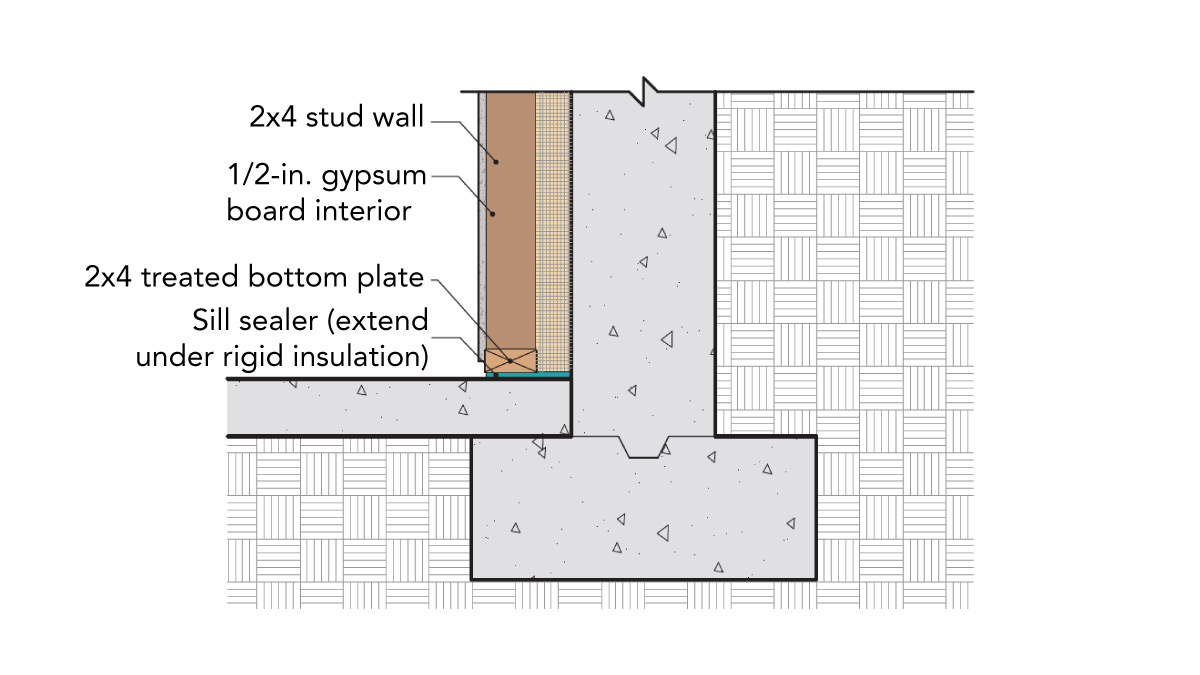
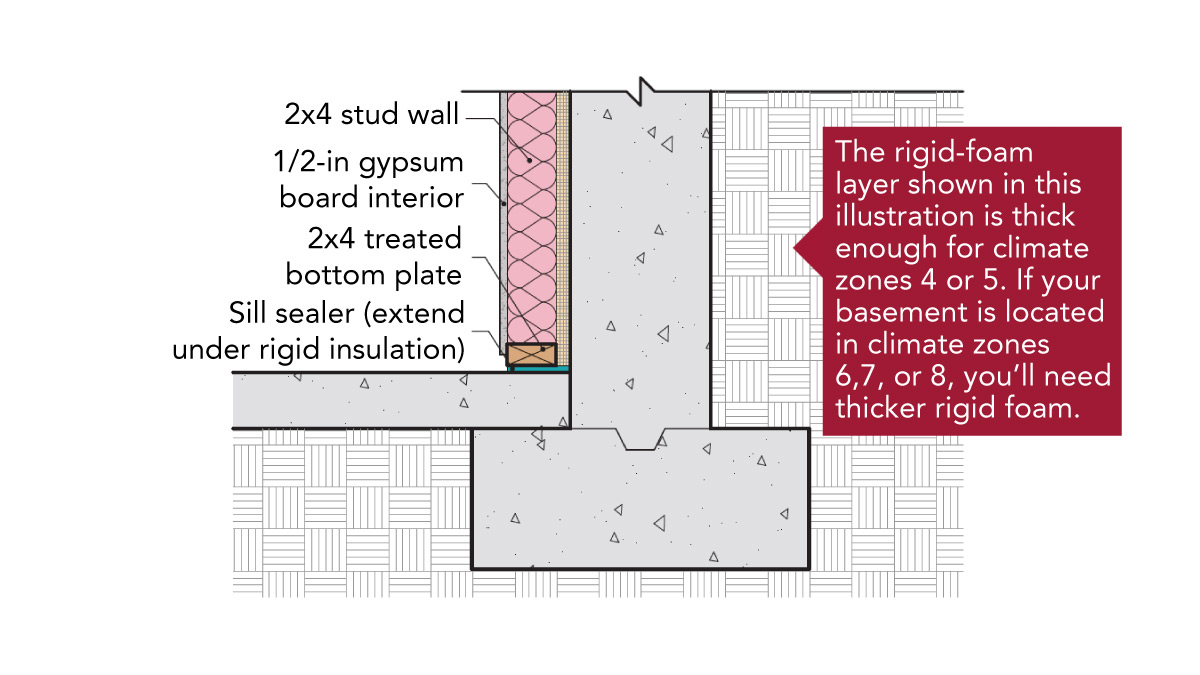
A continuous layer of interior rigid foam
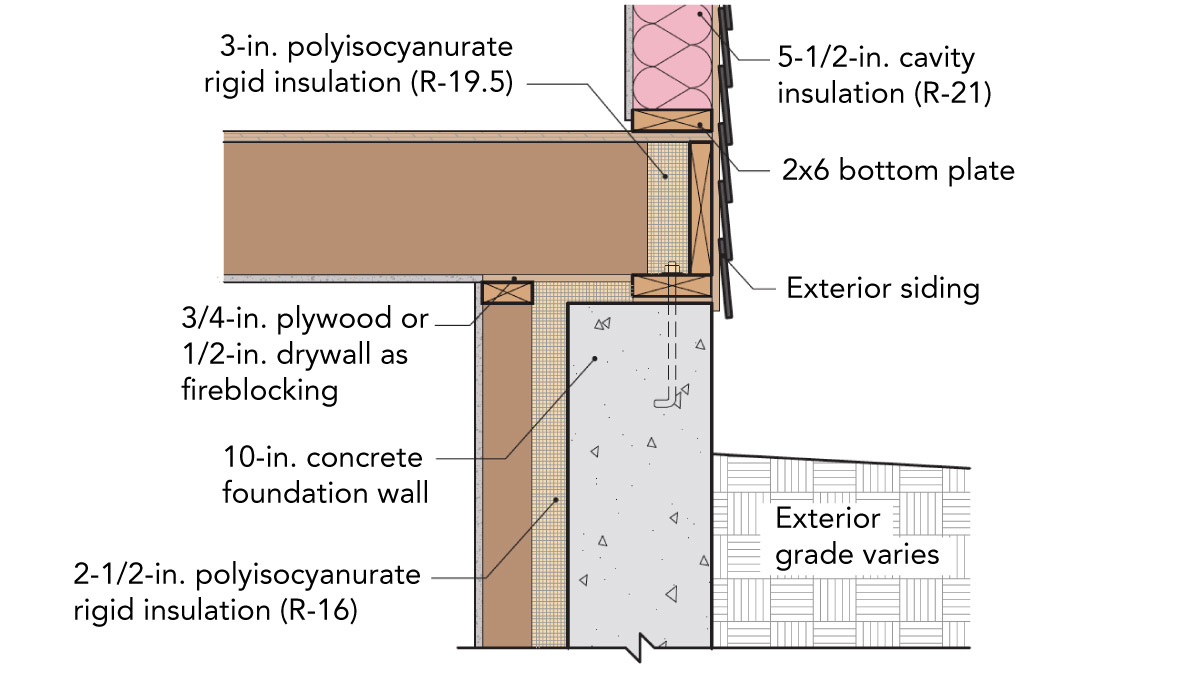
One simple way to insulate the interior of a basement wall is with a continuous layer of rigid foam that is thick enough to meet the minimum R-value for your climate zone. If you can’t reach your R-value target with one layer of rigid foam, it’s perfectly acceptable to install two layers of rigid foam. (If you are installing two layers, make sure to stagger the foam seams.) Rigid foam can be adhered to concrete with foam-compatible adhesive or can be attached with special fasteners like Hilti IDP or Rodenhouse Plasti-Grip PMF anchors. Once the rigid foam is installed, you can install a 2×4 stud wall on the interior side of the rigid foam, or you can install 1×4 strapping, 16 in. on center, to facilitate installation of the drywall. If you frame a 2×4 wall, don’t forget to install fireblocking at the top of the wall.
Note that the IRC lists two different R-value requirements for basement walls: a lower number (for example, R-15 in zone 5) for continuous foam, and a higher number (for example, R-19 in zone 5) for “cavity insulation”—usually interpreted as fluffy insulation like fiberglass installed between studs. Since it is inadvisable to insulate a basement wall with fluffy insulation like fiberglass unless the wall has first been insulated with a layer of continuous rigid foam or spray foam, it’s generally best to focus on an approach that uses continuous insulation, and to ignore the “cavity insulation” approach.
On the interior side of a basement wall, all three common types of rigid-foam insulation—polyisocyanurate, expanded polystyrene (EPS), or extruded polystyrene (XPS)—perform well. That said, green builders usually avoid the use of XPS, since most brands are manufactured with a blowing agent that has a high global-warming potential. Problematic blowing agents are also used in most brands of closed-cell spray foam, so if you plan to use closed-cell spray foam, seek out a brand of insulation that uses one of the new, more environmentally friendly blowing agents—for example, Heatlok HFO spray foam from Huntsman Building Solutions.
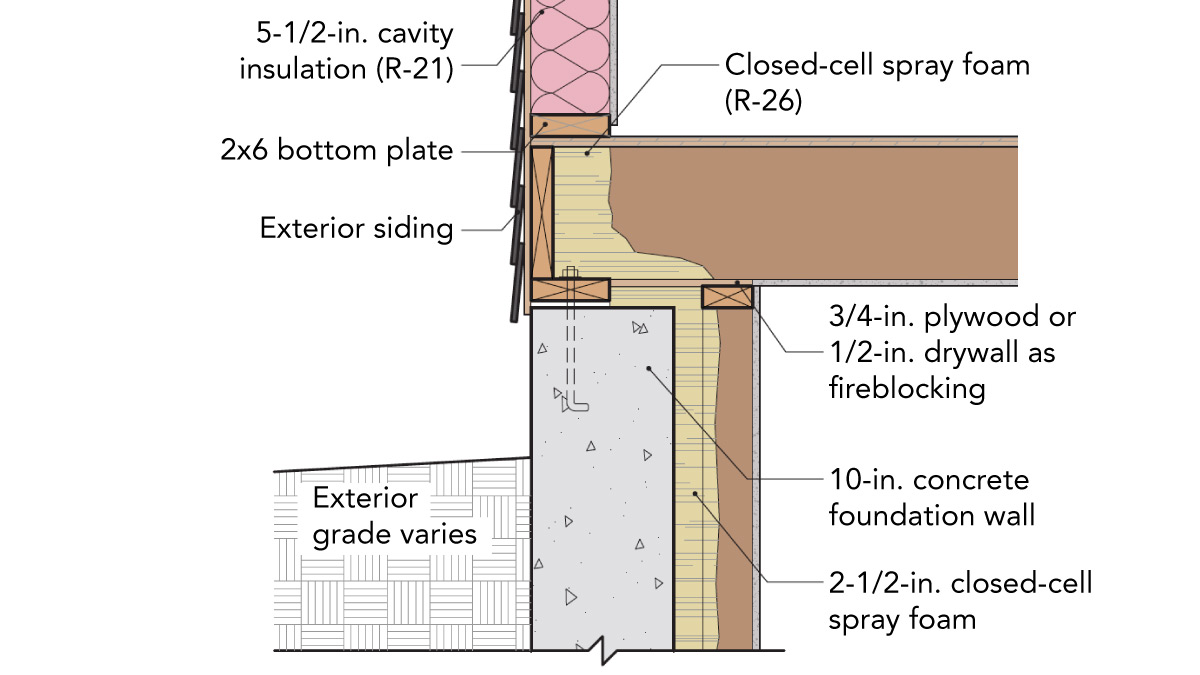
Continuous interior rigid foam with adjacent stud wall filled with fiberglass or mineral-wool batts
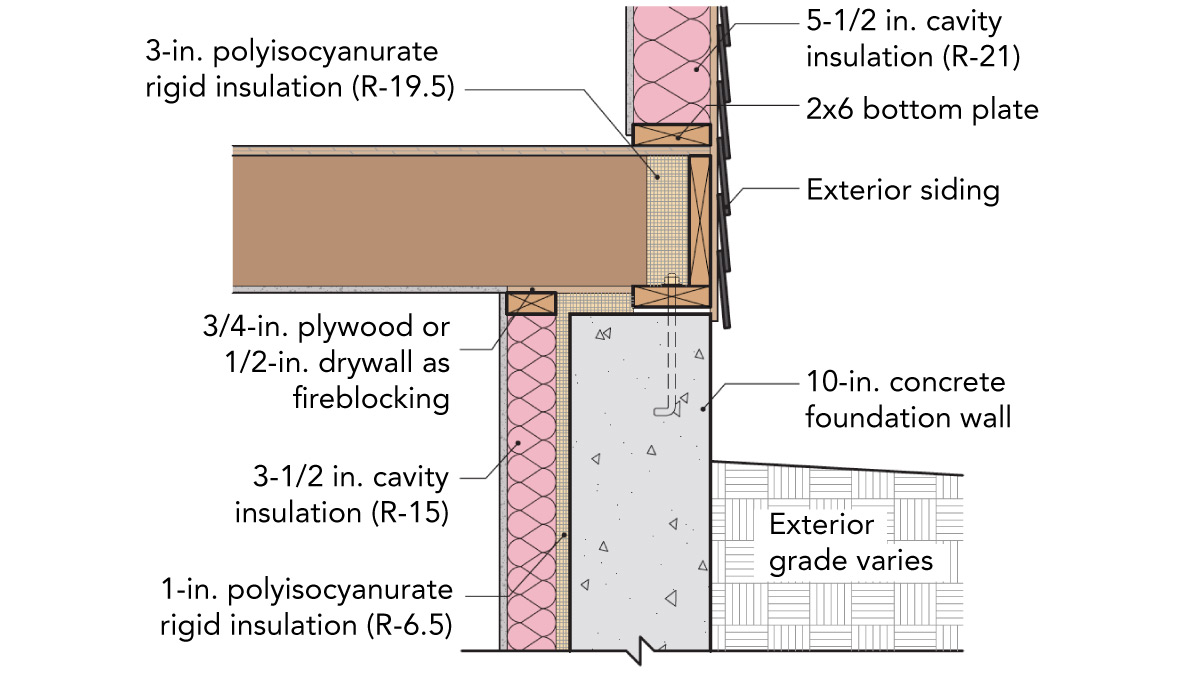
Many builders prefer to leave the stud bays uninsulated, as shown in the previous assembly, because it’s common for basements to experience occasional flooding, and fibrous insulation becomes a soggy mess if it ever gets wet. On the other hand, you may prefer to boost the assembly’s R-value by insulating between the studs. If so, keep two principles in mind. First, your rigid foam layer needs to be thick enough to prevent condensation problems. A conservative approach calls for at least R-2.5 of rigid foam in climate zone 3, at least R-5 of rigid foam in zones 4 or 5, at least R-7.5 of rigid foam in zone 6, and at least R-10 of rigid foam in zones 7 or 8. Second, mineral-wool batts generally perform better in damp environments than fiberglass batts.
Basement-wall systems should never include polyethylene sheeting—neither between the concrete and the foam insulation, nor between the gypsum drywall and the insulation. In these locations, polyethylene can trap moisture, leading to mold or rot.
If you live in an area where termites are a problem, your local building code may require that you leave a 3-in.-high termite-inspection strip of bare concrete near the top of your basement wall. These requirements vary widely from jurisdiction to jurisdiction, so it’s wise to seek local advice on this issue.
Don’t forget about airtightness as well. During the winter, indoor air tends to be warm and humid, while concrete foundation walls tend to be cold, setting up ideal conditions for potential condensation. You can limit the chance of condensation or mold by preventing any interior air from contacting cold concrete. If you are installing interior rigid foam, all of the foam seams need to be sealed with caulk, high-quality tape, or canned spray foam. If you are hiring a spray-foam contractor to insulate your wall, make sure that there are no gaps or shrinkage cracks in the foam that could allow indoor air to contact the concrete.
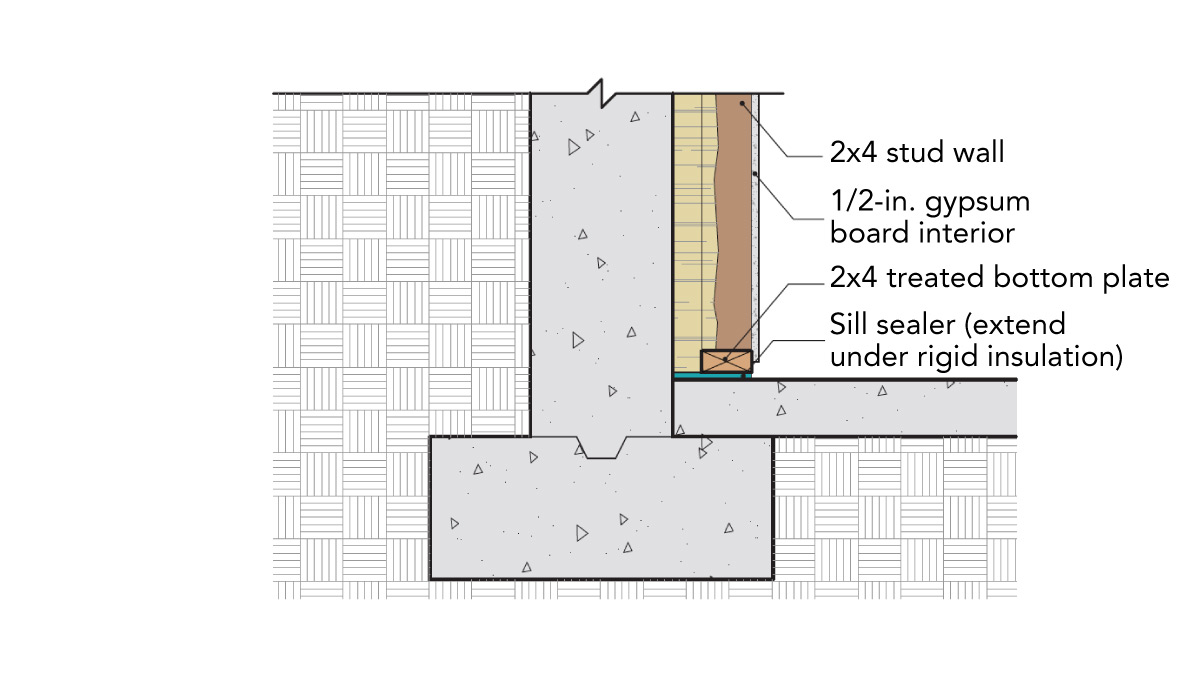
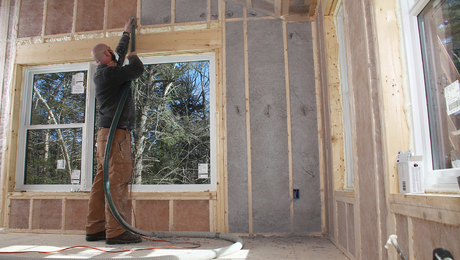
Interior closed-cell spray foam
If you plan to insulate your basement walls with spray foam, you’ll want to frame your 2×4 walls before the foam is sprayed, leaving a gap of 1-1/2 in. to 2 in. between the back of the studs and the concrete wall. The gap will be filled later with closed-cell spray foam. (Note that open-cell spray foam is too vapor-permeable to be suitable for basement walls.)
If your basement has stone-and-mortar walls, you can’t insulate them with rigid foam—the only type of insulation that makes sense for stone-and-mortar walls is closed-cell spray foam. Although it’s possible to buy do-it-yourself two-component spray-foam kits for this type of job, it’s generally less expensive to hire a spray-foam contractor for large jobs like basement walls.
When rigid foam or spray foam is installed on the interior side of a basement wall, the foam must be separated from living spaces by a so-called thermal barrier— that is, a layer of 1/2-in. drywall or a material that has been approved as equivalent in fire resistance to 1/2-in. drywall. If you don’t want to install any drywall, you can use Thermax, a brand of rigid-foam insulation that can be left exposed (because it has passed tests for thermal resistance), or you can use mineral-wool insulation as a thermal barrier.
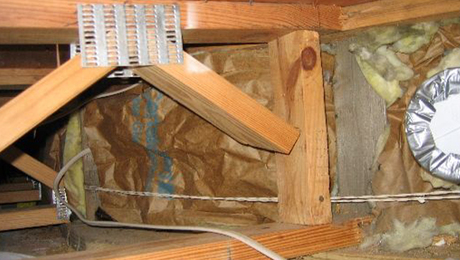
And remember—if you’re installing interior basement-wall insulation, don’t forget to insulate the rim joists.
In most U.S. locations, basement-wall insulation is required by code. Properly installed, basement insulation will save energy, improve comfort, and reduce the likelihood that your walls will be damp. With a lower chance of dampness, there will be fewer opportunities for mold growth—so your insulated basement will probably smell better than it used to.
Martin Holladay is a retired editor living in Vermont.
Drawings by Alexandra Baczek.
From Fine Homebuilding #299
RELATED LINKS


View Comments
My house has the dreaded “diaper wall” as mentioned in the article that was installed by a previous homeowner. I don’t see or smell a moisture issue but it’s hard to say since I can’t see into the walls. Is there a non-invasive or minimally-invasive technique I can use to find out if there’s any problems behind the poly?