FHB Logo Facebook LinkedIn Email Pinterest Twitter X Instagram Tiktok YouTube Plus Icon Close Icon Navigation Search Icon Navigation Search Icon Arrow Down Icon Video Guide Icon Article Guide Icon Modal Close Icon Guide Search Icon Skip to content
Subscribe
Log In
  • How-To
  • Design
  • Tools & Materials
  • Restoration
  • Videos
  • Blogs
  • Forum
  • Magazine
  • Members
  • FHB House
  • Podcast
Log In
How-To

Strong Connections With Loose Tenons

Make sturdy doors and frame-and-panels of any size with tools you already have.

By Tim Snyder Issue 326 - October 2024

Similar to mortise-and-tenon joinery, loose-tenon joinery is an efficient way to make cabinet face frames and doors without the need to measure and cut tenons as part of a stile or rail. Carpenter Tim Snyder walks through the process of creating loose tenons for a cabinet door with a router and a set of guide bushings. While the Festool Domino system will make quick work of the loose-tenon joinery process, it’s a manageable job without the Domino.

Tenon Tales

Mortise-and-tenon joinery has always been associated with quality construction. The tenon—a thinned-down section on one side of the joint—fits into a square mortise on the other. For the ­cabinet maker, this means a rock-solid connection between vertical and horizontal pieces without visible fasteners, and is the ideal way to make frame-and-panels for doors, walls, and case construction.

The only downside to traditional mortise-and-tenon joints is the difficulty in creating the tenons, which can be sized incorrectly or misaligned, resulting in parts that don’t fit correctly. In the worst cases, you have to make new parts to get a good fit. A variation on traditional mortise-and-tenon joinery is “loose tenon” joinery, which uses a separate, “loose” piece of stock to join a pair of matching mortises. Loose-tenon joinery—also called “floating tenon”—isn’t as sloppy as it sounds.

Strong and Simple Construction

Loose-tenon joinery is an efficient way to make cabinet face frames and doors. Mating parts get matching mortises that are joined together with a “floating” tenon that’s cut separately and glued into place. Typically on a door the rails butt into the stiles, which run long and receive hinge hardware. Other times the stiles butt into the rails, as shown on the cabinet face frame in the drawing. The orientation of each piece matters when marking the placement of the mortises and planning the stopped grooves.

Black and white hand drawing of loose-tenon joinery.

A proper-fitting loose or floating tenon fits snugly within the mortises in the mating parts. The tight fit ­provides good alignment of stile and rail parts and a strong connection because the tenon’s long grain bridges the stile-and-rail joint. This is a very efficient way to make precise-fitting joints in doors, frames, and other assemblies that require strong and invisible connections.

Of course, you can build doors and panels with faster methods of construction, like pocket screws, but these are not as strong as tenons and are impossible to hide with stained or natural finishes. You can also use stub tenons—essentially a tongue-and-groove joint—but these are still not as strong as loose tenons, especially for a project like a heavy door.

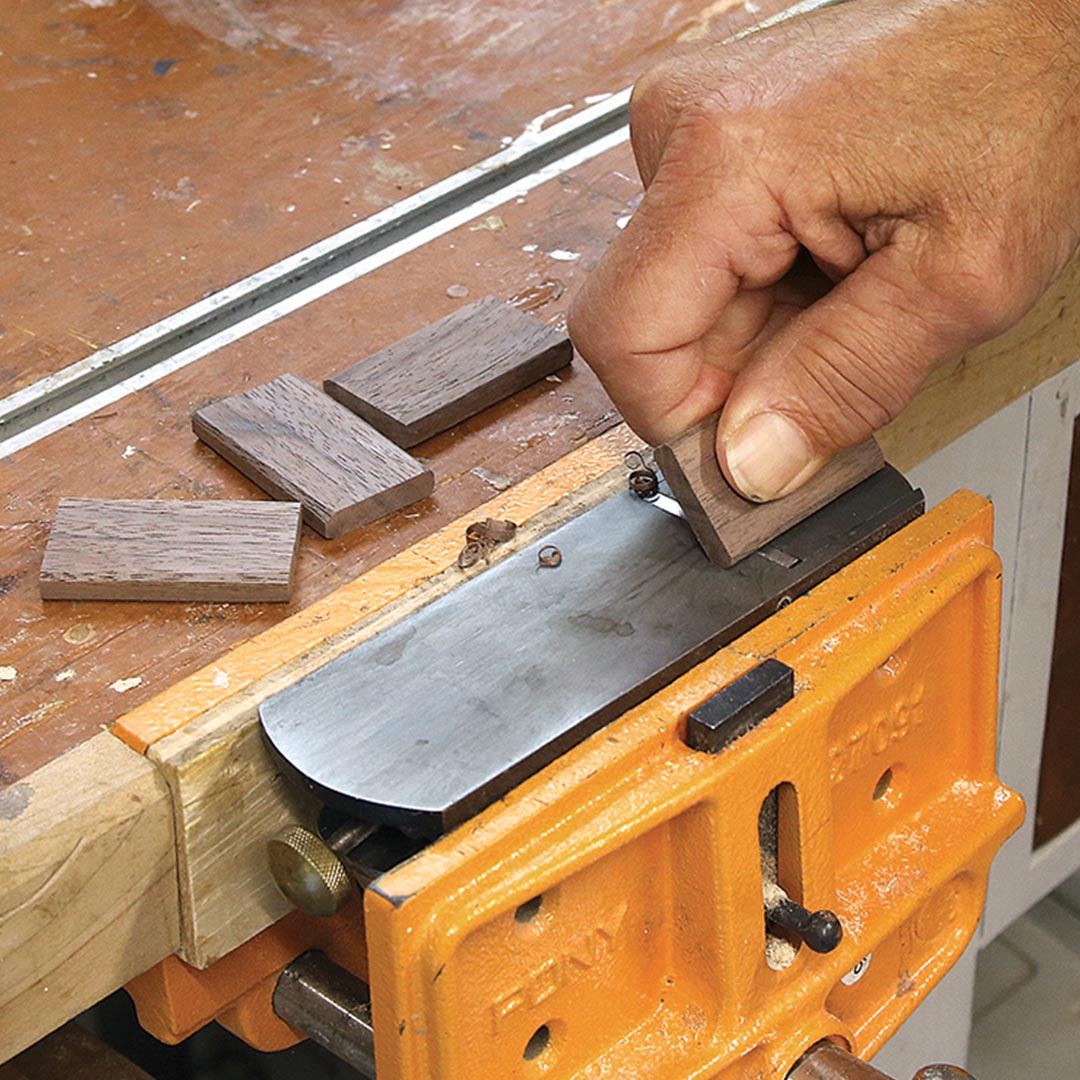
Loose tenons are easy to make, and you can use any straight-grained stock you have. In the frame-and-panel cabinet shown in this article, I used walnut offcuts from my scrap bin. And if you cut a loose tenon wrong, it’s easy to make replacements. Another thing to like about loose-tenon joinery versus traditional mortise-and-tenon joinery is the simplified math: With loose-tenon joints you can size your stiles and rails without having to account for tenon length.

Tools for Loose Tenons

Photo of router and guide bushings on a table.
The Right Router: I prefer a compact router, which is easy to handle when equipped with a 1⁄4-in.-shank spiral upcut bit to cut the mortises. The bit’s geometry ejects chips while it’s cutting to reduce clogging and keep it cool. This keeps the bit sharp longer and prevents burned stock. • Guide Bushings: A set of template guide bushings like this one from Lee Valley costs about $100, and a single 3⁄4-in. bushing guide can be bought online for about $10. When the two-piece guides are screwed together on the router base, the guide bushing centers the bit for accurately cut mortises.

Photo of a router baseplate.
Compatible Baseplate: To use a template guide bushing, the router must have a matching drilled baseplate. Many router kits include this plate; if not, you can purchase router-matched or universal versions for about $40.

Photo of a ¼-in. carbide spiral upcut bit.
The Best Bit: A 1⁄4-in. carbide spiral upcut bit like Frued’s 75-102 ($25) can cut 1-in.-deep mortises in a series of passes. A bit this size is a good choice for 3⁄4-in.-thick stock. I use the same bit in a router table to cut the grooves for the panel.

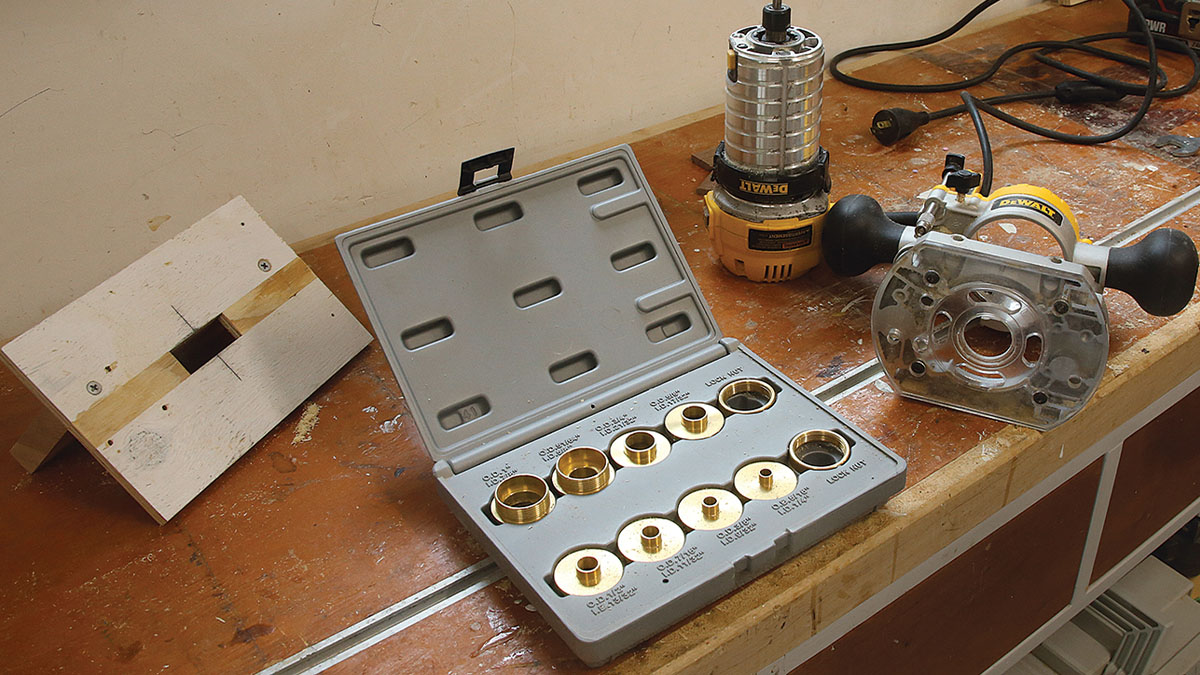
Use the Tools You Have

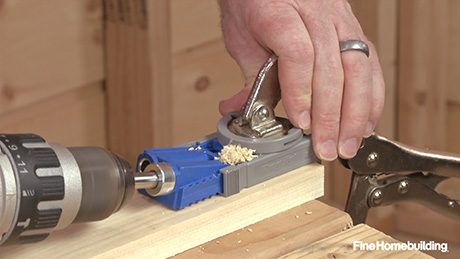
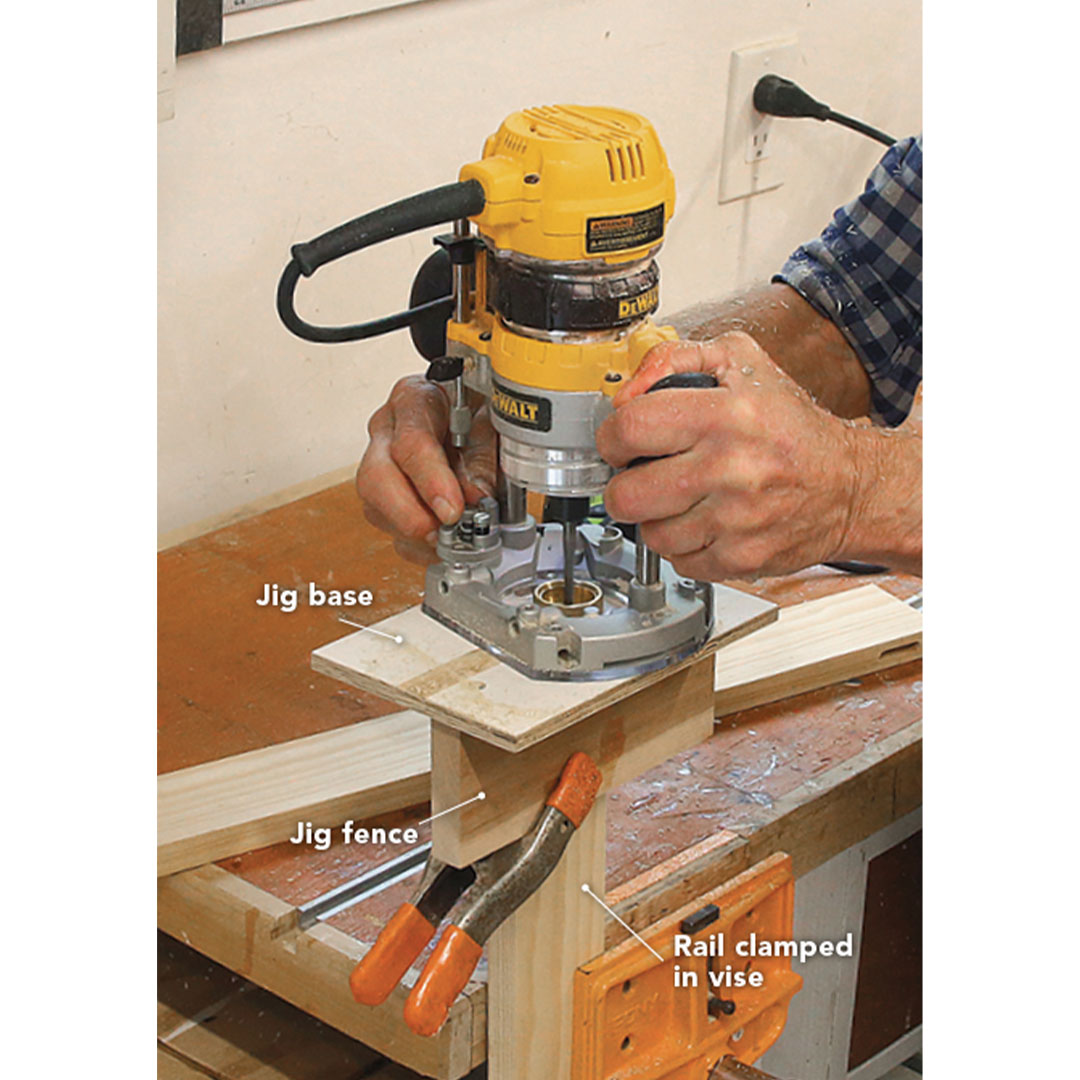
There is a tool (the Festool Domino) that makes the process of loose-tenon joinery quick and easy, but it’s expensive. Thankfully, expensive tools aren’t required to create strong loose-tenon joints. You simply need a plunge router, a template bushing, and an up-cutting, spiral-fluted bit for the router.

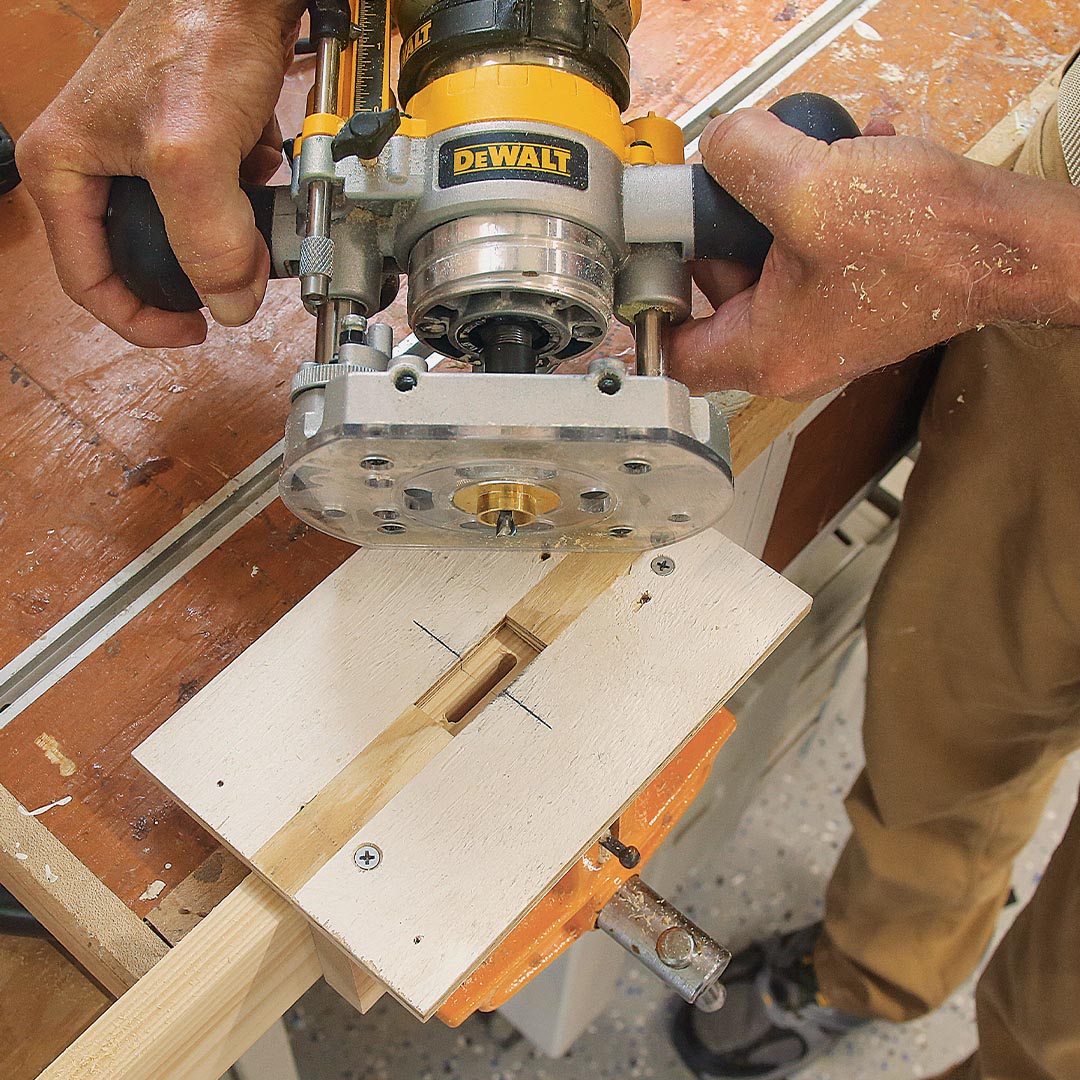
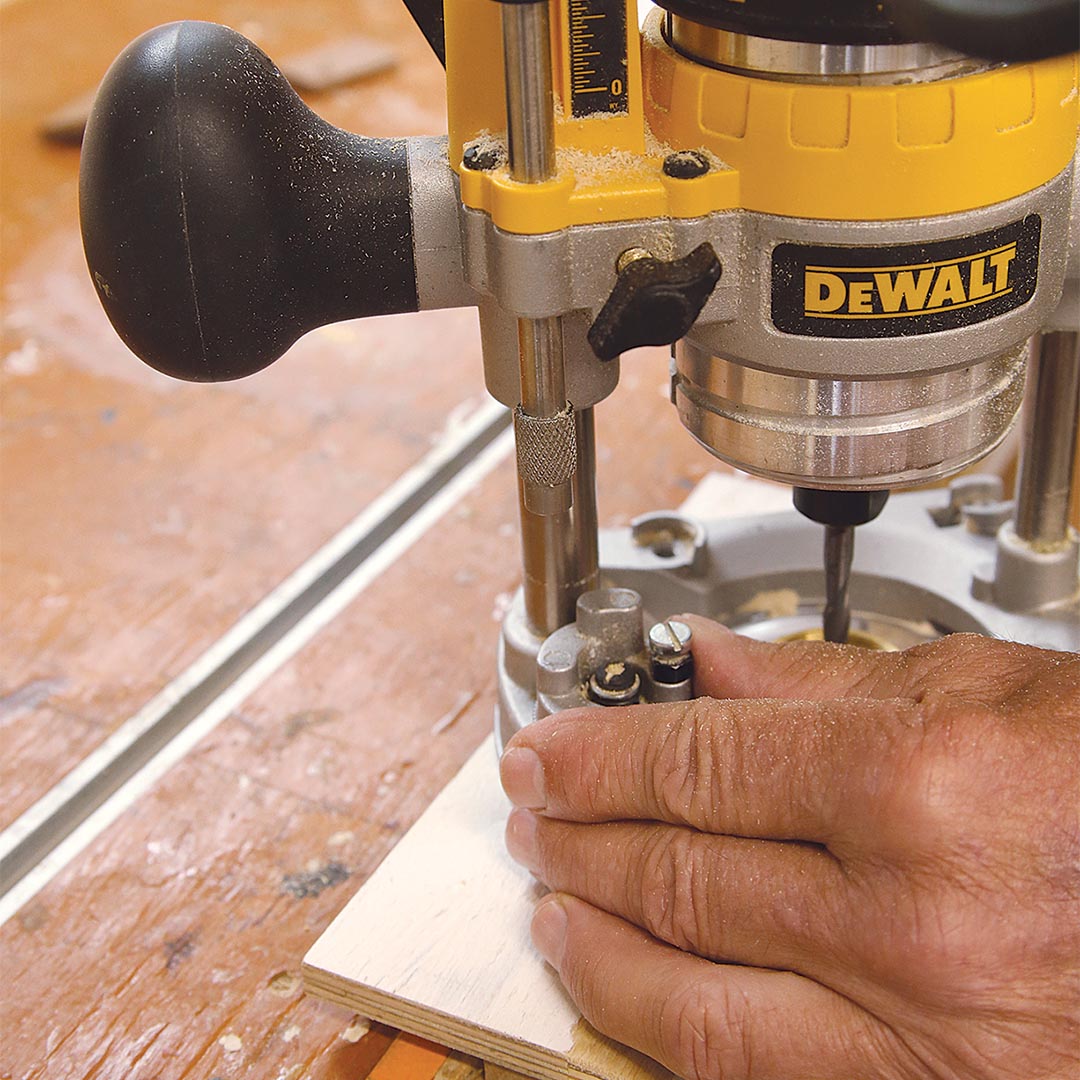
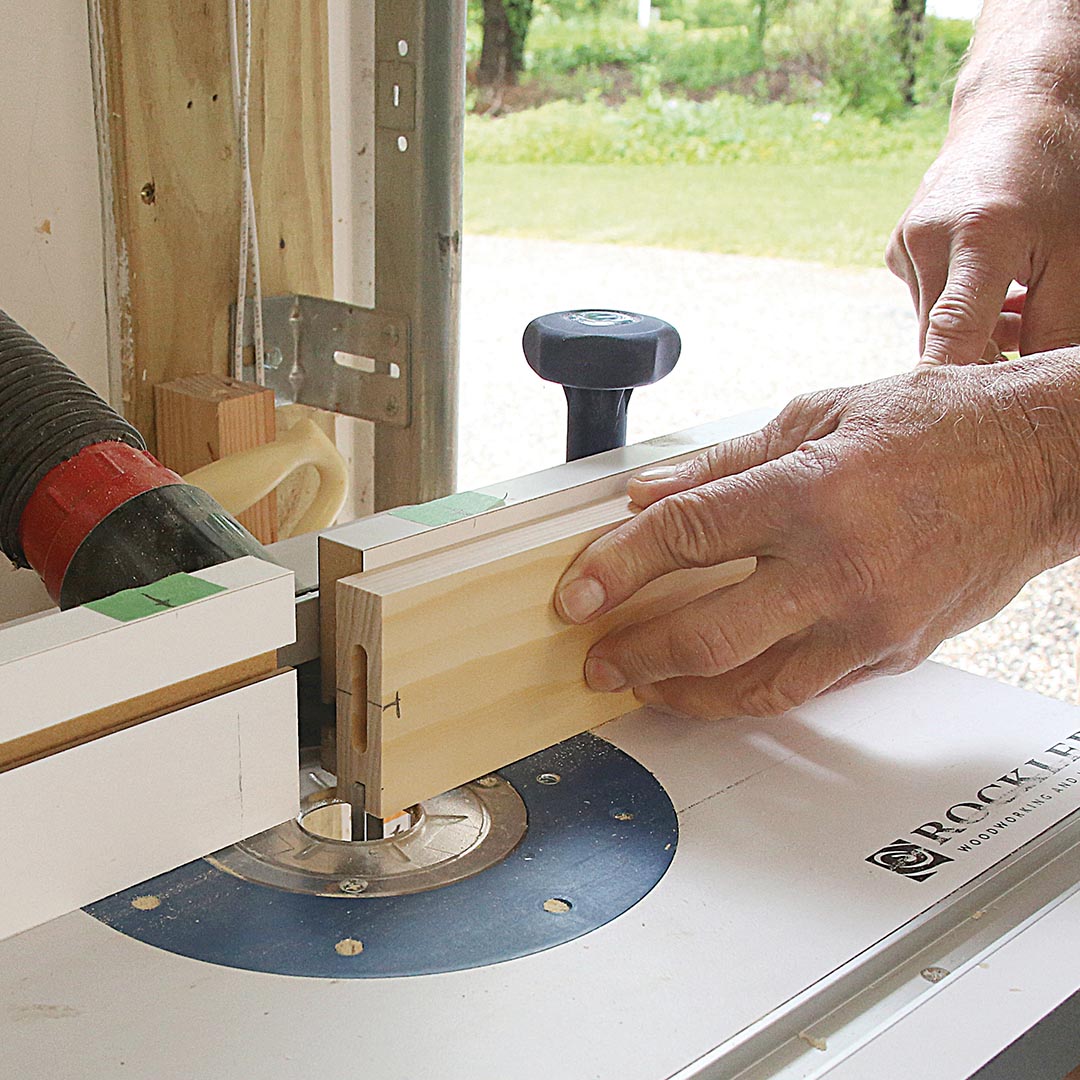
The template bushing is mounted in the base of the router and follows the opening in a shop-made jig that’s clamped to the workpiece. The template and bushing guide the bit to make a perfect mortise. By routing a series of progressively deeper cuts, you’ll be able to produce smooth, precise mortises.

The size of your mortises and loose tenons depends on the dimensions of your frame members. Generally, I aim for tenons that are about one-third the thickness of my frame stock. The cabinet doors here have 3/4-in.-thick stiles and rails, so mortises and tenons are 1/4 in. thick.

Loose-Tenon Specialist

Festool’s Domino system (developed in 2005 and first available in the U.S. in 2007) makes the loose-tenon joinery process fast and easy by simplifying the mortising and by including ready-made tenons. The Domino gave loose-tenon joinery a boost in popularity—but its hefty price tag (around $1600 for the machine and a box of tenons) can be a major barrier. For those willing to invest, the Domino tool streamlines the process, ensuring precise and repeatable results with minimal effort. If you want to learn more about the Domino, check out my review in FHB #310.

Photo of hands using a Festool Domino tool.

The width of the mortises and tenons should be around half the width of the frame stock. Mortise depth and tenon length may vary; some tenons are a design feature and so are exposed in the final piece, as is common with Arts and Crafts furniture and cabinets. These paint-grade cabinet doors have tenons that are about 2 in. long, which is a good size for mainstream cabinets and built-ins without exposed tenons.

Carpenters and furniture makers have used mortise-and-tenon joinery for centuries. The joints are sturdy and stay tight with changes in humidity. The design with its mating parts aids assembly. Loose tenons have all the benefits of conventional tenons, but without the hassles of correctly cutting the tenons on the stiles or rails.
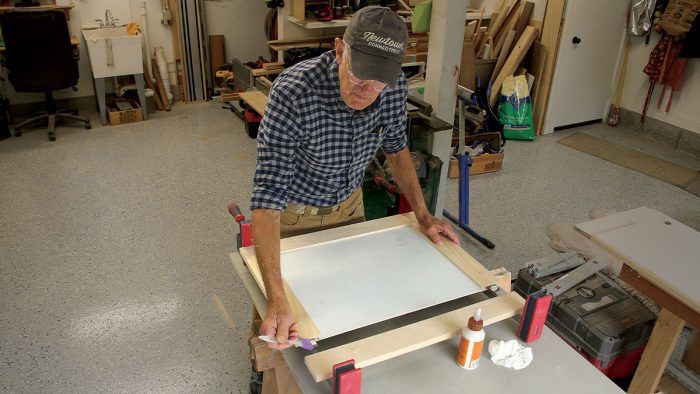
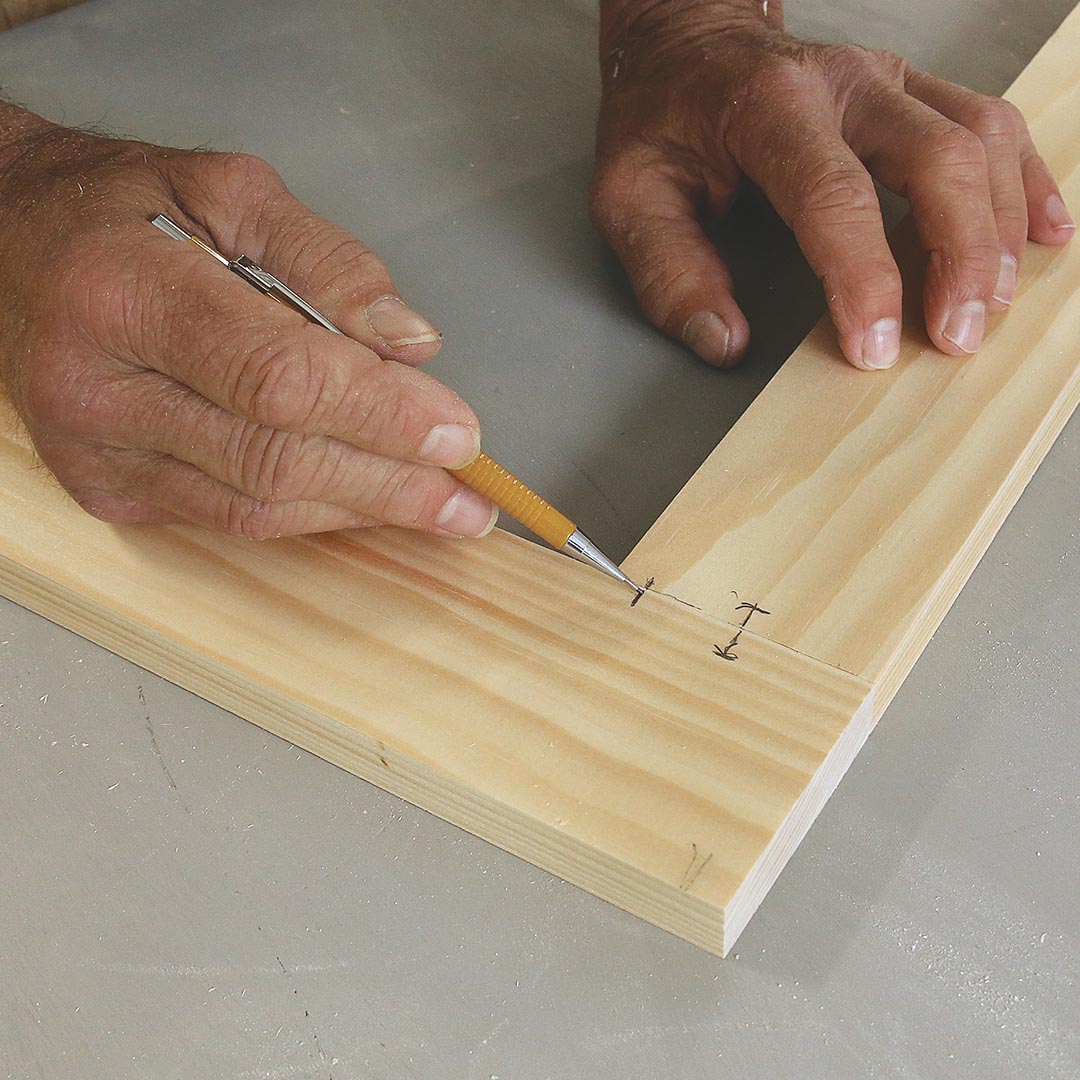
Mill the Mortises

I start by cutting stiles and rails to their finished dimensions. If you’re making a series of frame-and-panels, cut the same-size parts in batches. I dry-fit the frames on a flat work surface to double-check dimensions. Then I select and mark the best-looking face of each frame part that I want to be visible in the finished project.
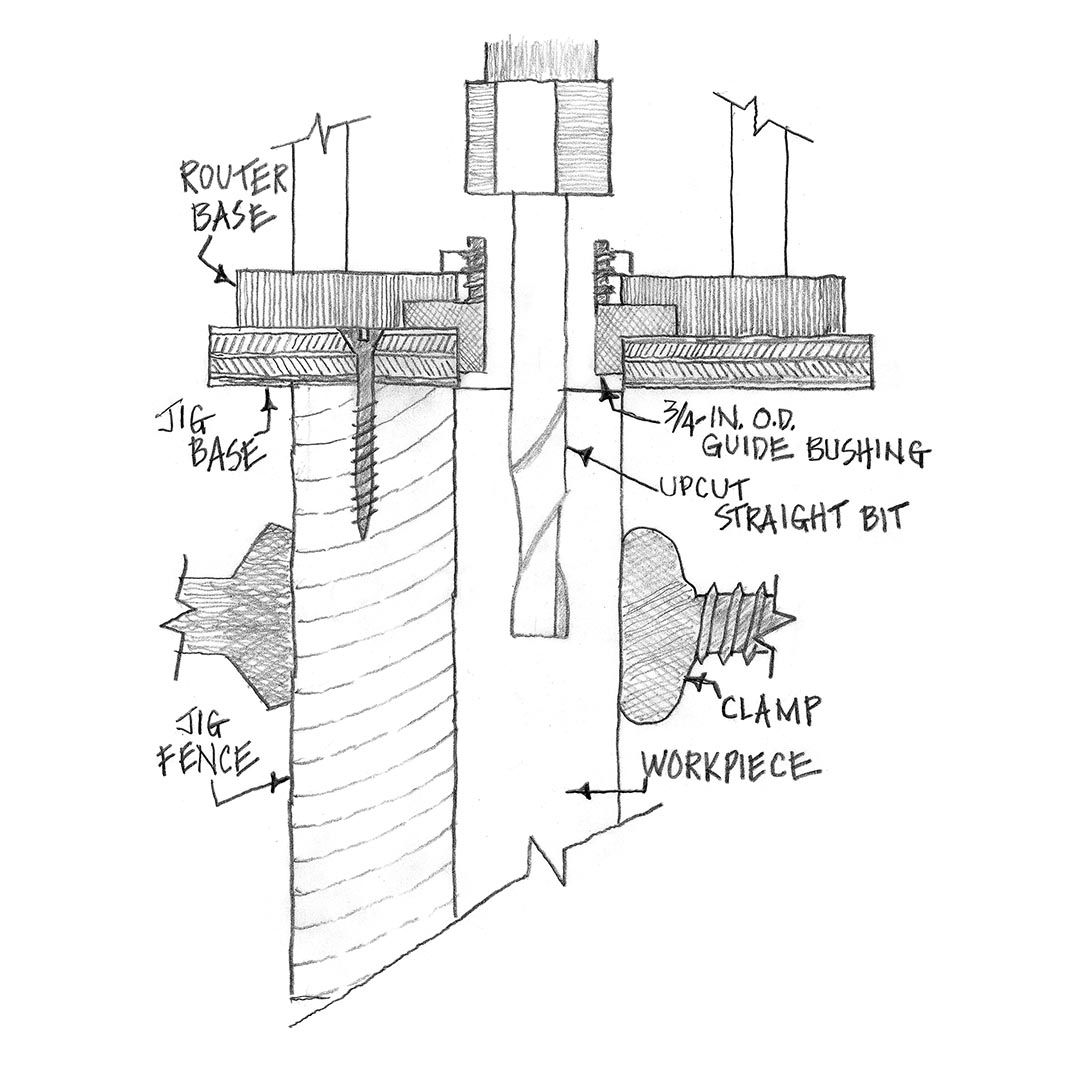
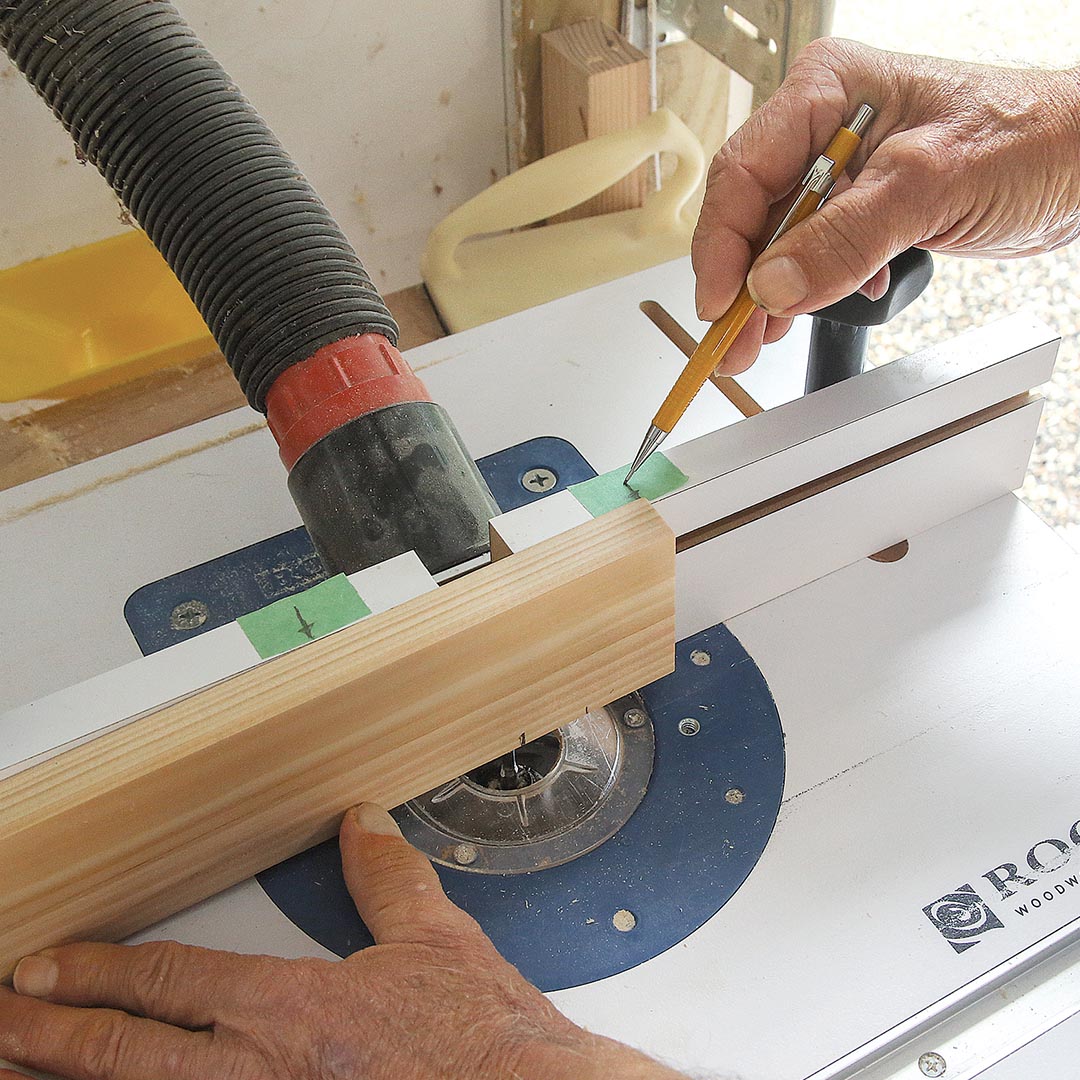
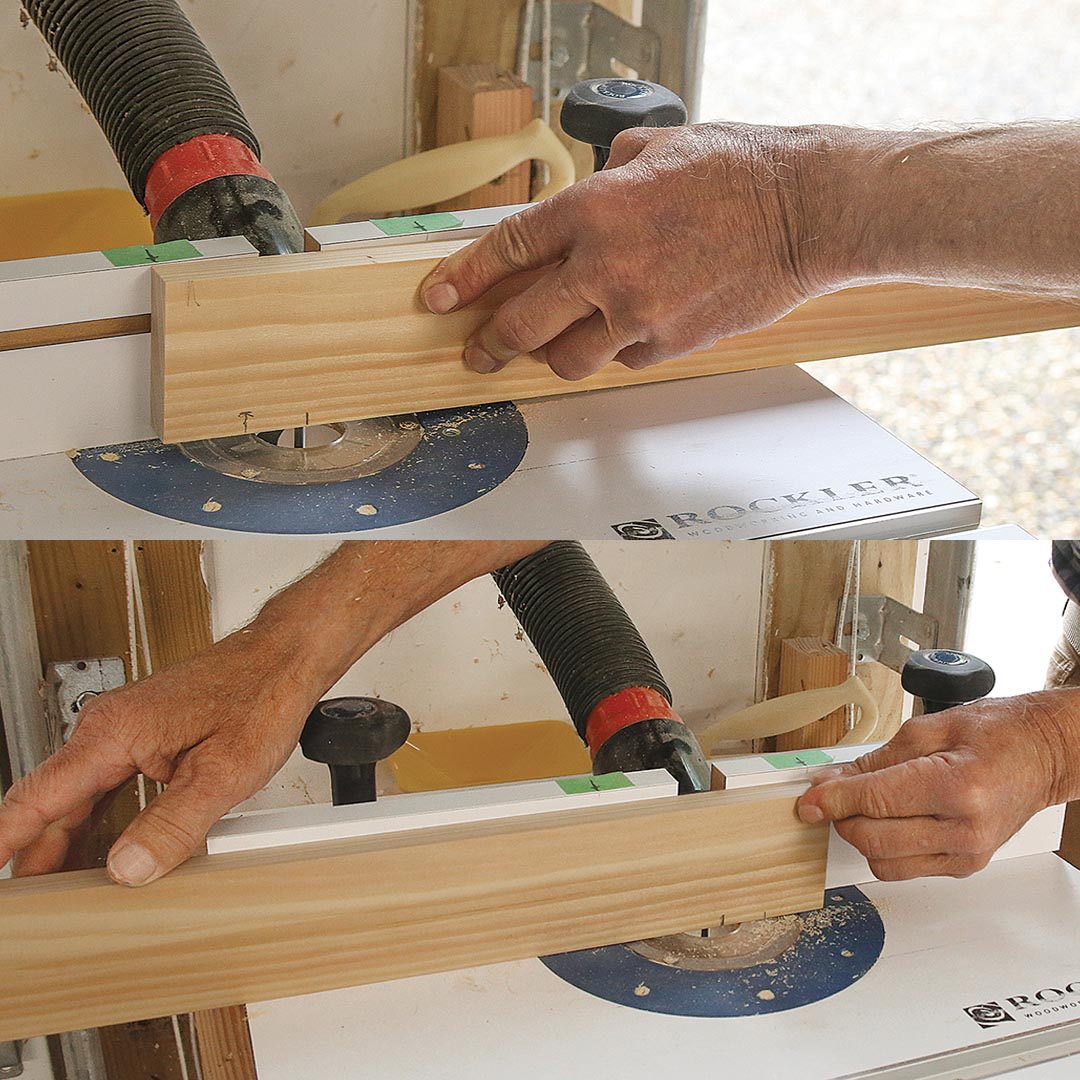
Black and white hand drawing of how to mill mortises.
To cut the mortises that receive the loose tenons, I use a shop-made jig to guide the router bit. The jig, which is made from scraps of 1⁄2-in. plywood, includes a vertical fence that clamps onto the workpiece and a horizontal base with a rectangular, 3⁄4-in.-wide opening. The opening guides a 3⁄4-in. O.D. template guide bushing centered in the router base and surrounding the bit. The jig and bushing locate the 1⁄4-in. spiral bit in the center of the 3⁄4-in. stock.

Mark the Mortise Locations

The mortise-and-tenon joint should be near the center of the stile-and-rail connection. These 2-1⁄4-in.-wide frame parts will have a 1⁄4-in.-deep groove for the panel, so I mark the parts at 1 in. from the outside edge, which centers the tenon in the section of stile or rail without the groove.

Photo of hands holding a pencil and marking the mortise location on the stile-and-rail connection.
Photo of hands holding a router to mortise stiles.

Mortise the Stiles

You can mortise the stiles and rails in either order. I transfer the mark I made on the face of a stile to the inside edge of the stile and center the jig’s mortise opening on the mark. I rout the mortise in a series of passes to reach the final depth.

Depth Stops Make It Easier

A multiposition, turret-style depth stop makes it easy to cut the mortise in a series of 1⁄4-in.-deep cuts. After making a pass, I rotate the stop a click and make another 1⁄4-in. pass until I reach the planned 1-in. mortise depth.

Photo of a hand setting a multiposition turret-style depth stop on a router.
A photo of hands using a router to mortise the other side of the stile.

Mortise the Other End

Once I’ve completed a mortise on one end of the stile, I mortise the other end the same way. A bench vise or clamping worktable makes it safer and easier to hold the stiles and rails for mortising.

Mark the Rail Mortise

Once I’ve cut the mortises on the stiles, I mortise each rail using the same setup. I start by transferring the mark showing the center of the mortise on the face of the dry-fit frame to the end of the rail.

A photo of hands transferring the mark on the center of the mortise to the face of the dry-fit frame to the end of the rail.
Labeled photo of a loose tenon jig created by Tim Snyder.

Mortise the Rails

As with the stiles, I make a series of progressively deeper passes in the rails until the final 1-in. depth is reached.

Clean as You Go

Between gradually deeper passes with the router bit, I vacuum the mortise to prevent a buildup of chips that could obstruct the cut and overheat the bit.

Photo of the author, Tim, cleaning the loose tenon jig with a shop vacuum.

Rout the Grooves

I prefer a groove to hold the panel in the frame rather than a rabbet and separate stop. The groove eliminates the slow process of fitting and installing a stop to hold the panel. I cut the groove to match the panel thickness in the stiles and rails using a router table and a fence. Two frame sides receive a groove along their entire length; the other two have stopped grooves.
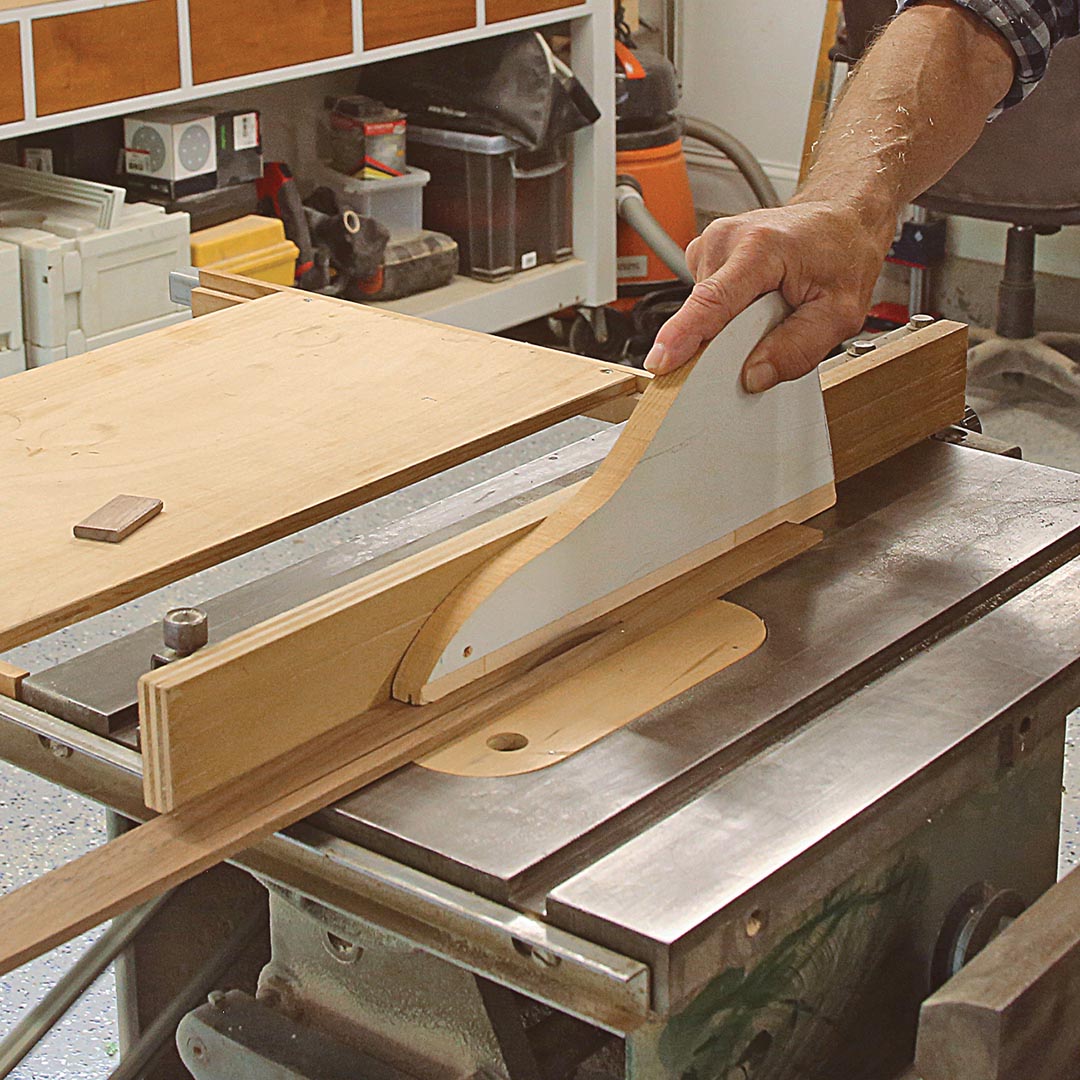
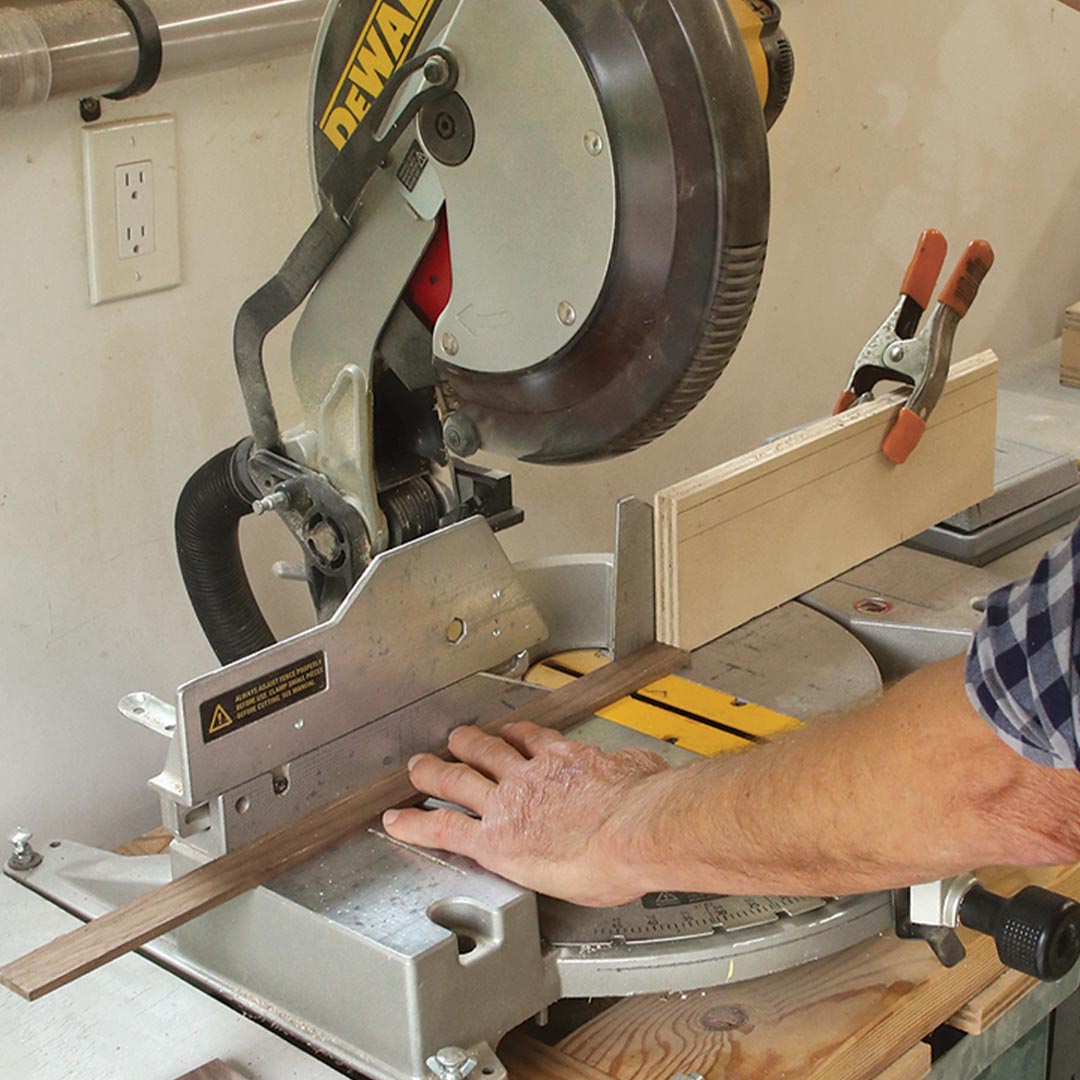
Photo of hands marking the stopped groove on a piece of wood.

Mark the Stopped Groove:

On this cabinet door, the stiles run long and receive the stopped groove. I mark where the groove stops on both ends of each stile.

Mark the Fence:

With the workpiece on the router table, I mark the beginning and end of the stopped groove on the router table fence.

Photo of hands markings the fence on a piece of wood on the router table.
A photo of hands routing the stopped grooves.

Rout Stopped Grooves:

I keep the pencil lines visible (facing out) during setup and when routing so that the grooves will be aligned during door assembly. Gripping the workpiece firmly and keeping it tight to the fence, I lower it onto the spinning router bit at the forward alignment mark. I advance the stock until I reach the rear stop mark, then raise it off the bit. Cutting the groove too short will keep the panel from fitting, but cutting a little beyond the stop mark is no big deal.

Rout Continuous Grooves:

The rails will have continuous grooves that hold the center panel. I use the same router bit and run the parts from end to end, keeping my fingers clear as the bit finishes the groove and exits the stock.

A photo of hands routing continuous grooves on the rails.

Cut the Tenons

I make tenons from straight-grained hardwood. It’s smart to size tenons 1⁄8 in. to 3⁄16 in. narrower and shorter than the width and depth of the mortises, while maintaining snug-fitting thickness. This sizing strategy means I can fine-tune the alignment between the stiles and rails during assembly.

A photo of hands cutting a piece of wood to width.

Cut to Width:

I use 1⁄2-in.-thick tenons for entry doors and 1-in.-thick tenons for timber joinery. Tenons 1⁄4 in. thick are perfect for cabinet doors and frame-and-panel assemblies for casework. I make them from any straight-grained hardwood offcuts I have in my scrap bin.

Cut to Length:

With the stock cut to width, I cut single tenons from the longer stock with a miter saw. A stop clamped to the fence makes for efficient cutting and ensures tenons are the same length. I cut them slightly shorter than the depth of the mortise so they don’t bottom out.

A photo of hands cutting a piece of wood to length.
Photo of a hand using a mortise with rounded corners to ease the edges on the tenons.

Ease the Edges:

The router bit makes mortises with rounded corners, so I ease the edges on the tenons for a good fit before assembly. I use a block plane clamped in my bench vise and run the tenon corners over the plane, chamfering the edges to match the mortise.

Assemble the Panels

Once I have the stiles and rails mortised and grooved, I cut the center panel from plywood, MDF, or solid stock. Because of their stability with changes in moisture content, plywood and MDF are cut 1⁄8 in. to 1⁄4 in. undersized. Solid-wood panels should be further undersized; the amount depends on the wood’s moisture content, installed environment, and species. Rift-sawn or quartersawn stock will minimize expansion and contraction with humidity changes.

Create the Panel:

I cut this door’s plywood panel ¹⁄8 in. smaller in both the length and width than the maximum groove-to-groove measurement. Cutting it slightly undersized makes fitting it into the frame easier without weakening the finished assembly.

Photo of hands cutting a plywood panel.
Photo of hands marking a piece of wood using a pencil.

Mark the Fronts:

Once all the parts are cut, mortised, and grooved, I lightly sand them to prepare the surface for paint or finish, which erases the layout marks. I re-mark the pieces to identify the side facing up, which is the most visible side of the finished panel.

Glue Up:

To assemble the frame and panel, I glue a pair of tenons into one of the stiles and then slide the rails over the tenons. Next, I slide the panel into the grooves, and glue the two remaining tenons into the rails. Finally, I glue the exposed tenons, slip on the second stile, and clamp.

Photo of author, Tim, glueing a pair of tenons into one of the stiles.

— Tim Snyder; writer and woodworker in Newtown, Conn. Photos by Patrick McCombe, except where noted. Drawings by the author.

From Fine Homebuilding #326

RELATED STORIES

  • Wedging a Mortise
  • Windows & Doors Project Guide
  • Build Your Own Interior Doors

Fine Homebuilding Recommended Products

Fine Homebuilding receives a commission for items purchased through links on this site, including Amazon Associates and other affiliate advertising programs.

Handy Heat Gun

This heat gun is great for drying joint compound, primer and paint when patching drywall and plaster walls. Plus it can soften adhesive, get a very cold small engine to start, and shrink heat-shrink tubing.
Buy at Amazon

Reliable Crimp Connectors

These reliable, high-quality connectors from Wirefy work on 10-22-gauge wire have heat-shrink insulation to keep out water and road salt.
Buy at Amazon

Affordable IR Camera

This camera is super useful for tracking down air leaks in buildings. The one-hand pistol grip arrangement frees your other hand for steadying yourself while maneuvering tricky job sites.
Buy at Amazon

Sign up for eletters today and get the latest how-to from Fine Homebuilding, plus special offers.

Signing you up...

This site is protected by reCAPTCHA and the Google Privacy Policy and Terms of Service apply.
See all newsletters
See all newsletters
×

Get home building tips, offers, and expert advice in your inbox

Signing you up...

This site is protected by reCAPTCHA and the Google Privacy Policy and Terms of Service apply.
See all newsletters
See all newsletters

New Feature

Fine Homebuilding Forums

Ask questions, offer advice, and share your work

Log in or create an account to post a comment.

Sign up Log in

Become a member and get full access to FineHomebuilding.com

Up Next

Video Shorts

Featured Story

FHB Podcast Segment: Gutter Covers 101

Gutter covers may be riskier than you think.

Featured Video

Builder’s Advocate: An Interview With Viewrail

Learn more about affordable, modern floating stairs, from design to manufacturing to installation.

Related Stories

  • Mortising a Hinge without a Router
  • What to Know When Buying Kitchen Cabinetry
  • Fastening an Exterior Door With Brick Mold
  • Big Doors Have Big Challenges

Discussion Forum

Recent Posts and Replies

  • |
  • |
  • |
  • |
  • |
  • |
View More Create Post

Highlights

Fine Homebuilding All Access
Fine Homebuilding Podcast
Tool Tech
Plus, get an extra 20% off with code GIFT20

"I have learned so much thanks to the searchable articles on the FHB website. I can confidently say that I expect to be a life-long subscriber." - M.K.

Get home building tips, offers, and expert advice in your inbox

Signing you up...

This site is protected by reCAPTCHA and the Google Privacy Policy and Terms of Service apply.
See all newsletters
See all newsletters

Video

View All Videos
  • Building Custom Kitchen Cabinets
  • Podcast 331: PRO TALK With Cabinetmaker Ben Scott
  • How to Use a Pocket-Hole Jig
  • Podcast 128: Worst. Photo. Shoot. Ever.
View All

Routers

View All Routers Articles
  • How to Make Stepped Corbels with a Router Jig
  • How To Build a Craftsman-Style Fireplace Mantel
  • Scribing Rails to a Round Column
View All Routers Articles

Fine Homebuilding Magazine

  • Issue 330 - April/May
    • Deck Details for Durability
    • FAQs on HPWHs
    • 10 Tips for a Long-Lasting Paint Job
  • Issue 329 - Feb/Mar 2025
    • Smart Foundation for a Small Addition
    • A Kominka Comes West
    • Making Small Kitchens Work
  • Issue 328 - Dec/Jan 2024
    • How a Pro Replaces Columns
    • Passive House 3.0
    • Tool Test: Compact Line Lasers
  • Issue 327 - November 2024
    • Repairing Damaged Walls and Ceilings
    • Plumbing Protection
    • Talking Shop
  • Issue 326 - October 2024
    • Paint Behind Strike Plates
    • Conceal Cut Ends
    • Ladder Slip Solution

Fine Home Building

Newsletter Sign-up

  • Fine Homebuilding

    Home building tips, offers, and expert advice in your inbox.

  • Green Building Advisor

    Building science and energy efficiency advice, plus special offers, in your inbox.

  • Old House Journal

    Repair, renovation, and restoration tips, plus special offers, in your inbox.

Signing you up...

This site is protected by reCAPTCHA and the Google Privacy Policy and Terms of Service apply.
See all newsletters

Follow

  • Fine Homebuilding

    Dig into cutting-edge approaches and decades of proven solutions with total access to our experts and tradespeople.

    Start Free Trial Now
    • Facebook
    • Instagram
    • X
    • LinkedIn
  • GBA Prime

    Get instant access to the latest developments in green building, research, and reports from the field.

    Start Free Trial Now
    • Facebook
    • YouTube
  • Old House Journal

    Learn how to restore, repair, update, and decorate your home.

    Subscribe Now
    • Facebook
    • Instagram
    • X

Membership & Magazine

  • Online Archive
  • Start Free Trial
  • Magazine Subscription
  • Magazine Renewal
  • Gift a Subscription
  • Customer Support
  • Privacy Preferences
  • About
  • Contact
  • Advertise
  • Careers
  • Terms of Use
  • Site Map
  • Do not sell or share my information
  • Privacy Policy
  • Accessibility
  • California Privacy Rights

© 2025 Active Interest Media. All rights reserved.

Fine Homebuilding receives a commission for items purchased through links on this site, including Amazon Associates and other affiliate advertising programs.

X
X
This is a dialog window which overlays the main content of the page. The modal window is a 'site map' of the most critical areas of the site. Pressing the Escape (ESC) button will close the modal and bring you back to where you were on the page.

Main Menu

  • How-To
  • Design
  • Tools & Materials
  • Video
  • Blogs
  • Forum
  • Project Guides
  • Reader Projects
  • Magazine
  • Members
  • FHB House

Podcasts

  • FHB Podcast
  • ProTalk

Webinars

  • Upcoming and On-Demand

Podcasts

  • FHB Podcast
  • ProTalk

Webinars

  • Upcoming and On-Demand

Popular Topics

  • Kitchens
  • Business
  • Bedrooms
  • Roofs
  • Architecture and Design
  • Green Building
  • Decks
  • Framing
  • Safety
  • Remodeling
  • Bathrooms
  • Windows
  • Tilework
  • Ceilings
  • HVAC

Magazine

  • Current Issue
  • Past Issues
  • Magazine Index
  • Subscribe
  • Online Archive
  • Author Guidelines

All Access

  • Member Home
  • Start Free Trial
  • Gift Membership

Online Learning

  • Courses
  • Project Guides
  • Reader Projects
  • Podcast

More

  • FHB Ambassadors
  • FHB House
  • Customer Support

Account

  • Log In
  • Join

Newsletter

Get home building tips, offers, and expert advice in your inbox

Signing you up...

This site is protected by reCAPTCHA and the Google Privacy Policy and Terms of Service apply.
See all newsletters
See all newsletters

Follow

  • X
  • YouTube
  • instagram
  • facebook
  • pinterest
  • Tiktok

Join All Access

Become a member and get instant access to thousands of videos, how-tos, tool reviews, and design features.

Start Your Free Trial

Subscribe

FHB Magazine

Start your subscription today and save up to 70%

Subscribe

We hope you’ve enjoyed your free articles. To keep reading, become a member today.

Get complete site access to expert advice, how-to videos, Code Check, and more, plus the print magazine.

Start your FREE trial

Already a member? Log in