FHB Logo Facebook LinkedIn Email Pinterest Twitter X Instagram Tiktok YouTube Plus Icon Close Icon Navigation Search Icon Navigation Search Icon Arrow Down Icon Video Guide Icon Article Guide Icon Modal Close Icon Guide Search Icon Skip to content
Subscribe
Log In
  • How-To
  • Design
  • Tools & Materials
  • Restoration
  • Videos
  • Blogs
  • Forum
  • Magazine
  • Members
  • FHB House
  • Podcast
Log In
How-To

Modern Techniques Restore a Historic House

There's no point in living in the past, so use these techniques to bring an old structure into the present

By Scott McBride Issue 192

A complication of trim The paneled embrasure that angles away from the room and its attendant casing would fill any carpenter’s day, now or back then. The biggest departure for a modern trim carpenter restoring an 18th-century home is the order of construction: The trim goes on before the plaster. This allows the casings, referred to collectively as the architrave, to be slightly recessed in the plaster, which in turn helps to seal out drafts.

Montpelier, the home of President James Madison, has gone through several architectural incarnations, but it started out as a no-nonsense brick Georgian built on the Virginia frontier in 1760. Iron nails were costly in those days, and carpenters used surprisingly few of them. They relied instead on complex joinery that seems onerous by today’s standards, such as dovetailing a casing leg to a plinth block. In the spirit of restoring the house to its Madison-era state, my crew has helped to duplicate every one of the details, down to the last notch.

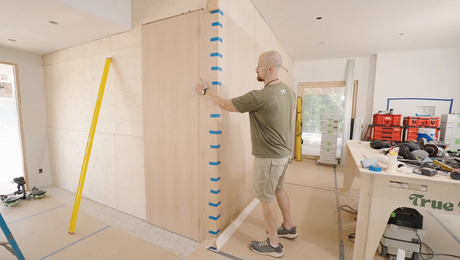
We didn’t use bowsaws or a brace and bit. In particular, project manager and former boatwright Bill Bichell came up with a succession of timesaving tricks that employed modern tools to make the work efficient. The first-floor front windows are a good example. The 17-in.-thick walls are punctuated with recessed window openings called embrasures, which are made of paneled jambs splayed at an angle to maximize the passage of sunlight. Taking our cue from an existing window we assembled each embrasure on site.

We began installation by cutting the jambs to length and temporarily fitting them in position. The legs were cut shy of the floor for an easy fit; a thin baseboard, called the running plinth, covered the gap later. The final step in the process was to measure the width of the frame and panel that goes below the window.

The architrave’s outboard edges were nailed to wooden plugs in the brickwork, and the inboard edges were nailed to the jambs. Finishing up included drawing the backbands tight, fitting the running plinth, and pinning the decorative bead into its dado.

A positive lock instead of fasteners
An angled tongue milled on the edge of the paneled jamb engages a groove plowed in the face of the window frame and makes alignment of the long pieces easier.

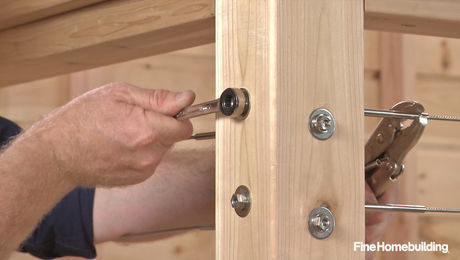
Minimize scribing in thick stock
Like much of the trim used in the house, sturdy plinth blocks were made of heart pine. To make scribing the plinths to the floor an easier process, carpenters routed a shallow pass from the plinth’s underside, knocking off high spots with a chisel. As seen above, among the unusual details we reproduced were casings dovetailed into the backs of the plinth blocks.

A lesson from the boatyard
For accurate measurement of the width of the lower panel between the jambs, project manager Bill Bichell used a simple trick: He slid two thin wood scraps outward until they contacted the jambs, then clamped them together. The measurement is transferred to the corresponding part of the panel.

Trick of the trade

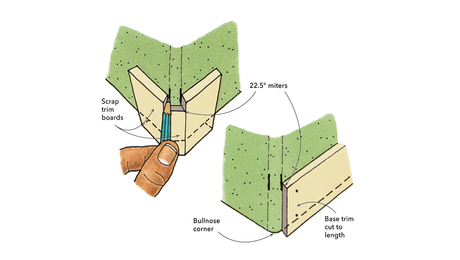
To minimize hammer marks on the trim, use a scrap of hardboard slotted for the protruding nail. The hole at the other end makes the guard easy to hold.A curious detail creates the need for a jig
The delicate bead that divides the upper and lower halves of the leg jambs was presumably intended to make these fixed pieces mimic the folding window shutters found on costlier embrasures of the period. The dado that housed the bead also had to include a thicker bullnose panel cap. To rout the dual-width dado, Bill Bichell devised a straightedge router jig featuring a stop attached with rare-earth magnets. He routs the short, wider portion of the dado with the stop in place, then changes to a smaller-diameter bit, quickly removes the stop, and completes the dado.


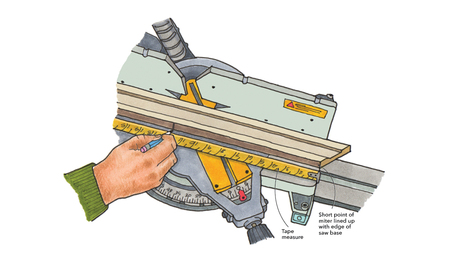
Clean, accurate, and complex miters
The head of the architrave meets the legs in a hip miter, a joint more difficult to cut than a plain miter but also less susceptible to seasonal humidity changes. Hip miters are marked out on the flat back side of the trim and are rough-cut with a jigsaw (1). A hardboard straightedge is clamped to the trim; then a router with a 1/2-in. straight bit cuts to the line (2). A sharp chisel cleans up the intersection of the two cuts (3).


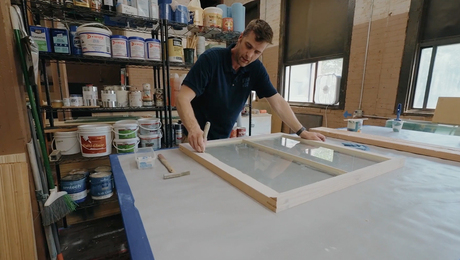
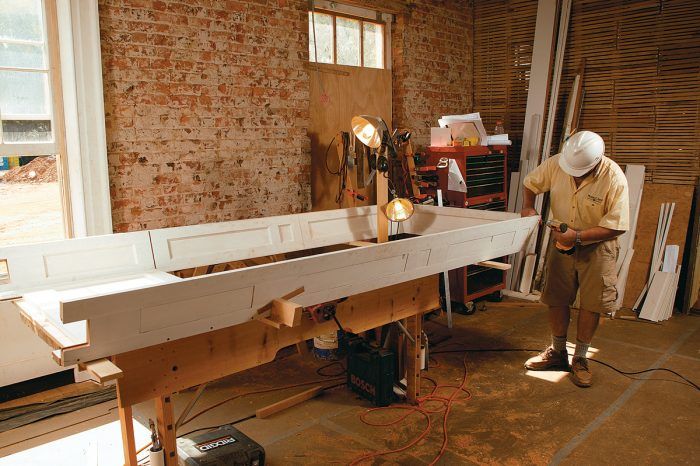
Blocking captures the angle on the bench
The finished parts are assembled as a unit on the bench prior to installation. Placed near the midsection, blocks support the jambs at the appropriate angle; shims keep everything tight.

Sign up for eletters today and get the latest how-to from Fine Homebuilding, plus special offers.

Signing you up...

This site is protected by reCAPTCHA and the Google Privacy Policy and Terms of Service apply.
See all newsletters
See all newsletters
×

Get home building tips, offers, and expert advice in your inbox

Signing you up...

This site is protected by reCAPTCHA and the Google Privacy Policy and Terms of Service apply.
See all newsletters
See all newsletters

New Feature

Fine Homebuilding Forums

Ask questions, offer advice, and share your work

Log in or create an account to post a comment.

Sign up Log in

Become a member and get full access to FineHomebuilding.com

Up Next

Video Shorts

Featured Story

Eight Common Electrical Myths and Mistakes

Dangerous electrical work and widespread misconceptions cause fires, deaths, and $1.5 billion in property damage annually.

Featured Video

How to Install Cable Rail Around Wood-Post Corners

Use these tips to keep cables tight and straight for a professional-looking deck-railing job.

Related Stories

  • Window Glazing with Traditional Putty
  • Making and Installing Wood Wall Paneling
  • Tom Gensmer, Remodeler and Window-Repair Expert
  • Shim Trim With Screws

Discussion Forum

Recent Posts and Replies

  • |
  • |
  • |
  • |
  • |
  • |
View More Create Post

Highlights

Fine Homebuilding All Access
Fine Homebuilding Podcast
Tool Tech
Plus, get an extra 20% off with code GIFT20

"I have learned so much thanks to the searchable articles on the FHB website. I can confidently say that I expect to be a life-long subscriber." - M.K.

Get home building tips, offers, and expert advice in your inbox

Signing you up...

This site is protected by reCAPTCHA and the Google Privacy Policy and Terms of Service apply.
See all newsletters
See all newsletters

Video

View All Videos
  • Window Glazing with Traditional Putty
  • Making and Installing Wood Wall Paneling
  • Building a Flush Interior Door With Carpenter Casey Knips
  • How to Repair Shrinking Crown Molding
View All

Trimwork

View All Trimwork Articles
  • Template for Bullnose Base Corners
  • Simple Miter Measurements
  • Conceal Cut Ends
View All Trimwork Articles

Fine Homebuilding Magazine

  • Issue 330 - April/May
    • Deck Details for Durability
    • FAQs on HPWHs
    • 10 Tips for a Long-Lasting Paint Job
  • Issue 329 - Feb/Mar 2025
    • Smart Foundation for a Small Addition
    • A Kominka Comes West
    • Making Small Kitchens Work
  • Issue 328 - Dec/Jan 2024
    • How a Pro Replaces Columns
    • Passive House 3.0
    • Tool Test: Compact Line Lasers
  • Issue 327 - November 2024
    • Repairing Damaged Walls and Ceilings
    • Plumbing Protection
    • Talking Shop
  • Issue 326 - October 2024
    • Paint Behind Strike Plates
    • Conceal Cut Ends
    • Ladder Slip Solution

Fine Home Building

Newsletter Sign-up

  • Fine Homebuilding

    Home building tips, offers, and expert advice in your inbox.

  • Green Building Advisor

    Building science and energy efficiency advice, plus special offers, in your inbox.

  • Old House Journal

    Repair, renovation, and restoration tips, plus special offers, in your inbox.

Signing you up...

This site is protected by reCAPTCHA and the Google Privacy Policy and Terms of Service apply.
See all newsletters

Follow

  • Fine Homebuilding

    Dig into cutting-edge approaches and decades of proven solutions with total access to our experts and tradespeople.

    Start Free Trial Now
    • Facebook
    • Instagram
    • X
    • LinkedIn
  • GBA Prime

    Get instant access to the latest developments in green building, research, and reports from the field.

    Start Free Trial Now
    • Facebook
    • YouTube
  • Old House Journal

    Learn how to restore, repair, update, and decorate your home.

    Subscribe Now
    • Facebook
    • Instagram
    • X

Membership & Magazine

  • Online Archive
  • Start Free Trial
  • Magazine Subscription
  • Magazine Renewal
  • Gift a Subscription
  • Customer Support
  • Privacy Preferences
  • About
  • Contact
  • Advertise
  • Careers
  • Terms of Use
  • Site Map
  • Do not sell or share my information
  • Privacy Policy
  • Accessibility
  • California Privacy Rights

© 2025 Active Interest Media. All rights reserved.

Fine Homebuilding receives a commission for items purchased through links on this site, including Amazon Associates and other affiliate advertising programs.

X
X
This is a dialog window which overlays the main content of the page. The modal window is a 'site map' of the most critical areas of the site. Pressing the Escape (ESC) button will close the modal and bring you back to where you were on the page.

Main Menu

  • How-To
  • Design
  • Tools & Materials
  • Video
  • Blogs
  • Forum
  • Project Guides
  • Reader Projects
  • Magazine
  • Members
  • FHB House

Podcasts

  • FHB Podcast
  • ProTalk

Webinars

  • Upcoming and On-Demand

Podcasts

  • FHB Podcast
  • ProTalk

Webinars

  • Upcoming and On-Demand

Popular Topics

  • Kitchens
  • Business
  • Bedrooms
  • Roofs
  • Architecture and Design
  • Green Building
  • Decks
  • Framing
  • Safety
  • Remodeling
  • Bathrooms
  • Windows
  • Tilework
  • Ceilings
  • HVAC

Magazine

  • Current Issue
  • Past Issues
  • Magazine Index
  • Subscribe
  • Online Archive
  • Author Guidelines

All Access

  • Member Home
  • Start Free Trial
  • Gift Membership

Online Learning

  • Courses
  • Project Guides
  • Reader Projects
  • Podcast

More

  • FHB Ambassadors
  • FHB House
  • Customer Support

Account

  • Log In
  • Join

Newsletter

Get home building tips, offers, and expert advice in your inbox

Signing you up...

This site is protected by reCAPTCHA and the Google Privacy Policy and Terms of Service apply.
See all newsletters
See all newsletters

Follow

  • X
  • YouTube
  • instagram
  • facebook
  • pinterest
  • Tiktok

Join All Access

Become a member and get instant access to thousands of videos, how-tos, tool reviews, and design features.

Start Your Free Trial

Subscribe

FHB Magazine

Start your subscription today and save up to 70%

Subscribe

We hope you’ve enjoyed your free articles. To keep reading, become a member today.

Get complete site access to expert advice, how-to videos, Code Check, and more, plus the print magazine.

Start your FREE trial

Already a member? Log in