FHB Logo Facebook LinkedIn Email Pinterest Twitter X Instagram Tiktok YouTube Plus Icon Close Icon Navigation Search Icon Navigation Search Icon Arrow Down Icon Video Guide Icon Article Guide Icon Modal Close Icon Guide Search Icon Skip to content
Subscribe
Log In
  • How-To
  • Design
  • Tools & Materials
  • Restoration
  • Videos
  • Blogs
  • Forum
  • Magazine
  • Members
  • FHB House
  • Podcast
Log In
Mastered in a Minute

How to Install Wall Sheathing

A quick look at the right way to skin a stud wall.

By Fine Homebuilding Editors

From the underlying framing to the water barrier, this video lets you tackle wall sheathing in a minute.

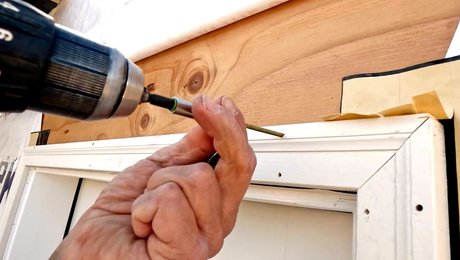
Wall sheathing starts with making sure the underlying wall framing is square.

The first sheet should hang below the bottom wall plate to tie into the framing below. A line snapped across the studs orients the top of this sheet.

The second row of sheathing should be offset at least three stud bays from the first.

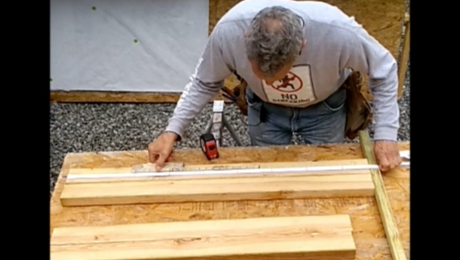
Mark the location of window and door openings with tick marks.

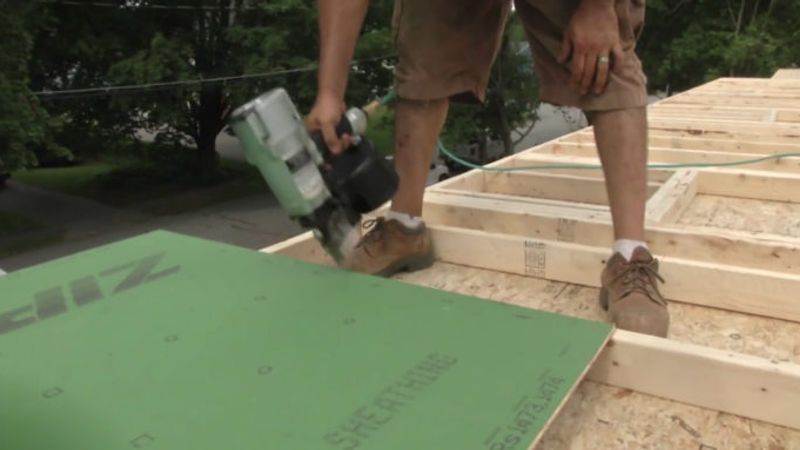
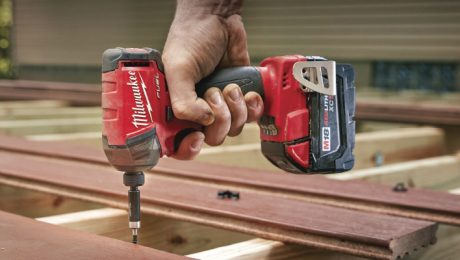
Use the right nails – At least 2 in. long ring-shanked nails are required, and they should be spaced no further apart than 12 in. in the center of the sheet and 6 in. along supported edges.

The nails should be about 3/8 in. in from the edges. Angling the nailer helps to ensure the nails hit the studs along the ends of the sheets.

Ideally, the nails should be driven just flush with the face of the sheathing.

Using the tick marks made earlier as starting points, snap lines at the edges of the openings and cut them out with a circular saw.

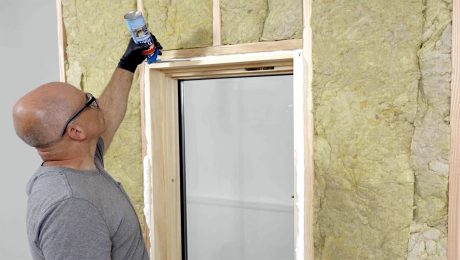
For standard OSB or plywood sheathing, install housewrap using cap fasteners.

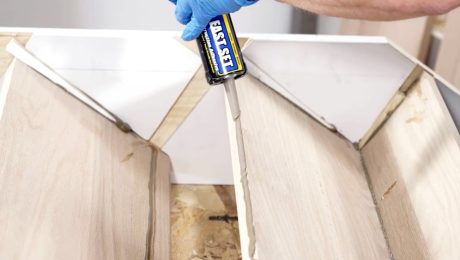
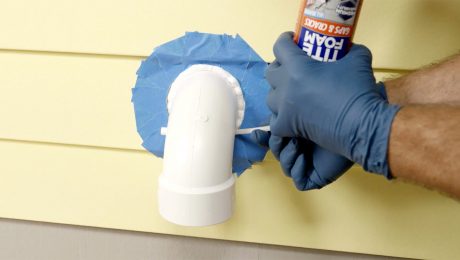
When using sheathing with an integrated water-resistant barrier, remove any dust or debris from the surface and tape all seams flashing-style using a j-roller to embed the tape.

More on Wall Sheathing 

4 Options for Shear Bracing Foam-Sheathed Walls – If you aren’t building in a high-wind area continuous sheathing is likely to cost more than other bracing solutions. This article discusses four alternatives for shear bracing foam-sheathed walls.

Plywood vs. OSB – New-generation panels mean decade-old notions are no way to choose sheathing. Here’s what you need to know.

What’s the Difference: Control Layers – Air barriers, vapor barriers, water-resistive barriers, and insulation.

Why Use a Spray-Applied Water-Resistive Barrier? – A liquid WRB won’t blow off, it goes on fast, and it’s an economical way to make a house airtight and waterproof.

Sign up for eletters today and get the latest how-to from Fine Homebuilding, plus special offers.

Signing you up...

This site is protected by reCAPTCHA and the Google Privacy Policy and Terms of Service apply.
See all newsletters
See all newsletters
×

Get home building tips, offers, and expert advice in your inbox

Signing you up...

This site is protected by reCAPTCHA and the Google Privacy Policy and Terms of Service apply.
See all newsletters
See all newsletters

New Feature

Fine Homebuilding Forums

Ask questions, offer advice, and share your work

View Comments

  1. simonbell90 | Feb 01, 2017 08:30am | #1

    Brilliant

  2. user-6282711 | Feb 02, 2017 09:12pm | #2

    That was a terrible video.

  3. K6_4759931 | Feb 06, 2017 01:31pm | #3

    Really, that's it? Adhesives necessary? What the reason for the overhang at the bottom of the wall? How do you handle wall connections? Lot more to it than what was shown for new guys starting out.

  4. 382 | Feb 06, 2017 01:35pm | #4

    Overdriven fasteners are very apparent in this video. I think you should resist the impulse to "Just to get the content up" and spend a little more time on quality. Nothing "Fine" about this "Fine Homebuilding" video.

  5. Jienou | Feb 06, 2017 01:58pm | #5

    In many jurisdictions sheathing can only be installed vertically on the wall, which is different from the video.

  6. BWH | Feb 06, 2017 03:55pm | #6

    No mention of sheathing gaps. Plus around here you need a nailing inspection before taping. Maybe a little less heavy metal and a little more content.

  7. suburbangeorge | Feb 06, 2017 05:26pm | #7

    Don't get some of these comments. The overhang at the bottom of the wall is to tie the sheathed wall to the rim joist below. Sheathing on lower wall should also catch the rim. Now you have one structure rather than several stacked on top of each other. Never heard of adhesive on wall sheathing and I've done lots of structural engineered wall sheathing. Floor adhesive is to stop squeaks not for strength. The strength of the sheathing is in how many and what guage nails you use. Don't know what jurisdiction would require vertical sheathing. It is inherently weaker with your joints all on one stud. By staggering the joints you lessen the chance of failure. If I'm doing a job where vertical sheathing will really help me in some other way, I lay out my joints in the wall framing and use 3 by or 4 by studs at the joints lessening the chance of all of those nails(lots of shear panels are nailed 2, 3 or 4 inches OC on the edges) splitting the stud.

  8. ArmandM | Feb 06, 2017 05:26pm | #8

    I suppose the flaw here is trying to cover this topic with the "Mastered in a Minute" format. That might be sufficient time for addressing sheathing fasteners, taping seams, or squaring the wall.

  9. suburbangeorge | Feb 06, 2017 06:31pm | #9

    Got to thinking and went back and looked again. Don't even know what that sheathing is for. It sure isn't structural. There should be a row of blocking between the studs that the joints fall on. Once again better to use 3 by or 4 by blocks. Sheathing has NO STRUCTURAL VALUE unless it's nailed on all four edges. To be most useful, it should also have edge nailing at other significant framing members like the bottom wall plate.

  10. user-6314355 | Feb 07, 2017 12:30pm | #10

    I too questioned not gaping the sheathing at the place they butt. Since many framers in our area frame old school by nailing down shoe plates on accurate chalk lines , create the upper plates on top of the shoe plates, do the marking for windows , doors etc and pull the plates back to toenail the studs. We have found that this gives us the most reliably straight walls.Despite the curvature of the plate material

  11. suburbangeorge | Feb 07, 2017 03:39pm | #11

    @ user-6314355 What you describe is sort of "new" old school. Have seen framers work that way but I don't like building walls on ladders. The way I learned, back in the '70's, was to nail down your bottom plate with 8 sinkers along the chalk lines as you describe then add the top plate with more 8 sinkers and detail as you describe. After you've plated the entire house or story, if multiple story, you mark the plate packages for identification, pull them up as packages and stack them out of the way. Starting with the longest wall you build it on the deck and stand it up bracing it only at the ends so the braces don't get in the way of building subsequent walls. Your method might be more appropriate if building on a slab which I pretty much never do. The other thing that shapes my practices is that I'm pretty much never framing multiple structures at the same time. When I order plate stock, I insist that it be straight even if I have to pay for #1. That's much cheaper in the long run than dealing with twisty construction grade plate stock.

  12. patrickklebba | Feb 25, 2017 02:12am | #12

    I use it very good tool

  13. JC72 | Aug 18, 2017 10:48am | #13

    @suburbangeorge

    Vertical sheathing can be used to provide blocking between raised heel trusses.

Log in or create an account to post a comment.

Sign up Log in

Become a member and get full access to FineHomebuilding.com

More Mastered in a Minute

View All
  • Fastening an Exterior Door With Brick Mold
  • Assemble Housed Stairs With Construction Adhesive
  • Insulating Foam for High-Performance Windows
  • Air-Seal Penetrations With Canned Foam
View All

Up Next

Video Shorts

Featured Story

Eight Common Electrical Myths and Mistakes

Dangerous electrical work and widespread misconceptions cause fires, deaths, and $1.5 billion in property damage annually.

Featured Video

Micro-Adjust Deck-Baluster Spacing for an Eye-Deceiving Layout

No math, no measuring—just a simple jig made from an elastic band is all you need to lay out a good-looking deck railing.

Related Stories

  • Making and Installing Wood Wall Paneling
  • Less Noise, More Torque
  • FHB Podcast Segment: Drywall-Free Half Wall Finish
  • FHB Podcast Segment: Plaster Peeling Predicament

Discussion Forum

Recent Posts and Replies

  • |
  • |
  • |
  • |
  • |
  • |
View More Create Post

Highlights

Fine Homebuilding All Access
Fine Homebuilding Podcast
Tool Tech
Plus, get an extra 20% off with code GIFT20

"I have learned so much thanks to the searchable articles on the FHB website. I can confidently say that I expect to be a life-long subscriber." - M.K.

Get home building tips, offers, and expert advice in your inbox

Signing you up...

This site is protected by reCAPTCHA and the Google Privacy Policy and Terms of Service apply.
See all newsletters
See all newsletters

Video

View All Videos
  • Don't Wait to Get These Tools
  • How to Enlarge a Hole With a Hole Saw
  • 10 Great Gift Ideas for People Who Love Tools
  • Replace the Cord on a Power Tool
View All

Walls

View All Walls Articles
  • FHB Podcast Segment: Drywall-Free Half Wall Finish
  • FHB Podcast Segment: Plaster Peeling Predicament
  • That Modern Look
View All Walls Articles

Fine Homebuilding Magazine

  • Issue 330 - April/May
    • Deck Details for Durability
    • FAQs on HPWHs
    • 10 Tips for a Long-Lasting Paint Job
  • Issue 329 - Feb/Mar 2025
    • Smart Foundation for a Small Addition
    • A Kominka Comes West
    • Making Small Kitchens Work
  • Issue 328 - Dec/Jan 2024
    • How a Pro Replaces Columns
    • Passive House 3.0
    • Tool Test: Compact Line Lasers
  • Issue 327 - November 2024
    • Repairing Damaged Walls and Ceilings
    • Plumbing Protection
    • Talking Shop
  • Issue 326 - October 2024
    • Paint Behind Strike Plates
    • Conceal Cut Ends
    • Ladder Slip Solution

Fine Home Building

Newsletter Sign-up

  • Fine Homebuilding

    Home building tips, offers, and expert advice in your inbox.

  • Green Building Advisor

    Building science and energy efficiency advice, plus special offers, in your inbox.

  • Old House Journal

    Repair, renovation, and restoration tips, plus special offers, in your inbox.

Signing you up...

This site is protected by reCAPTCHA and the Google Privacy Policy and Terms of Service apply.
See all newsletters

Follow

  • Fine Homebuilding

    Dig into cutting-edge approaches and decades of proven solutions with total access to our experts and tradespeople.

    Start Free Trial Now
    • Facebook
    • Instagram
    • X
    • LinkedIn
  • GBA Prime

    Get instant access to the latest developments in green building, research, and reports from the field.

    Start Free Trial Now
    • Facebook
    • YouTube
  • Old House Journal

    Learn how to restore, repair, update, and decorate your home.

    Subscribe Now
    • Facebook
    • Instagram
    • X

Membership & Magazine

  • Online Archive
  • Start Free Trial
  • Magazine Subscription
  • Magazine Renewal
  • Gift a Subscription
  • Customer Support
  • Privacy Preferences
  • About
  • Contact
  • Advertise
  • Careers
  • Terms of Use
  • Site Map
  • Do not sell or share my information
  • Privacy Policy
  • Accessibility
  • California Privacy Rights

© 2025 Active Interest Media. All rights reserved.

Fine Homebuilding receives a commission for items purchased through links on this site, including Amazon Associates and other affiliate advertising programs.

X
X
This is a dialog window which overlays the main content of the page. The modal window is a 'site map' of the most critical areas of the site. Pressing the Escape (ESC) button will close the modal and bring you back to where you were on the page.

Main Menu

  • How-To
  • Design
  • Tools & Materials
  • Video
  • Blogs
  • Forum
  • Project Guides
  • Reader Projects
  • Magazine
  • Members
  • FHB House

Podcasts

  • FHB Podcast
  • ProTalk

Webinars

  • Upcoming and On-Demand

Podcasts

  • FHB Podcast
  • ProTalk

Webinars

  • Upcoming and On-Demand

Popular Topics

  • Kitchens
  • Business
  • Bedrooms
  • Roofs
  • Architecture and Design
  • Green Building
  • Decks
  • Framing
  • Safety
  • Remodeling
  • Bathrooms
  • Windows
  • Tilework
  • Ceilings
  • HVAC

Magazine

  • Current Issue
  • Past Issues
  • Magazine Index
  • Subscribe
  • Online Archive
  • Author Guidelines

All Access

  • Member Home
  • Start Free Trial
  • Gift Membership

Online Learning

  • Courses
  • Project Guides
  • Reader Projects
  • Podcast

More

  • FHB Ambassadors
  • FHB House
  • Customer Support

Account

  • Log In
  • Join

Newsletter

Get home building tips, offers, and expert advice in your inbox

Signing you up...

This site is protected by reCAPTCHA and the Google Privacy Policy and Terms of Service apply.
See all newsletters
See all newsletters

Follow

  • X
  • YouTube
  • instagram
  • facebook
  • pinterest
  • Tiktok

Join All Access

Become a member and get instant access to thousands of videos, how-tos, tool reviews, and design features.

Start Your Free Trial

Subscribe

FHB Magazine

Start your subscription today and save up to 70%

Subscribe

We hope you’ve enjoyed your free articles. To keep reading, become a member today.

Get complete site access to expert advice, how-to videos, Code Check, and more, plus the print magazine.

Start your FREE trial

Already a member? Log in