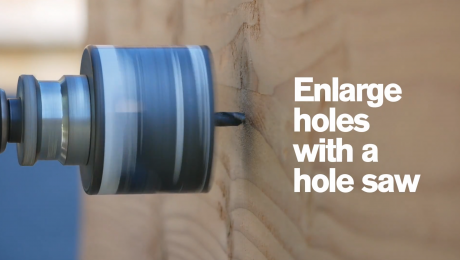
How to Enlarge a Hole With a Hole Saw
Use this reader-submitted tip to safely align your drill with an existing hole that's larger than the pilot bit on your hole saw.

The video above was inspired by this smart reader-submitted tip from Issue 162 of Fine Homebuilding magazine:
Because hole saws rely on a pilot bit to guide them, it’s pretty tough to enlarge an existing hole. There’s no wood for the pilot bit to bite. But there are ways to get around the problem. One solution, as shown in the drawing, is to use a wooden plug as a pilot.
Using a hole saw the size of the existing hole, cut a plug from a piece of scrap wood. Extract the plug from the hole saw, and impale it on the pilot bit of the larger hole saw. Make sure the plug extends below the plane of the saw’s teeth. Insert this rig into the hole that needs enlarging, and drill away. The plug won’t fall off because the twist of the pilot bit tries to screw its way further into the plug. By the time it does, the larger saw has established its own kerf.
—Don Reinhard, via email, None
Edited and illustrated by Charles Miller
From Fine Homebuilding #162


View Comments
Great tip!!
Great idea! But there is another solution from Lee Valley - it's called the oops arbor https://www.leevalley.com/en-ca/shop/tools/power-tool-accessories/hole-cutters/52518-oops-arbor
you simply use the smaller hole saw as a guide for the larger one. Used it many times and works great for $16.50 CDN. Too bad there is not a solution to go the other way!!
I just drill a hole in a relatively thin piece of stock, like scrap 1/2" plywood, and drill a hole in it with the hole saw. The scrap can then be clamped or screwed to the piece to be bored out. This method can be a little tricky if the holes have to be absolutely concentric, BUT you can also easily bore the new hole offset from the original.
If I needed the new hole to be absolutely positively concentric with the old, I'd attach the plywood undrilled to the workpiece, then use a hole saw of the size of the old hole, and drill through the old hole just until the pilot drill drilled through the plywood. Then I'd go the other direction with the new hole saw, using the same pilot hole. Again, by the time the saw goes through the plywood, the outer guide has been established.
100% this. The most reliable method of all in terms of keeping the two holes concentric. Doesn't require a $17 special arbor.
Same. I cut different half-moon shapes this way.
Amazing coincidence for me. I just "invented" this workaround the day before yesterday. The threaded mounts on my new sink hardware weren't long enough to extend down through the 1" hole in the marble countertop and two thicknesses of plywood the cabinet maker had left underneath, and still leave enough thread to work with. Needed to get further up the rod AND have room to get a tool in to tighten the mounting nut. Only a hole saw would do, but there was no way I could keep it from skipping around uncontrollably under there.
Ended up up using a piece of 1" dowel--drilled a pilot hole down the center of the dowel on my press, then used the dowel to center a 3" hole saw through a couple of thicknesses of plywood. Worked perfectly, and pulled the waste out to boot!
If you need the new larger hole to be concentric with the original hole, the tip will be unreliable.
The tipster uses a hole saw the size of the existing hole to make his positioning plug. The problem is, the resulting plug will be smaller than the original hole by about 1/8 to 3/16 inch. A 1 inch hole saw yields a plug that’s about 7/8 inch across.
So when the tipster inserts his guide plug into the hole, there with be a lot of slop such that the new hole saw’s pilot bit will probably not hit the center of the hole.
To make the plug you could futz around trying to find a hole saw that’s about 1/8 inch bigger than the original hole, but….
Ann’s method looks like the way to go.
I'm thinking of the situation where you can't afford to scar the surface that needs a bigger hole, like replacing a 70 year old mortised lockset with a modern one in a 70 year old solid oak arch top door (aka $2,000.)
Ann's solution can work if you can put 2-3 screws outside the diameter of the old hole, inside the diameter of the new hole. Sometimes you need 2 pieces of plywood, using the screws to clamp the substrate between them.
Worst case, you cut a square with diagonal about equal to the diameter of the old hole, then trim the corners until it's a force fit in the old hole.
What's wrong with using a curved rasp and frequently checking the diameter?
A method I have often used is to drill the new size hole in a piece of plywood. Then clamp that plywood over the hole you wish to enlarge. You can either center it, or you can offset it if need be. Then the hole saw is perfectly located where you need the hole to be, and the pilot bit is not even necessary.
cobb: This is the method I use. The previously mentioned plywood method seems to require access to both sides of the material, and that's often not possible. For those concerned about marring the material's surface with screw holes, one can also use "turner's tape" (strong double-stick tape) to affix the plywood cutting template.
An alternate but similar technique - mark and centrepunch a dowel the same size as the existing hole, bang the dowel into the hole, and use the hole saw to drill the larger hole, now centered by the dowel.
When I first read this tip I was so sad I had not thought of it myself! I have now used it many times with great success every time. On another note, the "tips" section has, for the 20+ years I have been reading FH, been one of my favorite sections of the magazine, keep them coming!
Sadly, that Lee Valley tool is "no longer available"... Thank you for the other worthy tips/suggestions...
Starrett and Bosch make versions of this. The Starrett is available on Amazon.