FHB Logo Facebook LinkedIn Email Pinterest Twitter X Instagram Tiktok YouTube Plus Icon Close Icon Navigation Search Icon Navigation Search Icon Arrow Down Icon Video Guide Icon Article Guide Icon Modal Close Icon Guide Search Icon Skip to content
Subscribe
Log In
  • How-To
  • Design
  • Tools & Materials
  • Restoration
  • Videos
  • Blogs
  • Forum
  • Magazine
  • Members
  • FHB House
  • Podcast
Log In

Fine Homebuilding Project Guides

Roofing

Guide Home
  • Tools and Materials
  • Roof Replacement and Reroofing
  • Roof Ventilation
  • Waterproofing
  • Installing Asphalt Shingles
  • Installing Other Types of Roofs
  • Roof Maintenance and Repair
Tips & Techniques

Cedar-Roof Shingling Guide

Quick to make and easy to use, this plywood guide keeps courses straight and on layout.

Issue 138
Click here to enlarge illustration. Edited and illustrated by Charles Miller.

A few years ago, I attended a seminar sponsored by a cedar-shingle manufacturer. The local rep showed a film of a real professional installing shingles. This guy was nailing so fast that the entire room burst out laughing. Like the other builders attending this event, I claim roofing as only part of my repertoire, and that level of skill just isn’t in the cards for me.

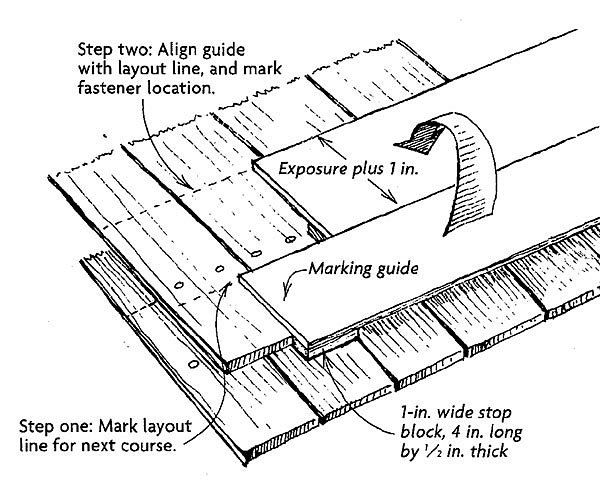
On those occasions when I do install wood shingles, I set the courses to a pencil line that I mark using a simple guide made out of a 4-ft. to 5-ft. length of 1/4-in. plywood. To make the guide, I first rip the piece of plywood to a width equal to the exposure of the shingles, plus 1 in. I affix stop blocks to the underside of the plywood at each end. As shown in the drawing, they are 1 in. wide, 4 in. long and 1/2-in. thick.

To use the guide, I position it so that the stop blocks catch the butts of the previous course of shingles. Then I draw a line along the top of the guide to locate the butts of the next course. Next, I move the guide up and lay its bottom edge along this line and mark another line along the top of the guide.

Of course, the shingles cover this line as they’re laid down, but the guide provides a reference line on the leading edge. That, and the nails in the previous shingle, are enough to eliminate any hesitation when nailing. To make sure none of the shingles wanders off layout, I snap a chalkline every few courses as a control.

— Arne Waldstein; Great Barrington, MA

From Fine Homebuilding #138

RELATED STORIES

  • What’s the Difference: Cedar Shingles
  • Installing Cedar Shakes
  • Estimating Cedar Shingles

Got a Tip?

Do you have any great tips like this guide for cedar-roof shingling? Share your methods, tricks, and jigs with other readers. Tag them @FineHomebuilding on social, email them to us at [email protected], or upload them to FineHomebuilding.com/reader-tips. We’ll pay for any we publish.

Updated November, 2024

Fine Homebuilding Recommended Products

Fine Homebuilding receives a commission for items purchased through links on this site, including Amazon Associates and other affiliate advertising programs.

Roofing Gun

This lightweight, pneumatic roofing nailer is capable of driving ¾-in to 1¾-in coil roofing nails and has a depth adjustment wheel to dial in nailing depth on the various shingle types you're likely to encounter.
Buy at Amazon

Flashing Boot

Adequately seal vulnerable vent penetrations through the roof with this galvanized flashing and flexible rubber collar.
Buy at Amazon

Ladder Stand Off

Stability is key when working off a ladder or accessing the roof, and this lightweight aluminum stand-off makes any extension ladder safer and more comfortable to use.
Buy at Amazon

Sign up for the Fine Homebuilding Tip of the Day and get daily tips and special offers delivered to your inbox.

Signing you up...

This site is protected by reCAPTCHA and the Google Privacy Policy and Terms of Service apply.
See all newsletters
See all newsletters
Previous: Estimating Cedar Shingles Next: Snap-Lock Standing-Seam Metal Roof Installation

Guide

Roofing

Chapter

Installing Other Types of Roofs

View Comments

  1. Edspa | Mar 20, 2017 07:28pm | #1

    I make a guide by ripping a piece of straight 3/4"ply the width of the exposure and tacking small blocks on the bottom edge to form a shallow T or L. It's easy to locate the guide with the blocks touching the bottom edge of the previous course. I tack the guide on with small finish nails

  2. Edspa | Mar 20, 2017 07:35pm | #2

    and can rest the shingles on the guide and nail without marking. I don't have to line up the bottom edge of the new course or have the shingles slide around. Cut a small block the exposure plus 1" and mark every few feet to guide in nailing

Log in or create an account to post a comment.

Sign up Log in

Become a member and get full access to FineHomebuilding.com

Roofing

Roofing

A complete resource that includes the best materials and the right techniques to build a sturdy, leak-free, attractive roof on any house

View Project Guide

View All Project Guides »

Become a member and get unlimited site access, including the Roofing Project Guide.

Start Free Trial

Tools and Materials
  • Roof Coverings
  • Roofing Materials
  • Power Tools
  • Handy Helpers
  • Staging and Ladders
  • Safety Equipment
Roof Replacement and Reroofing
  • Preparing the Old Roof
  • Sheathing
  • Installing the New Roof
Roof Ventilation
  • Venting Basics
  • Installation
Waterproofing
  • Underlayment
  • Drip Edge
  • Flashing Adjoining Walls
  • Dormer and Skylight Flashing
  • Chimney Flashing
  • Vent Flashing
  • Gutters
Installing Asphalt Shingles
  • Calculating Shingles
  • Layout
  • Installation
  • Valleys
Installing Other Types of Roofs
  • Cedar Shingles
  • Metal
  • Low-Slope Roofs
  • Slate and Tile
Roof Maintenance and Repair
  • Assessing the Problem
  • Repairing Asphalt-Shingle Roofs
  • Other Roofing Repairs

Fine Home Building

Newsletter Sign-up

  • Fine Homebuilding

    Home building tips, offers, and expert advice in your inbox.

  • Green Building Advisor

    Building science and energy efficiency advice, plus special offers, in your inbox.

  • Old House Journal

    Repair, renovation, and restoration tips, plus special offers, in your inbox.

Signing you up...

This site is protected by reCAPTCHA and the Google Privacy Policy and Terms of Service apply.
See all newsletters

Follow

  • Fine Homebuilding

    Dig into cutting-edge approaches and decades of proven solutions with total access to our experts and tradespeople.

    Start Free Trial Now
    • Facebook
    • Instagram
    • X
    • LinkedIn
  • GBA Prime

    Get instant access to the latest developments in green building, research, and reports from the field.

    Start Free Trial Now
    • Facebook
    • YouTube
  • Old House Journal

    Learn how to restore, repair, update, and decorate your home.

    Subscribe Now
    • Facebook
    • Instagram
    • X

Membership & Magazine

  • Online Archive
  • Start Free Trial
  • Magazine Subscription
  • Magazine Renewal
  • Gift a Subscription
  • Customer Support
  • Privacy Preferences
  • About
  • Contact
  • Advertise
  • Careers
  • Terms of Use
  • Site Map
  • Do not sell or share my information
  • Privacy Policy
  • Accessibility
  • California Privacy Rights

© 2025 Active Interest Media. All rights reserved.

Fine Homebuilding receives a commission for items purchased through links on this site, including Amazon Associates and other affiliate advertising programs.

X
X
This is a dialog window which overlays the main content of the page. The modal window is a 'site map' of the most critical areas of the site. Pressing the Escape (ESC) button will close the modal and bring you back to where you were on the page.

Main Menu

  • How-To
  • Design
  • Tools & Materials
  • Video
  • Blogs
  • Forum
  • Project Guides
  • Reader Projects
  • Magazine
  • Members
  • FHB House

Podcasts

  • FHB Podcast
  • ProTalk

Webinars

  • Upcoming and On-Demand

Podcasts

  • FHB Podcast
  • ProTalk

Webinars

  • Upcoming and On-Demand

Popular Topics

  • Kitchens
  • Business
  • Bedrooms
  • Roofs
  • Architecture and Design
  • Green Building
  • Decks
  • Framing
  • Safety
  • Remodeling
  • Bathrooms
  • Windows
  • Tilework
  • Ceilings
  • HVAC

Magazine

  • Current Issue
  • Past Issues
  • Magazine Index
  • Subscribe
  • Online Archive
  • Author Guidelines

All Access

  • Member Home
  • Start Free Trial
  • Gift Membership

Online Learning

  • Courses
  • Project Guides
  • Reader Projects
  • Podcast

More

  • FHB Ambassadors
  • FHB House
  • Customer Support

Account

  • Log In
  • Join

Newsletter

Get home building tips, offers, and expert advice in your inbox

Signing you up...

This site is protected by reCAPTCHA and the Google Privacy Policy and Terms of Service apply.
See all newsletters
See all newsletters

Follow

  • X
  • YouTube
  • instagram
  • facebook
  • pinterest
  • Tiktok

Join All Access

Become a member and get instant access to thousands of videos, how-tos, tool reviews, and design features.

Start Your Free Trial

Subscribe

FHB Magazine

Start your subscription today and save up to 70%

Subscribe

We hope you’ve enjoyed your free articles. To keep reading, become a member today.

Get complete site access to expert advice, how-to videos, Code Check, and more, plus the print magazine.

Start your FREE trial

Already a member? Log in