FHB Logo Facebook LinkedIn Email Pinterest Twitter X Instagram Tiktok YouTube Plus Icon Close Icon Navigation Search Icon Navigation Search Icon Arrow Down Icon Video Guide Icon Article Guide Icon Modal Close Icon Guide Search Icon Skip to content
Subscribe
Log In
  • How-To
  • Design
  • Tools & Materials
  • Restoration
  • Videos
  • Blogs
  • Forum
  • Magazine
  • Members
  • FHB House
  • Podcast
Log In
How-To

Refinish Your Wood Floors

Uncover the beauty in old hardwood flooring with a little patience and some great professional advice.

By Brent Kelosky Issue 253 - Aug/Sept 2015

Synopsis: The ingredients needed to refinish wood floors are straightforward: just a single coat of stain over a carefully sanded surface, a coat of sealer to lock in the stain, and two coats of polyurethane to provide the wear layer. But the job also requires the right tools used in the right sequence, and it demands as much patience as it does skill. Author Brent Kelosky explains his process for refinishing a wood floor, including how to handle damaged areas.

Although my company does all types of flooring installations, our bread and butter has always been refinishing worn hardwood. Our goal is to uncover the beauty under the decrepit surface of the floor, which involves no small amount of labor. When we arrived on-site for the job shown here, the wall-to-wall carpeting had already been removed, revealing 750 sq. ft. of severely worn red-oak flooring that appeared original to this old Pennsylvania farmhouse. Although we got back down to bare wood quickly, that’s just the beginning of a job like this.

The job took a two-person crew just under five days to complete and cost about $4.50 per sq. ft. in labor and materials. Refinishing a hardwood floor is an admittedly disruptive process, but you realize it’s worth it when you first set eyes on the results.

The materials are straightforward — just a single coat of stain, a coat of sealer to lock in the stain, and two coats of polyurethane to provide the wear layer — but breathing new life into an old wood floor takes a lot of patience. It all starts with sanding.

Sanding will make or break your job

Without question, the critical difference between a professional-looking finished floor and a poor attempt is how much care is taken during the sanding stage. Although you’re only removing 1⁄16in. or so of actual wood, the sanding process takes multiple days — that is, if it’s done correctly.

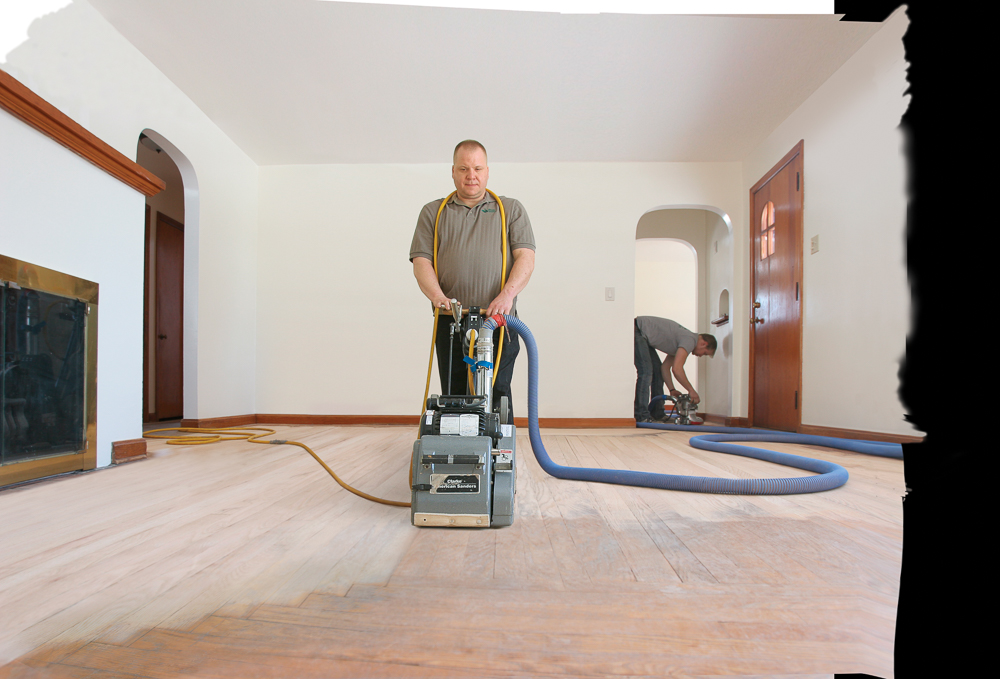
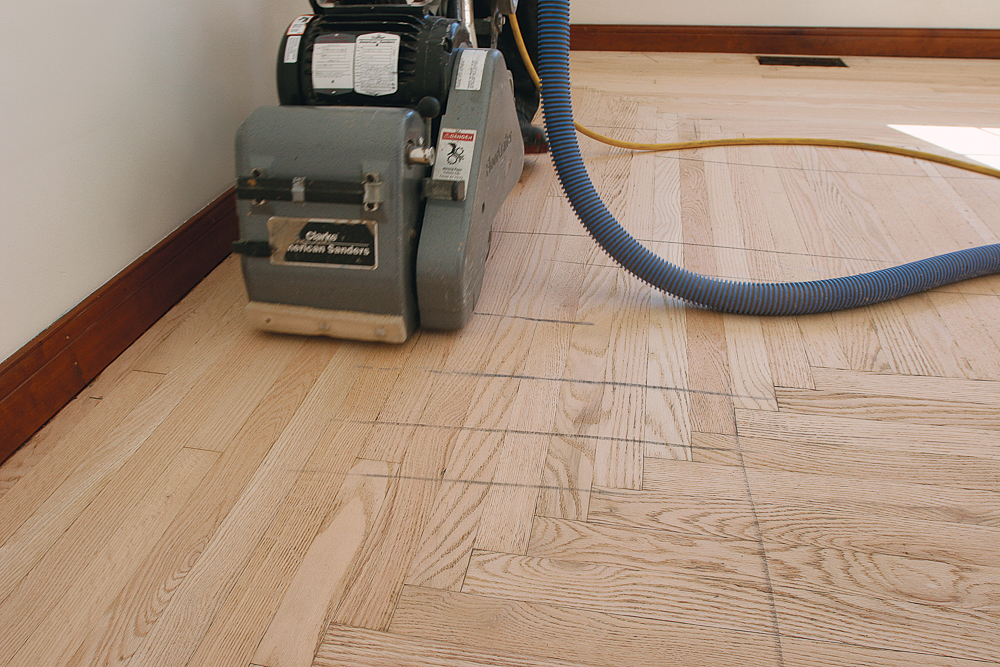
In addition to some common hand and power tools, there are three specialized tools we use on our jobs: a belt floor sander, an orbital edger, and a buffer.

The bulk of the sanding work is handled by the large, very aggressive, 220v belt sander. Run back and forth through the room, working in the same direction as the floor’s wood grain, the belt sander is used to take slow, overlapping passes.

Although an upright orbital sander is the most common tool available at rental yards, we prefer to use a belt sander. (A drum sander is also an improvement over the orbital.) An orbital sander is a fairly gentle and forgiving tool, which may seem appealing if you’re unsure of your abilities, but it also requires much more time to do the job. On badly damaged floors, you’ll likely give up long before you get the blemishes sanded out.

A belt sander runs on wheels and uses a lever to lower the machine — which puts the sanding belt in contact with the floor surface — and then to lift it away. Because the machine is so aggressive, you can’t allow it to sit in one spot for even a couple of seconds or you will end up with significant gouges. It should be lowered to the floor as it’s being moved forward to start a pass, then lifted back off at the end of each pass.

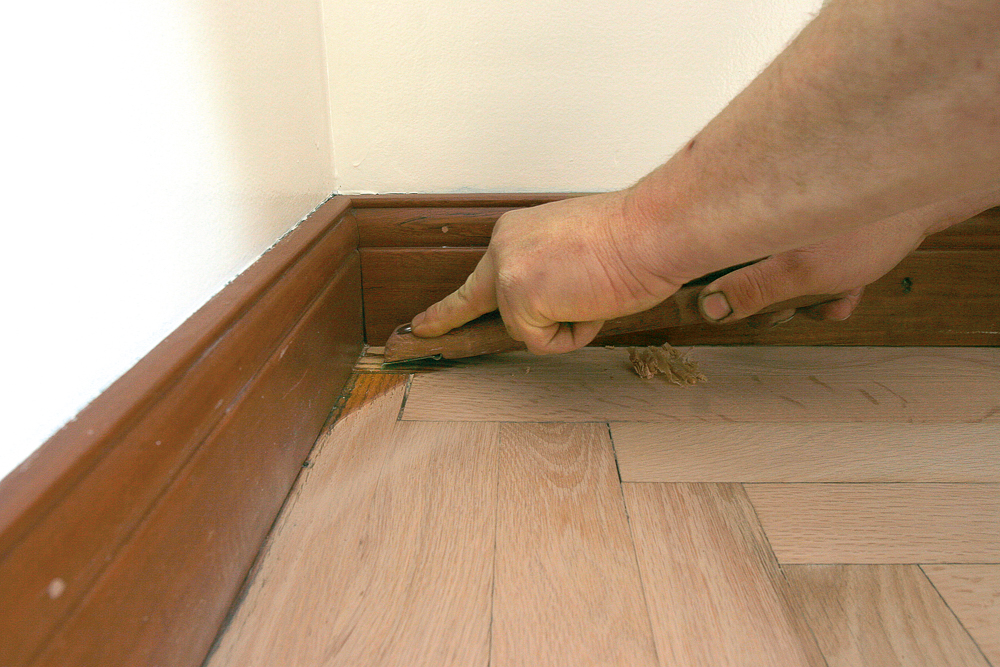
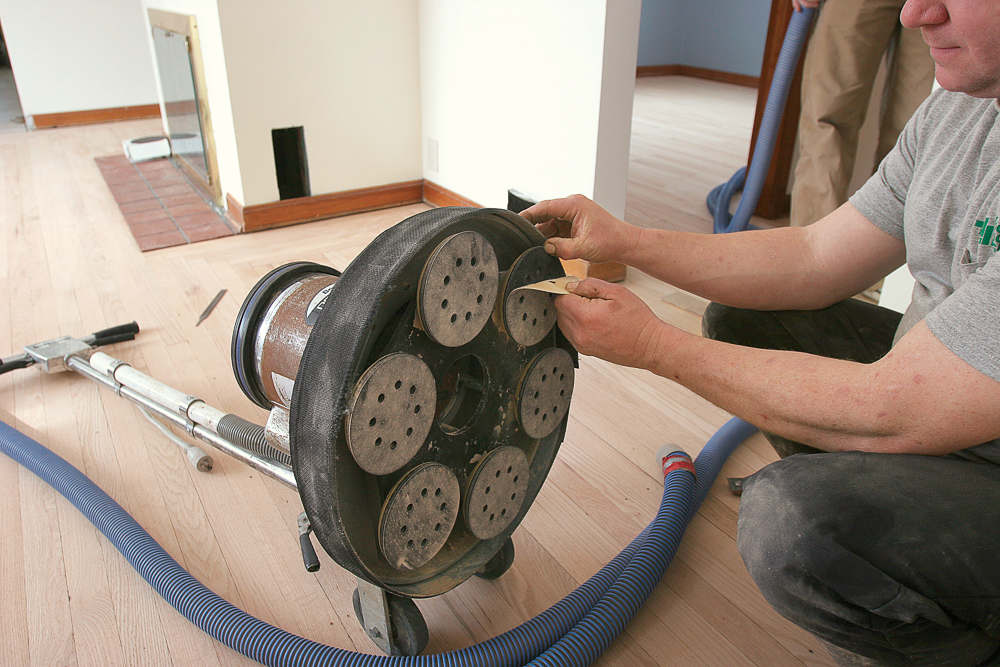
A powerful handheld orbital sander called an edger is used to sand the perimeter of the room and any areas where the larger machine won’t fit. The smallest details and corners are done by hand with a scraper and sandpaper. Later in the process, a buffing machine is outfitted for finer sanding, but first comes the rough cut.

Get back to bare wood

first pass with a belt sander and edger
The first pass with the belt sander and the edger, which we call the rough cut, typically relies on 36-grit paper to remove the existing finish and stain quickly, revealing fresh wood across most of the floor.
Heavy, powerful, and aggressive, a professional-grade belt sander
Large areas. Heavy, powerful, and aggressive, a professional-grade belt sander (which can be rented)does the heaviest lifting in a floor-refinishing job. Slow, overlapping passes are made in the direction of the floor boards.
an edger
Edges. A powerful orbital sander known as an edger sands the flooring around the edges of each room and in any areas too small to be handled by the full-size belt sander.
scraping with a handheld draw scraper
Corners. Scraping with a handheld draw scraper followed by some hand sanding quickly reveals bare wood in corners and around details where a sander won’t fit. Wherever the scraper goes, so does a metal file, which is used frequently to hone the scraper’s cutting edge.

Sand incrementally and patiently

Although it’s not the coarsest option in our arsenal, 24 is typically the lowest grit we use for the rough cut. Such a coarse grit is only necessary when a floor has lots of built-up wax on the surface, and even then it’s pretty inefficient for removing actual wood. In most cases, we start with 36-grit sandpaper, which removes the existing topcoats and stain, revealing fresh wood across most of the floor. From there, we sand the floor twice more with 50-grit and 80-grit paper, spending additional time on problem areas such as deep scratches or surface stains (see “Dealing with damage”).

A crucial step that’s often not considered by first-timers is blending together the sanding patterns from the belt sander and the edger. Because they have different weights, operate at different speeds, and are run in different directions, these two machines leave the sanded floor looking and feeling inconsistent, even when they’re equipped with the same grit of sandpaper. The remedy for this problem is a random-orbit sander.

Even though we use 80-grit paper with the belt sander and the edger, experience has taught us that the random-orbit sander should be equipped with 60-grit paper, which roughs up the perimeter of the room and any other areas where the two machines had overlapping passes. Although it seems counterintuitive, this ensures that the stain penetrates evenly. A final pass with the ­upright buffer machine is the last step in the sanding process before the floor undergoes a thorough vacuuming.

Dealing with damage

We often see pet stains, traffic patterns, knife marks along the edges of the room left from the carpet installation, and missing wood or abandoned registers. Our first choice is always to sand out the damage if we can, but damage often extends beyond the missing, scratched, or dented wood.

Sanding can’t fix everything, and often it’s impossible to predict whether a damaged section can be sanded out until you try. For areas that can’t be remedied with sanding, there are two options: acceptance or board replacement.

When sanding damaged areas, we take several passes with the belt sander at a slight angle to the wood grain, alternating the angle of the machine between each series of passes. It sometimes helps to spray the surface of the damaged flooring with water—just enough to wet it evenly—between passes with the belt sander. The water raises the grain of the wood, lifting deeper stains to be within reach of the sander.

We typically don’t bother filling large gaps with putty. Experience has taught us that the camouflage rarely lasts and that this repair isn’t worth the effort. It’s extremely difficult to fill an entire void, and seasonal movement combined with vibrations of walking usually open the gaps again. These imperfections are often best left as they are.

Sand with patience

Although the sanding progress isn’t as dramatic as during the rough cut, the incremental passes with belt sander, edger, buffer, and random-orbit sander are crucial and demand a slow, methodical system.
use rubber to mark across the grain
Track your progress. To ensure that no spots are skipped, use a hard piece of rubber to mark across the grain of the floor before sanding. Rubber is more reliable than a marker, which can dry out quickly.
using a random-orbit sander to retouch edges of room
Back it up one grit. Use a random-orbit sander to retouch the edges of the room. Although the rest of the floor is sanded to 80 grit, use 60-grit paper here to avoid a halo effect around the room’s perimeter.
buffer with multidisk head
Buff to blend. The final sanding pass is done with a buffer that’s equipped with a multidisk head and 80-grit paper. This setup blends the scratch patterns of the belt sander and the edger, ensuring a uniform look when stain is applied.

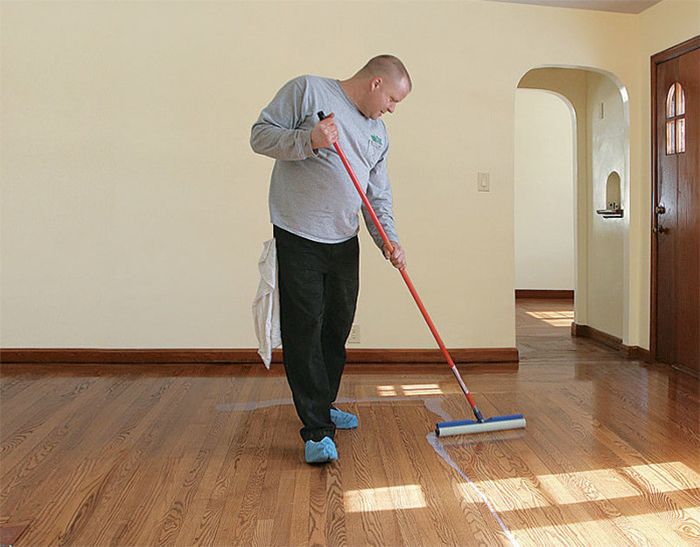
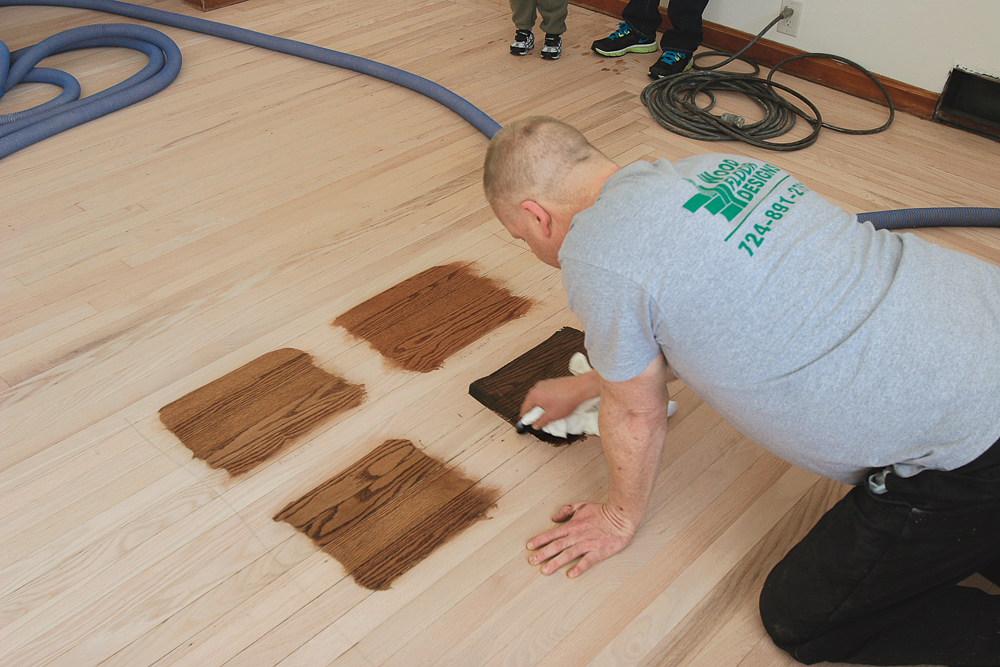
Staining is done by hand

Although water-based stains are an option, I’ve found them to be inferior to oil-based products, especially in getting even stain color in large rooms. Along with the sealer and topcoats that come after it, we use stain from Bona Kemi. When using multiple cans of stain, we combine them in one bucket to ensure that the color is uniform. We apply the stain with a lint-free cloth, then wipe the excess before it dries in place.

It’s critical to protect the unstained portions of the floor from moisture as you work. ­Water in the wood causes that part of the floor to absorb pigment differently, and even something as subtle as perspiration through the knees of your pants can leave discolored blotches in the finished floor. Always use disposable shoe covers when you’re walking the floor; bare or socked feet are an absolute no. Kneepads are essential, as well as a rag under each hand. In hot weather, a cloth tied around the head will catch sweat dripping from your brow.

Sandpaper scratches that went unnoticed during the previous floor-prep phase often become obvious as they trap pigment during the stain application. These scratches can be sanded by hand with the same 80-grit paper used in the last pass of the sanders and then recoated right away with stain. There’s no need to bother with the vacuum.

When the schedule allows, we like to let the stain dry overnight. If the sealer will be ­applied later the same day, we check for dryness by wiping a white cotton cloth across the stained surface. If no stain is transferred to the cloth, it’s dry enough to move on to the seal coat, which is a waterborne product used to separate the stain from the topcoats that come next. Depending on the brand of polyurethane, the sealer may not be a strict prerequisite, but we use it to provide an extra layer of build above the stain, which ­enhances the visual depth of the topcoats. ­After the sealer dries, minor blemishes and nail holes can be filled with a putty that matches the stain color before the entire floor is abraded with the buffer. Then the floor gets another pass with the vacuum, followed by a pass with tack cloths to pick up any ­remaining dust.

using floor as sample board
Use the floor as the sample board. The most accurate way to decide between stain colors is to apply the stain options right to the floor after the first or second pass with the belt sander. They can then be sanded out with the next pass.
two-person staining team
A two-person staining team. Working on padded hands and knees to prevent moisture spots that will keep the stain from penetrating evenly, the first person wipes the stain on using a folded cotton cloth while the second person follows behind, using another cloth to work the stain into the wood in a firm, circular rubbing motion.

Waterborne polyurethane is the most durable choice

Although we use oil-based stain, we switch to a waterborne product for the polyurethane topcoats because the waterborne products have lower odor and faster dry times and are actually more durable than oil-based topcoats. For sheen, I encourage customers to opt for either satin or semigloss because wear patterns from pets and foot traffic are more obvious on floors with high-gloss finishes.

A small handheld foam pad is used to ­apply the polyurethane around the perimeter of the room, around details such as balusters and hearths, and in small areas. While the edges and details are still wet, a T-bar with a spongy applicator pad spreads finish across the rest of the floor in rows that follow the direction of the grain.

Optimum conditions for drying the topcoat are temperatures between 65°F and 80°F, with 40% to 60% relative humidity and some air movement to help wick away moisture, but not so much that it blows dust around.

The coat of sealer and the first coat of polyurethane are typically dry enough for a recoating in about four hours, but we ­never apply more than two coats of finish in a single day. My advice here is not to rush it, because the most recent coat of finish always dries faster than what’s under it, and you don’t want to risk trapping moisture, which leads to adhesion problems.

There should be no need for sanding ­between or after coats of polyurethane. ­After the last coat, the floor can be walked on ­gently in about four or five hours, but restrict normal foot traffic for 24 hours. Anything that might prevent drying, such as an area rug, shouldn’t be replaced until after seven days to allow the finish to cure fully.

Topcoats share the same technique

The topcoats on a floor—from the single coat of sealer through the two coats of water-based polyurethane—are applied using the same tools and techniques. Make sure to buff the floor after the seal coat, but you shouldn’t need to sand between or after the coats of polyurethane.

finishing with t-bar coat
Edges come first. Working just ahead of the person applying finish with the T-bar, coat the perimeter of the room by pouring a thin line of finish directly onto the floor, then spreading it with a handheld applicator pad.
using the snowplow approach
The snowplow approach. A T-bar applicator pushes the finish evenly across the floor. To prevent buildup at the edges of the room, apply each row by flowing it smoothly into the next using a continuous curving motion. Apply four to five overlapping rows at a time, which is about the limit of what can be reached easily without stepping in the wet finish.
feathering the finish from the edges
Retouch the curves. Remove the perimeter curve marks by feathering the finish from the edges of the room inward, wringing excess from the T-bar by pressing it firmly on the unfinished part of the floor.
smoothing the seal coat
Smooth the seal coat. Supplement a maroon (very fine grit) buffing pad with strips of 180-grit adhesive sandpaper to smooth out the dried coat of sealer, being careful not to walk on buffed surfaces.
using a push-brook with tack cloth.
Push-broom tack cloth. After sanding the seal coat and vacuuming the floors, put on shoe covers and pick up the last bits of dust with a moistened towel wrapped around the head of a push broom. This ensures a clean surface for the first coat of polyurethane.

Photos by Justin Fink


Related stories:

  • 11 Wood-Flooring Problems and Their Solutions
  • Refinishing Floors Safely
  • Invisible Repairs for a Hardwood Floor

From Fine Homebuilding #253

For many more photos and practical advice on framing eaves, please click the View PDF button below.

Sign up for eletters today and get the latest how-to from Fine Homebuilding, plus special offers.

Signing you up...

This site is protected by reCAPTCHA and the Google Privacy Policy and Terms of Service apply.
See all newsletters
See all newsletters
×

Get home building tips, offers, and expert advice in your inbox

Signing you up...

This site is protected by reCAPTCHA and the Google Privacy Policy and Terms of Service apply.
See all newsletters
See all newsletters
View PDF

New Feature

Fine Homebuilding Forums

Ask questions, offer advice, and share your work

Log in or create an account to post a comment.

Sign up Log in

Become a member and get full access to FineHomebuilding.com

Up Next

Video Shorts

Featured Story

Podcast Episode 680: Knob-and-Tube Wiring, Vapor Movement, and Gutter Covers

Listeners write in about shower panels and cordless tools and ask questions about old wiring, air leaks, and gutter covers.

Featured Video

A Modern California Home Wrapped in Rockwool Insulation for Energy Efficiency and Fire Resistance

The designer and builder of the 2018 Fine Homebuilding House detail why they chose mineral-wool batts and high-density boards for all of their insulation needs.

Related Stories

  • FHB Podcast Segment: A Permanent Wood Foundation in the Adirondacks
  • Torched and Porched
  • 10 Tips for a Long-Lasting Paint Job
  • FHB Podcast Segment: Drywall-Free Half Wall Finish

Discussion Forum

Recent Posts and Replies

  • |
  • |
  • |
  • |
  • |
  • |
View More Create Post

Highlights

Fine Homebuilding All Access
Fine Homebuilding Podcast
Tool Tech
Plus, get an extra 20% off with code GIFT20

"I have learned so much thanks to the searchable articles on the FHB website. I can confidently say that I expect to be a life-long subscriber." - M.K.

Get home building tips, offers, and expert advice in your inbox

Signing you up...

This site is protected by reCAPTCHA and the Google Privacy Policy and Terms of Service apply.
See all newsletters
See all newsletters

Video

View All Videos
  • FHB Podcast Segment: Sealing a Floor Cavity in a Slab-on-Grade House
  • Podcast 606: Foam Slabs, Gaps in Click Flooring, and Board and Batten Rainscreens
  • Podcast 587: Members-only Aftershow—Basement Flooring
  • Podcast 543: Affordable Flooring, Replacing Replacement Windows, and Low-Flow Fans
View All

Floors and Coverings

View All Floors and Coverings Articles
  • What's the Difference: Linoleum vs. Vinyl
  • Keep Self-Leveler in Place
  • What is Balloon Framing? The Full Process Revealed
View All Floors and Coverings Articles

Fine Homebuilding Magazine

  • Issue 330 - April/May
    • Deck Details for Durability
    • FAQs on HPWHs
    • 10 Tips for a Long-Lasting Paint Job
  • Issue 329 - Feb/Mar 2025
    • Smart Foundation for a Small Addition
    • A Kominka Comes West
    • Making Small Kitchens Work
  • Issue 328 - Dec/Jan 2024
    • How a Pro Replaces Columns
    • Passive House 3.0
    • Tool Test: Compact Line Lasers
  • Issue 327 - November 2024
    • Repairing Damaged Walls and Ceilings
    • Plumbing Protection
    • Talking Shop
  • Issue 326 - October 2024
    • Paint Behind Strike Plates
    • Conceal Cut Ends
    • Ladder Slip Solution

Fine Home Building

Newsletter Sign-up

  • Fine Homebuilding

    Home building tips, offers, and expert advice in your inbox.

  • Green Building Advisor

    Building science and energy efficiency advice, plus special offers, in your inbox.

  • Old House Journal

    Repair, renovation, and restoration tips, plus special offers, in your inbox.

Signing you up...

This site is protected by reCAPTCHA and the Google Privacy Policy and Terms of Service apply.
See all newsletters

Follow

  • Fine Homebuilding

    Dig into cutting-edge approaches and decades of proven solutions with total access to our experts and tradespeople.

    Start Free Trial Now
    • Facebook
    • Instagram
    • X
    • LinkedIn
  • GBA Prime

    Get instant access to the latest developments in green building, research, and reports from the field.

    Start Free Trial Now
    • Facebook
    • YouTube
  • Old House Journal

    Learn how to restore, repair, update, and decorate your home.

    Subscribe Now
    • Facebook
    • Instagram
    • X

Membership & Magazine

  • Online Archive
  • Start Free Trial
  • Magazine Subscription
  • Magazine Renewal
  • Gift a Subscription
  • Customer Support
  • Privacy Preferences
  • About
  • Contact
  • Advertise
  • Careers
  • Terms of Use
  • Site Map
  • Do not sell or share my information
  • Privacy Policy
  • Accessibility
  • California Privacy Rights

© 2025 Active Interest Media. All rights reserved.

Fine Homebuilding receives a commission for items purchased through links on this site, including Amazon Associates and other affiliate advertising programs.

X
X
This is a dialog window which overlays the main content of the page. The modal window is a 'site map' of the most critical areas of the site. Pressing the Escape (ESC) button will close the modal and bring you back to where you were on the page.

Main Menu

  • How-To
  • Design
  • Tools & Materials
  • Video
  • Blogs
  • Forum
  • Project Guides
  • Reader Projects
  • Magazine
  • Members
  • FHB House

Podcasts

  • FHB Podcast
  • ProTalk

Webinars

  • Upcoming and On-Demand

Podcasts

  • FHB Podcast
  • ProTalk

Webinars

  • Upcoming and On-Demand

Popular Topics

  • Kitchens
  • Business
  • Bedrooms
  • Roofs
  • Architecture and Design
  • Green Building
  • Decks
  • Framing
  • Safety
  • Remodeling
  • Bathrooms
  • Windows
  • Tilework
  • Ceilings
  • HVAC

Magazine

  • Current Issue
  • Past Issues
  • Magazine Index
  • Subscribe
  • Online Archive
  • Author Guidelines

All Access

  • Member Home
  • Start Free Trial
  • Gift Membership

Online Learning

  • Courses
  • Project Guides
  • Reader Projects
  • Podcast

More

  • FHB Ambassadors
  • FHB House
  • Customer Support

Account

  • Log In
  • Join

Newsletter

Get home building tips, offers, and expert advice in your inbox

Signing you up...

This site is protected by reCAPTCHA and the Google Privacy Policy and Terms of Service apply.
See all newsletters
See all newsletters

Follow

  • X
  • YouTube
  • instagram
  • facebook
  • pinterest
  • Tiktok

Join All Access

Become a member and get instant access to thousands of videos, how-tos, tool reviews, and design features.

Start Your Free Trial

Subscribe

FHB Magazine

Start your subscription today and save up to 70%

Subscribe

We hope you’ve enjoyed your free articles. To keep reading, become a member today.

Get complete site access to expert advice, how-to videos, Code Check, and more, plus the print magazine.

Start your FREE trial

Already a member? Log in