
Simple Air-Sealed Ceiling for a High-Performance Home
Building an airtight box before adding a roof creates a conditioned mechanical cavity, a safe work surface, and a platform for deep insulation.
Synopsis: Builder Josh Edmonds details his company’s method of building a space for mechanicals in the ceiling cavity by using I-joists to create a floor system for the roof to sit on. Creating this airtight “box” means the mechanicals stay inside the conditioned and air-sealed space above the ceiling, so there is no drilling through the air barrier, and the equipment is more accessible because it’s not buried in insulation.
About six years ago, we were building a double-stud high-performance house. Our company had been trying to get away from the industry trend of relying on spray foam insulation for an air-seal, and had been using Zip System sheathing to provide predictable air-sealing for our walls. To make this building tighter, we were going to run the same sheathing across the bottom of the trusses to have a nicely connected, airtight building. That works OK on paper, right?
We were framing the walls when we realized that the recessed lights, water lines (we were building on a frost-protected slab), and heat-recovery-ventilator (HRV) ducts we were going to install later would make our air barrier look like Swiss cheese. On top of that, we weren’t keen on the idea of running water lines and HRV ducts above the sheathing air-seal because they would be subject to colder temperatures (even buried under lots of insulation) and could possibly freeze. All around, it seemed like a bad idea.
A sheathed box simplified air-sealing
So we decided to build an air-sealed ceiling by sheathing over the top of the ceiling instead. This doesn’t really work when the rafters or trusses sit on top of the walls, as most houses around us are built. To make it easy to air-seal and connect to the air barrier on the walls, we built a floor system for the roof to sit on, running I-joists across the building and putting 7⁄16-in. Zip sheathing on top of that—green side up with all the joints taped. Swiss-cheese problem solved. Now we could run all the mechanicals inside our airtight envelope.
There’s a bit more to it, but that’s the basic idea: We built an airtight box and then put a roof on it. We’ve now done this on a number of homes, including a Passive House, using different variations on the idea. Once we used floor trusses instead of I-joists. At least once we installed Zip on the bottom of the roof trusses and then screwed 2x4s on edge into the bottoms of the trusses, creating a 3-1⁄2-in. cavity for mechanicals. After trying it all, the entire team has concluded that I-joists are the way to go. When we look at labor and materials, we find that I-joists are actually our best option. The material cost is slightly higher, but the savings in labor and other headaches down the road more than make up for it. The lead time between ordering and delivery is reasonable, plus we can cut them to length on-site.
Bonus benefits of building this way
Along with the continuous air-seal and ability to keep the mechanicals inside of the conditioned and air-sealed space, there are some other obvious benefits to this air-sealed ceiling assembly. One is a supertight building that is predictable and hard to mess up. With a dedicated mechanical cavity, you don’t have to worry about drilling through the air barrier and doing some air-sealing origami to bring back its integrity.
There are less obvious benefits as well. Because we’re building what amounts to a floor system, we substitute LVLs in place of the standard rim board and use joist hangers over openings, which allows us to eliminate headers from our walls. This gives us the option to run the windows or doors up to the ceiling and eliminate some wood from the walls. We also avoid worries about truss uplift creating drywall cracks and air leaks because the trusses aren’t connected to the interior walls.
We’re also dried in more quickly—once the Zip is installed and taped, we are dry inside and a crew can start on mechanicals. This has saved us when trusses were late or the weather wasn’t playing nice. When the trusses do come, having a flat deck to walk on makes them safer and easier to install. Later, when installing the loose-fill cellulose in the attic, we can walk around without worrying about missing a joist and falling through the ceiling. And if something does need to get upgraded or repaired down the road, the mechanicals are more accessible when they aren’t buried in insulation.
This has become our default for all of our under-roof assemblies. Standardizing practices is important for us when it comes to guaranteeing blower-door test results on each project—our contracts guarantee a result equal to or lower than 0.6 ACH50. Try this method and you’ll see why we have the confidence to make that promise.
Frame the ceiling first
We install the ceiling as if we were framing a floor, starting with an LVL rim that allows us to eliminate headers in the wall.
We use 11–7⁄8-in. I-joists because they are stiff and can handle large spans, which allows us to run them continuous from plate to plate.
Before setting the joists over openings, we place the joist hangers that are needed to transfer the loads from the joists to the rim. While the crew members continue setting joists, another can finish nailing off the hangers.
As any conscientious framers would, we stack the joists over wall studs for a continuous load path. We fasten the joists to the partition walls as we would standard ceiling joists.
Sheathe and tape over the ceiling
We run the Zip sheathing as if we were running subfloor.
We use 7⁄16-in. Zip because we don’t need it to structurally act like a floor. The only weight it will have to handle is a dense bed of blown-in cellulose insulation; it’s also stiff enough for us to walk on during construction. We seal the perimeter sheets to the top plates with acoustical caulk.
We don’t tape this corner transition from wall to ceiling; you’ll see why in a moment. Make sure to mark the joist layout on the sheathing and adjust the I-joists as necessary when fastening to keep them on layout.
As always with Zip, roll the tape so the pressure-sensitive adhesive bonds with the panel to create a tight air- and water-seal.
Caulk for continuity
We seal the sheathing to the rim with acoustical caulk. (On this job, we ran out of the OSI SC175 we normally use and substituted Zip Liquid Flash in some areas. This works well as an air-seal, but it is a lot more expensive than acoustical caulk.) This, rather than ZIP tape, is what gives the air barrier continuity at the wall-to-ceiling intersection.
The last strip of sheathing ties the top of the wall to the energy heel of the roof trusses to manage uplift.
We set the trusses on a 2×6 plate on top of the Zip air-seal to allow the roof trusses to function independently of the I-joist mechanical cavity.
It keeps the truss company happier and limits the deflection from snow load on our drywall ceiling below. Again, we tape and roll all seams.
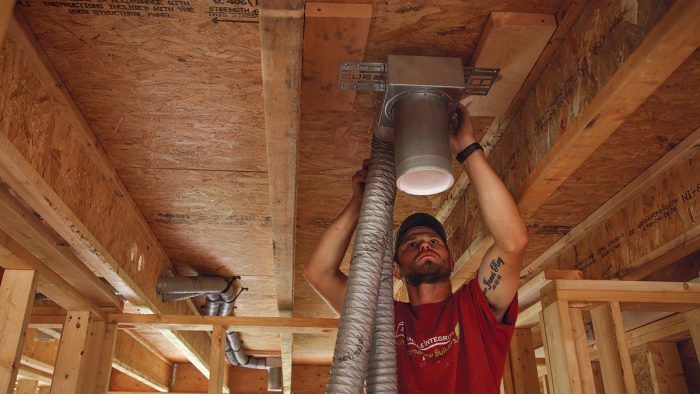
Rough–in mechanical systems
The air-sealed ceiling provides a dry space to begin mechanical rough-in before the roof is finished, and the I-joists provide plenty of space to run mechanicals—both between them and through them—and making cutouts for ducts, tubing, and wires is a breeze (make sure to follow the manufacturer guidelines for size, spacing, and location of these holes). Where we have a plumbing penetration for a vent stack going through the Zip air barrier, we drill those holes with a hole saw so that they are nice and tidy, and use Zip Liquid Flash on both sides of the penetration to seal it up.

Appears in Fine Homebuilding #302 titled “Simple Air-Sealed Ceiling”
To view the entire article, please click the View PDF button below.
Fine Homebuilding Recommended Products
Fine Homebuilding receives a commission for items purchased through links on this site, including Amazon Associates and other affiliate advertising programs.

Portable Wall Jack

11" Nail Puller

Leather Tool Rig

View Comments
Josh, thank you for the great article and solid strategy. I am curious, do you see any reason you couldn't employ this technique to a vaulted ceiling? Also, have you considered adding rigid foam insulation outside of the LVL rim board to prevent thermal bridging via the i joists?
Thanks,
Tanner
Good question Tanner_W. I'm not related to the build at all but, judging from the window bucks it looks like they're going to do some type of exterior insulation so the rim joist will be insulated by that.