
A Roundup of Air-Sealing Products
Tapes, sealants, and gaskets all have a role in building airtight houses.

Do building scientists sometimes wake up and feel like Bill Murray in “Groundhog Day,” trapped in a time loop where no matter how many times they try to explain the importance of air-sealing nobody listens? It must have seemed that way at times, but builders and building codes are gradually heeding their advice and houses are slowly but surely getting tighter—and the result is lower heating and cooling bills, healthier indoor air, and more durable structures.
A certain level of air tightness is now required by the International Residential Code. In Climate Zones 1 and 2, the air leakage rate in new houses should not exceed five air changes per hour at a pressure difference of 50 pascals (ach50) when measured with a blower door; in Climate Zones 3 through 8, the limit is 3 ach50. Conscientious builders will be the first to say these limits are not a big deal. But it gets harder when the goal is certification under a more stringent program. The German Passive House standard, for example, requires an air leakage rate of no more than 0.6 ach50, and builders and owner/builders who try to hit this metric can spend a lot of time finding and plugging even tiny air leaks in the building enclosure.
What is a reasonable goal? A 2013 study by the Lawrence Berkeley National Laboratory concluded that the 5 ach50 and 3 ach50 guidelines are a good middle ground that would save U.S. consumers about $33 billion a year in energy bills. Lower leakage rates will, of course, save more money but are more difficult to achieve.
As more builders get serious about reducing air leaks, manufacturers have responded with a greater variety of products. Some of them are more expensive and finicky than others, but if a builder wants to produce a house that’s close to airtight, he or she will find lots of help.
But before looking at the range of products that are available, let’s start with a few basics about air barriers and air sealing.
- Air barriers can be made from a number of different materials. Some are rigid, some are not.
- Most air leaks occur where one material transitions to another—not in the middle of a piece of sheathing, for example, but where the sheathing meets the top plate or where a duct or pipe penetrates the building enclosure.
- An air barrier must not only be impermeable to the flow of air but also continuous around the entire structure.
- An air barrier should be clearly marked on construction drawings. The idea is that a builder should be able to trace the air barrier on the plans without once lifting pencil from paper. Allison Bailes, an energy consultant based in Georgia, calls this the “Pen Test.”
- An air barrier can be located anywhere in the building assembly: on the outside of the building, the inside of the building, or in the middle of an exterior wall.
Builders are becoming more proficient with air-sealing techniques and materials, but with a little perseverance even non-pros can make remarkably tight structures. One of them is Eric Whetzel, whose work on his own home in the Chicago area has been detailed in a long-running blog at GBA called “Urban Rustic.” Eric invested thousands of dollars and many hours in air-sealing his house.
“Overall, I really enjoyed the process of air-sealing everything up,” Eric said in an email. “In fact, even with less redundancy in what I did, it’s still shocking to me just how little is asked of conventional builders to meet a 3 ach50 blower-door score. With a detailed plan and someone conscientious doing the work, there’s no reason a score below 1.0 or even the Passive House 0.6 isn’t a reasonable expectation. And the upside of detailed air sealing, namely lowering heating/cooling bills while also reducing the risk of water intrusion, is so compelling, both for homeowners and builders (who don’t want call-backs) alike.”
When Eric was finished, he had a very tight house: 0.2 ach50, one third of the Passive House standard.
There are many articles at GBA about air barriers. Another good source of information is the Building Science Corporation where you can find article like this this primer by Joseph Lstiburek. For more focused articles on air-sealing techniques use the search function at GBA or Fine Homebuilding magazine and tap into the extensive online libraries they offer.
Not your granddad’s duct tape
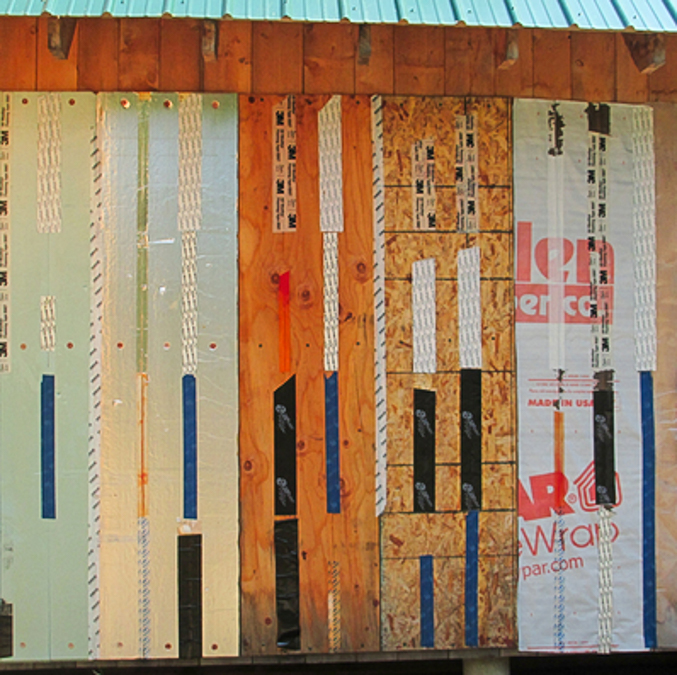
Specialized tapes made by North American and European manufacturers have become a formidable air-sealing weapon for many builders. They can be used in a variety of situations: sealing windows and doors into rough openings, at the top and bottom of framed walls to seal the sheathing to the top plate or the foundation, as a site-made gasket for plumbing penetrations.
The sheer number of choices can be bewildering. For instance, 475 High Performance Building Supply, a Brooklyn, New York, retailer of construction materials, offers 15 different types of tape (all of them are made by Pro Clima, a German manufacturer). Small Planet Supply, a Washington state supplier, carries a dozen varieties of Swiss-made Siga tape. In the U.S., 3M and Huber Engineered Woods both offer air-sealing tape.
These tapes have different uses. Some are made for sealing joints between pieces of plywood sheathing; others are best for sealing nail holes or taping pieces of housewrap together. Some are made to stick to concrete. They also can be expensive (a 6-inch-wide by 82-foot roll of Siga Fentrim F is $115 from Performance Building Supply in Portland, Maine).
So, how to choose?
Start with the specific materials you will be sealing. Manufacturers and retailers can offer advice on which variety of the tape they sell will work best. Then consider experimenting with tape and technique, as Eric did on his own house. He used Pro Clima tape as well as R-Guard products from Prosoco and was happy with all of them.
“I would practice using these products on a mock wall assembly that included an opening for a window and at least one penetration,” he said. “This way it’s easy to practice using these products in a low-risk environment to see how they work and if a preference develops.”
Talking with other builders about their experiences with different brands and types of tape, or reading articles online at GBA and other websites would be a good start. One of the more ambitious survey articles was written (and later updated) by Martin Holladay, GBA’s former editor, who in 2013 published “Backyard Tape Test.” Holladay applied 11 different types of tape to six different substrates on an outside wall of his woodshed in northern Vermont, waited a month and then tried to peel them off. The idea was to see which ones stuck and which ones didn’t. He reported his findings in this article published in Fine Homebuilding magazine.
He found there were three general types of tape: rubberized asphalt, butyl, and acrylic. All of them have quirks: rubberized asphalt tapes don’t stick very well in cold weather or to dirty or wet surfaces. Butyl tapes cost more but aren’t as likely to ooze in hot weather as asphalt and they work better in cold temperatures. Tapes with acrylic adhesives are available from both European and U.S. manufacturers. The best of them outperform all other types of air-sealing tapes, Holladay wrote.
In a followup 10 months later, Holladay tried peeling off the tape that remained on the side of his wood shed. He found that the bond between some of the tapes and the substrates had actually improved. The results of the second round of testing can be found here.
Among his observations (Holladay is careful not to claim the tests were performed scientifically):
- Some tapes seem better suited to certain substrates than others. For example, Siga Wigluv and 3M All Weather Flashing Tape did very well on oriented strand board and plywood. Zip System tape stuck admirably to housewrap but fell off extruded polystyrene insulation (XPS).
- Most of the tapes did well on housewrap, while foil-faced polyisocyanurate insulation also proved easy to tape. Here, brand didn’t seem to matter very much (there were, however, some exceptions).
- Some tapes seem to stick more tenaciously with time, possibly because the bond created by high-quality acrylic adhesive is slow to develop.
A reader later added a comment to the article describing his own experiences with two types of tape and said the key is to roll out the tapes under pressure in order to improve adhesion. One of the manufacturers, 3M, recommended using its 3M90 contact adhesive as a primer on dicey substrates, and the reader, Tom Cross, found that to be very effective.
It’s worth pointing out that Holladay’s original test was in 2012, eight years ago. Products change. The survey is useful, but certainly not ironclad. So what is the moral of this story? There are lots of brands to choose from, and some work better than others on certain substrates. Ask around, read what you can, and pick accordingly. If you’re working with a designer or consultant, you’ll have some help in choosing the most appropriate air-sealing materials.
“Hiring a consultant with air-sealing experience would be a minimal cost compared to the cost of the building, and it’s really cheap insurance in getting the details right,” David Goodyear, an owner/builder in Newfoundland and the author of the GBA blog “Flatrock Passive,” said in an email. “Look for people with Passive House experience or building other performance homes.”
Liquid-applied flashing and water-resistive barriers
Vents, plumbing and electrical conduit that poke through the building’s exterior are all potential air leaks. One way of sealing them is with a liquid-applied flashing material. These sticky materials vary in their chemical makeup, and they can be applied in one of several ways. Most can bridge gaps up to 1/4 inch wide.
At least a dozen manufacturers offer these products, according to this 2015 report. After it has cured, the flashing forms a rubbery layer that is waterproof and airtight but also vapor permeable.
Some builders use liquid-applied flashing as an alternative to peel-and-stick membranes to waterproof the rough openings for door and windows. Maine builder Ben Bogie is one of them. In the photo below he is using Zip Liquid Flash (made by Prosoco) to waterproof the window sill and seal the top edge of the sheathing to the window opening. Bogie applies a zig-zag bead of the material to the surface, then smooths it out with a plastic knife. The liquid-applied flashing is used in combination with flashing tape to install windows—caulk and expanding foam are not part of the picture.
There are a few disadvantages, including difficulty of applying most of these materials in cold weather and higher costs. But there also are advantages: many can be applied to damp surfaces, reapplication and repair is easy, and learning how to use the products is not difficult.
Some builders use housewrap as an exterior air barrier and water-resistive barrier, but a waterproofing contractor in the Boston area argues that the asphalt based, liquid-applied WRB he uses does a much better job. In an article at Fine Homebuilding magazine, Andrew Hall writes that Tremco Barrier Solutions’ Enviro-Dri, which can be installed only by trained contractors, forms a continuous waterproof layer over exterior sheathing to block water and greatly reduce air leakage. It’s not subject to the same installation errors that Hall regularly sees with housewrap. The coating won’t blow off, and it works in really tough conditions.
According to Hall, Enviro-Dri is more expensive than housewrap but allows builders to meet the IRC requirements for airtightness with very little additional air-sealing. The vapor-permeable coating can be left exposed to the weather for four months (other brands, such as Henry’s Air-Bloc All Weather STPE can be left exposed for much longer). After spraying a base coat at seams and corners, these areas are reinforced with polyester joint fabric before a second coat is applied.
These coatings are made by several manufacturers. Others include Prosoco (Spray Wrap MVP), GCP (Perm-A-Barrier), W.R. Meadows, (Air-Shield), BASF (MasterSeal AWB 660), and IMETCO (IntelliWrap).
Caulks and sealants
Caulks are useful for sealing gaps less than ¼ inch wide and for bonding materials together. Builders familiar with air-sealing techniques usually recommend acoustical caulk, which stays pliable over time rather than hardens as it cures.
Mike Guertin, a Rhode Island builder and editorial advisor at Fine Homebuilding magazine, has used both Tremco Acoustical Sealant and Titebond Acoustical Smoke & Sound Sealant. “I mention those only because lots of people go for the regular sealants that cure,” Guertin said in an email. “These may not be well known—they say soft and sticky. There are probably other acoustical sealants that do the same.” (USG, Liquid Nails, OSI, and no doubt other manufacturers offer their own versions, often marketing them for reducing sound transmission in drywall partitions and party walls.)
Tremco’s Curtainwall Sealant also can be used as a lap joint and perimeter sealant for polyethylene vapor retarders.
Guertin finds these sealants useful when sealing small gaps and when sealing materials that will be in compression—when he uses plywood to seal an old HVAC chase through a subfloor into the basement, for example. “I use any good gunnable sealant that has pretty good elongation should the materials move,” he says. “I’ve found acoustical sealant economical and it stays sticky/gooey rather than curing. And it sticks to anything.” (That’s why some builders refer to these sealants as “black death.”)
Acoustical sealant also is useful when sealing a polyethylene barrier in the ceiling between the to top floor and the attic to the wall plate, Guertin says. Seams in the plastic sheeting can be sealed with acrylic adhesive tape. Although some builders have found that detailing a poly layer here is too fussy, Guertin says that is not the case.
Sealants also can be used to seal any gaps between framing members or at the edges of sheathing on interior wall cavities. Whetzel—a belt-and-suspenders man when it comes to air-sealing—made extensive use of a product called Contega HF on his own house. Like acoustical sealant, Contega shows long-term elasticity, according to the manufacturer.
At least one type of caulk can be sprayed into wall, ceiling and floor assemblies to seal air leaks. Knauf’s EcoSeal is a water-based elastomeric that is applied with an airless sprayer. According to this article, Knauf developed the product to improve the performance of the air-permeable fiberglass insulation it sold. Once leaks in stud bays and other cavities have been sealed, and the spray-on material has cured, fiberglass batts or blown-in fiberglass can be added to complete the insulation. Insulation performance improves when it is completely enclosed in an airtight cavity.
(Owens Corning introduced a similar product called Energy Complete at about the same time, but the company says it has been discontinued. Energy Complete was a two-part sealant that required chemical cleaning of the B component of the spray equipment.)
Unlike the so-called flash-and-batt approach to insulation—which combines a 2-inch layer of spray polyurethane foam for air sealing with fiberglass batts—EcoSeal doesn’t have any R-value in itself. It’s simply a sealant that can be applied around the edges of a framed cavity to seal leaks. EcoSeal can’t be used as a compressible gasket.
Buttoning up the mud sill
Builders typically use a thin layer of foam between the top of a concrete foundation wall and the wood mud sill, but Texas-based designer Armando Cobo goes a step further with a Protecto Wrap product called Premium Energy Sill Sealer. This is a self-adhering, closed-cell foam layer 3/8 in. thick designed to seal the irregularities that are common in a concrete surface.
Cobo, who specializes in designing net-zero homes with air leakage rates no higher than 1 ach50, says he prefers to use products that have been thoroughly vetted.
“Since concrete slabs or walls are not perfect,” he said in an email, “my first choice would be Protecto Wrap’s Energy Sill Sealer…when a builder uses the cheap blue sill sealer, I recommend to fold it in half, set a generous bead of caulk on one side against the concrete, lay it flat and apply another bead of caulk against the bottom of the plate.”
To seal the face of the foundation-bottom plate intersection, Cobo has used sealants spread with a knife and, on a few occasions, Protecto Wrap’s Tripel Guard Sill Sealer, which includes a peel-and-stick membrane that laps over the top of the foundation and the mud sill.
Other manufacturers also make flashing tape that cn be used to seal the seam between the foundation and the mudsill. Siga’s Fentrim tape is one such brand.
On the inside, one option for sealing the rim joist is with a layer of spray polyurethane foam. The foam gets into the oddly shaped spaces that make insulating this area so difficult with conventional products. Builders also may cut pieces of rigid foam to fit between floor joists and foam them into place with canned foam, but this approach is not as reliable and takes more time.
Whole-house air sealing on auto-pilot
Air-sealing an entire house can be fussy and time-consuming, involving a number of different products used in different places and in different ways. An Ohio-based company called Aeroseal developed an approach that makes the process very simple, although not necessarily cheap.
Leaning on technology developed at the University of California, the company markets an air-sealing process called AeroBarrier in which an acrylic sealant is atomized and forced into cracks and gaps in the building enclosure under pressure. The company says that in a few hours, the process can air-seal a typical single-family house to the point where it meets code. The longer the equipment runs, the tighter the house gets; given enough time, a house can be sealed well enough to meet the Passive House requirement of 0.6 ach50.
Technicians start by setting up a number of nozzle heads on stands throughout the house. After protecting anything that should not be sealed—such as bathroom fans—the house is pressurized with a blower door and the sealant is distributed as an aerosol. The higher indoor air pressure pushes the sealant into gaps in the building enclosure and gradually seals them up. The company says the sealant will close gaps up to ½ inch wide. Technicians monitor progress with a computer and turn off the atomizers when the leakage rate hits the customer’s goal.
There’s no set fee for the service. But company officials have estimated that the cost of air-sealing a 2,000 square-foot house to 1 ach50 would be about $3,000. The cost for an occupied home would be higher—between $3 and $4.25 per square foot, according to one installer Field tests in California found that air-sealing to about 1 ach50 took between 1 and 3 hours. AeroBarrier can be used to air-seal existing homes as well as new construction, although prepping the house to protect surfaces will take some time and effort.
Air-sealing membranes
Builders concerned about the potential for trapping moisture in wall and ceiling cavities can chose vapor-open membranes for both interior and exterior air barriers.
Maine builder Dan Kolbert, for example, used Siga’s Majvest 500 on the exterior of a double-stud wall house his company built recently. The fully-adhered membrane is windproof and rainproof, according to the manufacturer, but it’s also diffusion-open so any moisture inside the wall can dry to the exterior as well as the interior. Another option is Henry’s Blueskin.
Kolbert applies Majvest when wall sections are on the ground, using a stiff rubber squeegee to press the material firmly onto the surface of the sheathing. Siga says the membrane sticks to most common building materials—including concrete, plywood, and metal—without a primer.
At the bottom of the wall, Kolbert uses a self-adhering tape, also made by Siga, to span the gap between the wall and the foundation for an uninterrupted air barrier on the outside of the building.
The ceiling between the uppermost story and the attic is a notorious source of air leaks. The tops of partitions, electrical and plumbing lines, HVAC chases, can lights—they’re all potential sources of warm, moist air for an unconditioned attic. Some builders install poly sheeting or a layer of OSB (with taped seams) here as an air barrier, but manufacturers also offer vapor permeable membranes as an alternative.
Whetzel, who often worked by himself, chose a Pro Clima product called Intello Plus and used it as the top layer of a service cavity below the attic. There were two things he liked about it: Not only was it a lot easier to install than 4×8 sheets of OSB, but it also varies in vapor permeance depending on the season. According to the manufacturer, it’s a vapor retarder in the winter (less than 0.13 perms) but vapor open in the summer (13.2 perms) to allow drying toward the interior.
What about canned foam?
Many builders have used expanding insulating foam (products like Great Stuff) as part of an air barrier, particularly to seal the gap between windows and doors and the framed rough opening.
Does it work? Some builders think it’s less effective than other products, such as tape.
“I’ve become more skeptical of spray foam as a sealing material,” Guertin wrote. “I’ve heard of problems where the rigidity of cured foam can lead to it debonding from the materials it’s sealing when they move. I’ve moved toward using sealing tapes for wide gaps that I used to use foam on, greater than 1/4 inch.”
Bogie has come to the same conclusion. “Canned spray foam is not a reliable air barrier for window and door rough openings,” he wrote in an article posted at GBA. “It can pull away from the framing or the window with seasonal wood movement and it is known to disintegrate over time.” Bogie, too, has switched to sealing tape.
Air-sealing is a commitment
Air-sealing takes time, materials and technique. Good results take practice, and commitment.
“I’m not sure what the total cost was for all the tapes, liquid membranes, Roflex gaskets, and Intello,” Whetzel said, “but I’m sure it was thousands of dollars. This included learning how to use the tapes with a mock wall assembly as well as practicing on the garage. I know some of the redundancy that I did (e.g. Roflex gasket and tape for interior and exterior sides of penetrations) was probably unnecessary, but I wanted to make sure I had long term air tightness and I was paranoid about having any water intrusion.”
Goodyear’s efforts also paid off: a blower-door test of 0.36 ach50. He estimates that air-sealing took some 310 hours of labor (between Goodyear and his father), or about $4500 in labor at current rates and another $3000 or so in materials. The blower door test was another $500, but the total cost of all that was less than 2% of the total house cost.
Utility bills have been about 70% less than what he had been paying at other homes he’s lived in.
“The house is amazingly comfortable in winter and summer,” he said in an email. “The payback in materials and labor is less than 13 years, including insulation upgrades and air-sealing, but given looming electricity rate hikes it is probably less.”
Scott Gibson is a contributing writer at Green Building Advisor and Fine Homebuilding magazine. This article originally appeared on GBA.com.
Fine Homebuilding Recommended Products
Fine Homebuilding receives a commission for items purchased through links on this site, including Amazon Associates and other affiliate advertising programs.

Insulation Knife
Disposable Suit
Foam Gun

View Comments
Very nice rundown! What are some good (ideally low-toxicity) high-temperature caulks for sealing sheathing at its seam with chimneys/fireplaces or for potentially hot insulated canned lights? (Maybe this is less relevant for lights?)