
Insulating Basement Walls with Embedded Joists
If the ends of your floor joists are embedded in the foundation walls, assess the situation carefully before you insulate.
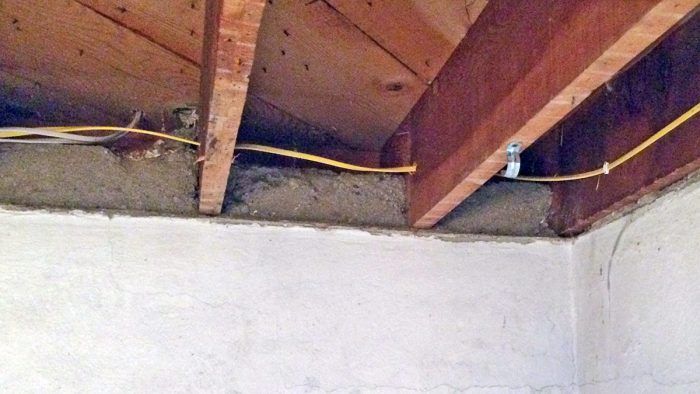
If you visit the basement of an older home, you may notice that the floor joists above your head are embedded in the foundation walls. This is rare in a modern home, where floor joists usually rest on a 2×6 pressure-treated mudsill that is bolted to the top of the foundation wall.
In a house with embedded joists, the top of the foundation wall is often level with the tops of the joists. This construction method required builders to frame the floor (supporting the joists with temporary beams in some cases) before the wall was complete, and then to finish the wall by placing concrete around the ends of the joists. The same method was also used for some homes with stone-and-mortar foundations or brick foundations.
Builders used to embed joists in the foundation walls to prevent air leakage into the joist bays. While it’s true that poured concrete is a decent air barrier, embedded joists have a downside: the joist ends are susceptible to moisture accumulation and rot.
Interior insulation makes the situation worse
The ends of most embedded joists don’t rot, of course. While these joist ends face a daunting number of moisture sources — capillary moisture rising up the foundation wall, condensation of moisture from the interior air, and foundation moisture from wind-driven rain — the lumber is also able to dry out when conditions are favorable. Joist ends on the south side of a building usually have a lower moisture content than joist ends on the north side, since sunlight warms a foundation and helps keep embedded joists dry.
If homeowners get tired of the energy losses associated with uninsulated basement walls, and decide to install interior insulation, there’s a potential for greater problems. In a basement with embedded joists, the new interior insulation will now make the joist pockets colder, and therefore wetter. The insulation also assures that less energy (that is, heat flow through the wall) is available to help the joist ends dry out. Joists which had been kept dry for decades by escaping heat may, once the wall is insulated, begin accumulating enough moisture to be at risk of rot.
What do the researchers say?
Attempts to use software to model moisture flows through the ends of embedded joists have been inconclusive, due in part to the three-dimensional complexity of beam pockets and the multiplicity of moisture sources. Building scientists have therefore concluded that when it comes to embedded joists, monitoring field conditions results in more useful information than hygrothermal modeling.
After reaching this conclusion, two engineers from Building Science Corporation, Kohta Ueno and Joseph Lstiburek, conducted a field study of embedded joists at a brick building in Lawrence, Massachusetts. The studied walls were above-grade walls, so the researchers’ findings may not apply to below-grade walls. That said, the problem of joist-end rot in multi-wythe brick buildings is similar in many respects to the problem of joist-end rot in residential basements with embedded joists. In both cases, interior insulation makes the situation worse.
Ueno and Lstiburek published a a research report titled “Field Monitoring of Embedded Wood Members in Insulated Masonry Walls in a Cold Climate.”
The researchers installed moisture probes in the ends of embedded joists and monitored the moisture content of the wood after the walls were insulated on the interior with rigid foam. They found that the moisture content of the joist ends was high, especially on the north side of the building, but there was no evidence of rot.
Ueno and Lstiburek wrote, “At many orientations (especially north), joist moisture contents are high (20-30% or higher), which is higher than the range considered conducive to long-term durability; RH levels often remained at 100%. On other, solar-heated orientations (south), the moisture content is in the safe, 10-13% range. However, installation of sensors and the removal of a joist end sample indicate that these wood members (dense, old-growth framing) can survive these moisture contents without damage.”
Ueno and Lstiburek noted, “Moisture content measurements consistently showed that the lower joist end was wetter than the upper joist end. This can be attributed to direct contact with the masonry, gravity drainage of bulk water, deeper embedment at the bottom of the beam (greater drying at the top), and/or more of an air pocket at the top of the beam. The cheek measurement was drier than the joist end measurements in all cases.”
The researchers also reported, “Traditional guidance is to keep wood MC below 20%; decay fungi are inhibited below this level (Carll and Highley 1999), with optimum growth occurring in the 25% –30% MC range. Decay fungi become active at MC levels above 28% (Straube and Burnett 2005). However, the MCs should interpreted with temperatures in mind. Biological activity is inhibited at low temperatures, so high MCs in mid-winter pose less risk than in warmer seasons. Sustained high MCs at moderate temperatures pose the greatest durability risks. Many of these joists started at high MC levels, before the installation of insulation or air sealing. No evidence of damage was seen at the joist ends, indicating that these wood members — especially dense, old-growth (1906/1930 construction) framing — can survive these moisture contents without damage. …
“Orientation has a major effect on RH and MC levels: all south-facing joists had MC as well within the safe range, due to solar heating and drying. The east and west orientations had a mixture of results, but many remained above the 20% MC level, while the north side joists were generally among the wettest. ”
Ueno and Lstiburek cited previous research by Rob Dumont and L. Snodgrass, as reported in a 2005 paper, “Field Measurement of Wood Moisture Contents in Wood Joists Embedded in Masonry Exterior Walls.” One of the residences monitored by Dumont and Snodgrass was located in Kincardine, Ontario. The house had masonry walls insulated on the interior with spray polyurethane foam. Ueno and Lstiburek wrote that the joist ends at the Kindardine house “showed consistently elevated moisture contents (20%+) at several locations. Potential moisture sources included capillary uptake from the wet foundation and rainwater absorption through the face of the masonry (due to surface detailing); reduced drying to the interior due to spray polyurethane foam was another potential factor.”
Climate matters
Several sources note that embedded joists in dry climates (for example, Saskatchewan and Manitoba) seem to last a long time.
A GBA reader named Geoff Ireland, posting a comment on a Q&A thread about embedded joists, wrote: “As far as joist ends in concrete are concerned, thousands of houses in Winnipeg were built this way from the ’30s right into the ’70s. I have looked at hundreds of them and I have yet to see evidence of rot unless exterior details were done wrong and the rim joist is rotten. This is not to say that I think it’s a good building method — it’s just the way it is.”
On the other hand, in regions with a wetter climate (for example, in British Columbia), joist end rot may be more likely. Malcolm Taylor, a designer and builder who works in British Columbia, posted this comment: “I’ve never dealt with embedded joists, but the end of beams in beam pockets here in the Pacific Northwest turn to mush fairly quickly.”
Advice to homeowners and builders
If your house has joists embedded in your basement walls, should you insulate the wall?
The first point to emphasize is that it’s always safer to insulate this type of wall on the exterior rather than the interior. Exterior foundation insulation keeps the foundation walls warmer and dryer than interior insulation, and that’s good for embedded joists.
For more information on exterior foundation insulation, see “How to Insulate a Basement Wall.”
The second point to emphasize is that regardless of your insulation strategy, it always makes sense to reduce humidity levels in your basement. For more information on all of the strategies to achieve that goal, see “Fixing a Wet Basement.”
Risk factors
If you decide to insulate your basement wall on the interior, however, you should assess several risk factors before proceeding. Here is a list of the relevant risk factors:
- The risk is greater when the foundation wall is cold. Clearly, this risk is best addressed by insulating the foundation on the exterior with rigid foam or mineral wool.
- Since the risk is greater when the foundation wall is cold, the risk is higher in cold climates than warm climates.
- The risk is greater when the foundation is wet. Foundations are wetter in climates with high rainfall than in climates with low rainfall.
- Since the risk is greater when the foundation is wet, homes that have an exterior grade that doesn’t slope away from the foundation, or homes in locations with clay soils that stay damp, are at greater risk of problems.
- The risk is greater if moisture levels are high in the basement air (or crawl space air). This risk factor can be mitigated several ways, including the operation of a dehumidifier.
- The risk if greater if the distance from grade to the lowest wooden components of the house is small, and the risk is less if the foundation extends far above grade.
- The risk is greater if bushes near the exterior of the foundation prevent sunlight and wind from reaching the above-grade portion of the foundation.
- Insulating the interior of a north wall is riskier than insulating the interior of a south wall.
If an assessment of the risk factors makes you nervous, you can consider the insertion of borate rods into holes drilled into the ends of embedded joists. More information on this technique is described in a valuable resource from Building Science Corporation, “Analysis of Joist Masonry Moisture Content Monitoring.”
Another approach in risky situations is to limit the thickness of any interior rigid foam insulation to only 1 inch. According to a Natural Resources Canada guide called Keeping the Heat In, “For fully-embedded joists, do not exceed a maximum of 25 mm (1 in.) of foam board insulation as the concrete below the floor may make the floor above uncomfortably cold and prone to damage.”
Thinner insulation means slightly higher energy bills than thicker insulation, but if the thin insulation saves your joists from rot, that’s a small price to pay.
Use a Sawzall or a chainsaw
The best solution to the problem of embedded joists is to cut off the ends of the joists with a Sawzall or chainsaw, and to support the joist ends with a new stud wall, or with a new beam and new posts on new concrete footings.
Building scientist John Straube calls the chainsaw approach “the practical Yankee solution.”
Originally published on GreenBuildingAdvisor.com.
Fine Homebuilding Recommended Products
Fine Homebuilding receives a commission for items purchased through links on this site, including Amazon Associates and other affiliate advertising programs.

Great Stuff Foam Cleaner

Utility Knife

Foam Gun
