
Installing a Circuit Breaker in an Existing Panel
When adding a new circuit or replacing a faulty breaker, here is what you need to know to work safely in the panel.
Synopsis: Even when the main breaker is turned off, live conductors are still feeding into the box. Follow our steps to keep this installation safe and simple. Learn the right order to work in, the right tools to use, and the right mentality you’ll need when working with electricity. We include a detailed diagram to help you identify every wire and component beneath the panel, and we highlight five types of breakers to help you choose which one is right for your job. This article will guide you step-by-step through the installation, from the moment you shutoff the breaker, to the moment you label your new, working circuit.
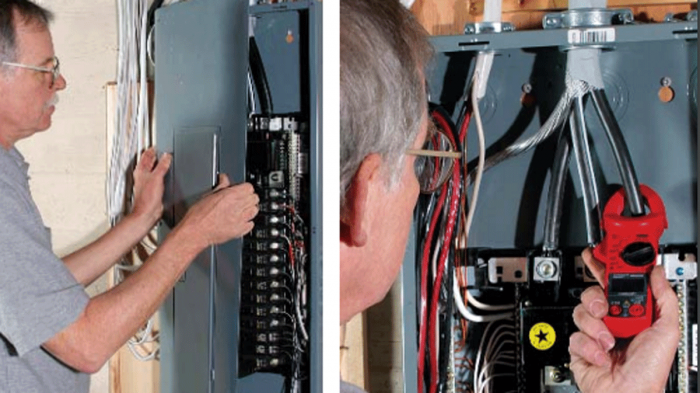
If you’ve made it this far, chances are the hard work is done. You’ve built an addition, remodeled your kitchen, or set up a home office, and you’re ready to hook up new electrical circuits to the juice. Not so fast. While this part of installing a new circuit is the easiest, it’s also the most dangerous. Even when the main breaker is turned off, live conductors still are coming into the box. Any time I work in an electrical panel, I treat it as if it were live. Safety is my No. 1 concern.
When in doubt, test the draw
Most likely, a modern house with 200-amp electrical service and room for a new breaker is capable of carrying a larger load. But never assume your service can handle more draw. If you have a smaller or crowded panel, you should test the panel with a voltage meter to determine the available capacity.
Turn on every electric device that you can, and read the amperage being drawn on each main feeder. The incoming feeder on the left side of the panel feeds phase A. The one on the right feeds phase B. The total draw on the panel should not exceed 80% of its capacity.
For example, the draw on a 200-amp service should not exceed 160 amps. If the draw on the panel is more than 80% of the panel’s capacity, you should install a larger service.
If you have more than one space for a new breaker and if there is at least one space available on each phase, you should mount the breaker so that it draws power from the phase with the lower tested load. The phases feed alternating rows of breakers. The A phase feeds breakers one and two, the top row. The B phase feeds the second row, breakers three and four, and so on down the panel.
Install the breaker first
Snapping the circuit breaker into place is the easiest part of the job, but it’s important to take some safety precautions before you begin the installation. Remove any metal jewelry, and use insulated tools. Wear UV-rated safety glasses to protect your eyes in case any arcing occurs. And remember that the best way to avoid a short is to wire carefully.
Turn off the main breaker, and remove the panel cover. This will de-energize the hot buses, but remember that the feeders on the incoming side of the main breaker are still hot. The only way to de-energize the panel completely is to remove the meter, an impractical solution. The trick is to keep the power on the conductors and not where it can cause damage.
Make sure that the new breaker is turned off, and slide the hooks on the back of the breaker onto the mounting strip. The breaker should give some resistance before snapping into place. If it doesn’t feel as if it’s going to snap in, then start over.
Secure the new cable before exposing the wires
Feeding wire around a panel can be frustrating. Work slowly and patiently. Have enough wire to work with, but not so much that you can’t control it. Measure the cable from where it will enter the box to the farthest location a wire needs to reach, and cut it off there.
Do as much work as you can outside the box, including cutting the cable’s jacket. Remember, though, that exposed wire conducts electricity, so don’t take the jacket off until you are ready to terminate the wires.
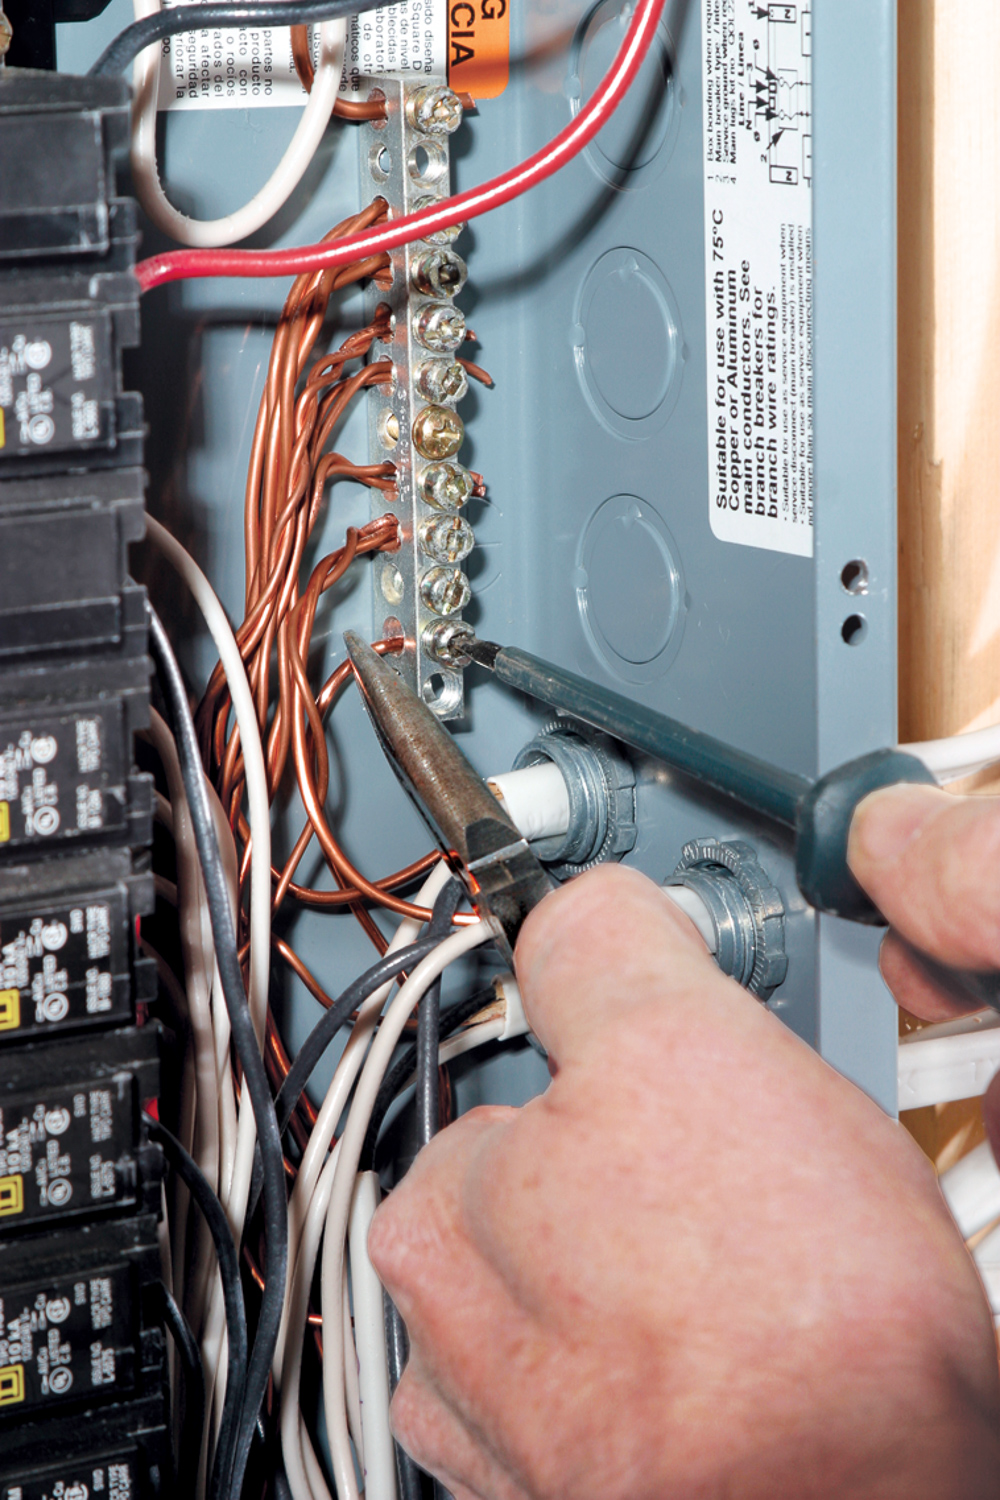
Code requires that you secure incoming cable to the box with cable connectors. Remove a knockout from the box for the new cable, and install the connector in the opening before running the wire into the panel. As soon as you’ve run the new cable in the box, tighten the connector to keep the cable from moving around while you’re working. The cable also has to be attached to the structure of the building, usually within 12 in. of the box, but you can do this step last in case you need more cable inside the box.
After the cable is fed into the box and is secured, pull off the outer sheathing. One nice thing about wire is that when you bend it in one direction, it stays there. As soon I remove the sheathing from the cable, I bend all the wires to a safe place and work with one wire at a time.
Terminate the wires in order
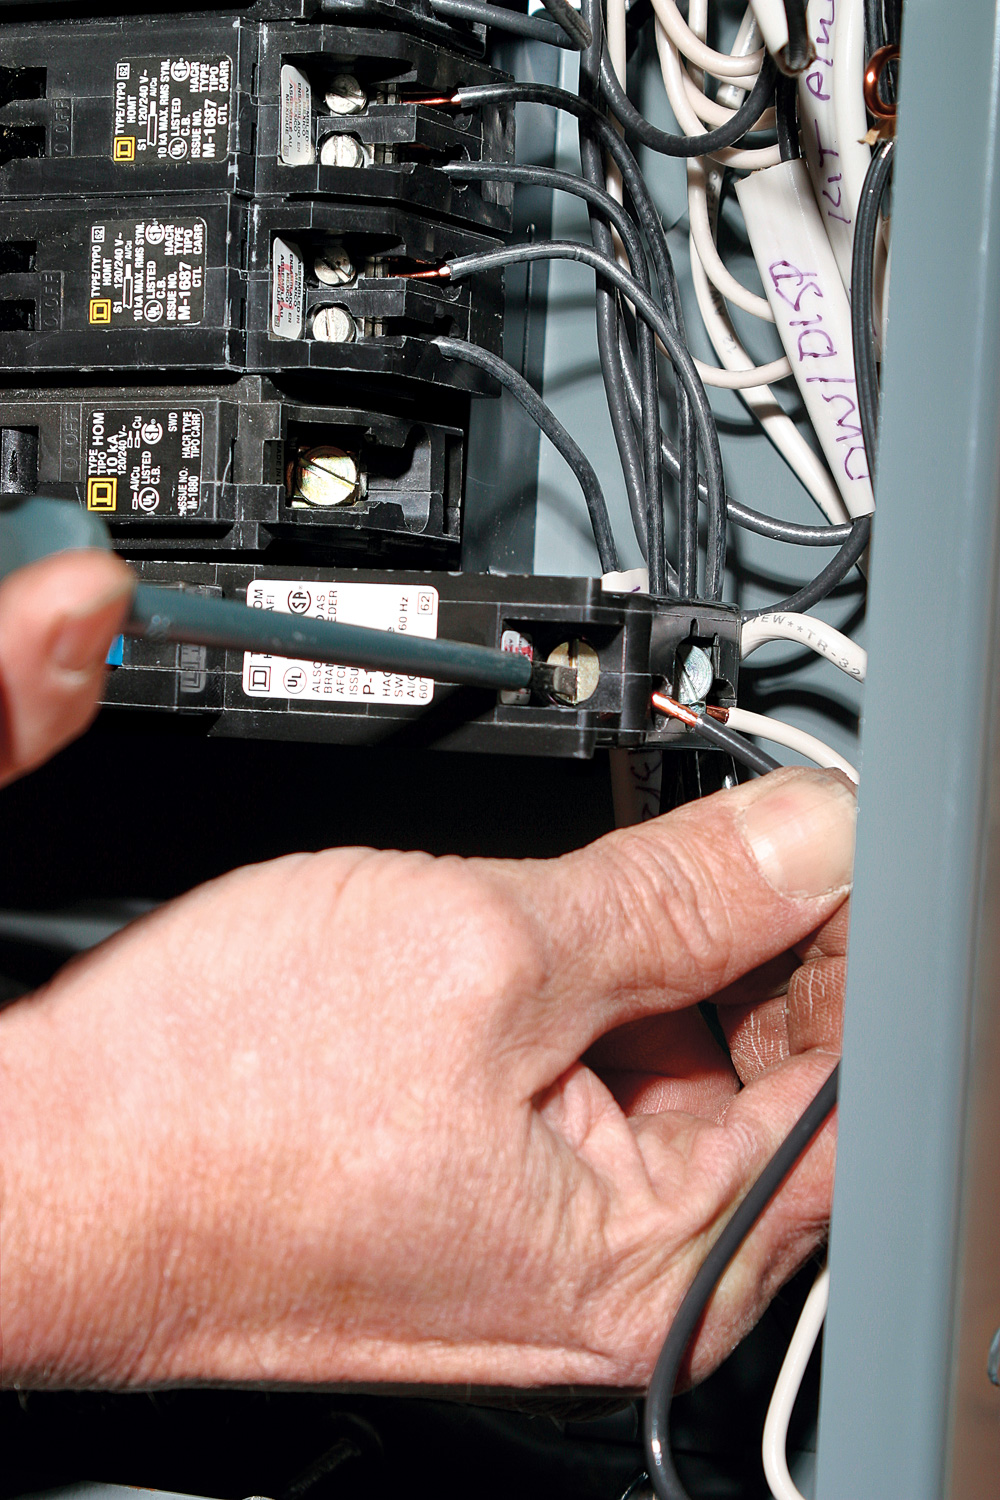
As you terminate the wires, the trick is preventing the new wires, especially the ground, from contacting power. Terminate the ground wire first, the neutral wire second, and the hot wire last. Working in this order is the electrical equivalent of hooking up the overflow and the drain before the supply line in plumbing. By connecting the hot wire last, you ensure that all the supporting wire is in place before the circuit goes anywhere near power.
As you route the copper ground wire to the ground bus bar, or in some cases to a shared neutral/ground bar, follow the outside corner of the box and stay as far from the hot bus as you can. If you are using a standard breaker, terminate the neutral wire directly to the neutral bus bar. AFCI and GFCI breakers monitor current on the neutral wire, so in this case, the neutral wire is terminated on the breaker. The screw for terminating the neutral for these breakers is on the outside edge behind the screw for the hot wire. A coiled white wire (a pigtail) attached to the breaker then is fed to the neutral bus bar to complete the neutral.
Finally, lead the hot wire to the new breaker. Trim and strip it the same way you did the neutral conductor, and fasten it to the breaker.
Test the new circuit
Twist out an opening for the new breaker, and re-cover the panel. Now you can reset the main breaker. Double-check to make sure the outlets along the circuit are ready to go. If the new devices all are installed and all splices are covered, turn on the new breaker. Test the
power at each new device. If you installed an AFCI or GFCI, check its function by pushing the test button; it should trip. Reset the
breaker as you would any other: First, turn it all the way off, then back on. As a last step, be sure to add the function of the new circuit to the legend printed inside the panel door.
Think safety inside the box
Any time you work in the panel, it is important to work with the main breaker switched off. But keep in mind that the main feeder lines that supply power to the panel are still live. Make sure that all the branch circuits are fastened securely to the building and are clamped to the box. Use only insulated tools, and never let exposed wires contact hot areas of the panel. When it comes time to terminate the wires for a new or existing circuit, make sure to work in the right order:
- Ground
- Neutral
- Hot
Check the panel for space and load
In panels with 200-amp service, if there is room to add a breaker, there is likely plenty of electricity to go around. If the panel is older or rated for lower voltage, the total draw should be tested before a new circuit is added. The total draw should not exceed 80% of the panel’s voltage rating.
Prepare the panel for the new circuit
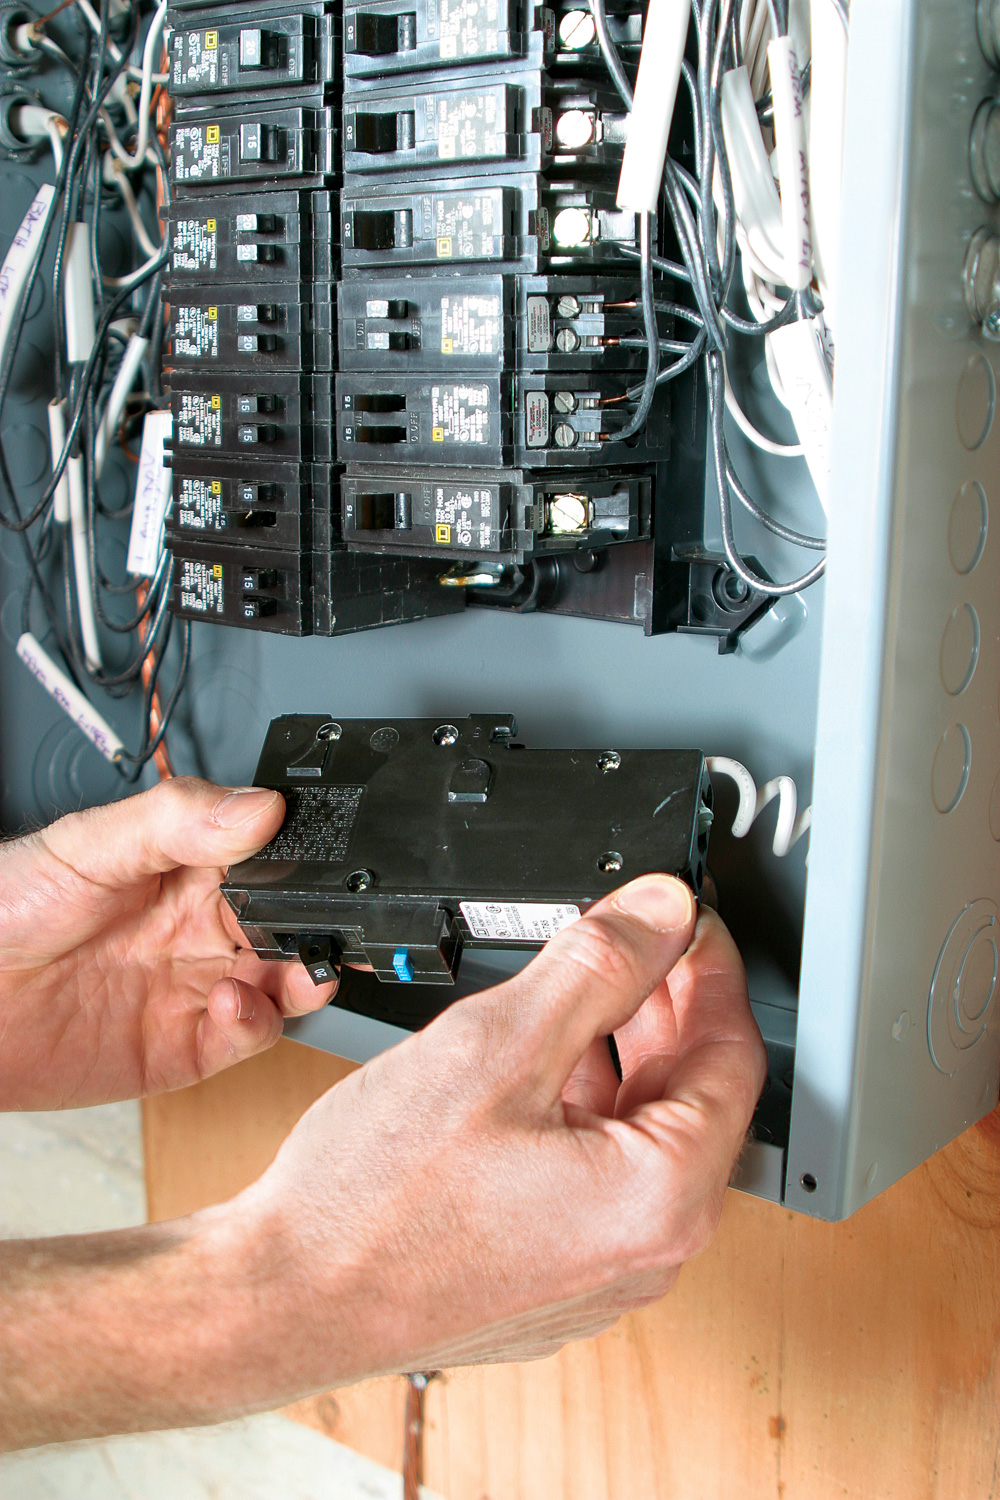
Add the new breaker to the hot bus bar. With the breaker switched off, slide it onto the mounting rail, and press down on the inside edge of the breaker. You’ll be able to feel the spring clips locking the breaker in position.
Make way for the new cable. If the panel can support a new circuit, it should have knockouts available for the new wire. After creating the opening, install a 1⁄2-in. cable connector to anchor the new cable to the box.
Cut the cable with sheathing to spare. Hold the new cable so that it follows the path it will take as it enters the panel, and cut the sheathing at a point that will be at least 1⁄2 in. inside the panel. Leave the sheathing on until you have run the cable into the panel, then tighten the clamp.
Breaker basics
An electrical system is only as safe as the breaker.
Arc-fault circuit interrupters (AFCI), like the one installed for this bedroom addition, monitor the hot and neutral wires for sudden spikes in draw. AFCI protection is required in bedrooms, or anywhere that someone might sleep. This includes circuits feeding receptacles, lights, a hard-wired smoke detector, and even a dedicated circuit that serves a sleeping area.
A circuit breaker is the on and off switch for a circuit. A breaker trips to open the circuit and to protect it from over-current damage. Too much current on the circuit can cause conductors to overheat, melt, and start a fire. Properly selected and installed circuit breakers are vital to a safe electrical system.
The type of breaker used for a new circuit is based on the area of the house the circuit serves and the amount of draw on the circuit. It’s also important for the brand of breaker to be compatible with the electrical panel. Here, a Square D AFCI breaker is installed in a Square D panel.
If the circuit you’re adding doesn’t feed a wet area, doesn’t feed a room where someone might sleep, and doesn’t go outside, a standard breaker is all you should need.
Ground-fault circuit interrupters (GFCI) are required in potentially wet areas. GFCIs compare the amount of power flowing on the hot wire to the amount returning on the neutral wire. If the amount of power on the neutral drops below the amount on the hot, the device trips and opens the circuit.
GFCIs are required outside; in bathrooms, boathouses, garages, unfinished basements, and crawlspaces; within 6 ft. of sinks; and for all countertop outlets in kitchens.
If you’re adding a dedicated circuit for an appliance that draws a lot of power, you may need to install a two-pole breaker and run a cable with heavier conductors. Two-pole breakers draw rom both phases to supply 240v. Ranges, ovens, water heaters, clothes dryers, and air-conditioning compressors require this kind of power. The manufacturer’s nameplate on the appliance should give you the specifics.
If the panel has load capacity but no room, you can replace one full-size breaker with two half-eight breakers. Tandem breakers (two half-height breakers in one) are also available. They let you install two breakers capable of protecting two circuits in the space normally occupied by one breaker.
Make the final Connections Safely
Terminate the ground, neutral, and hot wires in order.

Simple math
How to determine breaker and wire size
If you’re confident that your panel can handle the draw of a new circuit, I don’t recommend running out and spending your money on a voltage meter. It is easy to estimate the draw on a new circuit. The same calculations can be used to determine whether an existing circuit has enough capacity to carry a greater load, or to determine the size of the breaker and wire that should be used for a new circuit.
Branch electrical circuits should be loaded at no more than 80% of their over-current protection rating, or the size of the breaker. That allows 12 amps on a 15-amp circuit or 16 amps on a 20-amp circuit. Most electrical service is 240v separated into two phases of 120v each. At 120v, a 15-amp circuit has a capacity of 1440 volt-amps, or watts (12 amps x 120 volts = 1440 watts). Using the same equation, a 20-amp circuit can carry up to 1920w.
To estimate the draw on a circuit, I use 100w per lamp holder and 180w per standard dual-receptacle outlet. Consequently, it’s time to add a new circuit when you have eight receptacles or 14 lamp holders (or any combination thereof) on a 15-amp, 120v circuit. On a 20-amp, 120v circuit, 10 receptacles or 19 lamp holders make a full load. If you’re adding a new circuit for a dedicated use, you should use the draw information on the device’s nameplate to determine the circuit size you need.
If your final total is equal to or less than 1440w, you can install 15-amp receptacles, 14-ga. wire, and a 15-amp circuit breaker. If your calculation equals more than 1440w and goes as large as 1920w, you should add a 20-amp circuit with 12-ga. wire and receptacles rated for 20 amps. Switches and lights almost always are rated for 20-amp protection.
Photos by Brian Pontolilo
Related stories:
- Making Sense of Circuit Breaker Test Buttons
- Why Do I Have To Separate Grounds and Neutrals?
- Grounding Basics
From Fine Homebuilding #165
For more photos and details, click the View PDF button below.
