FHB Logo Facebook LinkedIn Email Pinterest Twitter X Instagram Tiktok YouTube Plus Icon Close Icon Navigation Search Icon Navigation Search Icon Arrow Down Icon Video Guide Icon Article Guide Icon Modal Close Icon Guide Search Icon Skip to content
Subscribe
Log In
  • How-To
  • Design
  • Tools & Materials
  • Restoration
  • Videos
  • Blogs
  • Forum
  • Magazine
  • Members
  • FHB House
  • Podcast
Log In

Fine Homebuilding Project Guides

Wiring

Guide Home
  • Working with Electricity
  • Tools and Materials
  • Receptacles and Switches
  • Lights and Fans
  • Rough-In
  • Outdoor Wiring
  • Panels and Subpanels
Building Skills

Wiring a Single-Pole Switch

You don't need to be an electrician to wire a light switch–you just need to have a few basic tools and follow these simple steps.

By Dave Balaban Issue 176

Installing a single-pole switch is just one in a series of tasks that make up an electrician’s work, but along with running rough wiring and installing boxes, it’s a task that anyone can do and save some money in the process. When wiring a switch, there are two scenarios: You’re connecting two feeds (one power, one to the fixture) or one feed (from the fixture to the switch). The tools you need are basic: Phillips-head and slotted-head screwdrivers, a pair of wire strippers, electrician’s tape, yellow wire nuts (for two conductors), red wire nuts (for three conductors), lineman’s pliers, and a utility knife. If you’d like more information on residential wiring, please consult Rex Cauldwell’s book Wiring a House.

Safety is the first priority when wiring a home

No matter how simple the job or how confident you are with your wiring skills, you should always turn off the circuit breaker before touching any wiring in your house. To make sure the circuit you’re about to touch is truly powered down, check the wires with an electrical tester.

If you’re concerned about the condition of your existing wiring, or if you’re not sure that the circuit you’re about to work on is up to code, take a look at the following two articles first:

9 Common Wiring Mistakes and Code Violations – These can be illegal or dangerous—or both—but all are simple to avoid.

Is Your Old Wiring Safe? – Inspect the electrical panel and exposed wiring to identify safety risks and upgrade options.

7 simple steps to get the job done

Step 1: Leave yourself enough slack. Pull 8 in. to 10 in. of non-metallic sheathed cable through the box, then trim it back to a 6-in. length, measured from the outside face of the box. The cutters on lineman’s pliers cut cleanly and easily through the cable.

Pull 8 in. to 10 in. of non-metallic sheathed cable through the box

Step 2: There are two ways to skin a piece of non-metallic sheathed cable, but here’s the most foolproof. Make a shallow cut about 2 in. long at the end of the cable. Now grab both black and white conductors, and pull them apart in opposite directions so that the jacket rips, continuing until the tear reaches the inside of the box. Now cut the jacket away, leaving about 1/2 in. inside the box.

skin a piece of non-metallic sheathed cable

Step 3: Stripping the jacket with a knife is trickier. Starting where the non-metallic sheathed cable comes into the box, carefully insert the tip of a sharp utility-knife blade into the jacket’s center, and slice the jacket all the way to the end of the cable. Trim the jacket away close to where the cable enters the box and carefully inspect both black and white insulations for cuts. Any nicks should be covered completely with two wrappings of electrical tape.

carefully insert the tip of a sharp utility-knife blade into the jacket’s center, and slice the jacket all the way to the end of the cable


Switch to a dimmer?

dimmer switch

Used instead of a standard switch, a dimmer gives you more flexibility in lighting control. Installation is often easier than a single-pole switch because many dimmers require wire nuts to connect to the power source rather than the screw terminals found on conventional switches. Dimmers range in cost from $10 to $30.


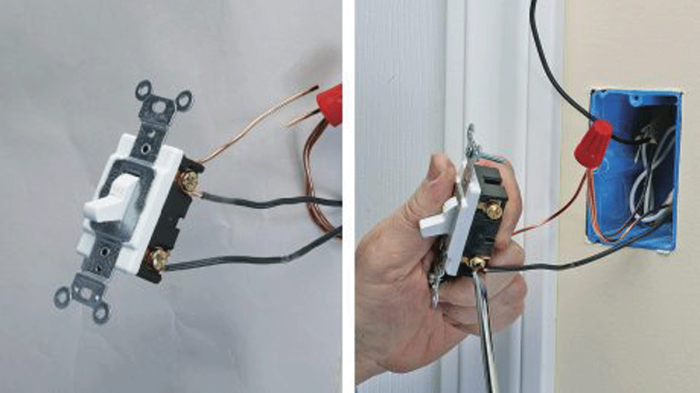
Step 4: Strip and bend the hooks. Strip each wire’s insulation back about 3/4 in. Make an open-ended loop on the black wires with needle-nose pliers or wire strippers. Next, make a loop in a 6-in. length of bare ground wire, fasten it around the green screw terminal, and tighten the screw snugly.

Strip and bend the hooks  make a loop in a 6-in. length of bare ground wire, fasten it around the green screw terminal, and tighten the screw snugly

Step 5: Connect the pairs. Wires in a box get connected together with wire nuts—small caps with metal inserts that grab the wire tight when twisted. To make these connections, firmly press the tips of all wires that are being connected together into the nut and twist the nut clockwise until the wires are wrapped tightly together and there is a good amount of resistance to further twisting.

Make sure the size of the wire nuts are matched to the number and gauge of wires you are connecting (acceptable numbers and sizes will be listed on the packaging). In this case, with a yellow wire nut, join the white wires, then use a red wire nut to join the two grounds and a short length of ground that’s connected to the switch. Gently push these sets into the back of the box.

With a yellow wire nut, join the white wires Gently push these sets into the back of the box

Step 6: Attach the black wire loops to the switch terminals. Always remember to wrap the wire clockwise around the screw so that when the screw tightens, it carries the loop with it.

Attach the black wire loops to the switch terminals

Step 7: Fold the wires behind the switch, not on the sides. After wrapping the switch body with a layer of tape, fold the black wires back into the box neatly, then push in the switch on top of the wires. Finish by securing the switch’s screws to the box.

Fold the wires behind the switch, not on the sides


A wire stripper is an indispensable tool

A wire stripper is an indispensable tool

If you watch late-night television, you may have seen advertisements that feature a guy yelling about some appliance that performs a host of tasks, all for an unbelievable price. You probably won’t see this wire stripper from Klein Tools (www.kleintools.com), but it’s worthy of a good yell: It’s the tool you want when you’re doing electrical work. Its jaws are gauged to strip five different wire sizes. They also can cut wire and bend hooks, and they have a serrated nose for gripping. The plastic-padded handles are curved for a comfortable grip. The tool really is a bargain, about $15 in most stores.

Photos by: Charles Bickford


Sign up for eletters today and get the latest how-to from Fine Homebuilding, plus special offers.

Signing you up...

This site is protected by reCAPTCHA and the Google Privacy Policy and Terms of Service apply.
See all newsletters
See all newsletters
Previous: Making Receptacles Flush Next: How to Install a Single-Pole Light Switch

Guide

Wiring

Chapter

Receptacles and Switches

Log in or create an account to post a comment.

Sign up Log in

Become a member and get full access to FineHomebuilding.com

Wiring

Wiring

Trusted, code-compliant guidance from the pros for working safely on any wiring project

View Project Guide

View All Project Guides »

Become a member and get unlimited site access, including the Wiring Project Guide.

Start Free Trial

Working with Electricity
  • Basics
  • Safety
  • Troubleshooting and Upgrades
Tools and Materials
  • Electrical Tools
  • Electrical Boxes
  • Cables and Wires
Receptacles and Switches
  • Materials
  • Wiring Receptacles
  • Wiring Switches
Lights and Fans
  • Lighting Design
  • Installing Lights
  • Fans
Rough-In
  • Planning
  • Installing Electrical Boxes
  • Running Cable
  • Retrofit Work
  • Making Connections in Boxes
  • Electrical Conduit
Outdoor Wiring
  • Basics
  • Outlets
  • Installing Lighting
Panels and Subpanels
  • Understanding Panels
  • Circuits
  • Installing a Subpanel

Fine Home Building

Newsletter Sign-up

  • Fine Homebuilding

    Home building tips, offers, and expert advice in your inbox.

  • Green Building Advisor

    Building science and energy efficiency advice, plus special offers, in your inbox.

  • Old House Journal

    Repair, renovation, and restoration tips, plus special offers, in your inbox.

Signing you up...

This site is protected by reCAPTCHA and the Google Privacy Policy and Terms of Service apply.
See all newsletters

Follow

  • Fine Homebuilding

    Dig into cutting-edge approaches and decades of proven solutions with total access to our experts and tradespeople.

    Start Free Trial Now
    • Facebook
    • Instagram
    • X
    • LinkedIn
  • GBA Prime

    Get instant access to the latest developments in green building, research, and reports from the field.

    Start Free Trial Now
    • Facebook
    • YouTube
  • Old House Journal

    Learn how to restore, repair, update, and decorate your home.

    Subscribe Now
    • Facebook
    • Instagram
    • X

Membership & Magazine

  • Online Archive
  • Start Free Trial
  • Magazine Subscription
  • Magazine Renewal
  • Gift a Subscription
  • Customer Support
  • Privacy Preferences
  • About
  • Contact
  • Advertise
  • Careers
  • Terms of Use
  • Site Map
  • Do not sell or share my information
  • Privacy Policy
  • Accessibility
  • California Privacy Rights

© 2025 Active Interest Media. All rights reserved.

Fine Homebuilding receives a commission for items purchased through links on this site, including Amazon Associates and other affiliate advertising programs.

X
X
This is a dialog window which overlays the main content of the page. The modal window is a 'site map' of the most critical areas of the site. Pressing the Escape (ESC) button will close the modal and bring you back to where you were on the page.

Main Menu

  • How-To
  • Design
  • Tools & Materials
  • Video
  • Blogs
  • Forum
  • Project Guides
  • Reader Projects
  • Magazine
  • Members
  • FHB House

Podcasts

  • FHB Podcast
  • ProTalk

Webinars

  • Upcoming and On-Demand

Podcasts

  • FHB Podcast
  • ProTalk

Webinars

  • Upcoming and On-Demand

Popular Topics

  • Kitchens
  • Business
  • Bedrooms
  • Roofs
  • Architecture and Design
  • Green Building
  • Decks
  • Framing
  • Safety
  • Remodeling
  • Bathrooms
  • Windows
  • Tilework
  • Ceilings
  • HVAC

Magazine

  • Current Issue
  • Past Issues
  • Magazine Index
  • Subscribe
  • Online Archive
  • Author Guidelines

All Access

  • Member Home
  • Start Free Trial
  • Gift Membership

Online Learning

  • Courses
  • Project Guides
  • Reader Projects
  • Podcast

More

  • FHB Ambassadors
  • FHB House
  • Customer Support

Account

  • Log In
  • Join

Newsletter

Get home building tips, offers, and expert advice in your inbox

Signing you up...

This site is protected by reCAPTCHA and the Google Privacy Policy and Terms of Service apply.
See all newsletters
See all newsletters

Follow

  • X
  • YouTube
  • instagram
  • facebook
  • pinterest
  • Tiktok

Join All Access

Become a member and get instant access to thousands of videos, how-tos, tool reviews, and design features.

Start Your Free Trial

Subscribe

FHB Magazine

Start your subscription today and save up to 70%

Subscribe

We hope you’ve enjoyed your free articles. To keep reading, become a member today.

Get complete site access to expert advice, how-to videos, Code Check, and more, plus the print magazine.

Start your FREE trial

Already a member? Log in