
Get a Perfect Paint Job on Trim, Windows, Doors, and Cabinets
Here are myriad tips for prep, paint selection, and application techniques for a quality finish.
If you can pick up painting techniques from experienced professionals, you will make your work easier and your paint jobs look better without having to learn by trial and error. That’s why we’ve compiled this collection of pro tips so you can easily produce a beautiful finish on any interior surfaces in your home.
Painting Interior Trim
Begin by preparing the trim, window sashes, and doors by filling nail holes with nonshrinking wood filler, priming bare wood, caulking gaps with acrylic latex caulk (letting it dry overnight), lightly sanding all trim with 180-grit sandpaper, and vacuuming dust and debris. Enamel paint—which dries to a hard, glossy finish—is best for trim, window sashes, and doors because it’s the most durable. By the way, there are both oil-based and latex enamels.
Painting straight edges requires a quality brush and a steady hand. If you can develop a steady hand, you won’t need to use masking tape, which is time-consuming to apply. In most cases, all you need is a 2-1/2-in. or 3-in. angled sash brush, unless your baseboards are exceptionally wide. Start with crown (ceiling) molding, proceed to door and window trim, and finish with the baseboards. Always paint with the grain, cutting trim edges first, then filling in the field with steady back-and-forth strokes. To avoid lap marks, paint about 3 ft. of trim at a time, overlapping adjacent sections while they’re still wet. If the paint is drying too fast, add Flood Floetrol to latex paint or its Penetrol to oil-based paint.
If trim edges are thinner than 3/16 in., they’ll be difficult to cut in without spreading trim paint on the wall. In that case, overlap the wall paint onto the trim edge so that it covers the edge completely, producing a clean, straight line. In other words, the thin edge of the trim will be covered with wall paint, not trim paint, but your eye won’t notice.
| PRO TIP: Too often, amateurs dab paint on, which leaves crooked lines and uneven paint thickness. As you cut in or paint trim, use long brushstrokes. Apply paint generously to the surface, then smooth it out. For best brush control, hold the handle, not the ferrule, as if you were throwing a dart. |
Painting Windows
Window sashes vary greatly in design. But as a general rule, paint them from the inside of the sash out. That is, if sashes are divided into multiple panes by muntins (narrow wood sections between panes of glass), paint the muntins first. Then paint along the insides of sash rails and stiles where they meet glass. Finally, paint the faces of sashes. To develop a rhythm, paint all the vertical muntins—one side at a time—then the horizontal muntins. By painting similar window elements at the same time, rather than jumping around, you’ll be less likely to miss elements and the work will go faster.
Don’t worry about cutting in clean edges at the glass. Instead, paint slightly onto the glass (1/16 in.), even if unevenly, thus creating a tight seal. After the paint dries, use a razor to cut a clean line on the glazing.
| PRO TIP: Before using a razor to clean paint from window glass, wash the windows well. Otherwise, grit or sanding residue could scratch the glass as it is pulled along the surface by the razor. Those scratches will be all too visible when the sun shines through the glass. For best results, change razors often. |
Painting a Double-Hung Window
Open windows to paint their edges. When painting double-hung windows, follow the steps at left. If you are repainting the exterior of the house at the same time, go outside and paint the accessible parts of the window. Slide the window sashes back to their original position, and finish painting. To prevent binding, move the sashes as soon as the paint is dry.
Painting Doors
The easiest way to paint doors is to first pull the hinge pins and lay the door across a pair of sawhorses. (If that’s not possible, shim beneath the door so it can’t move.) For the best-looking results, remove all door hardware except hinge leaves, especially if you’re spray painting. Cover the hinges with masking tape. If you prefer not to remove the old latch mechanism and escutcheons, carefully mask them, too.
If you’re brush painting a flush door (flat surface), divide it into several imaginary rectangles, each half the width of the door. Apply paint with the grain and overlap the edges of adjacent sections. Work from top to bottom. Painting panel doors is similar, but work from the inside out: Paint the insides of the panels first, next the rails (horizontal pieces) top to bottom, and finally the vertical stiles.
| PRO TIP: To paint both sides of a door without waiting for the first painted side to dry, drive a pair of nails into the top and bottom of the door, then rest those nails on a pair of sawhorses. You and a helper can grab the nails and flip the door over. When both sides are dry, pull the nails, then fill and paint the holes. |
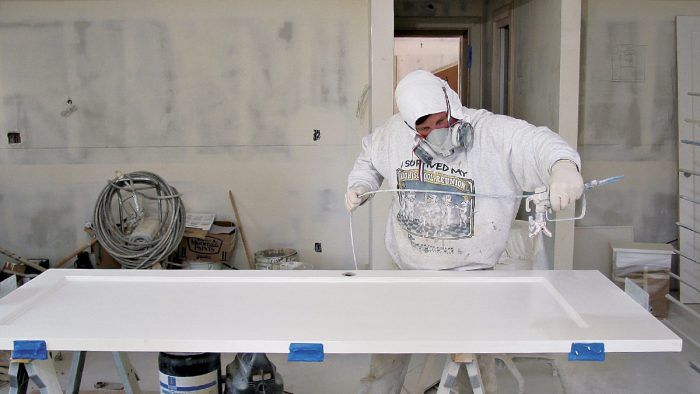
Painting Cabinets
For this task, it’s faster if you remove and spray paint drawers and doors, and brush paint cabinet frames. You’ll need a spray room isolated from the house (a clean garage is ideal); a drying rack for doors; and a sprayer, which you can rent. Be sure to read the earlier sections on painting safety and spray painting, which emphasize ventilation and wearing a respirator.
This freestanding drying rack is constructed from 8-ft. lengths of 1/2-in. galvanized-steel electrical conduit, 2×2 frames lag-screwed together, and two pieces of 3/4-in. plywood. The plywood base is roughly 30 in. by 30 in.; the plywood top can be smaller, say, 18 in. by 18 in. Drilling the holes in the 2x2s slightly larger than the conduit diameter allows quick disassembly. To keep the conduit from getting dinged during transport, store it in 3-in. plastic DWV (drain, waste, and vent) pipe with capped ends; wrapping blue tape around the conduit prevents the metal from marring newly painted cabinet doors. To avoid tipping, load the rack from the bottom, unload it from the top, and balance the weight carefully side to side.
|
Start by washing doors and drawer fronts, especially those near the kitchen stove. If your cleaner isn’t cutting the grease, try TSP or denatured alcohol; make sure you wear goggles and gloves. That done, examine the cabinet parts and their hardware, and plan to replace the doors or drawer fronts that are warped or not repairable, as well as hardware that’s broken or outdated. Before disassembling cabinet parts for spraying, assign each door and drawer a number. Write these numbers just inside the cabinet frame, where they won’t be covered by paint. Number lower cabinet doors on bottom edges and upper doors on top edges (the least visible locations), or number them behind the hinges.
Tape over door-hinge mortises if you’ll reuse the hinges. Otherwise, paint buildup in the mortise may misalign the hinges and thus the doors. Either cover the mortises with tape or leave the hinges on the doors and mask off the hinges.
Remove hardware before prepping the doors. If existing paint is flaking or the doors are dented, start with 100-grit sandpaper in a random-orbit sander, wipe off dust with a damp rag, and fill cracks and holes with nonshrinking wood filler. Repeat the sequence as needed, ending with a 220-grit sanding by hand. However, if the old paint is in good condition, a single pass with 220-grit paper and a damp rag is all you’ll need to prep before painting.
| PRO TIP: Most amateurs fold sheets of sandpaper in half, then in quarters. But sheets will last longer if you fold them in thirds. Folding sandpaper in fourths places abrasive surfaces face to face, causing premature wear. |
For the most durable surface, apply a coat of primer-sealer to unpainted surfaces. (A painted surface in good condition does not need a primer.) Follow this with three coats of enamel, which will hide well, even if you’re applying light paint over dark. Use acrylic-latex paint for the primer and finish coats, even if the cabinets are presently covered with oil-based enamel. Top-quality latex enamel is almost as tough as any oil-based enamel, it dries faster, and it’s much easier to clean up. To minimize runs, keep the doors horizontal during spraying and drying. Between coats, sand lightly with 320-grit garnet sandpaper. Painting drawer faces is essentially the same, except that you should mask off the drawer sides. Paint cabinet frames from the inside out, finishing with long, vertical strokes on the frame faces.
| PRO TIP: For some old-house purists, spray-painted finishes are too perfect. So, after spraying two finish coats, they use a 6-in. roller to apply a thinned (10% to 15%) final coat. They then tip off the surface with light strokes of a brush tip. Use a 3/8-in. mohair roller cover, which will not shed. Easy does it: Brushmarks should be faint—barely visible, in fact. |

View Comments
If working with wood older than 1978 when lead paint was outlawed, be careful to prep safely. Most likely all the layers should be stripped down to bare wood to get a nice new finish. With lead paint, no toxic fumes and little dust are critical. Infrared Speedheater takes care of both.