
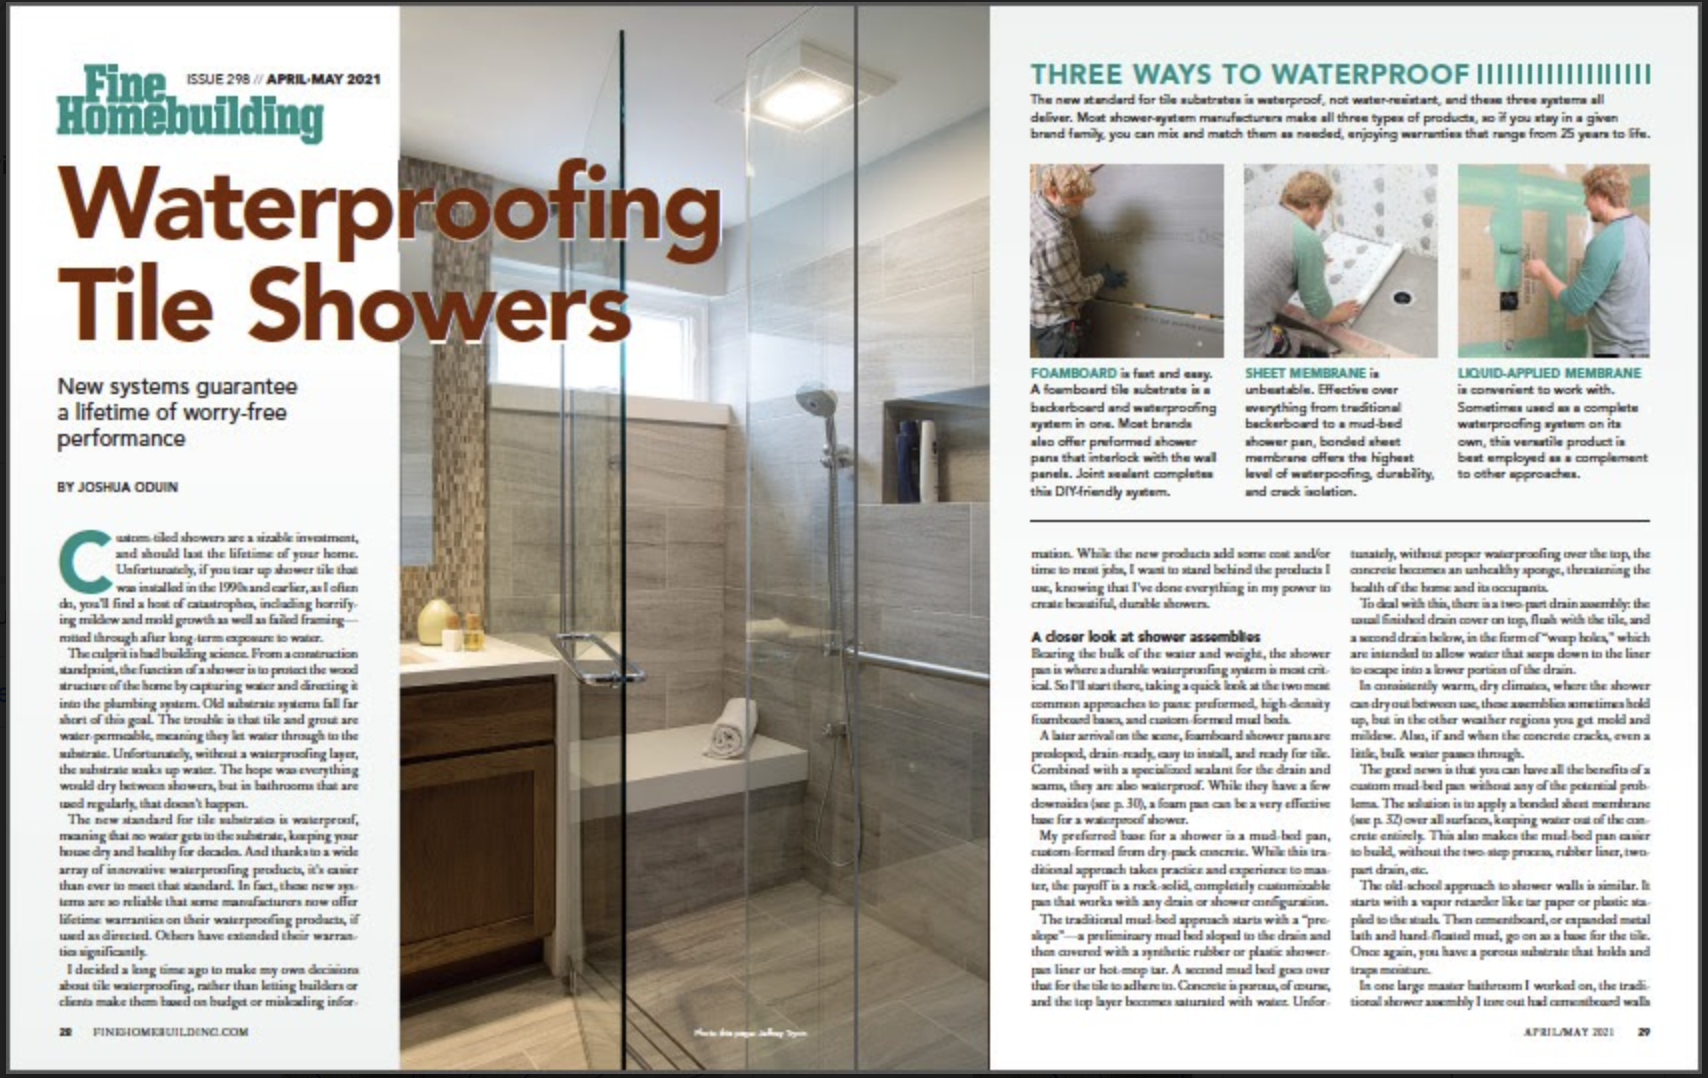
Three Ways to Waterproof Tile Showers
Modern waterproofing systems guarantee a lifetime of worry-free performance for a tile shower.
Synopsis: Tile and grout are water-permeable, so to create a waterproof shower, a substrate system must be completely waterproof. This article runs through the options when it comes to waterproofing foamboard, bonded sheet membrane, and liquid-applied membrane and gives a closer look at three approaches that incorporate these waterproofing options. The article includes pros and cons of each system and method, and a rundown of manufacturers and shower-waterproofing products.
Why shower waterproofing is so important
Custom-tiled showers are a sizable investment, and should last the lifetime of your home. Unfortunately, if you tear up shower tile that was installed in the 1990s and earlier, as I often do, you’ll find a host of catastrophes, including horrifying mildew and mold growth as well as failed framing—rotted through after long-term exposure to water.
The culprit is bad building science. From a construction standpoint, the function of a shower is to protect the wood structure of the home by capturing water and directing it into the plumbing system. Old substrate systems fall far short of this goal. The trouble is that tile and grout are water-permeable, meaning they let water through to the substrate. Unfortunately, without a waterproofing layer, the substrate soaks up water. The hope was everything would dry between showers, but in bathrooms that are used regularly, that doesn’t happen.
Three systems for waterproofing showers
The new standard for tile substrates is waterproof, not water-resistant, and these three systems all deliver. Most shower-system manufacturers make all three types of products, so if you stay in a given brand family, you can mix and match them as needed, enjoying warranties that range from 25 years to life.
|
|
|
|
When we talk about a waterproof shower, we mean that no water gets through the substrate, keeping your house dry and healthy for decades. And thanks to a wide array of innovative waterproofing products, it’s easier than ever to meet that standard. In fact, these new systems are so reliable that some manufacturers now offer lifetime warranties on their waterproofing products, if used as directed. Others have extended their warranties significantly.
I decided a long time ago to make my own decisions about tile waterproofing, rather than letting builders or clients make them based on budget or misleading information. While the new products add some cost and/or time to most jobs, I want to stand behind the products I use, knowing that I’ve done everything in my power to create beautiful, durable showers.
A closer look at shower assemblies
Bearing the bulk of the water and weight, the shower pan is where a durable waterproofing system is most critical. So I’ll start there, taking a quick look at the two most common approaches to pans: preformed, high-density foamboard bases, and custom-formed mud beds. A later arrival on the scene, foamboard shower pans are presloped, drain-ready, easy to install, and ready for tile. Combined with a specialized sealant for the drain and seams, they are also waterproof. While they have a few downsides (see below), a foam pan can be a very effective base for a waterproof shower.
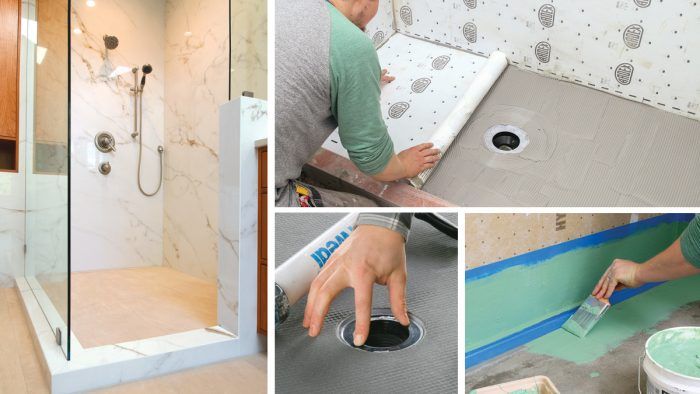
Waterproof Shower Method 1: Full Foamboard System
This full Wedi Building Board system includes wall panels and a presloped, one-piece pan, with a quick-curing sealant used at joints, seams, and penetrations.
Pros:
- Quick
- DIY friendly
- Wall panels easy to cut and handle
- Tile substrate and waterproofing in one step
Cons
- Relatively pricey
- Limited pan sizes and shapes, although they can be field-trimmed
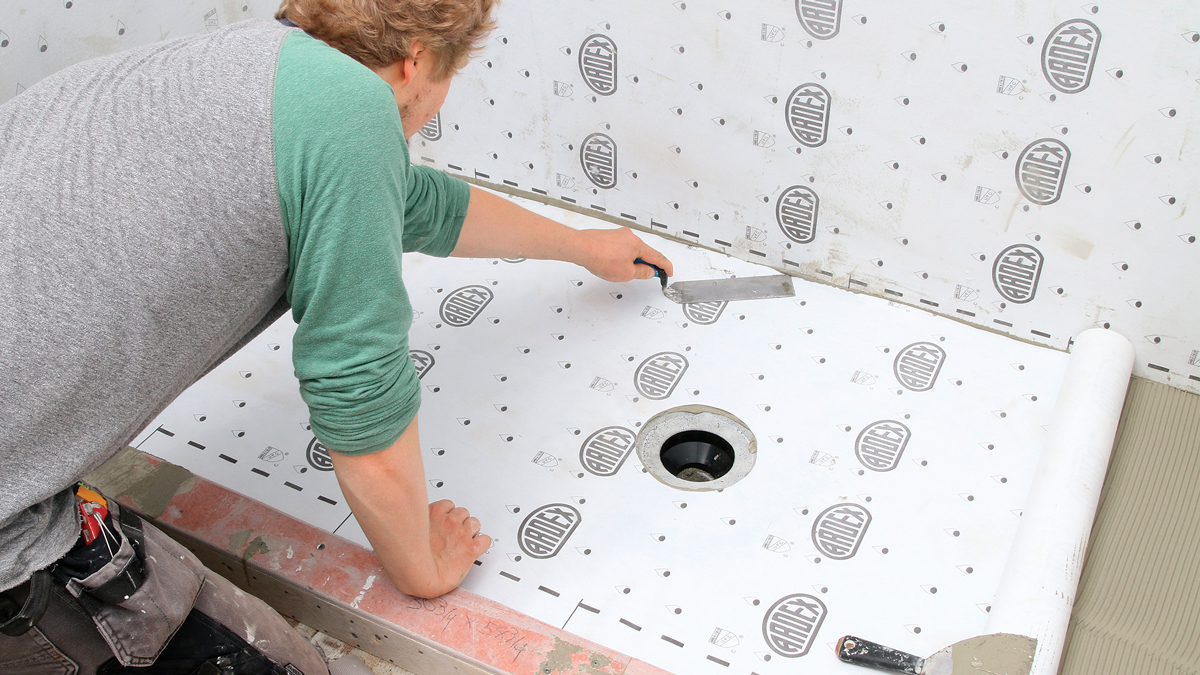
Attach the drain flange. Joint sealant goes below the flange, and a threaded collar pulls it tight. More sealant goes over the top.
Apply thinset. Apply a notched coat of thinset mortar to the back of the pan and the subfloor.
Place the pan. Walk all over the pan to collapse the thin-set ridges and ensure the pan is fully bonded.
|
|
|
|
|
|
|
|
|
My preferred base for a shower is a mud-bed pan, custom-formed from dry-pack concrete. While this traditional approach takes practice and experience to master, the payoff is a rock-solid, completely customizable pan that works with any drain or shower configuration.
The traditional mud-bed approach starts with a “preslope”—a preliminary mud bed sloped to the drain and then covered with a synthetic rubber or plastic shower pan liner or hot-mop tar. A second mud bed goes over that for the tile to adhere to. Concrete is porous, of course, and the top layer becomes saturated with water. Unfortunately, without proper waterproofing over the top, the concrete becomes an unhealthy sponge, threatening the health of the home and its occupants.
To deal with this, there is a two-part drain assembly: the usual finished drain cover on top, flush with the tile, and a second drain below, in the form of “weep holes,” which are intended to allow water that seeps down to the liner to escape into a lower portion of the drain.
In consistently warm, dry climates, where the shower can dry out between use, these assemblies sometimes hold up, but in the other weather regions you get mold and mildew. Also, if and when the concrete cracks, even a little, bulk water passes through.
The good news is that you can have all the benefits of a custom mud-bed pan without any of the potential problems. The solution is to apply a bonded sheet membrane (see below) over all surfaces, keeping water out of the concrete entirely. This also makes the mud-bed pan easier to build, without the two-step process, rubber liner, two-part drain, etc.
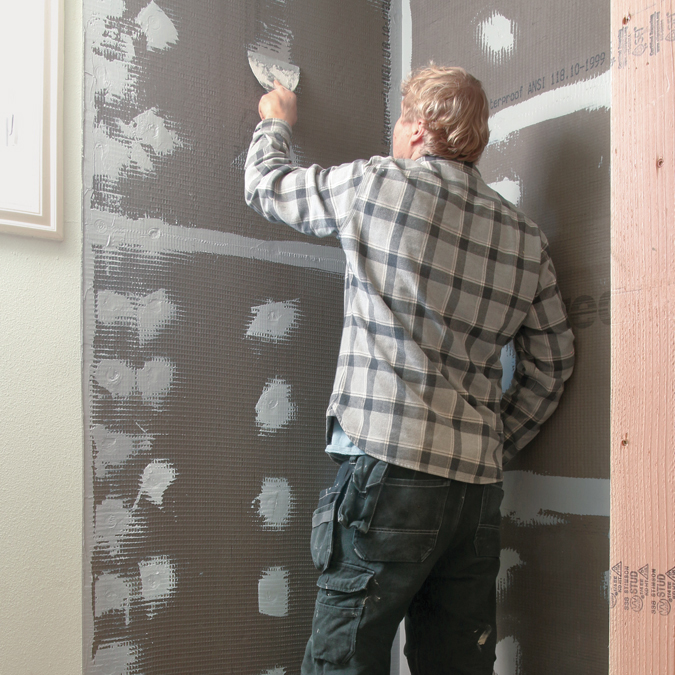
Waterproof Shower Method 2: Sheet Membrane Over Everything
I prefer solid, customizable mudbed shower pans, and a bonded sheet membrane is by far the best way to fully waterproof the concrete. On these walls, the sheet membrane (Ardex SK 175) went over standard Hardiebacker cementboard— stiffer than drywall and less expensive than foamboard.
Pros
- Unmatched permeability ratings
- Unmatched strength and durability
- Works over any substrate
Cons
- Requires skill and experience to apply properly
- Seam banding builds up in corners
|
|
|
Special accessories for penetrations. Smart collars are available for common plumbing penetrations. The pipe collar fits tightly, while one for a mixing valve directs water around it and down.
|
|
|
|

The old-school approach to shower walls is similar. It starts with a vapor retarder like tar paper or plastic stapled to the studs. Then cementboard, or expanded metal lath and hand-floated mud, go on as a base for the tile. Once again, you have a porous substrate that holds and traps moisture.
In one large master bathroom I worked on, the traditional shower assembly I tore out had cementboard walls with a layer of Aquabar tar paper behind, a water-resistant approach some contractors still rely on. Both cementboard and tar paper were trashed from constant saturation. Today’s waterproofing materials go on top of the substrate, sealing out water entirely.
Wood-framed homes expand and contract with fluctuations in temperature and humidity. Properly built tile shower (and floor) assemblies not only protect the wood framing from moisture, but also isolate the tile from the framing, allowing small cracks in the substrate—usually around the perimeter of the shower pan—without telegraphing them to the tile and grout above. This ability varies by system, with sheet membranes taking top honors and the old-school mud-bed approach, with the waterproofing between layers of mud, failing the test.
Of course, no tile assembly can survive improper framing. It’s paramount that the structure of the home is engineered to meet all seismic and load-bearing requirements, and meet or exceed building codes. That means the subfloor for floor and shower tile should be a minimum of 5⁄8-in. plywood—I always use 3⁄4-in. for floors with 16-in. joist spacing. With wider joist spacing, check with the waterproofing manufacturer for their tested assemblies.
Three great tools for waterproofing showers
As they have in other aspects of tile-setting, Europe has led the way in waterproofing. The most innovative products come largely from Italy (Mapei) and Germany (Wedi, Schluter, and Ardex), though U.S. companies like Laticrete have also stepped up.
There are three types of proven products for waterproofing shower substrates—sheet membrane, liquid-applied membrane, and foamboard— and you can often use them together in the same shower. Because tile-backer manufacturers offer at least two of these product types, you can stay within a single manufacturer’s lineup for any shower and guarantee full warranty protection. The three custom showers featured in this article demonstrate how easy this is to do.
Another key factor in maintaining warranties is using products as intended. Manufacturers provide detailed instructions on proper use, so read them carefully.
Like any building material, each type of waterproofing has its tradeoffs. Understanding them will help you design the right combination for your skills and needs. Product availability is another challenge, so it’s important to understand more than one approach.
Sheet membranes can’t be beat
In many ways, bonded sheet membranes are the top-tier waterproofing option. While not the best option for DIYers, they are the most durable and versatile barrier, with the best crack-isolation properties and best permeance ratings (see “Perm ratings,”below), and I recommend them highly for pros skilled in the tile trade. Top brands include Schluter, Noble Company, Ardex, Wedi, Mapei, and Laticrete.
Perm ratings: How waterproofing is tested and classified
A perm rating is a standard measure of a material’s permeance, based on the quantity of water vapor that will pass through it in a given period under a given amount of pressure. The higher the number, the more readily vapor can diffuse through the barrier.
I want my shower-tile substrates to perform at 2 perms or less overall—ideally closer to 1 perm. With that in mind, here are the perm ratings for commonly used waterproofing systems in showers.
- Tar paper, 5 perms
- Laticrete Hydro Ban liquid-applied membrane, 1.27 perms
- Schluter-Kerdi sheet membrane, 0.75 perms
- Schluter-Kerdi-Board foamboard, 0.48 perms
- Ardex SK 175 sheet membrane, 0.5 perms
Steam showers are a different beast—to handle higher temperatures and vapor levels, steam showers require higher-level waterproofing systems. In short, they must be virtually vaporproof. For a system to qualify for steamshower use, it needs a perm rating of 1 or less for residential use and 0.5 or less in a commercial setting. Appropriate waterproofing systems for steam showers include Schluter- Kerdi-DS and Ardex SK 175 sheet membranes, and Wedi Vapor 85 foamboard.
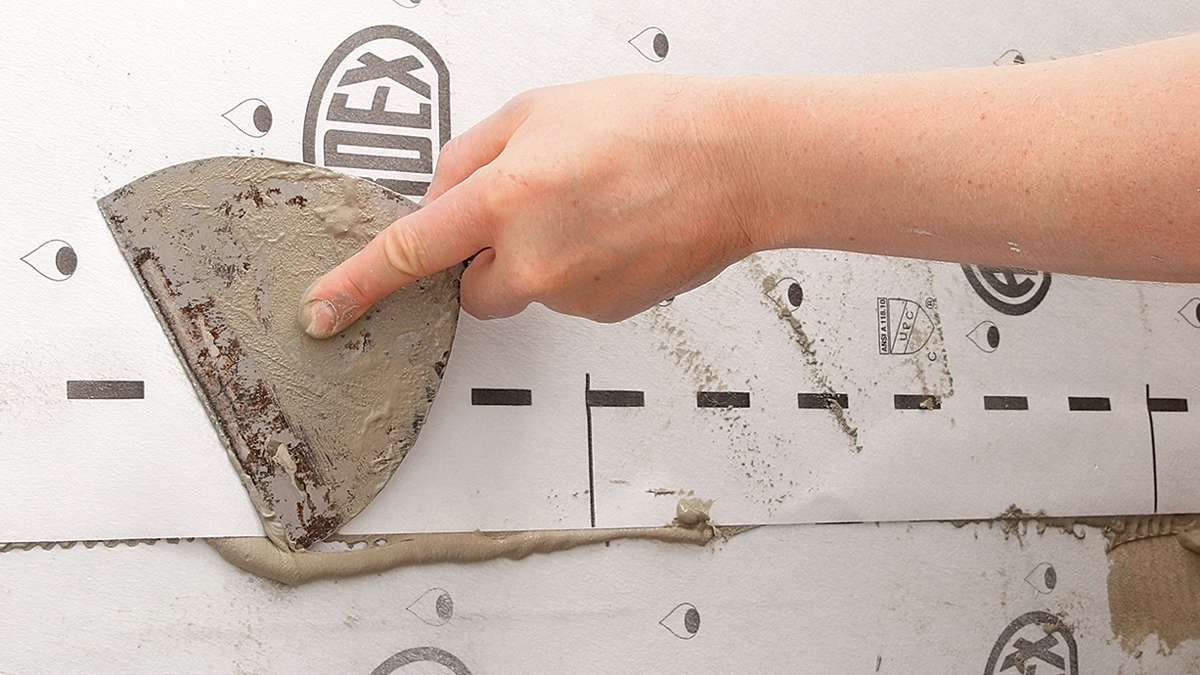
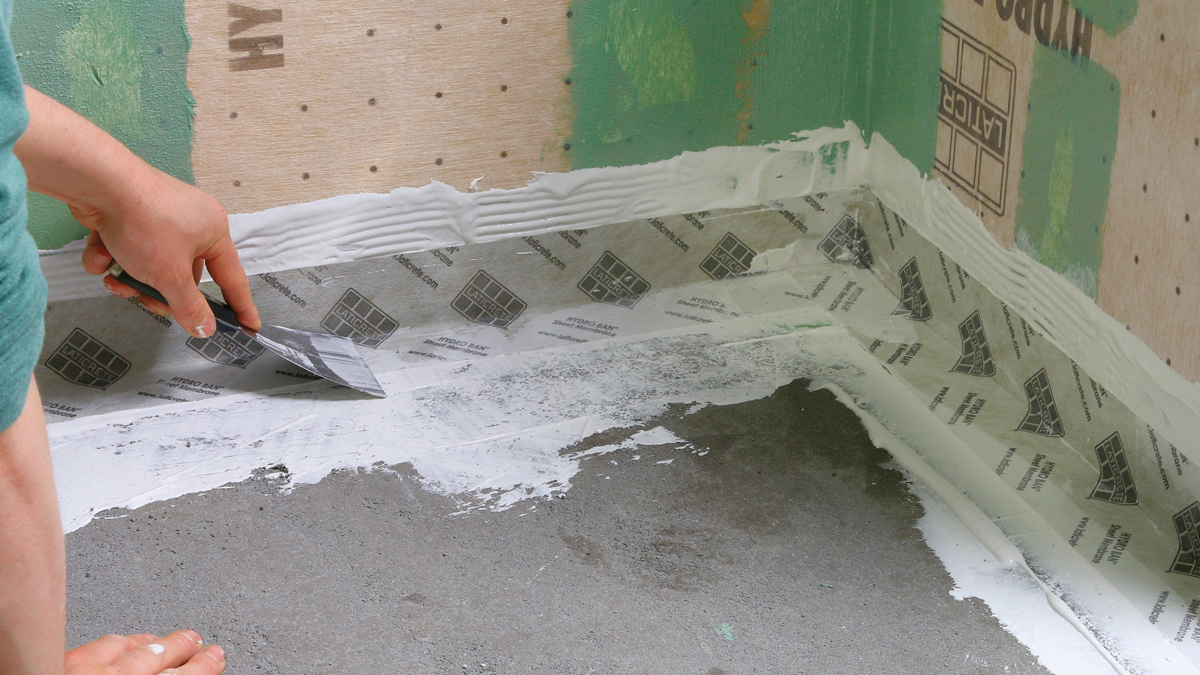
Sheet membranes are typically made of polyethylene, with a bonding fleece on both sides to help with adhesion. They are applied to the substrate with thinset mortar—some requiring modified, others unmodified. Most sheet-waterproofing systems come with preformed inside and outside corners as well as 5-in.-wide seam tape to ensure 2-in. overlaps. These are also applied with thinset.
Sheet membranes might not be best for beginners
Although sheet-membrane systems are marketed as DIY-friendly, I don’t recommend them for first-time tilers. They require 100% thinset contact in every joint. That means you have to use the right product, at the right consistency, and collapse every trowel ridge while leaving a thin layer of thinset behind every seam. For beginners, it’s just too easy to overwork the joints and leave a path for water.
Taking advantage of their unmatched strength and durability, I use sheet membranes on all of my mud-bed shower pans, and occasionally on walls too, in place of foamboard systems. Strong enough to make up for a less-than-perfect substrate, bonded sheet membranes are also a great way to level the playing field. As a general contractor and a tile-setter, I can control every aspect of my jobs, from framing to finishes, but if you are a tile specialist, without as much control over the substrate, bonded sheet membranes will go over whatever backerboard the contractor or drywallers choose to install, and still guarantee a waterproof assembly.
Membranes can be time savers
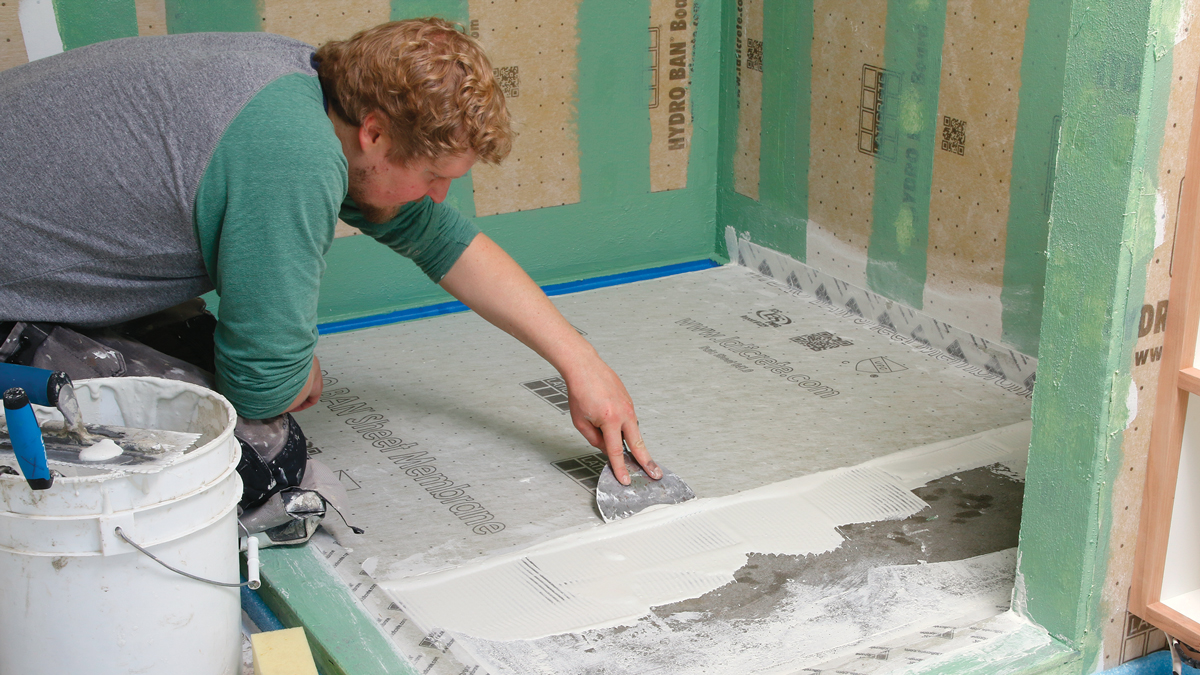
Unlike with liquid-applied membranes, which I’ll discuss in a moment, you can apply a sheet membrane over a mud-bed assembly without letting the concrete dry fully first. And they can be tiled on immediately as well. That said, I always allow sheet membranes a few days to cure before flood-testing the waterproofing (more on that later) and setting tile.
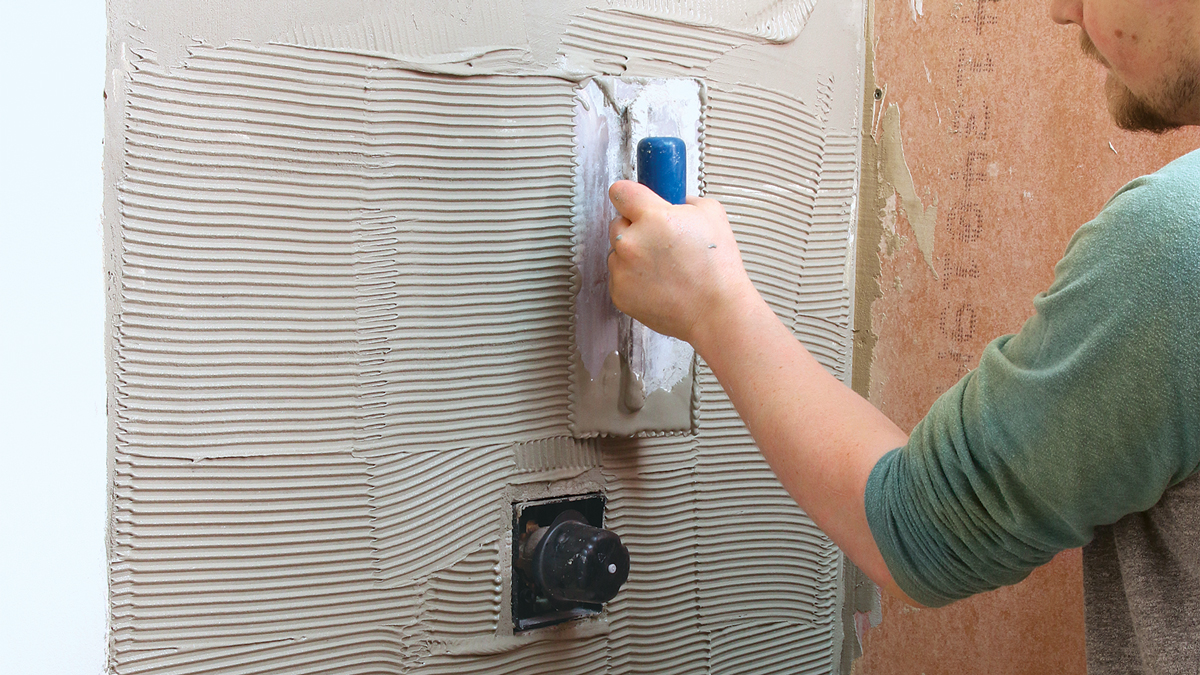
Because sheet-membrane systems utilize overlapping strips to waterproof seams, there is inevitable buildup in some spots, especially corners. To accommodate these raised areas, I use a medium-bed thinset and a larger notch trowel (3⁄8-in. to 1⁄2-in.) when setting tile on top.
Plumbing penetrations are prone to leaks and water infiltration, but sheet-membrane systems provide great products for sealing these weak points too, including collar seals that go around pipes, and gaskets that seal around the mixing valve.
Also, you can use the standard seam strips in nonstandard ways: around the edges of niches and curbs, and even around the entire floor—taking advantage of their strength and crack-isolation properties.
Foamboard systems cost more but are easier to use
Foamboard systems can be used for walls, the pan, or both to create a shower substrate. Most systems also offer preformed niche boxes that integrate nicely as well. Between the parts and over the seams goes a liquid-applied elastomeric sealant, creating a fully waterproof substrate with an excellent factory warranty.
While a little pricier than other approaches, foamboard systems are quick and easy to use, making them a great option for DIYers. They are a backerboard and waterproofing system in one, eliminating the need for a separate cementboard or mud bed and then a sheet or liquid membrane over the top. And the lightweight foamboard is easy to handle and cut—slicing and snapping like drywall.
Time-tested products include Schluter-Kerdi-Board and Wedi Building Board, though there are other excellent newer products, including Johns Manville Goboard, USG Durock Ultralight, Laticrete Hydro Ban, and Prova’s Prova-Board Plus.
Tapered foam pans simplify shower floor installations
Most systems offer presloped foamboard shower pans, rabbeted at their edges to accept the wall panels. The first step is bonding the base to the subfloor with thinset mortar. Then the sealant is squeezed into the rabbets like caulk and the wall panels slide into place, attached directly to the framing with screws and specialized washers. Last, more of the same sealant is troweled over each seam and penetration.
Generally, I use foamboard on walls only, with a custom mud-bed pan below (by using a sheet membrane from the same foamboard manufacturer to waterpoof the pan, I keep the warranty intact). The foamboard is faster and less labor-intensive than installing backerboard or drywall and then waterproofing over the top of it. My main issue with foamboard shower pans is the limited range of sizes, drain types, and drain locations. The preformed pans are also relatively expensive, compared to a mud bed and sheet membrane.
My personal favorites in the foamboard family are Wedi Building Board and Laticrete Hydro Ban, which seem stiffer and more durable than Schluter-Kerdi-Board and others. Both of my favorites offer a compatible sheet membrane that I use on my mud-bed pans.
Be sure you choose and use foamboard fasteners properly
Different foamboard systems require different fasteners, some with washers attached and others using specialized screws only. Be careful to sink fasteners so they just dimple the board, sitting flush with the surface but not much farther.
Just as drywallers use joint tape to prevent cracks between panels, I use the tape recommended by the manufacturer to reinforce the joints around the foamboard shower pan, embedding it in the joint sealant. It’s not officially part of this system, but it’s a cheap, easy way to add mechanical reinforcement to critical seams.
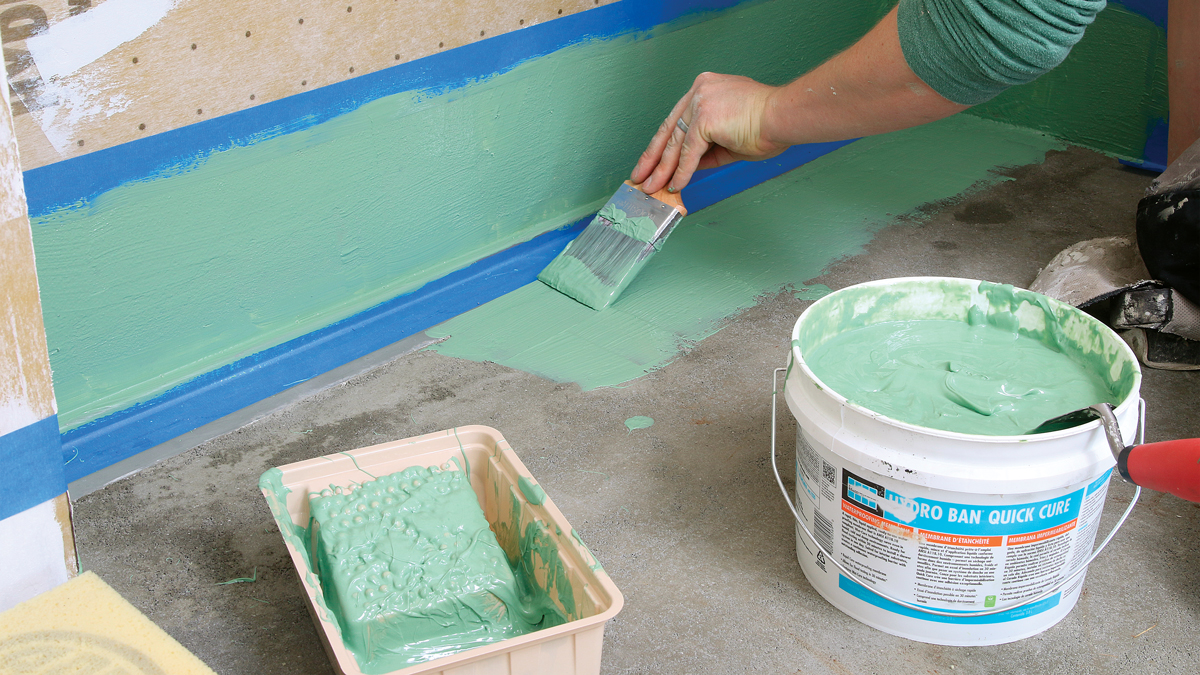
Liquid membranes are versatile insurance
Liquid-applied membranes are handy and versatile, but they have their limitations. Some of the best-known brands are Laticrete Hydro Ban, Redgard, Mapei Aquadefense, and Ardex 8+9. You can apply products like these on just about any shower or floor substrate quickly and easily, using a roller or paintbrush.
While not quite as a strong and durable as sheet membranes, with somewhat lower crack-isolation abilities, liquid-applied membranes go down as a thin, flat layer, in large areas and corners alike. Also, liquid-applied waterproofing tends to be less costly than other options.
Liquid-applied membranes can be used in two ways: as a standalone waterproofing system or as a complement to other systems. As a standalone system, I tend to use them for small areas like tub surrounds and other places where a superflat surface and a uniform layer of thinset are paramount— under small mosaic tile, for example, where excess mortar would squeeze up through the gaps.
Sheets beat liquid-applied membranes on concrete shower beds
On mud-bed shower pans, I don’t trust a liquid-applied membrane on its own. I like the durability and crack-isolation properties of sheet membrane over concrete, and I feel more confident standing and working on it than I do a liquid-applied film, which is more vulnerable to damage. A number of sheet-membrane or foamboard waterproofing systems include a liquid-applied membrane or sealant as one of their components, to waterproof seams, joints, and penetrations. This is how I use liquid-applied waterproofing most often.
While my favorite sheet-membrane systems require large overlaps, and don’t call for liquid-applied membranes specifically, I often add one at seams and joints anyway, for additional peace of mind. All brands offer a liquid product that can be used this way, and since they’re so quick and easy to apply, it’s hard to say no to the cheap insurance.
Thickness is important when applying liquid membranes
First, make sure you’re applying the waterproofing at the required thickness, measured in mils (1 mil equals 0.001 in.). Second, be sure to apply the correct number of coats. The most accurate way to measure thickness is using a wet-film gauge, which is a great idea when you’re still getting used to these products. In general, the rule of thumb is that the finished membrane should be the approximate thickness of a driver’s license. It’s better to be too thick than too thin.
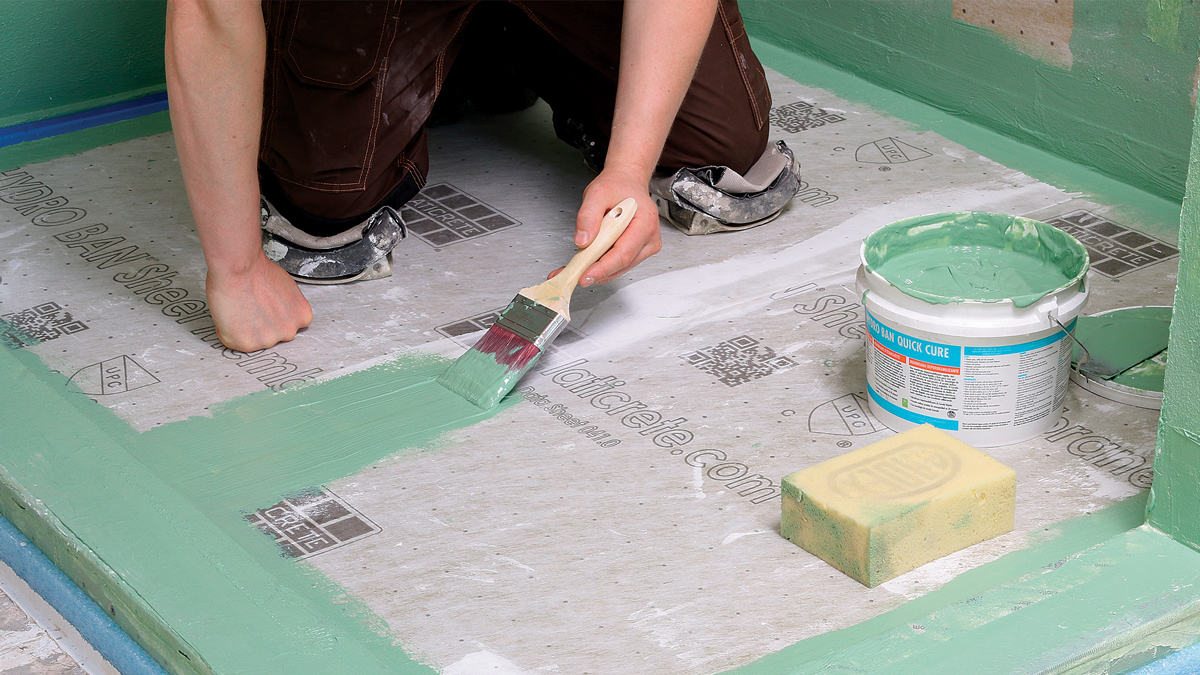
Another critical guideline is the cure time between coats, usually a full day for the first coat and less for the second. However, there are an increasing number of faster-curing products that come in handy when time is a big factor. Ardex 8+9 and Laticrete Hydro Ban Quick Cure are two well-known examples. If you are applying a liquid membrane over a drypack- mortar shower pan or mudfloated walls, you need to let the mud properly cure first, which typically takes 72 hours.
Some liquid-applied waterproofing requires mesh tape or fabric reinforcement in the corners and transitions. Even when it’s not required, I think it’s an easy way to add strength to areas that are vulnerable to expansion and contraction in the framing.
Waterproof Shower Method 3: Hybrid Approach
Staying within the Laticrete Hydro Ban family of products, I combined foam wallboard and joint sealant, sheet membrane for the mud-bed pan, and a liquid-applied membrane on seams and corners. This created a very flat wall substrate, perfect for the large-slab tile in this master bath.
Pros
- Combination of speed and versatility
- Foamboard walls are fast and flat
- Mud-bed pan is rock solid and completely customizable
Cons
- Mud-bed pan and sheet membrane require training and experience
|
|
|
|
The flood test, and the bottom line
Whether plumbing inspections require a shower-pan flood test or not, I always do one for peace of mind. A flood test lets you know what you are providing to the customer, and saves you the immense hassle and expense of coming back six months later to tear out the tile and track down leaks.
A flood test is relatively simple. Once the waterproofing has been installed and allowed to cure, per manufacturer’s recommendations, the shower pan is plugged with a cap or test balloon and then filled to the level of the curb with water, or to a marked line. Then the water is left to sit in the pan for a minimum of 24 hours. If the water level doesn’t drop (other than by evaporation), the pan passes the test. If it does leak, you’ll generally notice water on the nearby subfloor or the ceiling below, and you’ll have the chance to track down and fix the leaks before tile is installed.
If you are hiring a professional, it is important to ask which waterproofing methods and products they plan to use, and why. If you’re doing the work yourself, as a pro or DIYer, do your research, follow current professional standards and product guidelines, and consider one of the training courses offered by manufacturers. Understanding current waterproofing options will help you create a tiled shower that will stand the test of time.
Joshua Oduin builds and remodels homes in Oregon and Washington. Photos by Asa Christiana.
This article appears in Fine Homebuilding issue #298 titled “Waterproofing Tile Showers”
To read the entire article, please click the View PDF button below.
Related Links:
